Staying Alive Cold Kit

Here in Girl-world, we love to run around in the forests and mountains carrying very little with us to encumber us while we play. BUT....
We do need to be able to Stay Alive if anything happens.
Now, I, for one, like to go out running long distances in the mountains, and I am often on my own and I do not always know beforehand exactly what route I am taking or how long I will be.
You know, I am EXPLORING...
And...because I am running, I am usually not wearing very much and certainly not carrying very much.
And...because I am in the mountains, there is a good chance the the weather will suddenly turn very nasty just when I am a long way from home.
So. How to stay safe?
1. I do tell someone roughly in what area I will be and when I am expecting to return. I also leave this info in my car.
2. I carry a cell phone.
3. I carry my Stay Alive Cold Kit. (SACKIT) It fits into a pocket and with it I know that I can survive a night outdoors in pretty much any weather even when soaking wet and cold and wearing only my garish lycra running tights.
So what is this mythical SACKIT? (Rhymes with PackIT, TrackIT, CrackIT, and FrackIT!)
Well...it's for making a modern-day and very lightweight version of a scout fire.

You will need:
1 Normal Space Blanket
1 Modified Space Blanket (see instructions below)
3 - 4 Tea Light candles
1 Pack of Hurricane Matches (also called Lifeboat Matches)
3 Packs of Power Gel or similar goo - for eating, to keep the internal fires burning
The idea is that you use the modified space blanket as a poncho with your head sticking through an opening you have made, the other space blanket covers your head.
Then you sit on the ground with your knees up and light the candle inside your little one person teepee. You will be AMAZED at how warm you get.
Most tea lights burn for 4-5 hours so with 3-4 of them you can easily wait out the big storm.
OBVIOUS DANGER - WARNING!
NEEDLESS to say - Mylar space blankets are VERY Flammable. Keep the candle flame right between your legs and AWAY from the space blanket material. Do not light yourself on fire. Keep your head OUTSIDE the main poncho so that you do not asphyxiate. OK?
Modify your space blanket
I wish I could say that I came up with this idea, but I can't. I got it from Steve Isaac and it works great. Basically we want to modify the standard Mylar/aluminum space blanket so that it can more easily be used as a poncho or a shelter.
1. Start with a standard space blanket.
2. Find the center of the space blanket. Cut a piece of duct tape about 40cm long. Tape it onto the space blanket where you would like your head to go.
3. Turn the space blanket over and place another piece of duct tape in the same location so you have duct tape on both sides of the space blanket.
4. Place a piece of duct tape at each corner and the center of each side. To do this cut a piece about 10-15cm long and fold it over the edge so half is on one side and half on the other side
5. Use a hole punch or a nail to punch a hole in each of the eight perimeter patches: 4 corners and 4 sides. Don't cut a slit with a knife.
6. Fold the space blanket in half along the center piece of duct tape (Where you want your head to go.) Use the hole punch to punch two holes roughly 40cm apart. Cut between the two holes with a scissors to make a neck hole.
7. But you might not want a poncho. Maybe you really want to make a shelter or still use it as a blanket, so you have to make a seal for the neck hole you just made. Seal the neck hole with another piece of duct tape. Fold over the last inch or so on each end so you have something to grab.
8. Fold the space blanket back up always brushing the air out from the fold to the open end. Place the modified and folded space blanket in a Ziploc bag.
9. See the photos below.
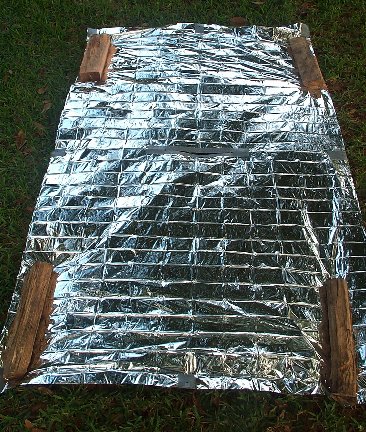
Overall view of the modified space blanket
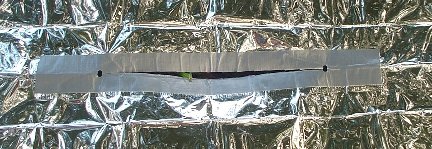
Close up of the neck hole
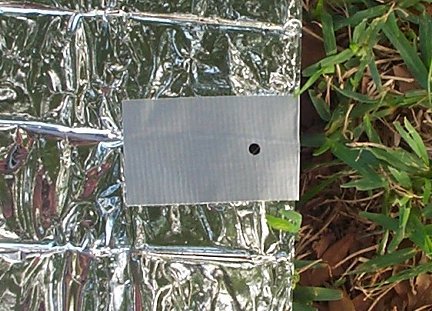
Close up of the tie-outs at the edges and corners of the space blanket.
(These are optional really)
Here in Girl-world, we love to run around in the forests and mountains carrying very little with us to encumber us while we play. BUT....
We do need to be able to Stay Alive if anything happens.
Now, I, for one, like to go out running long distances in the mountains, and I am often on my own and I do not always know beforehand exactly what route I am taking or how long I will be.
You know, I am EXPLORING...
And...because I am running, I am usually not wearing very much and certainly not carrying very much.
And...because I am in the mountains, there is a good chance the the weather will suddenly turn very nasty just when I am a long way from home.
So. How to stay safe?
1. I do tell someone roughly in what area I will be and when I am expecting to return. I also leave this info in my car.
2. I carry a cell phone.
3. I carry my Stay Alive Cold Kit. (SACKIT) It fits into a pocket and with it I know that I can survive a night outdoors in pretty much any weather even when soaking wet and cold and wearing only my garish lycra running tights.
So what is this mythical SACKIT? (Rhymes with PackIT, TrackIT, CrackIT, and FrackIT!)
Well...it's for making a modern-day and very lightweight version of a scout fire.
You will need:
1 Normal Space Blanket
1 Modified Space Blanket (see instructions below)
3 - 4 Tea Light candles
1 Pack of Hurricane Matches (also called Lifeboat Matches)
3 Packs of Power Gel or similar goo - for eating, to keep the internal fires burning
The idea is that you use the modified space blanket as a poncho with your head sticking through an opening you have made, the other space blanket covers your head.
Then you sit on the ground with your knees up and light the candle inside your little one person teepee. You will be AMAZED at how warm you get.
Most tea lights burn for 4-5 hours so with 3-4 of them you can easily wait out the big storm.
OBVIOUS DANGER - WARNING!
NEEDLESS to say - Mylar space blankets are VERY Flammable. Keep the candle flame right between your legs and AWAY from the space blanket material. Do not light yourself on fire. Keep your head OUTSIDE the main poncho so that you do not asphyxiate. OK?
Modify your space blanket
I wish I could say that I came up with this idea, but I can't. I got it from Steve Isaac and it works great. Basically we want to modify the standard Mylar/aluminum space blanket so that it can more easily be used as a poncho or a shelter.
1. Start with a standard space blanket.
2. Find the center of the space blanket. Cut a piece of duct tape about 40cm long. Tape it onto the space blanket where you would like your head to go.
3. Turn the space blanket over and place another piece of duct tape in the same location so you have duct tape on both sides of the space blanket.
4. Place a piece of duct tape at each corner and the center of each side. To do this cut a piece about 10-15cm long and fold it over the edge so half is on one side and half on the other side
5. Use a hole punch or a nail to punch a hole in each of the eight perimeter patches: 4 corners and 4 sides. Don't cut a slit with a knife.
6. Fold the space blanket in half along the center piece of duct tape (Where you want your head to go.) Use the hole punch to punch two holes roughly 40cm apart. Cut between the two holes with a scissors to make a neck hole.
7. But you might not want a poncho. Maybe you really want to make a shelter or still use it as a blanket, so you have to make a seal for the neck hole you just made. Seal the neck hole with another piece of duct tape. Fold over the last inch or so on each end so you have something to grab.
8. Fold the space blanket back up always brushing the air out from the fold to the open end. Place the modified and folded space blanket in a Ziploc bag.
9. See the photos below.
Overall view of the modified space blanket
Close up of the neck hole
Close up of the tie-outs at the edges and corners of the space blanket.
(These are optional really)
Last edited:
")