I've posted this across from our blog as we have been having a few discussions around processing birds. It contains very graphic images so please do not read if this may shock or offend.
I claim no particular knowledge or skill, just some experience. I found the first time dressing birds and games a little confusing and was concerned about getting it wrong. My aim here is to encourage people to "have a go". There are many different techniques, and I would encourage those that use a different method to photograph it and show it.
I wont show how to dispatch a domestic bird, but the most commonly used method is to dislocate the neck either free hand or by using a broom handle across the neck. I would advise getting an experienced poultry keeper to teach you these techniques. Ensure you also learn how to bleed a bird into a neck cavity or via hanging and cutting.
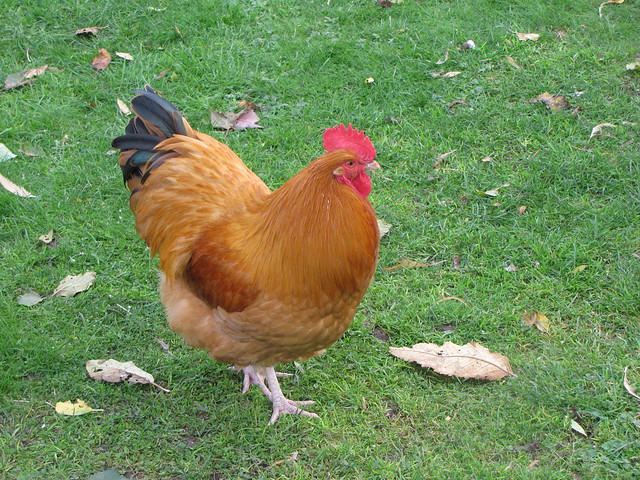
So first up, this is Pioneer the cockerel.
Im not big on naming livestock (you dont name your food), but my lady wife insists that we need a way to mention that chicken x has gone lame. So names they have. It is important to us to remember that they are living, sentient beings and that there living and dying and beyond should be respectful. That does not mean forgetting that they are here to feed us, but it does mean ensuring their time is natural, engaging, stimulating and healthy (not trying to be preachy, just explain our approach).
Prior to killing the bird, you may wish to isolate the night before and to only offer water to ensure that the crop and bowels are relatively empty during processing. It may also be useful to de-louse the bird prior to killing as plucking a lousy (literally) bird is no fun. That said, its sensible to check for, and treat, chicken lice. This should really be part of your standard health checks in any case.
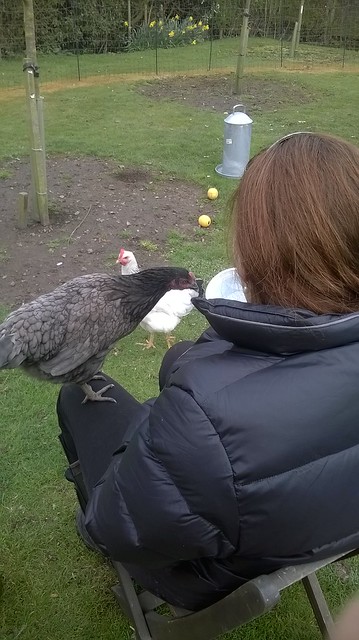
I believe that a calm bird at the point of dispatch will have a much improved flavour. A bird that is stressed in unfamiliar surroundings may not be placid. Equally a bird chased around for catching, or held and struggling may be flooded with adrenaline. For this reason getting birds used to be handled will make the dispatch process less anxious for them and you. To this end we hand feed our birds treats they will come to and even perch on us with no stress. This is not incompatible with then killing them but you need to keep in mind that this will eventually happen and these birds are not pets.
Having picked up your bird, take it out of sight of the rest of the flock prior to despatch in order not to distress the other chickens.
Once you have despatched your bird and hung it up to bleed, you face a plucking choice. You can dry pluck (pluck before the body cools and rigor mortis sets in). Or dip the bird in hot (c. 53C) water for 1-2 minutes (no more or it will start to cook). Dipping loosens the feathers but makes the skin more delicate. My opinion is that dry plucking is fine for a single bird, but if you are despatching a number of birds, then sipping is worth considering as the birds will cool before you can get them all plucked.
In this article I will show dry plucking. The process is similar for a dipped bird other than the dipping process. Everyone will have their own technique but this is mine.
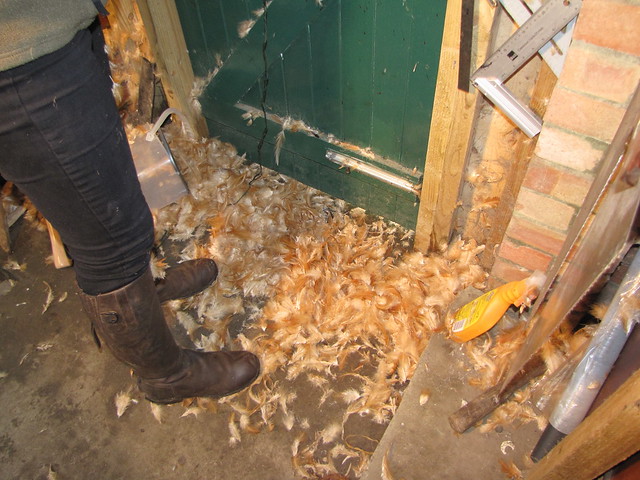
It is easier to pluck feathers from warm flesh, so dont delay if dry plucking. The bird does not cool evenly so there is a logical order to plucking. We pluck in the workshop as feathers go everywhere, its a job for outside the cottage in the garden on a nice Summers day.
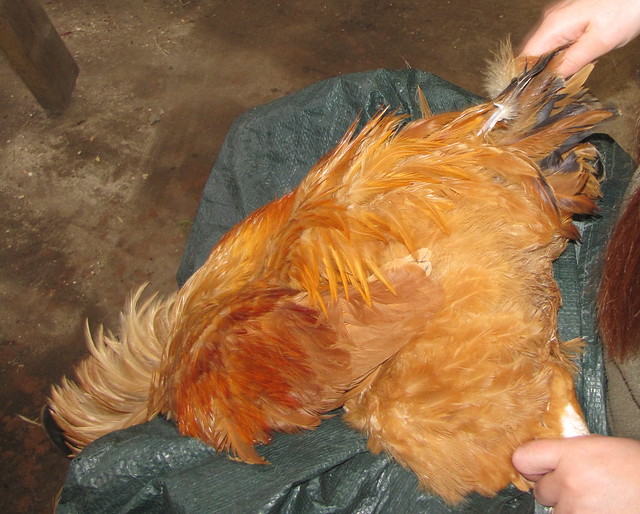
Whilst sitting, lay the bird on your lap face down and pluck the tail feathers first these are large feathers and removing them gives access to other areas. You may need to pluck one feather at a time.
Next remove the primary (big) wing feathers. Again, one feather at a time and, on a very large bird, pliers if needed. A birds extremities cool most quickly so plucking wings and legs should happen first.

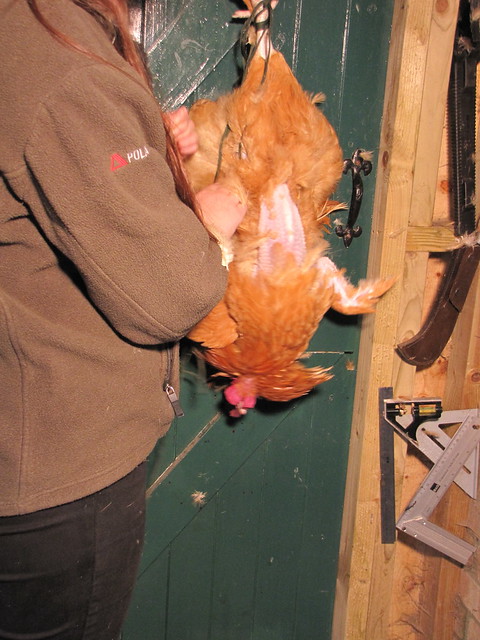
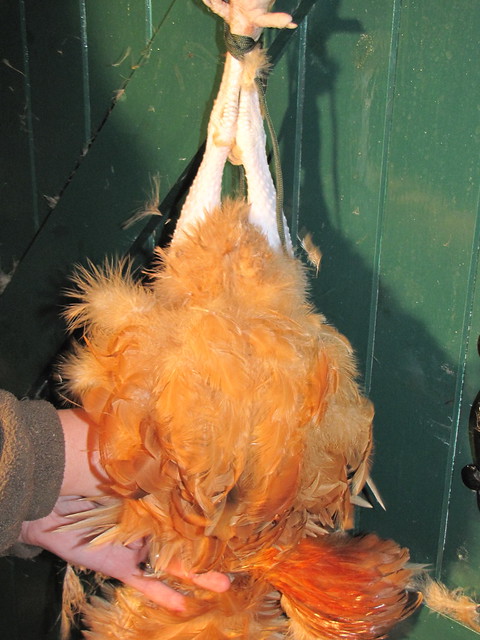
Next hang the bird up somewhere convenient on stout cord. To those who follow my blog, you may recognise this doorway. The nails in the frame are used for stringing onions and plucking chickens!
Pluck the legs next
Then the wings and start on the breast
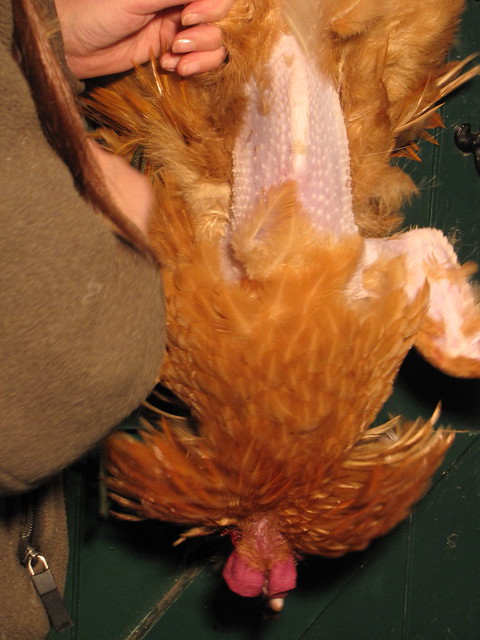
Finally pluck the back, neck and around the vent
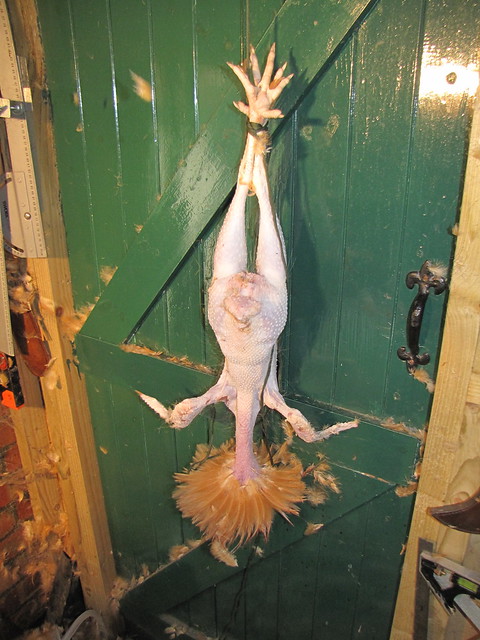
That is your bird roughly plucked. The next job is to dress the bird.
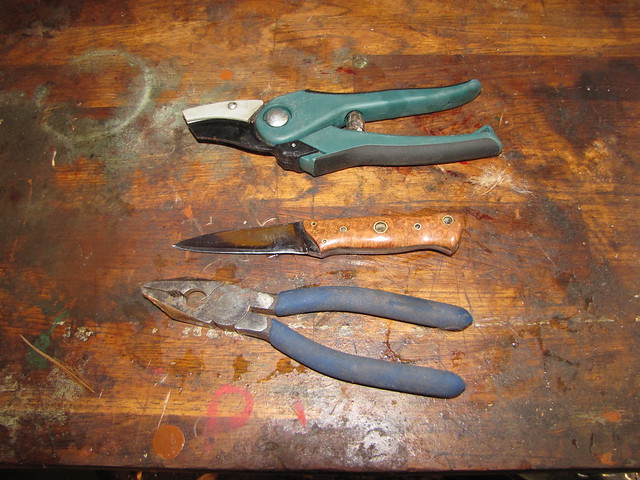
Having plucked your bird, transfer it to a clean work surface. I use these tools in plucking and dressing pliers (for stubborn feathers), anvil shears (for cutting bone) and a small, slim sharp knife. No need for some great big thing a two inch blade is ample.
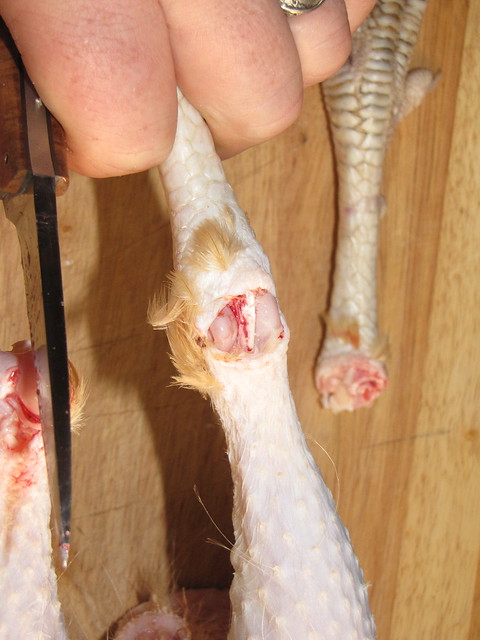
The first thing to do is remove the legs below the knees. Commercially this is done by just cutting through the bone in the lower leg with shears or secateurs. I prefer something a little more precise. First I slit the skin around the knee joint. After that I bend the leg forward and use the point to cut through one tendon (the white line you can see) then backwards and cut the other. A sharp bend and the knee joint separates with no bone fragments or splinters involved.
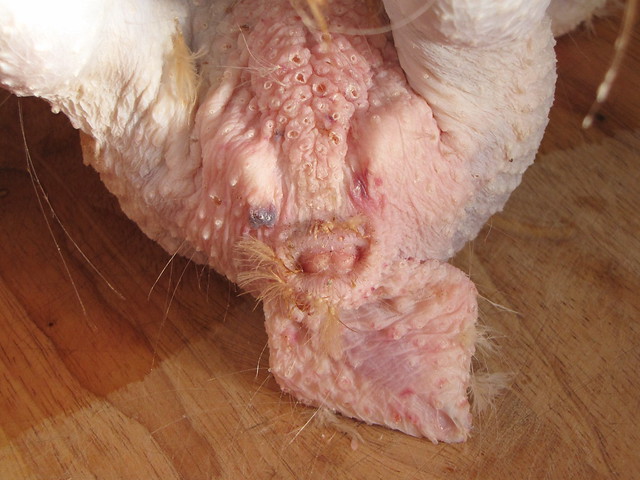
Next slit the skin of the neck (just the skin, do not pierce the wind pipe or food pipe that lay just under the skin outside of the neck meat
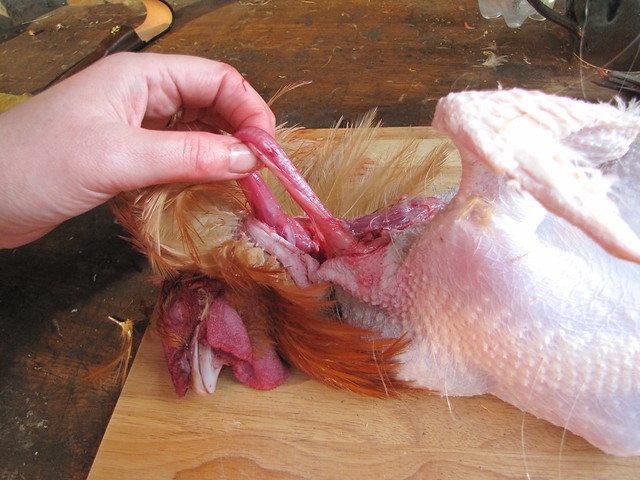
Using the shears (or knife if you prefer) sever the neck meat and spine (without cutting the wind and food pipes) at the torso and just behind the head. This leaves the head connected by only the food and wind pipes. The neck can then be kept for use in the giblets. By pulling gently on the head, the wind and food pipes can be pulled outwards and cut as far into the torso as possible. The head and pipes can then be disposed of. Insert your fingers gently into the body cavity and loosen the organs at the upper end of the cavity.

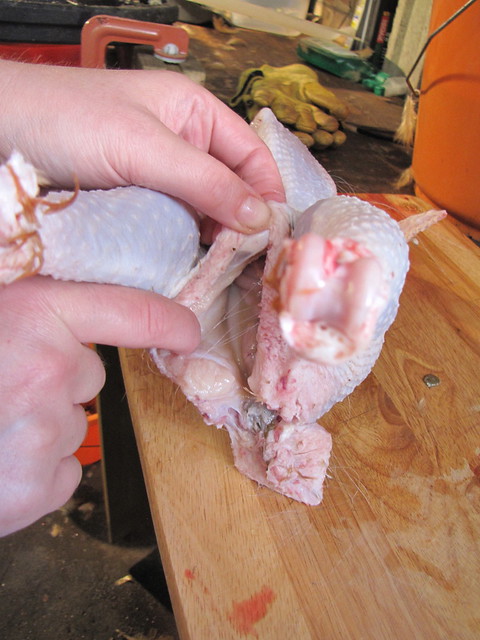
Next we need to free the other end of the organs at the vent (cloaca). The vent is the all purpose orifice in a chicken and serves both sexual and excretion purposes. The chickens intestines pass through the skin at the vent and the beak. In order to remove the intestines intact, you have to cut around the skin surrounding the vent.
Having cut around the vent, slit the skin above the vent up to the rib cage. You can then gently insert the fingers between the vent and carcass and gently separate the organs from the sides of the cavity.
You should then be able to remove the intestines intact. You can see the dark mass of the liver on top. If you wish to use this for pate etc. you need to remove the gall bladder (the greeny black point you can see in the middle).
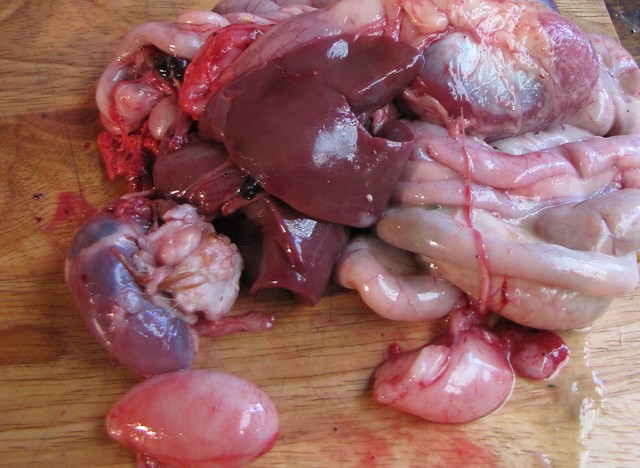
You then need to put your hand inside the cavity and remove the lungs (on the back wall you may need to scrape these off) and heart.
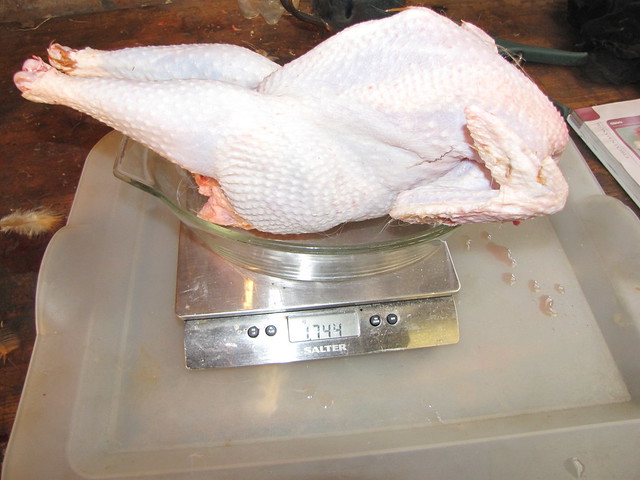
You can then weigh your bird and leave it to relax in the fridge for 3 or 4 days
After the bird has been cooled for a few days it can be frozen or cooked
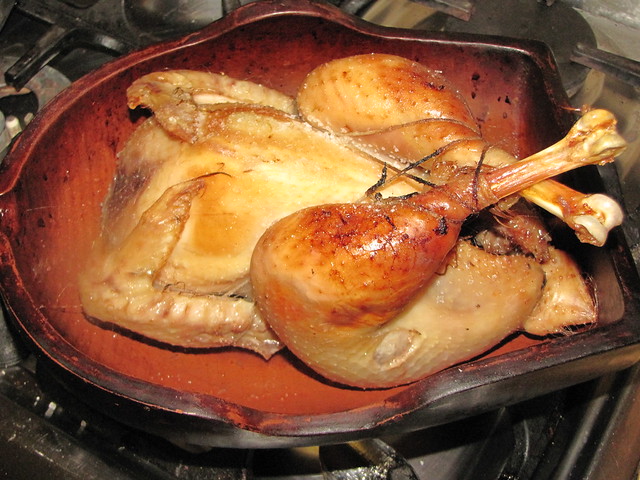
Pioneer was roasted with all home grown potatoes, veg etc. Even the sloe jelly came from the homestead a really self reliant meal. Remaining meat formed a cold meat salad and a satay stir fry. Much too good to waste.
I claim no particular knowledge or skill, just some experience. I found the first time dressing birds and games a little confusing and was concerned about getting it wrong. My aim here is to encourage people to "have a go". There are many different techniques, and I would encourage those that use a different method to photograph it and show it.
I wont show how to dispatch a domestic bird, but the most commonly used method is to dislocate the neck either free hand or by using a broom handle across the neck. I would advise getting an experienced poultry keeper to teach you these techniques. Ensure you also learn how to bleed a bird into a neck cavity or via hanging and cutting.
So first up, this is Pioneer the cockerel.
Im not big on naming livestock (you dont name your food), but my lady wife insists that we need a way to mention that chicken x has gone lame. So names they have. It is important to us to remember that they are living, sentient beings and that there living and dying and beyond should be respectful. That does not mean forgetting that they are here to feed us, but it does mean ensuring their time is natural, engaging, stimulating and healthy (not trying to be preachy, just explain our approach).
Prior to killing the bird, you may wish to isolate the night before and to only offer water to ensure that the crop and bowels are relatively empty during processing. It may also be useful to de-louse the bird prior to killing as plucking a lousy (literally) bird is no fun. That said, its sensible to check for, and treat, chicken lice. This should really be part of your standard health checks in any case.
I believe that a calm bird at the point of dispatch will have a much improved flavour. A bird that is stressed in unfamiliar surroundings may not be placid. Equally a bird chased around for catching, or held and struggling may be flooded with adrenaline. For this reason getting birds used to be handled will make the dispatch process less anxious for them and you. To this end we hand feed our birds treats they will come to and even perch on us with no stress. This is not incompatible with then killing them but you need to keep in mind that this will eventually happen and these birds are not pets.
Having picked up your bird, take it out of sight of the rest of the flock prior to despatch in order not to distress the other chickens.
Once you have despatched your bird and hung it up to bleed, you face a plucking choice. You can dry pluck (pluck before the body cools and rigor mortis sets in). Or dip the bird in hot (c. 53C) water for 1-2 minutes (no more or it will start to cook). Dipping loosens the feathers but makes the skin more delicate. My opinion is that dry plucking is fine for a single bird, but if you are despatching a number of birds, then sipping is worth considering as the birds will cool before you can get them all plucked.
In this article I will show dry plucking. The process is similar for a dipped bird other than the dipping process. Everyone will have their own technique but this is mine.
It is easier to pluck feathers from warm flesh, so dont delay if dry plucking. The bird does not cool evenly so there is a logical order to plucking. We pluck in the workshop as feathers go everywhere, its a job for outside the cottage in the garden on a nice Summers day.
Whilst sitting, lay the bird on your lap face down and pluck the tail feathers first these are large feathers and removing them gives access to other areas. You may need to pluck one feather at a time.
Next remove the primary (big) wing feathers. Again, one feather at a time and, on a very large bird, pliers if needed. A birds extremities cool most quickly so plucking wings and legs should happen first.
Next hang the bird up somewhere convenient on stout cord. To those who follow my blog, you may recognise this doorway. The nails in the frame are used for stringing onions and plucking chickens!
Pluck the legs next
Then the wings and start on the breast
Finally pluck the back, neck and around the vent
That is your bird roughly plucked. The next job is to dress the bird.
Having plucked your bird, transfer it to a clean work surface. I use these tools in plucking and dressing pliers (for stubborn feathers), anvil shears (for cutting bone) and a small, slim sharp knife. No need for some great big thing a two inch blade is ample.
The first thing to do is remove the legs below the knees. Commercially this is done by just cutting through the bone in the lower leg with shears or secateurs. I prefer something a little more precise. First I slit the skin around the knee joint. After that I bend the leg forward and use the point to cut through one tendon (the white line you can see) then backwards and cut the other. A sharp bend and the knee joint separates with no bone fragments or splinters involved.
Next slit the skin of the neck (just the skin, do not pierce the wind pipe or food pipe that lay just under the skin outside of the neck meat
Using the shears (or knife if you prefer) sever the neck meat and spine (without cutting the wind and food pipes) at the torso and just behind the head. This leaves the head connected by only the food and wind pipes. The neck can then be kept for use in the giblets. By pulling gently on the head, the wind and food pipes can be pulled outwards and cut as far into the torso as possible. The head and pipes can then be disposed of. Insert your fingers gently into the body cavity and loosen the organs at the upper end of the cavity.
Next we need to free the other end of the organs at the vent (cloaca). The vent is the all purpose orifice in a chicken and serves both sexual and excretion purposes. The chickens intestines pass through the skin at the vent and the beak. In order to remove the intestines intact, you have to cut around the skin surrounding the vent.
Having cut around the vent, slit the skin above the vent up to the rib cage. You can then gently insert the fingers between the vent and carcass and gently separate the organs from the sides of the cavity.
You should then be able to remove the intestines intact. You can see the dark mass of the liver on top. If you wish to use this for pate etc. you need to remove the gall bladder (the greeny black point you can see in the middle).
You then need to put your hand inside the cavity and remove the lungs (on the back wall you may need to scrape these off) and heart.
You can then weigh your bird and leave it to relax in the fridge for 3 or 4 days
After the bird has been cooled for a few days it can be frozen or cooked
Pioneer was roasted with all home grown potatoes, veg etc. Even the sloe jelly came from the homestead a really self reliant meal. Remaining meat formed a cold meat salad and a satay stir fry. Much too good to waste.
")