Ye Olde Englishe Machette

  • Hey Guest, Early bird pricing on the Summer Moot (29th July - 10th August) available until April 6th, we'd love you to come. PLEASE CLICK HERE to early bird price and get more information.

tombear

On a new journey
Jul 9, 2004
4,494
556
54
Rossendale, Lancashire
Cheers! :)

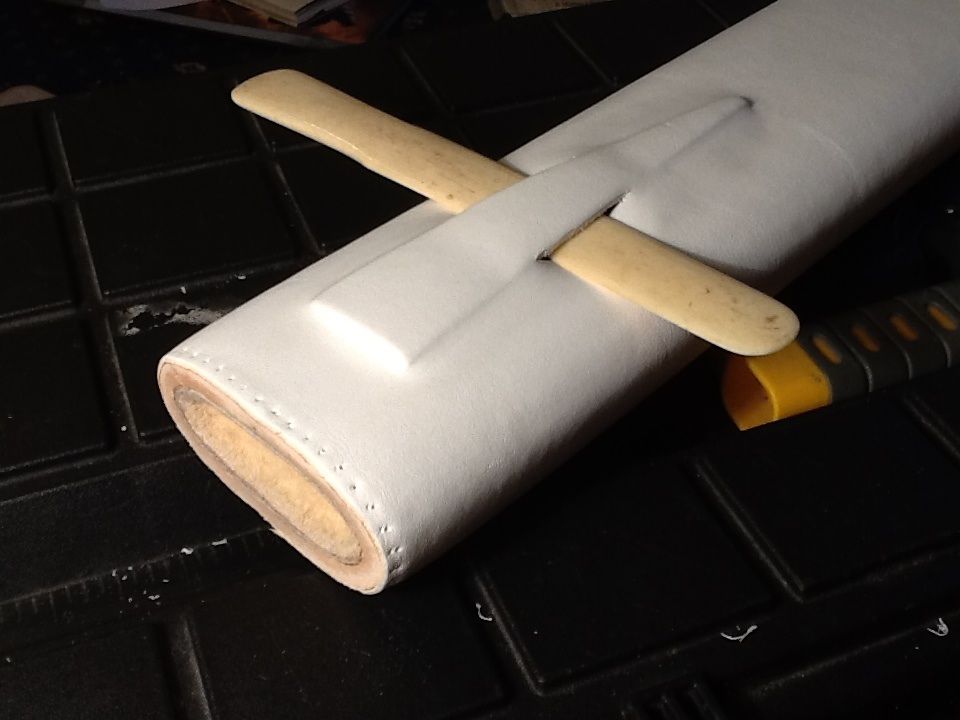
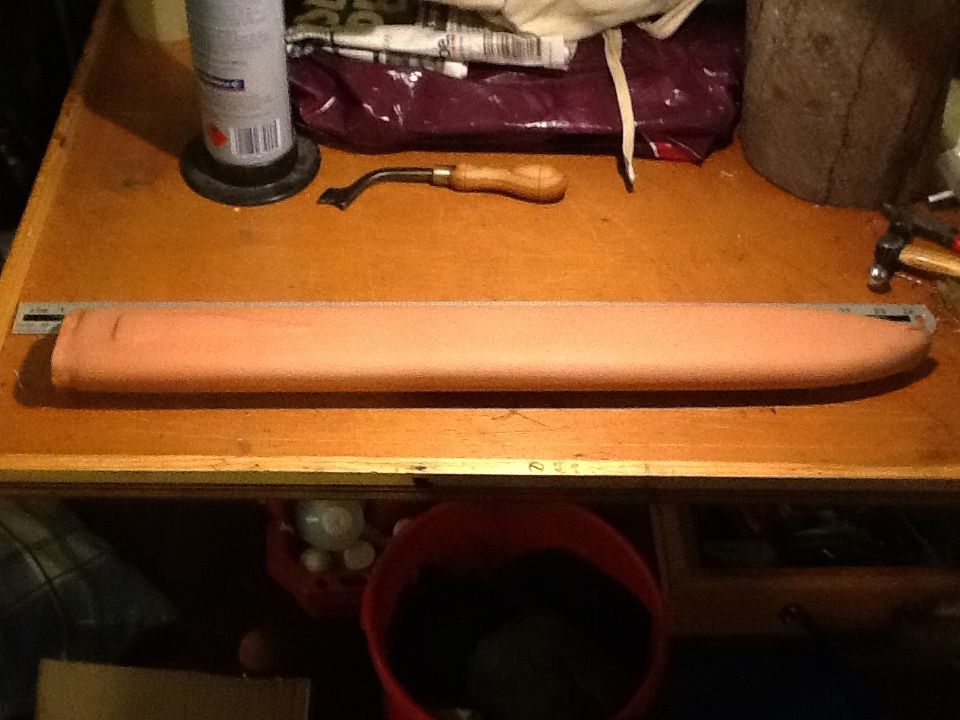
The hide glue seams to have worked really well.

image_zps48ab1df0.jpg


there will no be a pause while I source the covering material.....


atb

Tom
 

tombear

On a new journey
Jul 9, 2004
4,494
556
54
Rossendale, Lancashire
Cheers, but the hard parts to come, well hard for me. I've got to cut out the leather to allow for the taper at one end, make all the awl holes, hot glue it around the slide, wet it in cold water, the leather that is, and keep it damp while I sew the lot up, edge to edge with the rising parts of the stitching on the inside, let it dry and pull tight, then sew the outer to the liner at the mouth, probably with a sort of ring of leather between so the hilt will have something substantial to bang against. Polishing/ waterproofing shouldn't be too much trouble.

ATB

Tom
 

tombear

On a new journey
Jul 9, 2004
4,494
556
54
Rossendale, Lancashire
Not done much today, just made a glorified leather washer and since the pic glued it on and trimmed the lining down to a neat edge.

AshScabbard13_zpsebaf593f.jpg


When the outer covering is on I will sew (probably after drilling holes) through the outer, washer and lining with sadlle stitch.

ATB

Tom
 

tombear

On a new journey
Jul 9, 2004
4,494
556
54
Rossendale, Lancashire
As practice and to make a pattern to cut the good stuff when I get some calfskin I decide to use a piece of 1mm stuff I was given, a strip curls up in boiling water like veg tan but its been dyed while and the surface is treated to be water proof so I've no idea what i t really is.

Anyroad it's a good job I did as I learned I can't butt stitch edges together in such thin stuff. No doubt some can but its beyond me. I reported to saddle stitching flesh to flesh so there's a small ridge down the centre of the back. I also, after several attempts, discovered if you tried to sew the leather around the wooden core the seam would drift off to one side or the other. However if you folded and sewed the seam in a neat straight line as long as the parallel part of the core, wetted the leather and pulled it on over the wooden core you can get the seam straight down the centre, or at least a lot better than trying to sew it there!

the rounded tip I did by tugging each side as best I could into place after a good wetting with cold water then trimming it roughly and sewing it together as tight as possible which pulled the leather into shape pretty well, better than I expected anyway.

Once it's dried I'll trim it and when I've got the calfskin ill slice through the stitches and use it as a pattern .

image_zps636130f0.jpg


If it was the correct leather I'd actually keep it on, stitching the top to the lining and waxing it.

atb

Tom
 

tombear

On a new journey
Jul 9, 2004
4,494
556
54
Rossendale, Lancashire
Trimmed the excess leather, opened up the belt slit and marked where the stitches through to the lining will go on the final version. I definitely only need 1mm, less than 1.3 anyway, calfskin now I'm not butt seeing it together

image_zpsfa1d8c61.jpg


image_zps4ef2b1e9.jpg
Atb

Tom
 

British Red

M.A.B (Mad About Bushcraft)
Dec 30, 2005
26,740
1,989
Mercia
I definitely only need 1mm, less than 1.3 anyway, calfskin now I'm not butt seeing it together
Atb

Tom

Are you having a stroke? :) I understand all the words - just not in that order (worryingly I actually do understand :))

Thats very neat work!
 

tombear

On a new journey
Jul 9, 2004
4,494
556
54
Rossendale, Lancashire
It's probably a psychological thing but I just can't do butt, Red.

just been gardening for 5 hours, well more hauling rocks around and using bolt cutters to trim chain link fence from where trees have grown around it so my hands are crabbed up and my back is long gone. All the inactivity while I was in a cast last year has left me neither use nor ornament! Doing up the garden should help to get fit again.

ATB

Tom
 

British Red

M.A.B (Mad About Bushcraft)
Dec 30, 2005
26,740
1,989
Mercia
Just been doing much the same - sweet peas planted out, first and second early spuds gone in. Will be getting peas and beans going soon...its good!
 

tombear

On a new journey
Jul 9, 2004
4,494
556
54
Rossendale, Lancashire
Finally bit the bullet and herself has ordered 7 square foot of 1mm kip side from Le Prevo, so that's one family curry we will not be having! Still I will be able to use the rest in the long run.

More sewing fun when it's arrived!

atb

Tom
 

tombear

On a new journey
Jul 9, 2004
4,494
556
54
Rossendale, Lancashire
With the calf from Le Prevo on its way I decided to start on the sling/baldric to go with the scabbard.

After a bit of research I decided to do a variation of the system on page 44 of "Scabbards and sheaths from viking and medieval Dublin" by Esther Cameron, which is based on the design suggested by Wilson.

I'll Saxon up the strap ends and have made a forged buckle based on one dug up from some piano wire I had left over from aero modelling. See below. I've made a start on the step ends , rough cut out brass sheet, drilled the holes for the diddly little copper rivets. I had got 72 inches of 1.5 inch wide 3 mm veg tan but as I finally decided on a 3/4" strap so I used a balsa strip maker with a new craft knife blade to slit it down the middle. It worked well a th blade was quite stiff, a scalpel blade tends to wander a bit.

https://www.hobbyking.com/hobbyking/store/__12439__Master_Airscrew_Balsa_Stripper.html

The three butterfly bits of brass will be folded around one of the rings ( probably the ones in the top plastic bag) before being riveted to the leather straps. To jazz up the brass ill use some steel letter stamps, the Vs, Xs and Os sort of thing. And herself has bought me a set of 6 Saxon style leather stamps made by Daegrad Tools over in Sheffield so I will fancy up the straps some with them.


image_zps820a19fc.jpg


I'm quite chuffed with the buckle, for me.

image_zps465c04cf.jpg


ATB

Tom
 
Last edited:

tombear

On a new journey
Jul 9, 2004
4,494
556
54
Rossendale, Lancashire
The veg tan calf arrived from Le Prevo and its lovely stuff. I've cut the practice cover off the wood and will use it as a pattern for cutting the cover, I'll add some length to it to allow for it shrinking and will drill the holes for the thread that will go through the outer, leather oval/bumper and sheepskin lining, when it has wll and truely finished drying. I trimmed the practice cover after a couple of days and it still crept down a mill or so after a week.

I'll leave off on the sling/baldric until the covers on, I got this far. I'll only be stamping on the strp end, the other bits are rather small.

p
image_zps643b5da0.jpg


atb

tom
 

tombear

On a new journey
Jul 9, 2004
4,494
556
54
Rossendale, Lancashire
Well, if I cock it up there's plenty spare, the bit at the bottom is all I need...

image_zpsd1ad2f85.jpg


Unless your using a I device and it will be the piece at the top.....

the crease is no mind as it will be going on wet and shrink tight.

atb

Tom
 

tombear

On a new journey
Jul 9, 2004
4,494
556
54
Rossendale, Lancashire
You and me both!

just finished for the night. First off I used a creasing tool heated up with a blow torch and wiped clean on a bit of scrap leather to put a groove around where I wanted the stitching to go ( I should have practiced the curved bits as they are less than perfect, to say the least ) then saddle stitched it with linen thread. It would have been easier if I'd given it a wider gap between the stitching line and the edge and trimmed it later.

image_zpsbf593341.jpg


I then soaked it in cold water in the hope it would become stretchy. There was then a farcical hour while I then tried to pull it over the wood but I just don't have the strength in my hands. I had to resort to cutting the stitching, trying to pull it on again, wrestling it off and cutting the stitching again and repeating the process until I finally managed to pull the end on. I then had to tie off the existing stitching and then saddle stitch the rest up again, keeping it damp to prevent the tightening up from starting. It's a bit rough on the back but sanding the raw edge of the seam and plenty of hot wax and tallow will cover a multitude of sins! The top suspension strap will cover some of the bodging up as well.

image_zpse6fd4c72.jpg


However I'm rather chuffed how the fronts come out and so far the leather has shrunk really well.

image_zpscab9ce73.jpg


Even untreated the veg tan calfskin looks well!

Now to wait until its properly dried, then I can trim the top, stitch the lining it the cover, tidy up the back seam, cut the slits either side of the strap slide and then wax the leather. To oil the sheepskin inside I'm thinking of mixing lanolin with isopropyl alcohol and using a tube to pour it all over the inside and then leaving it somewhere warm. for the alcohol evaporate away some.

Then it's just assemble the baldric and maybe find a "healing stone" to tie to it,

ATB

Tom
 
Last edited:

BCUK Shop

We have a a number of knives, T-Shirts and other items for sale.

SHOP HERE