Ye Olde Englishe Machette

  • Hey Guest, Early bird pricing on the Summer Moot (29th July - 10th August) available until April 6th, we'd love you to come. PLEASE CLICK HERE to early bird price and get more information.

tombear

On a new journey
Jul 9, 2004
4,494
556
54
Rossendale, Lancashire
Cheers! for the Ash scabbard, not including waiting for glue to dry and staring at it wondering what to do next etc I'd say between 6 and 8 hours actual hands on tools.

Just at the library trying to arrange some inter library loans. There's the excellent book on leather work dug out at York on line but I need to get hardcopies of these before I do the cover.

Sheaths and Scabbards in England AD400-1100 E Cameron
Scabbards and Sheaths From Viking and Medival Dublin " "
Knives and Scabbards J Cowgill et al

When I get home I think there will be another 1 or 2 hours on the surforms to get it down to 1/8th of a inch all round(I may err on the side of caution here) all round. I'll take it steady anyway.

ATB

Tom
 

tombear

On a new journey
Jul 9, 2004
4,494
556
54
Rossendale, Lancashire
Nearly a hour with the surforms and another hour watching TV and sanding got it to this. Since it will be covered I didn't bust a gut getting it pretty.

AshScabbard11_zps30aa130c.jpg


yup thats all that came off it in the bag, i've found surform scrapings are excellent for packing clay pipes, something i have a bizarely large number of.

I didn't quite manage to get it down to 1/8th thickness, 5/32nds was as near as damnit!

AshScabbard12_zpse2a0c856.jpg


And thats your lot until Ive got the books Ive mentioned and scored some 1 to 2mm veg tan calf skin. Not quite sure where to get that. I'll need to carved a horn or antler suspension strap which i will fix to the front of the wooden part before covering it in the leather.

ATB

Tom
 
Last edited:

tombear

On a new journey
Jul 9, 2004
4,494
556
54
Rossendale, Lancashire
Thanks! While i'm waiting for the books to arrive I can carve the suspension strap/ slider and inset it into the wood. No organic ones have survived so I will have to go off the dimensions of the imprints / openings on the leather scabbards covers that survive.

ATb

Tom

PS may ahve to get a diamond shaped awl as it seems thats what they used, something else that needs some research.
 

tombear

On a new journey
Jul 9, 2004
4,494
556
54
Rossendale, Lancashire
The area around the work bench, about a third of the 35 foot by 25 foot room, is bare, well, varnished, boards but the rest is carpeted for the comfort of the hangers on. Strictly speaking a 8 foot square in one corner is Lino, a wet area where they fitted a big catering sink for me where there's a fridge with a baby belling on top for when we are too lazy to go to the real kitchen. The views good as well.

ATB
Tom
 
Last edited:

tombear

On a new journey
Jul 9, 2004
4,494
556
54
Rossendale, Lancashire
Since no organic belt slides, the piece on the front of a scabbard for the suspension belt/system, have survived from the period I want to keep to the construction methods of, 9th century Anglo-Saxon with perhaps a nod towards 10th century Anglo-Norse, Some of this is guess work based on the work of some very clever bunnies. Since the antler i have isnt big enough for the job I decided to use horn which i have some of and which seams a likely material used.

Impressions of belt/strap slides which during this period were always under the covering material, were found on numerous discarded 1 to 2 mm thick calfskin scabbard covers dug up at York. From the types used I decided to use a York type 1 slide, basically a long narrow triangle of horn (or antler, or something else that hasnt survived) 4 or 5 inches long. This was either bowed out in someway to accomodate the strap, or had a hole carved out the back or there was a groove in the wood it was fixed to. Since the wood of the scabbard was quite thin, say 1/8th (3.175mm ) of a inch which Ive tried to replicate (later it became incredibly thin say by the 12 th C) I'm intending to inset the ends into the wood so only 2mm shows above the surface, so i'll be only going a mill or so down. I'll be using hide glue and some linen tape to bind the ends on. To allow a decent thickness of strap to go under the slide I will be removing some wood, hot moulding a bend in the middle of the slide and if required be carving the curved section out some more.

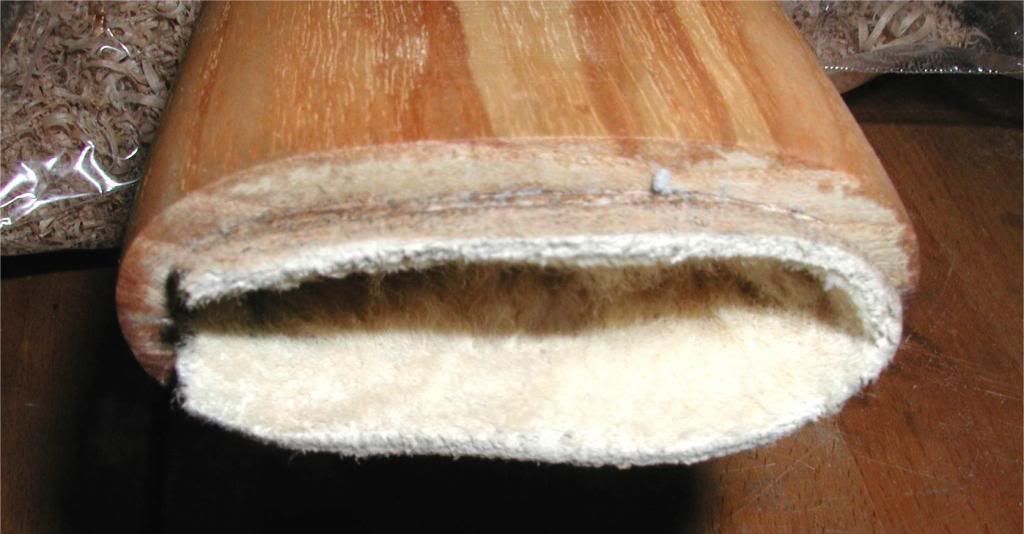
Anyroad, I dug out a old souvenir cow horn i'd already used the end of and sawed it into two pieces to make working it easier

Slide01_zps28ede318.jpg


I then found a suitable lidded vessel to boil them in, something that wasnt to be used for food again incase the process tainted the metal. the bottom half of one of the double boilers I aquired from carboots proved to be ideal.

Slide02_zpsb2431bba.jpg


I then got it to a good rolling boil and tested it every half hour to see if the horn had softened. i periodically topped it up from the kettle and made sure the windows were open as it smelt quite bad.

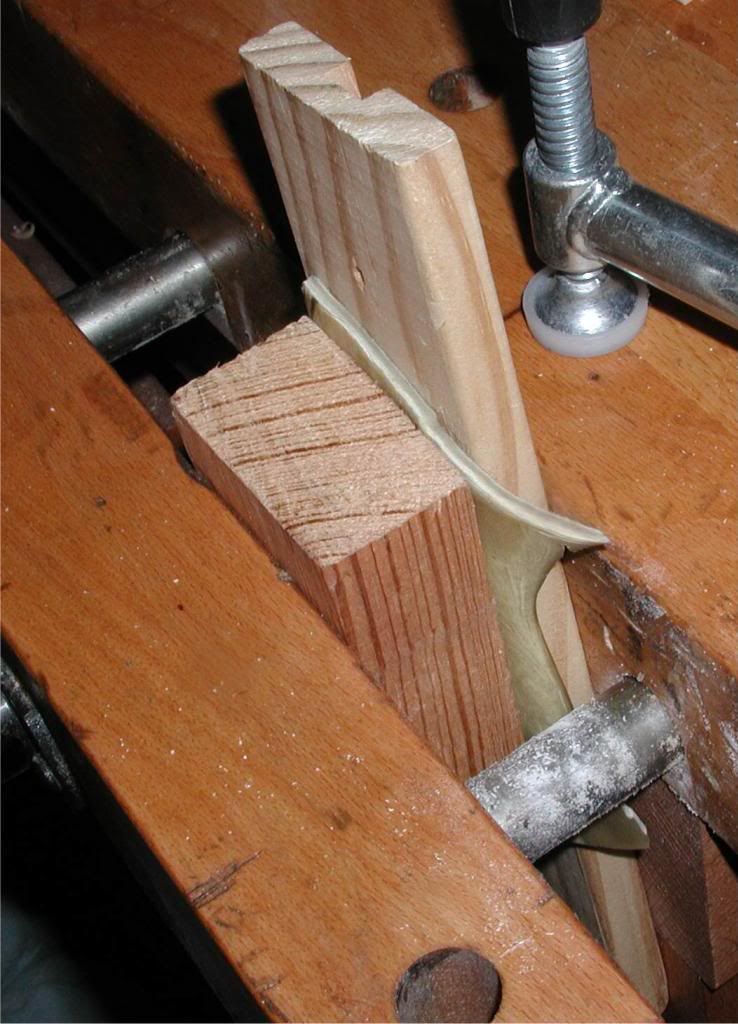
While it was boiling away i set up where I wanted to clamp the pieces down, to flatten the ends and leave a tunnel under the middle section. I rounded off the edges of a 3mm thick 1 inch wide piece of scrap ply and made a couple of plates to help spread the pressure coming off the clamps, I also rounded off the edges facing the 1 inch strip.

Slide03_zpsf32403ff.jpg


After 2 hours the piece I wanted to make the slide from had softened some. it still required quite a lot of presure to flatten it but I clamped it down as hard as I could, taking due care as I was dealing with boiling water after all! I listened carefully for any sounds of cracking and didnt hear anything.

Slide04_zps8446787b.jpg


Ill now leave it for a few hours and it will have hopefully taken on its new shape.

As a experiment i gave the other piece a extra half hour and then between two blocks of scrap wood, squished it good and hard in a bench wood vice.

Slide05_zps043b9533.jpg


had i thinned and shaped the pieces before hand they would have been easier to heat up ( the waters just a medium for transfering the heat safely) and bend but I wanted to leave as much material so i could work it to fit.

More when the clamps come off! If this fails I will have to try again or carve it down from a thicker piece.

ATB

Tom
 
Last edited:

British Red

M.A.B (Mad About Bushcraft)
Dec 30, 2005
26,751
1,999
Mercia
had i thinned and shaped the pieces before hand they would have been easier to heat up ( the waters just a medium for transfering the heat safely) and bend but I wanted to leave as much material so i could work it to fit.

ATB

Tom

I would argue that the main purpose of the water is as a temperature regulator - it just can't get hotter than 100C (is that what you meant by "safely"?). Bearing in mind when this was done, there would not have been thermometers on ovens or in fat, the chance of scorching would have been high
 

tombear

On a new journey
Jul 9, 2004
4,494
556
54
Rossendale, Lancashire
Yeah as in I can't actually scorch the piece, unless it boils dry of course, which I did once, not a good smell. Back in the day they would have had served their time, it was definitely a profession of specialists from what they have dug at York. Not long after this there's evidence they used specialist ovens like are used by glass workers, Glass beads were big business, so they may been a common "tool" . Personally I just don't fancy applying a intense, dry heat. Some web sites talk of wafting blow torches over the horn to soften it!

I've not been fully forgiven yet for getting them to the Colne Valley Museum yesterday, three hours early. There's not a lot to do at Golcar on a Sunday after you've been around the COOP three times. It was a excellent event, when it did start. The 33rd foot reenactment group was in residence and the ladies making havercakes in the early 19th C kitchen were very informative and I saw a lot of stuff worth copying. The top floor is 1/4 a clog makers workshop and the rest is working early wool machinery. Ok the Spinning Jenny is a copy but it works and looks the same.

Anyroad the point being I don't think I have the credit to get away with the stench of failure! Herself has hinted that more bone work would a a acceptable apology for the Great Museum Stake Out of 2014.

ill crack the clamps off the horn in a hour.

ATB

Tom
 
Last edited:

tombear

On a new journey
Jul 9, 2004
4,494
556
54
Rossendale, Lancashire
Well, they could have been flatter. I suspect I spent too long faffing while the horn rapidly cooled but I could work with them.

Slide06_zpsfde5fa5e.jpg


I selected the flattest section, sawed the part i wanted out and sanded to this shape

Slide07_zpsfe81a4eb.jpg


I should have used a thicker piece to hold up the centre as it required a lot of carving out to get a decent belt slot on the underside. However with a good file, some sand paper and a large scalpel to scrape with I got something acceptable. I need to rough the top and bottom up so the glue will stick to them, then inset it into the wood and open up the wood side of the belt slot.

Shame it will be covered in leather apart from a small area that will be exposed when the leather is slit.

Slide08_zps44f64a96.jpg


ATb

Tom
 

tombear

On a new journey
Jul 9, 2004
4,494
556
54
Rossendale, Lancashire
Last night I put a couple of heaped tablespoon of hide glue granules (thanks! you know who you are!) in a clean jar and covered them in cold water, lidded them and left them to stand.

Simply put hide glue is rawhide, chopped up into small pieces then boiled in water until it turns into a thick gelatinous goo, which is then evaporated and dried, without burning the stuff, until it forms a hard toffee like solid that is then broken up into granules or into a powder if thats what you like. It has been used for thousands of years, can be adversely affected by moisture and heat but has the advantage that it can be loosened and removed by the same agents. It is still popular with traditional woodworkers and the makers of musical instruments.

This morning I set up my gluing station thus

Slide09_zps726b6f3e.jpg


Thats a jam/cooking thermometer as the water in the improvised double boiler needs to be kept at 140 F.

Overnight the granules had swelled up and absorbed all the water, Once I was happy I could get a constant 140F I stood the open jar on the three pebbles in the water and stirring occaisionally left the glue to fully disolve and become a runny syrup.

To test it was ready I stuck in a piece of wood annd observed how the glue came off it, If it had ran off in drops like water it was too runny and I would have kept heating it up and stiring until enough of the water had evaporated. If it had fallen off in lumps I would have mixed it up some more and left it a bit longer. If it had remained lumpy/ falling off in chunks I would have added small amounts of hot water, stirring often, until it was the right consistancy. Fortunately I got there first time and the glue came off the stick in a long, well glue like, string.

Slide11_zpsb055c878.jpg


Ok not a fantastic pic but you get the idea.

in the meanwhile I had prepared the surfaces to be glued by cleaning them of dust and grease and had scored into them with something pointed,

Slide10_zpsa68dccdc.jpg


Id dug out a old paint brush and applied a good thick layer to the parts to be stuck together. Speed is important as as soon as it leaves the pot this stuff is cooling fast. I'd applied enough that glue squeezed out of the join but it was easily wiped off while it was still hot. In this case I used strong rubberbands to hold the job together.

Slide12_zpsff78ee5b.jpg


Different sites give different times for curing, it depends on tempreture and humidity, the shortest said three hours the longest said 24. Since i'm now stuck until I get a 8 x 24 inch piece of 1 - 2mm veg tan calf skin I will leave it for 24, in a cool, dry place. If it failsI will try again and apply it a bit hotter, maybe use a hairdryer to warm up the wood and horn, not having a open fire tol hand.

Cheers!

Tom
d
 
Last edited:

British Red

M.A.B (Mad About Bushcraft)
Dec 30, 2005
26,751
1,999
Mercia
This is a superb tutorial Tom - thank you so much :)

Tell me - have you thought about applying a tradional varnish over the lot to increase water proofing? A resin based one or a propolis based one for example?
 

tombear

On a new journey
Jul 9, 2004
4,494
556
54
Rossendale, Lancashire
Cheers!

When i was considering covering it in linen I would have definately have had a go at a period varnish. theres one near the bottom here

http://www.vikinganswerlady.com/wood.shtml#Finishing

And there s interesting discussion on finishes here

http://cavender.myweb.uga.edu/harp_project/

My lifes not worth filching some of the wifes beloved amber and making varnish from that!

I will admit I had to google what propolis was, fascinating stuff

http://en.wikipedia.org/wiki/Propolis

I'll have to try it sometime. I'll have a dig about and see if anyones worked out when its use got here. I know shellac didn't get to Europe until after Marco Polo.

Since I'd like to cover it in leather if I can get the right stuff without selling a kidney, I was going to treat the leather with a mix of neets foot, tallow, beeswax and pine resin (it seams to help it not going off).

I'm still considering how to get the lanolin to go inside of the lining evenly. Applying it to the blade would mean most would be going straight onto the first inch or so of the lining and it would only slowly spread to the rest. What I need to s=do is work out a non water based solvant I can mix it to which will evaporate and just stick a tube down the lot, pour a little in, with draw the tube a inch or so, pour in another bit , pull the tube out a bit and so on. Its faffing but I was loath to apply the grease until construction was complete.

What I may do, since it seems I have time now, is apply some walnut oil to the outside of the wood but not around the hide glued part in case that affects it. Logically it shouldn't as they have used both since Adam was a lad but also I want to apply hide glue on and around that are when the leather goes on and it may not stick so well onto a dried oil finish.

ATb

Tom
 

British Red

M.A.B (Mad About Bushcraft)
Dec 30, 2005
26,751
1,999
Mercia
I have some raw amber somewhere - I may try making amber varnish sometime:)

In finishing your leather, I would omit the neatsfoot - neatsfoot softens leather which is not at all what you want. The resin should be the main part with minimal fat and wax to make it penetrate and flow (and not chip).

As you say - I wouldn't oil anything that is to be glued later - it won't help adhesion at all.

Fascinating stuff this - thanks for sharing :) I have some random hooves and horns coming soon....and a boars tusk I think .....have to dream up something interesting for them!
 

tombear

On a new journey
Jul 9, 2004
4,494
556
54
Rossendale, Lancashire
I keep looking for chip amber in charity shops, you used to see it but i think everyones wised up.

How do you get the resin to penetrate without something it will disolve in? I've never managed collect enough to experiment with it, ruined plenty of clothes and had to regrind the tips of a couple of penknives but never actually collected much. The best place around here has been clear felled apart from a few very lonely looking decidious trees.

The neetsfoot in recipe is mainly so the dressing is a bit softer, like a hardish cream polish, theres not that much in it so i should have probably listed it in order of ingrediants.

One of the problems I have is often, back in the day they used horrible stuff on leather that we just wouldn't do now, like oak gall/ iron dyes which are in the long term corrosive. I've read accounts of them using so much neets foot oil on horse harness, especially down the pit, that the leather was black, they just expected it to be replaced.

I must admit a nice shiny resinous layer on the scabbard leather does appeal. Further reading has shown me that scabbard leather in the period i'm aiming at had minimal decoration and theres a distinct lack of evidence for metal fittings, chapes and such like. Oddly enough the contempory knife and seax sheaths were extensively embosed and covered with shiny bits!

ATB

Tom
 

British Red

M.A.B (Mad About Bushcraft)
Dec 30, 2005
26,751
1,999
Mercia
How do you get the resin to penetrate without something it will disolve in?
ATB

Tom

The best bet is to dissolve it in something volatile so that the carrier solvent evaporates quickly - ethanol or turpentine would both be gone in a few days completely. I suspect pure resin would crack as a varnish on a pliable material like leather - it would need a small (say 10% or less) plasticiser - beeswax works really well.

An alternative to get the shine you want would be a wax polish. Beeswax dissolved in an oil carrier (olive oil would certainly have been about) say 1 part wax to 3 parts oil. You could even put some tars in for waterproofing (a dollop of pine tar would be authentic). That would give a nice finish and assist waterproofing. Be easy to "touch up" too.
 

tombear

On a new journey
Jul 9, 2004
4,494
556
54
Rossendale, Lancashire
Excellent, i'll get me some pure turpentine. One of the lads used it for cleaning ( insert foul word here ) paintbrushes rather than refil the turps substitute jug until it was all gone. Around here I get reamed buying Rustins pure turps so I only use it sparingly.

Thanks!

Tom
 

BCUK Shop

We have a a number of knives, T-Shirts and other items for sale.

SHOP HERE