I concur! Would be something I’d like to try, so any inspiration from @Pattree would be most welcome.

I’m starting a thread here rather than adding it to Children’s Bushcraft as making the instrument is more than most children might manage.
I might have posted this before, if so then my apologies.
I’ll try and attach a sound file of some sort later.
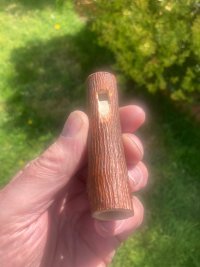
This whistle was made out of a green Rowan pruning from last year. The risk is that something shifts as it dries out and the Spirit of Song buggers off.
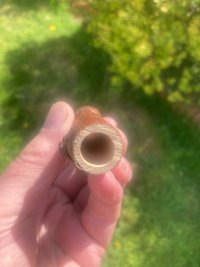
I drilled an 8mm pilot hole along the piece then followed it with an 18mm auger.

This doesn’t work with the dried out wood. My augers don’t bite and can easily crack the dry tube. (Yours might work)
I use a ratchet spanner to drive the auger rather than a power tool.

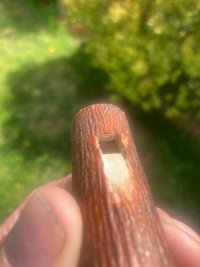
The “window” Is developed from a six mm drill hole and filed to 8mm square. A round hole can work. It’s roughly 20mm from the input end.
The top slope down to the window needs to be shallow enough not to cause turbulence as air escapes to ambient pressure.

I cut a similar slope into the upper inside side of the tube starting wide and finishing the same width as the window - just 1mm deep. You just might get away without this. A little chisel does it best - like the one in a carving Jack.
Leave the “blade” (fipple) between 1mm and 1/2mm thick at the edge.
A sharp blade can cause turbulence and a sibilant sound. It will also crack and rot quicker. It gets wet and dries out every time that you play the instrument and then put it away.
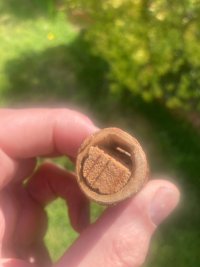
I’ve used cork to form the windway as it seals beautifully. It started as a cylinder then a single flat cut made from the diameter at the back to just shaving the circumference at the front and there you go. Note that the cork is orientated so that the natural tubules are perpendicular to the cut. This gives the smoothest windway.
It will probably play green but it’s well worth taking out the cork/block and letting it dry. Roll up a piece of sandpaper and smooth the inside bore once it’s dry - just a little smoothing.
Now
Blow gently. Yay! You’ve “voiced” The whistle.
Cover the end and blow gently again - with luck you have a note an octave lower.
Cover the end, blow gently and slowly rock your palm to open the end. That’s your instrument’s musical range.
Now wobble your palm backwards and forwards to receive a communication from a little planet far far away.
You are there! You will soon get the association of palm position and note so that playing the whistle is just s intuitive whistling with your lips.
For a dog whistle, blow hard and get a piercing note. You can still alter it by covering the end but musical it isn’t!
Many children have made the plastic conduit version of this at my workshops.
I make several different flutes and whistles but they take longer and are more difficult to illustrate.
I’d love to know how you get on if you try it. I’ll try a sound link later.
Enjoy.
Last edited:
