I got interested in basketry after seeing some of the amazing baskets that had been made by Fiona at the last Scottish Meet at Loch Tay, and decided to have a go myself, after being shown some of the basics there (how to make a base).
I've spent a lot of time looking on the internet, but there are very few sites with clear instructions on how to make baskets. So instead, I've taken what I already know, looked at some baskets made by others, and taken snippets of advice from websites and articles, to cobble together a basket design. I've done this as a step-by-step guide, partly as a diary of what I did, but more to seek advice and comments from those 'in the know'") However, if you follow what I did, you will end up with a basket, even if it looks a bit rustic!
However, if you follow what I did, you will end up with a basket, even if it looks a bit rustic!
I used willow for this basket, but any flexible material should do - my next one will hopefully be with materials growing around these parts. Either way, you need to soak the dry materials for at least an hour or two, and in some cases 24 hours, to ensure its flexible. Willow is ready to weave when you can bend the base of the rod at 90 degrees without it breaking.
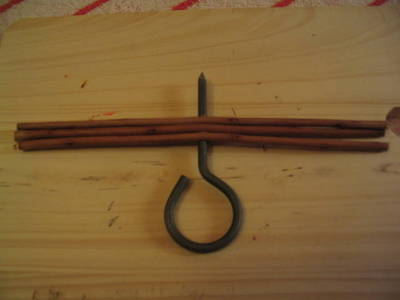
You will also need a bodkin (an awl, pointy tool, or large nail) and some secateurs or sturdy scissors.
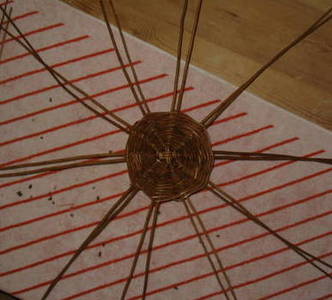
The Base
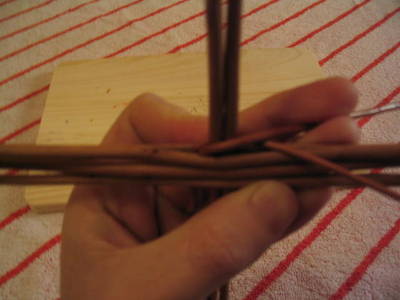
Start by pushing the bodkin through 3 rods in the middle, then feed 2 or 3 rods through this hole to make a cross-shape:
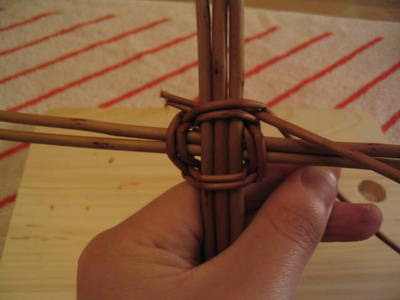
Next, take 2 weavers (thin rods) and tuck the thin ends in to the cut alongside the ones you pushed through above. Take one behind a set of 3 spokes, and one in front, and cross them at the gap, taking the front one behind and the back one in front - this is known as pairing:
Rotate the cross 90 degrees and repeat. You should go round the whole cross twice:
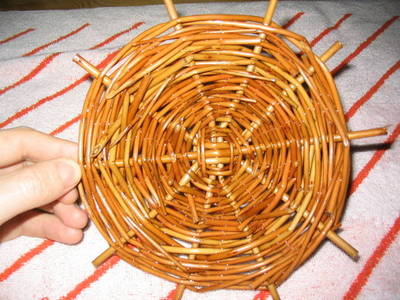
At this point, bend the left-most spoke of the 3 of that arm of the cross out to the left, and go in front and behind it, then the 2 remaining spokes. Repeat for the remaining 3 arms. Repeat again, but this time bending the right spoke out, and pairing round every spoke in turn. At this point you should now have a 'spider' of spokes, and have done 4 whole rotations. Keep pairing round each spoke, adding in new weavers as necessary (always matching thin end to thin, and thick end to thick. If necessary, double up when using thin strands so your overall weaver thickness remains constant. Continue going round until your base is large enough, finishing with thin ends. Tuck these in to the base.
The Side Spokes
The next stage in the process is to add the sides to the basket. You will need twice as many spokes as you had spokes in the base. Before you start on the sides, trim off each base spoke flush with the weaving edge.
Push the bodkin into the base at one side of a spoke, then insert a side spoke into the gap - pushing it in firmly. Do the same on the other side of the spoke, so each spoke has two side spokes coming out from it:
You will now need to bend up the spokes - this is called 'pricking up'. Take the bodkin, and push on the spoke close to the edge of the base, then bend the spoke up - it should crease and bend easily:
http://www.woodwose.net/images/bcuk/basketry/*****-up.jpg
Once all the side spokes are upright, loop over some string to stop them getting in the way:
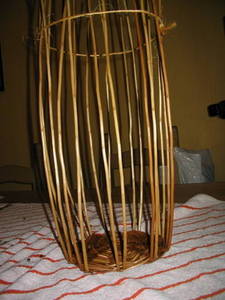
It also helps at this point to tie a marker to the top of one spoke, and consider this the 'start' when trying to count rotations of weaving later on.
Upsetting
Weaving around the base of the side spokes with a reinforced weave is called 'upsetting'. The weave used here is a '4 rod wale' - a wale is any weave using multiple weavers at once, going over and under multiple spokes at a time.
To begin, insert 4 weavers thick-end first into the base, to the right of 4 spokes (you might need the bodkin again). Bend these down slightly:
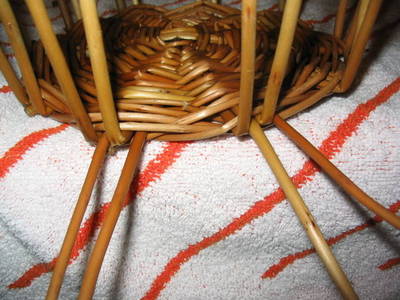
Take the first weaver, bend it to the right, over the other three weavers, and take it in front of 3 spokes, then behind one, ending by bending it downwards:

Repeat with the next weaver, going over the 3 weavers ahead of it:
Continue around the basket, repeating this weave, pushing down well to ensure a neat edge. You may need to add new weavers, in which case, add these in alongside the current weavers, if necessary weaving with both for a short while. You should do at least 2 full rotations of the basket,
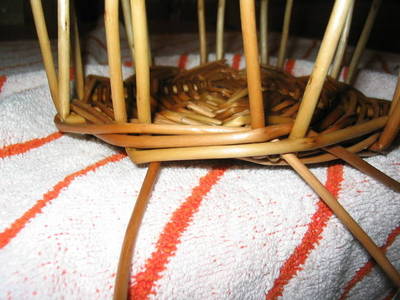
3-Rod Wale
(Apologies for the lack of photos here - my camera ran out of battery and I had to continue while it charged up again)
This is the same as the previous technique, but using 3 rods instead of 4, and crossing in front of 2 spokes, then behind one. Start by tucking the end of the weavers in behind 3 spokes, then begin weaving to the right as usual. Continue again for 2 or three full rotations of the basket.
Randing
There are many types of randing, which means weaving with one weaver at a time - I'm not sure which type this is though, but its quick and easy to build the basket up quite quickly.
Take 2 less weavers than the number of spokes you have - thus for 20 spokes, use 18 weavers. Tuck one weaver in behind a spoke, then take it in front of one to the right, then behind one, then back to the front. Turn the basket one spoke to the left, and do the same behind the next spoke. Repeat all the way round. You should now have 2 spokes to your left which have no weavers starting behind them. Take the next weaver to the left, and repeat the out-in-out weave once, which should make the gap move 'left'. Keep doing this round and round the basket and you should begin to gain height. When your weavers are used up, insert all new ones and continue:
As you can see in the above picture, its important to keep the side spokes vertical and evenly spaced as you weave Push down on the randing as you go round to keep it tight.
3-Rod Wale Again
To give the basket some strength at the top, return to the 3 rod wale as before, going round for 2 or 3 rotations. This also gives a nice border to the basket top. If you're making a tall basket, you can change to waling weaves at any time to give bands of different pattern around the middle of the basket.
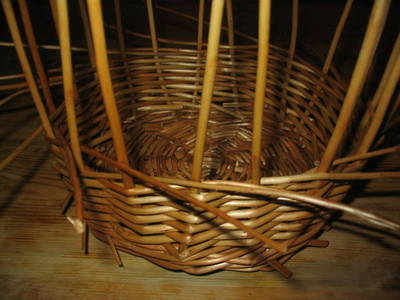
Border
I used a simple technique called a trac border. This is the same weave as the 3-rod wale, but is done with the side spokes. Firstly, ***** a spoke about a centimetre above the edge, and bend it to the right. Take this spoke in front of two spokes, then behind one and back to the front again. Repeat with the next spoke to the right, bending it over on top of the previous spoke. Be usre to always ***** at the same height above the original waling, to stop the basket edge creeping up. Go all the way around in this manner. When you get to the last 3 spokes, you will need to tuck these in under the already bent first 3 spokes, finishing off the edge.
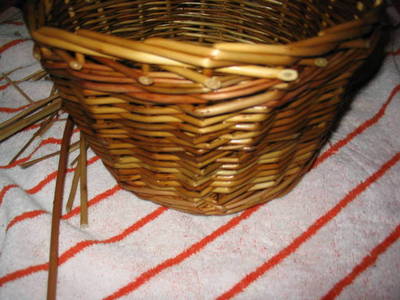
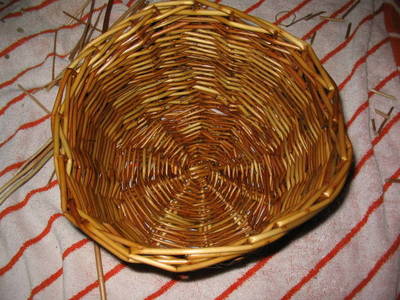
Finishing Off
Trim all the remaining loose ends, tucking in any that look loose. If your basket isn't quite the right shape, you can soak the whole basket and pull and push the sides to make it a better shape. You should now have a finished basket!
Things I Learnt
Be very careful about soaking your materials for long enough - I was impatient and you can see a few points where the willow has broken when bent in the photos. If necessary, resoak rods or parts of the basket if it dries out too much while working. It helps to keep the spare rods wrapped in a damp towel when not in use to stop them drying out too fast.
Pay attention to neatness - if you keep your spokes straight, and the weave tight, you can avoid some of the 'rustic' look my basket has
Charge your spare camera batteries before starting any project
Hope this helps someone - any comments, advice etc appreciated!
I've spent a lot of time looking on the internet, but there are very few sites with clear instructions on how to make baskets. So instead, I've taken what I already know, looked at some baskets made by others, and taken snippets of advice from websites and articles, to cobble together a basket design. I've done this as a step-by-step guide, partly as a diary of what I did, but more to seek advice and comments from those 'in the know'
However, if you follow what I did, you will end up with a basket, even if it looks a bit rustic! I used willow for this basket, but any flexible material should do - my next one will hopefully be with materials growing around these parts. Either way, you need to soak the dry materials for at least an hour or two, and in some cases 24 hours, to ensure its flexible. Willow is ready to weave when you can bend the base of the rod at 90 degrees without it breaking.
You will also need a bodkin (an awl, pointy tool, or large nail) and some secateurs or sturdy scissors.
The Base
Start by pushing the bodkin through 3 rods in the middle, then feed 2 or 3 rods through this hole to make a cross-shape:
Next, take 2 weavers (thin rods) and tuck the thin ends in to the cut alongside the ones you pushed through above. Take one behind a set of 3 spokes, and one in front, and cross them at the gap, taking the front one behind and the back one in front - this is known as pairing:
Rotate the cross 90 degrees and repeat. You should go round the whole cross twice:
At this point, bend the left-most spoke of the 3 of that arm of the cross out to the left, and go in front and behind it, then the 2 remaining spokes. Repeat for the remaining 3 arms. Repeat again, but this time bending the right spoke out, and pairing round every spoke in turn. At this point you should now have a 'spider' of spokes, and have done 4 whole rotations. Keep pairing round each spoke, adding in new weavers as necessary (always matching thin end to thin, and thick end to thick. If necessary, double up when using thin strands so your overall weaver thickness remains constant. Continue going round until your base is large enough, finishing with thin ends. Tuck these in to the base.
The Side Spokes
The next stage in the process is to add the sides to the basket. You will need twice as many spokes as you had spokes in the base. Before you start on the sides, trim off each base spoke flush with the weaving edge.
Push the bodkin into the base at one side of a spoke, then insert a side spoke into the gap - pushing it in firmly. Do the same on the other side of the spoke, so each spoke has two side spokes coming out from it:
You will now need to bend up the spokes - this is called 'pricking up'. Take the bodkin, and push on the spoke close to the edge of the base, then bend the spoke up - it should crease and bend easily:
http://www.woodwose.net/images/bcuk/basketry/*****-up.jpg
Once all the side spokes are upright, loop over some string to stop them getting in the way:
It also helps at this point to tie a marker to the top of one spoke, and consider this the 'start' when trying to count rotations of weaving later on.
Upsetting
Weaving around the base of the side spokes with a reinforced weave is called 'upsetting'. The weave used here is a '4 rod wale' - a wale is any weave using multiple weavers at once, going over and under multiple spokes at a time.
To begin, insert 4 weavers thick-end first into the base, to the right of 4 spokes (you might need the bodkin again). Bend these down slightly:
Take the first weaver, bend it to the right, over the other three weavers, and take it in front of 3 spokes, then behind one, ending by bending it downwards:
Repeat with the next weaver, going over the 3 weavers ahead of it:
Continue around the basket, repeating this weave, pushing down well to ensure a neat edge. You may need to add new weavers, in which case, add these in alongside the current weavers, if necessary weaving with both for a short while. You should do at least 2 full rotations of the basket,
3-Rod Wale
(Apologies for the lack of photos here - my camera ran out of battery and I had to continue while it charged up again
)This is the same as the previous technique, but using 3 rods instead of 4, and crossing in front of 2 spokes, then behind one. Start by tucking the end of the weavers in behind 3 spokes, then begin weaving to the right as usual. Continue again for 2 or three full rotations of the basket.
Randing
There are many types of randing, which means weaving with one weaver at a time - I'm not sure which type this is though, but its quick and easy to build the basket up quite quickly.
Take 2 less weavers than the number of spokes you have - thus for 20 spokes, use 18 weavers. Tuck one weaver in behind a spoke, then take it in front of one to the right, then behind one, then back to the front. Turn the basket one spoke to the left, and do the same behind the next spoke. Repeat all the way round. You should now have 2 spokes to your left which have no weavers starting behind them. Take the next weaver to the left, and repeat the out-in-out weave once, which should make the gap move 'left'. Keep doing this round and round the basket and you should begin to gain height. When your weavers are used up, insert all new ones and continue:
As you can see in the above picture, its important to keep the side spokes vertical and evenly spaced as you weave
Push down on the randing as you go round to keep it tight. 3-Rod Wale Again
To give the basket some strength at the top, return to the 3 rod wale as before, going round for 2 or 3 rotations. This also gives a nice border to the basket top. If you're making a tall basket, you can change to waling weaves at any time to give bands of different pattern around the middle of the basket.
Border
I used a simple technique called a trac border. This is the same weave as the 3-rod wale, but is done with the side spokes. Firstly, ***** a spoke about a centimetre above the edge, and bend it to the right. Take this spoke in front of two spokes, then behind one and back to the front again. Repeat with the next spoke to the right, bending it over on top of the previous spoke. Be usre to always ***** at the same height above the original waling, to stop the basket edge creeping up. Go all the way around in this manner. When you get to the last 3 spokes, you will need to tuck these in under the already bent first 3 spokes, finishing off the edge.
Finishing Off
Trim all the remaining loose ends, tucking in any that look loose. If your basket isn't quite the right shape, you can soak the whole basket and pull and push the sides to make it a better shape. You should now have a finished basket!
Things I Learnt
Be very careful about soaking your materials for long enough - I was impatient and you can see a few points where the willow has broken when bent in the photos. If necessary, resoak rods or parts of the basket if it dries out too much while working. It helps to keep the spare rods wrapped in a damp towel when not in use to stop them drying out too fast.
Pay attention to neatness - if you keep your spokes straight, and the weave tight, you can avoid some of the 'rustic' look my basket has
Charge your spare camera batteries before starting any project
Hope this helps someone - any comments, advice etc appreciated!