Rush dips

  • Hey Guest, Early bird pricing on the Summer Moot (29th July - 10th August) available until April 6th, we'd love you to come. PLEASE CLICK HERE to early bird price and get more information.

QDanT

Settler
Mar 16, 2006
933
5
Yorkshire England
I picked a batch of rushes and put them to soak, in a plastic storage bin, after 2 days although they were O.K. to peel you had to be careful as they would bend over as you pulled a section of skin off.By chance I'd left a couple of handfulls still in water and today after 8 days they were so much easier to peel the pith having soaked up more water was stiffer and didn't bend as you pulled a piece of skin off.This makes it allot faster.
I've noticed on the local OS Map some really out of the way places up on the moors with names :- Rushy clough,Rush candle clough,Rushy beds,The Rush beds,there seems to be a track up to them but no buildings or ruins about.
RushCandleClough.jpg

So that's this weeks expedition sorted.Hike in have a look about and at least a brew in a new place.I'll take the camera and keep you posted ------cheers all Danny
 

tombear

On a new journey
Jul 9, 2004
4,494
556
54
Rossendale, Lancashire
Hi Danny
please bare in mind the original texts mention that the rushes are picked in May to July so there may be some biological reason they are less suitable to use, a thickning of the stems or some such?

Any botanists out there?

ATB

Tom
 

QDanT

Settler
Mar 16, 2006
933
5
Yorkshire England
Hi Tom I've found they get harder to peel the more "browner" they get a few spots no problem more and the peel snaps.
Late summer is the best time to gather rushes. By then they had obtained their full height but were still green.
From:- http://www.crofters.org/personal essays/lighting.html
Dried rushes were peeled then aloud to dry ?? No mention of soaking. Guess Becky 0 hasn't done it.
cheers all Danny
 

tombear

On a new journey
Jul 9, 2004
4,494
556
54
Rossendale, Lancashire
Thats a great link, thanks!

I hadn't realised candle molds were used so early as if I can knock one up it means I can make some tallow candles as I won't need such a large amount of hot fat as i would if dipping.

Great info on "dills" as well, I'll search for images. I hope that they are something lie the long round tins you get some sigle malts in and that they can be the basis of making them.

ATB

Tom
 

tombear

On a new journey
Jul 9, 2004
4,494
556
54
Rossendale, Lancashire
I'm having trouble finding any illustrations of a dil / rushlight container.

The real bugger is in September we nearly went to St Fagans where there are some supposedly but went into central Cardiff insted to the Games Workshop as it was raining!

ATB

Tom
 

QDanT

Settler
Mar 16, 2006
933
5
Yorkshire England
The best rushes used for lights were the big cattail type ones, Gathered, cut and sold in bundles about 60cms (2feet) long.
As Launditch says leave a strip either side on the fine ones, but the big ones manage well with just one strip about 5mm wide.
Holding them can be a footer, the metal clamps used on the thin rushes are called 'nips'. A Y shaped frame or a bigger version of a josh stick holder works well though.

Curious now, what are you going to do with them ? :D They burn incredibly smokily.

cheers,
Toddy

just came across this :-
Rush Light or Rush Lamp
This earlier method of illumination requires the preparation of common cattails (Typha latifolia). Usually collected in the fall when rushes are gathered and dried for making chair bottoms, the stems holding the furry heads of the familiar plant. Excess leaves are removed as is the head and the long stems are allowed to dry. Once dry they are quartered, carefully split into 4 quarters with each containing equal amounts of the pithy center which soaks up the grease or oil used as fuel. The stems become the wicks once they are impregnated with hot grease. The wicks are soaked for several hours in oil heated on the stove or fireplace. The excess oil is removed and the rushes are stored where they can not be eaten by vermin. When ready for use they are placed in the rush light holder or rush lamp and are set alight. Only about an inch of wick is exposed above the wick holder and it is adjusted as it burns down. These tend to be messy, require regular maintenance and do have a propensity to smoke. Once the wick is used up it is replaced as the only fuel is the grease absorbed in the rush fibers. Place the rush wick as vertically as possible in the rush light holder. Expose an inch of rush above the holder and adjust as it burns down.
cheers all Danny
 

QDanT

Settler
Mar 16, 2006
933
5
Yorkshire England
Today being the first day this week it wasn't raining with low cloud I set off via Hoofstones height and down into Rush Candle Clough I wasn't expecting them to be as thick as my thumb and six foot high ( honest ! ) but I was expecting Rushes.Well not a one to be seen.
Rushcandleclough-1.jpg

So I carried on down stream to the first ruin where there were a few clumps and larger stems than I've had before.They're in soak at the moment and I did get a brew up there
ruin.jpg

cheers all Danny
 

QDanT

Settler
Mar 16, 2006
933
5
Yorkshire England
I'm having trouble finding any illustrations of a dil / rushlight container.

The real bugger is in September we nearly went to St Fagans where there are some supposedly but went into central Cardiff insted to the Games Workshop as it was raining!

ATB

Tom

have you seen this one ?
rushlightnipsandholder.jpg

cheers Danny
 

tombear

On a new journey
Jul 9, 2004
4,494
556
54
Rossendale, Lancashire
Great stuff and it explains a lot.

Just dragged into the house to dry a old, heavily turned, table leg that was in the wood pile, once dry and if it doesn't split theres a couple of meaty sections that may make good bases for the home made nips.

More anon

ATB

Tom
 
Last edited:

tombear

On a new journey
Jul 9, 2004
4,494
556
54
Rossendale, Lancashire
Yesterday I dug a old table leg out of the wood pile thats been there since we moved in and sawed section out of it and fashioned it into the base for the nips I made from some old pliers. Rather than strip it down I decided to leave it in its distressed state and just rubbed some wood dye into the raw surfaces and then some wax polish over the lot. On Herself's insistance I have glued some of the green felt (I rescued it from when the works snooker table was recovered) to the base. I'm pretty pleased with it so will now leave be.

Finished%20rushlight01.jpg


Finished%20rushlight02.jpg


cheers!

Tom
 

tombear

On a new journey
Jul 9, 2004
4,494
556
54
Rossendale, Lancashire
Cheers!
with that last one on a grey background, the very bottom of the leg I chopped up looks quite like that, If I do another I may use that bit.


Thanks for collecting the pics together

ATB

Tom
 
Jul 19, 2009
6
0
Chandler, AZ
I think this is one of the most fascinating and inspirations threads I have read in a long time. Thank you, Tom, for sharing your foray into this most interesting topic. You have done a wonderful job researching and recreating the rushlight!
 

QDanT

Settler
Mar 16, 2006
933
5
Yorkshire England
The rushes I gathered (see post 47) had been in a plastic storage bin with a metal grid and a granite egg keeping them under water for 9 days.So after tea tonight I set too and peeled them.Took just over 3 hours :-
Rushlight002photobuk.jpg

Tips :-
If the first peel doesn't peel all the way down "zip" first try disgard it unless you want to mess about all night
have sissors handy to trim the ends to 90* as your peeling and any soft just cut off
if you don't have good finger nails have a sharp knife handy as it gets to the last peel split
sit in a comfy chair and pull against thumb nail supporting pith along knee
good time to listen to favourite music I had Loreena Mckennitt on.
cheers all Danny
 

tombear

On a new journey
Jul 9, 2004
4,494
556
54
Rossendale, Lancashire
It would seem like the old books were right and when you pick them makes a real big differance to how easy they are to peel/work. I reckon the end of July must be the optimum time with regards to size and ease of peeling.


I've been using the ones I made to read in bed by, so long as the print is within a foot of the flame ther is no straining of the eyes. To stop me reading into the wee hours I've taken to using a set length of dip and when it is snuffed by burning down to the nips I go to sleep.

It's better than watching the clock.

Theres no smell worth mentioning and so far no drips on the bedside table.

ATB

Tom
 
Last edited:

QDanT

Settler
Mar 16, 2006
933
5
Yorkshire England
I found that about 5% just didn't want to peel easy it would snap after a couple of inches so I'd start again and end up picking bits off which takes time and saps your patience in a three hour session so if they didn't want to play they went on the peelings pile.The other 95% peeled just as fast as I could pinch a pice and pull "zip" "zip" "zip" next.Will just have to start picking earlier next year to experiment though there's still plenty to pick this year.We've had a couple of nights with them and the fire as only light source and found them fine at 45* and a couple of inches was good for 5 minutes on the coffee table between our chairs and you could read no problem even more so as it burnt shorter then both ends were lit. I've cut a tin full at 6" just for this.I'm dipping them in the bird hide at the back of my shed as I had a brew stove set up in there but it makes it hard to photograph as it's only about 4ft wide, on the next fine day I'll set it up in the garden and take some photos.Here's a photo of one burning in the kitchen I put my finger over the flash to cut some of it down.The Nips have a spring fitted just as an experiment but I found it tended to crush the rushlight and wasn't needed to hold it at 45* so I took it off .No noticeable smell when burning either
Rushlightslitphotobuk.jpg

cheers all Danny
 

QDanT

Settler
Mar 16, 2006
933
5
Yorkshire England
Rather than leaving out in the dew and drying in the sun I tied the last bunch up in a bundle and left them on the stove over night. No problems they dried and dipped fine.Lots of very small air bubbles coming out of the pith when a handfull dropped in the "grisset" as the tallow/wax was soaked up
rushlightdrying.jpg

cheers all Danny
 

QDanT

Settler
Mar 16, 2006
933
5
Yorkshire England
I posted this back in Feb.07 about making an oil insert for the 9 hour uco candle light lanterns
http://www.bushcraftuk.com/forum/showthread.php?t=19095

These instructions are for the lanterns that take the 9 hour UCO candles
28mm copper pipe, 28mm end caps, 6mm brass pipe, 6mm wick, Lamp oil, all from any good Ironmongers
or BQ as a last resort and a couple of old pennies if possible
allthebits.jpg

Cut a length of 28mm copper pipe, pipe cutter is best but hacksaw will do, just shorter than candle
Drill a 6mm hole in one end cap cut a short length of 6mm brass pipe tap into hole and solder
If you have some old pennies or other coins solder one on one end of the 28mm tube and you can cut
a coupler in to two or a tee piece into three and solder a penny onto the top and drill a 6mm hole through the penny to make an end cap.If you have
no coins solder a 28mm end cap on the pipe
Clean joints with wire wool and flux them then get the pipe just hot enough to melt the solder
i.e. don't melt the solder with the blow torch.
Thread a piece of wick, fill not quite full with oil and allow to soak
You don't need much wick showing almost flush will do, just experiment for max flame with no smoke
finished.jpg

bottlelanterns.jpg

As can be seen in last photo a piece of tube through a coin to fit an old jar or bottle makes a lamp

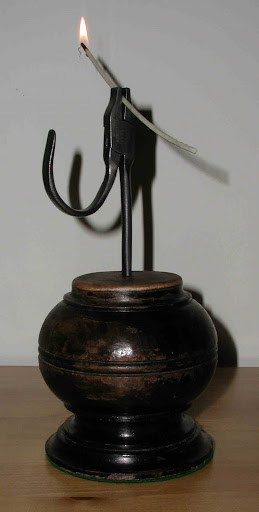
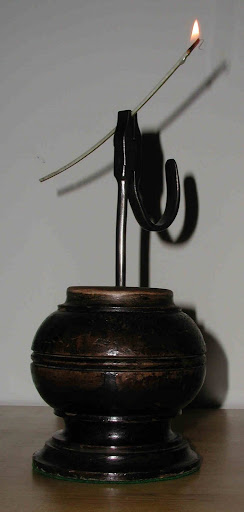
I had one lit the other night and the idea popped up Rushlight holder which developed into Wax taper holder/burner
I didn't know if they still did wax tapers 1950's haircut back of neck singe being the last time I remember them,but they're on E-bay 350257804952 being one of them and my local hardware shop which is a "Mica" http://www.micahardware.co.uk/public/postcodeareas/ stocks them.They are 12"long so I cut a pice of 28mm copper pipe to 13"and soldered a penny onto one end and used the oil lantern cap for the other.The pipe holds 20 wax tapers and a pice of wood with a suitable hole angles it to 45 degrees and also catches any drips,though once burning there aren't any.The taper can be pulled up by hand if there's a bit left showing or use tweezers if it's getting near the end of the pipe.

waxtapersflat.jpg


Wax taper in timing runs with flash:-

waxtapertimingflas.jpg

timinglarge.jpg


The black marks on the taper are felt tip dots 1" apart and it burnt at 4 and 1/2 minutes an inch

without flash:-

waxtapertimingnoflash.jpg


So anyone not fancying making tallow picking soaking drying dipping rushes here's an idea thats "Just like the real thing" and they work in the "Nips" too.The next experiment is to put a piece of pipe on the Grisset and pull the last dip through to size them then store and transport them in the pipe as rushdips are fairly fragile.Photos and results to follow.
cheers all Danny
 

BCUK Shop

We have a a number of knives, T-Shirts and other items for sale.

SHOP HERE