New pocket axe

  • Hey Guest, Early bird pricing on the Summer Moot (29th July - 10th August) available until April 6th, we'd love you to come. PLEASE CLICK HERE to early bird price and get more information.

British Red

M.A.B (Mad About Bushcraft)
Dec 30, 2005
26,715
1,962
Mercia
Heath,

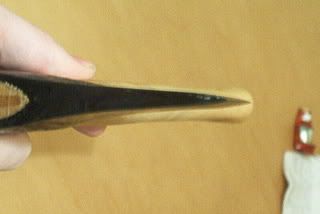
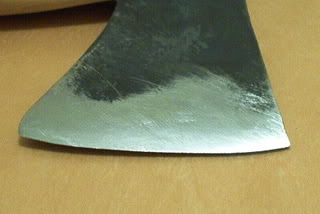
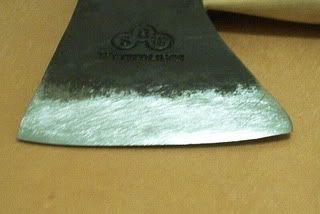
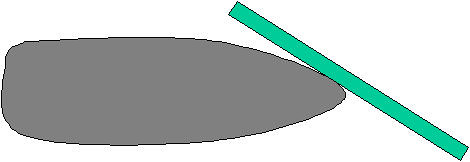
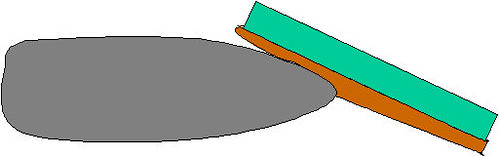
Can you bung some pictures up of the bevel as it is now please mate? Close ups of the bevel on each side if you would be so good and one on top of the axe looking along the bevel like this one.

headalignsp9.jpg


Then I can assess the next step more easily.

If you are really confident the bevels right then feel free to say "not needed" - just wanting to be certain that I give you the right advice mate

Red

Thanks for the kind words guys :eek: . We all give advice all though - thats what the site is all about surely :confused:
 
  • Like
Reactions: leon-b

heath

Settler
Jan 20, 2006
637
0
45
Birmingham
That makes me nervous now you're going to see my crude work. :eek: I'll try and sort out some pics tomorrow when I'm in College (I only have dial up at home and it would take an age to do pictures).
I think I've got the bevel ok and I'm hoping to get it finished for the weekend, so if you tell me what I need to do next I'll decide wether I'm confident enough to go ahead without you checking it out.
 

British Red

M.A.B (Mad About Bushcraft)
Dec 30, 2005
26,715
1,962
Mercia
;) I'm never nice!

Looks a lot better. Don't worry about the scratches. We knew that would happen right?

My only questions are these

(1) Around the heel - have you thinned enough metal off it? Its really hard to tell from the photos. The bit should be no thicker at the bottom than it is at the top - you decide if its right.

(2) is the curve of the convex bevel even all the way along? If it isn't, the bit will not bite correctly and will wear unevenly. To me, it looks sharper in the middle and rounder (more obtuse) at the toe and heel. Again its hard to tell, but future stages are only about smoothing out the metal, not really removing significant amounts - you need to decide


Now if it isn't right and you decide later you should have taken more off - everything from this point on is wasted. Entirely your call of course.

We aren't going to get this finished before the weekend I doubt for a few reasons

(1) You will need to fabricate the tools for the next stage
(2) Its a time consuming job that needs constant checking and I don't want you to rush it
(3) I'm not going to be online for a few days
(4) We haven't even begun to discuss the handle yet

Red
 

British Red

M.A.B (Mad About Bushcraft)
Dec 30, 2005
26,715
1,962
Mercia
Right, lets assume you have your bevel filed right...just make sure it is right!

Now, the next stage is to use your coarsest wet and dry paper to smooth the bevel out. Start with nothing finer than about 240 grit. We need to change direction (whilst still removing metal from bit to poll). You therefore change the angle to 90 degrees from your original angle and are filing bit to poll, heel to toe - like this.

368392106_d6929b3365.jpg


You need to use your coarsest grade until you have sanded out all the file marks - this will take some time. I use a diamond file before switching down, but you are limited in tools and this will work fine - it'll just take a bit longer. You do have a problem though. If you wrap your wet and dry over something flat, you will make contact on a tiny area - like this

368384863_1c31f518b8.jpg


This means that it will take ages to do and will tend to sand the convex bevel flat, however much you "roll your wrist". What you need to do is put something soft between your board and the wet and dry and then push down as you push back. This will bring a lot of wet and dry into contact with the bit and will also preserve the convexing. It will look more like this

368384866_cfbd9dce5f.jpg


How I achieved this into a handy package is as follows.

I took two bits of credit card sized thick plastic and glued them together just in the middle - it looked like this

British%20Red_6%20Stuck.jpg


I stock a bit of mousemat on top with glue (thick leather or anything "spongy" will do

British%20Red_9%20Mousemat.jpg


I cut the wet and dry to size and stuck the ends between the boards

British%20Red_8%20Fit%20paper.jpg


This is how it looks

British%20Red_10%20complete.jpg


Now you dont need to make this - a bit of wood, some felt and some sticky tape will do, but you get the idea!

You need to change wet and dry as it wears down and keep going until all the file marks in the original direction are gone.

When this is done, change to 400 grit and switch back to the first direction until all the lines from the 240 grit have gone. Then change direction and switch to 600 grit until the 400 grit lines have gone.

Then stick some more photos on!

Red
 

heath

Settler
Jan 20, 2006
637
0
45
Birmingham
well i'm starting to wish I had invested in a belt sander :(
I'm still on the 240 grit and and the file marks are still very much visible.
I'm a little concerned that I'm rounding off the toe a bit, is this a problem?
 

British Red

M.A.B (Mad About Bushcraft)
Dec 30, 2005
26,715
1,962
Mercia
You don't need a belt sander mate - a diamond file would help though - its between a coarse file and the rougher wet and dry. The toe (top corner) can stand to come back a bit on your bit anyway (just don't make it more obtuse).

The right tools always ease a job, but it is achievable with the basics. B&Q do an 80 grit wet and dry that would help - its still finer than a b***ard file but quicker than 240. I will still finish the job for you if you want?

Red
 

heath

Settler
Jan 20, 2006
637
0
45
Birmingham
I'm back to using the file, I thought I had it right but then looked at it in a new light (literally) and now I'm not happy with it :(
Better to do it now though I suppose.
 

British Red

M.A.B (Mad About Bushcraft)
Dec 30, 2005
26,715
1,962
Mercia
heath,

Don't rush it mate. Take your time on each stage. If you find getting rid of the file marks is a pain, try using a fine metal file or diamond file after the coarse file and before the wet and dry. Stick with it - its worth it!

Red
 

heath

Settler
Jan 20, 2006
637
0
45
Birmingham
quick question for you Red.
I need to take quite a bit off the heel end on one of the sides, in order to file just this area it would feel more natural to file towards the heel rather than away from it. (does that make sense?) should I stick to going in one direction (towards the helve) like you originally said, or would it be ok to go the other way?
 

British Red

M.A.B (Mad About Bushcraft)
Dec 30, 2005
26,715
1,962
Mercia
If you need to file in a different directionthen do. The thing is, keeping all the file marks in one direction makes removing them later easier.

However all marks will go via repeated changes in direction you'll understand later why one direction is easier - its not a crime though mate - if you need to change direction to lose a load of metal , then do so

Red


Hey Cegga - how's the double bit coming ;) ?

Red
 

heath

Settler
Jan 20, 2006
637
0
45
Birmingham
Well I'm finally there now, it's taken ages but I'm up to a 600 grit and all the scratches (from the 600 grit) are going in the same direction. All in all it's looking pretty good to me. So what comes next?
 

British Red

M.A.B (Mad About Bushcraft)
Dec 30, 2005
26,715
1,962
Mercia
Sounds good heath - chuck a picture up of the bit will you and we'll have a look!

It might be good enough as it stands or we might use a bit of buffing compund to really tidy it up to a mirror shine

Then we can talk about the helve if you would like a nice finish on that (thats easy - 30 minutes work tops)

Red
 

British Red

M.A.B (Mad About Bushcraft)
Dec 30, 2005
26,715
1,962
Mercia
I must get to doing a proper axe sharpening tutorial at some point - I just did this to help heath out really :eek:
 

tinderbox

Forager
Feb 22, 2007
195
1
61
East Lothian
I must get to doing a proper axe sharpening tutorial at some point - I just did this to help heath out really :eek:

I'd say that there's a full tutorial in this thread. It just needs pasting into one article. The only thing I would add to it is that for say a full sized felling axe you might not sharpen to such a polish, but you would carry a stone and file and retouch the blade regularly throughout a days work.
 

BCUK Shop

We have a a number of knives, T-Shirts and other items for sale.

SHOP HERE