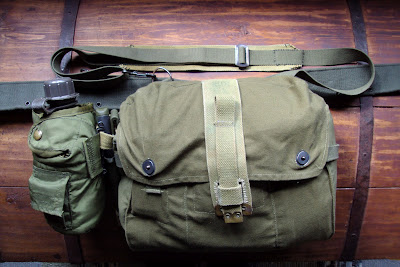
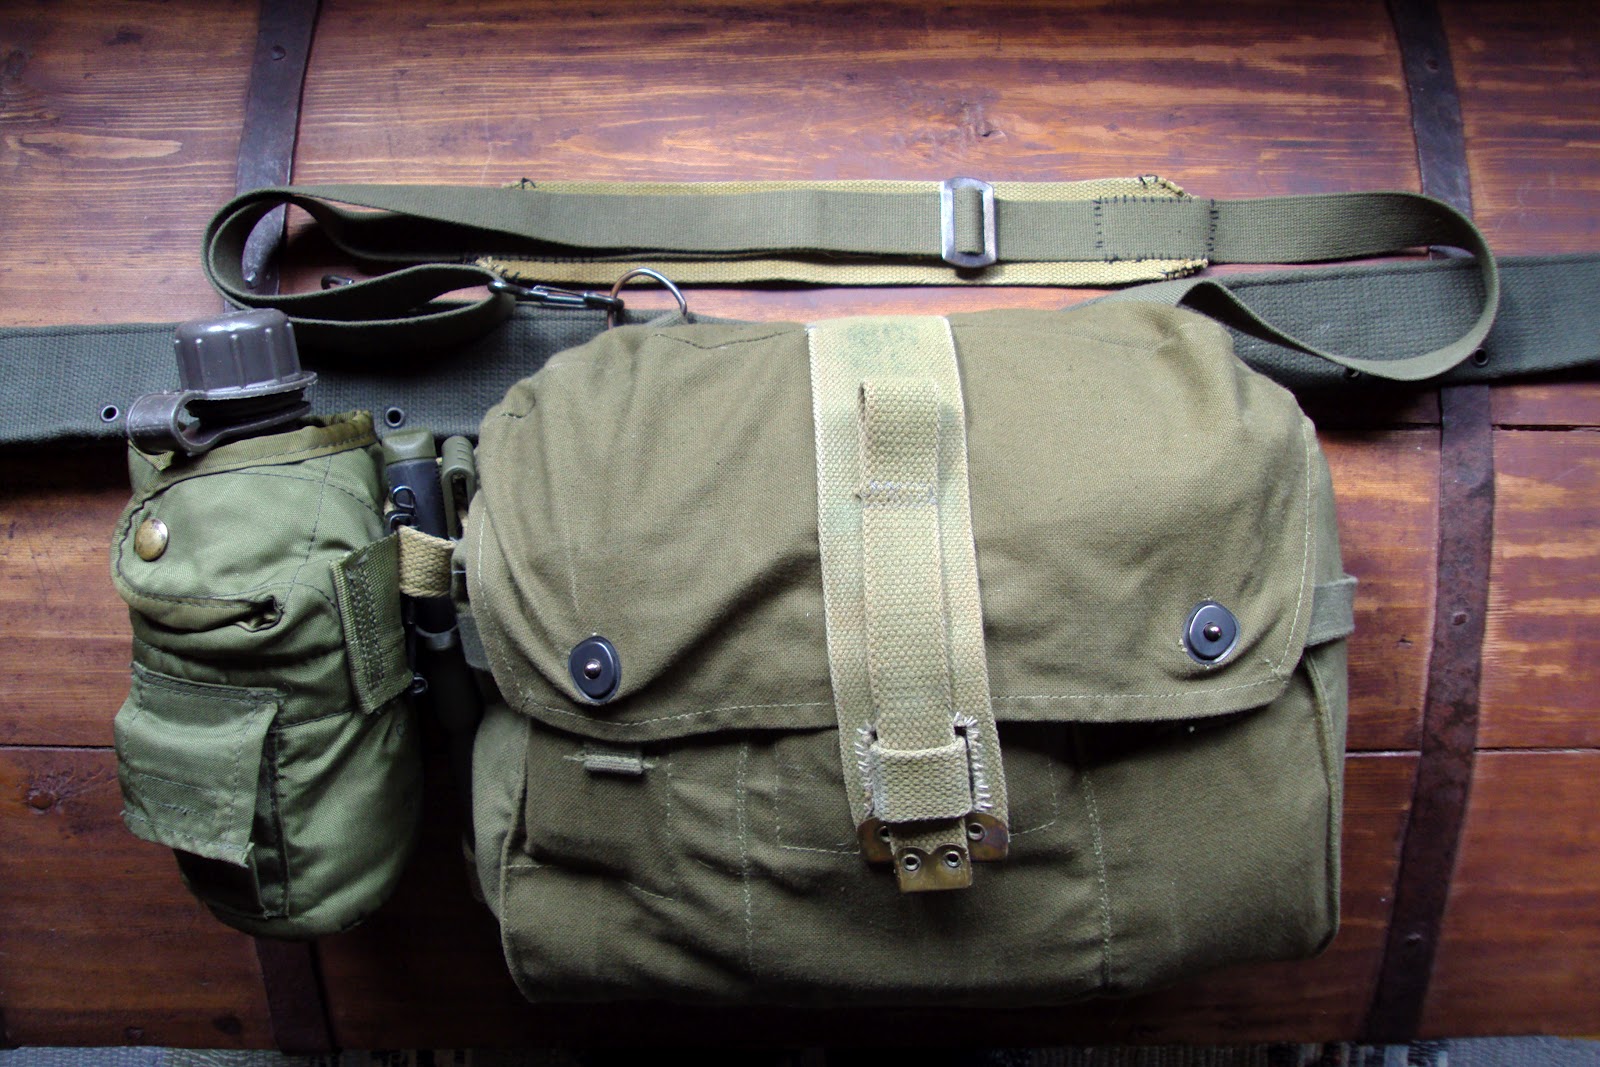
Lately these Finnish army gasmaskbags have become very popular in the Bushcraft/outdoorworld - and forums. The Weekend Woodsman, my Finnish "neighbour", was so kind to provide me with one and I have taken it with me on several occassions. They are mostly used as daypacks or manpurses. I call mine the "Finnbag"...
I did notice some shortcomings in this role. First of all I was quit tempted to overload this bag, making carrying it uncomfortable. It became to bulky and having the narrow crossbelt pressing down into your shoulder with every step is not my idea of comfortable either. Another problem was that the snaps tended to pop open all the time, highly increasing the risk of loosing stuff. A third issue I had with the bags was that the sides tended to bulge outward, leaving two gaps on either side, again increasing the risk of loosing gear, but also opening up opportunities for unwanted things to fall into the bag. Stuff like pineneedles, debris, small branches etc. I personally do not like that. The last issue I had (Yes, I know I have issues....) was that the narrow wastestrap got caught up in gear, when wearing a belt onto which that gear was attached. gear like canteens, knives, pouches.... This reduced carryingcomfort even more..... So..... Time to get to work!
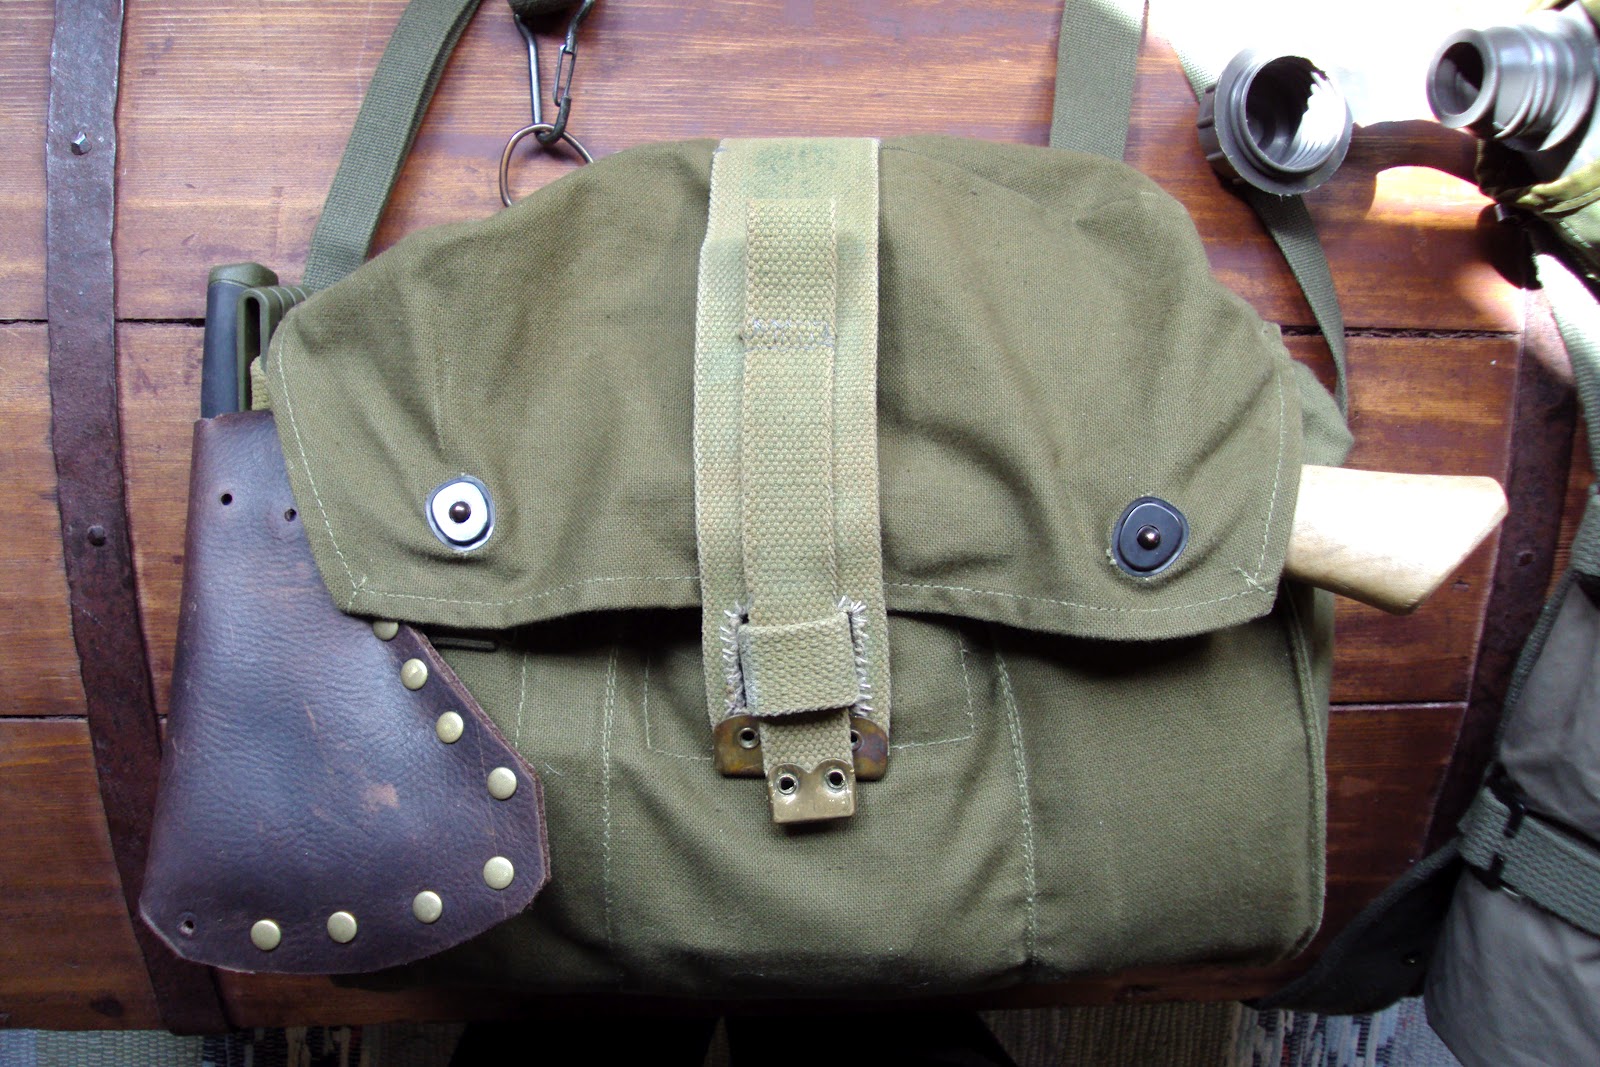
My main concern, the popping open of the snaps, could only be solved by removing and/or replacing the existing snaps, which would enevitably leave to large holes in the closingflap. Fixing those would prove to be a challenge and I would have to add some other way of closing the bag. I was planning on using small leather straps, but somehow that didn't look right. Than I remembered that I had the old homemade straps from my backpack still sitting in my "sparesbox". Hmmm.... could I use those?? I turned out I could! Instead of bypassing or eliminating the existing snaps I kept them, but added an extra belt to reduce strain on the snaps and adding an extra way of preventing the bag to pop open.
The old WW2-vintage webbingbelts are a bitch to stitch! Excuse the language, but there is no other way of putting it! Using standard needles and thread?? Forget it! Bring out some leatherstitchingequipment (nice scrabbleword...)! A very pointy, sturdy needle, some pliers, a thimble and a cuttingmat were essential.
The very first thing I did, was add "padding" to the shoulderstrap. Nothing fancy, just a wider piece of webbing stitched to the strap, but in such a way that the clasp was covered, but I still could adjust the length of the strap.
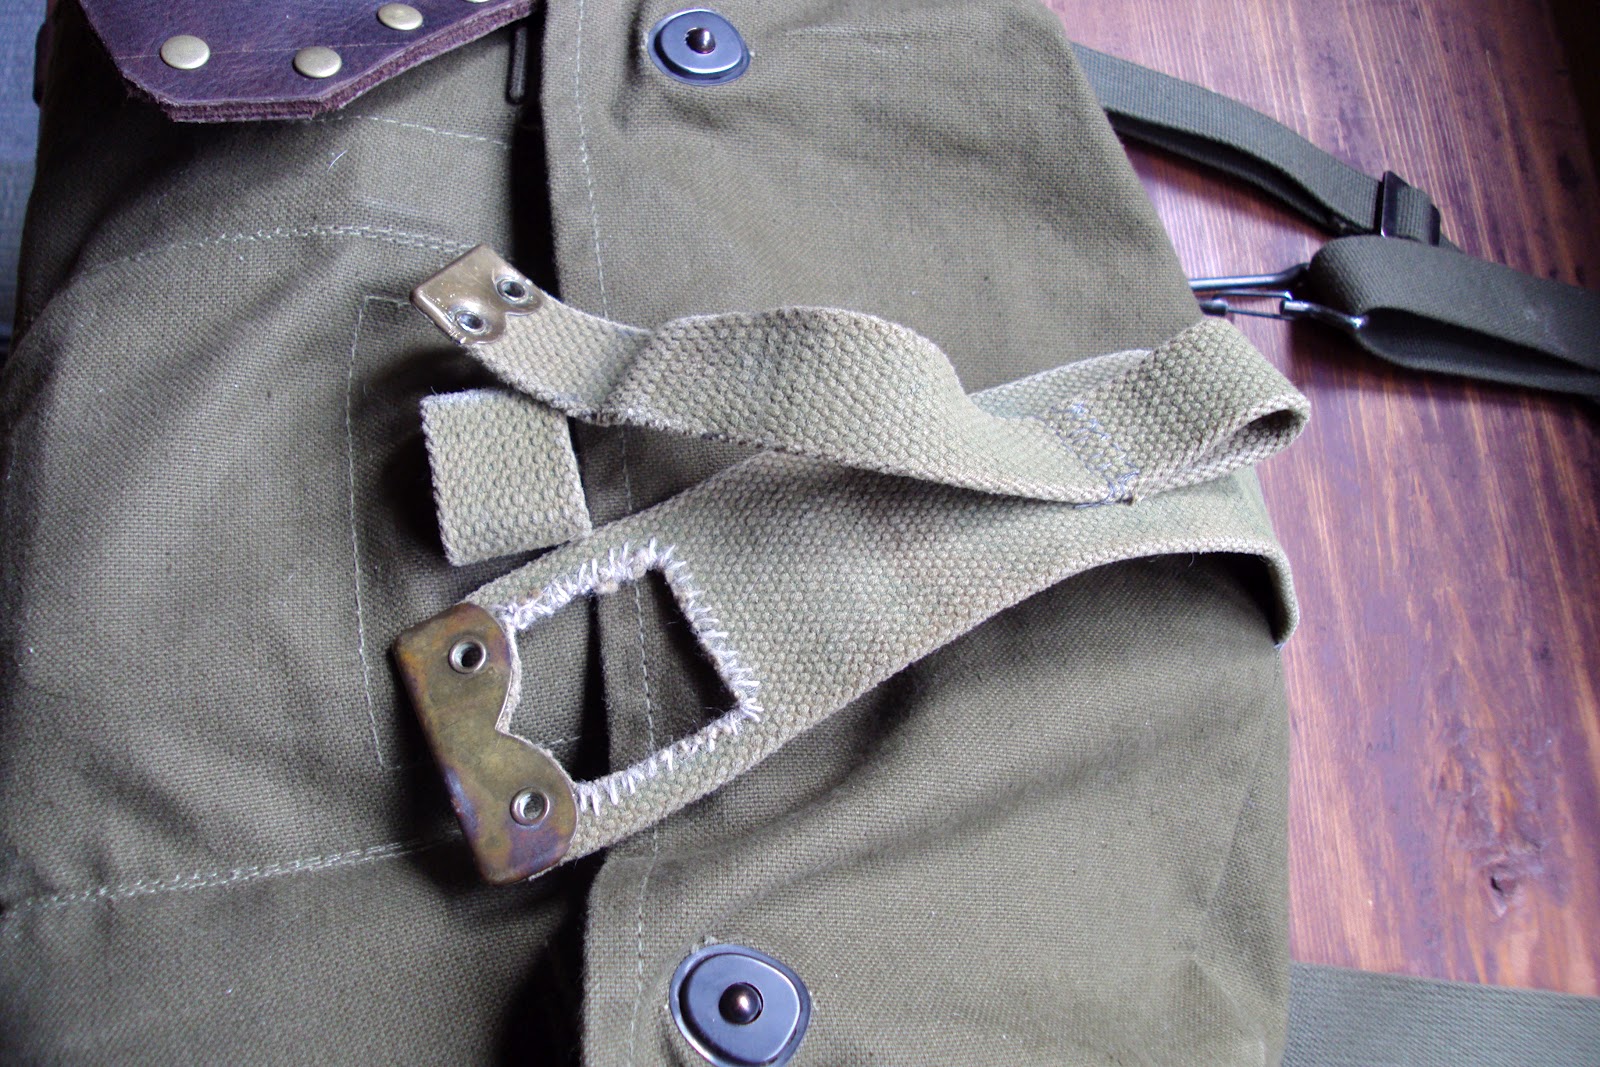
I tried to keep the look of those belts as good as possible, but the previous owner was "smart" enough to rivet the narrower of the two onto the broader one and he (must have been a "he" given the solution used) popped the rivets thrue the small eyelets of the first, through the webbing of the latter, just above the copper end, hence the funny shape of the opening. While I was at it, I added an extra loop on the end of the small strap. Always comes in handy and made finishing off the end look good!

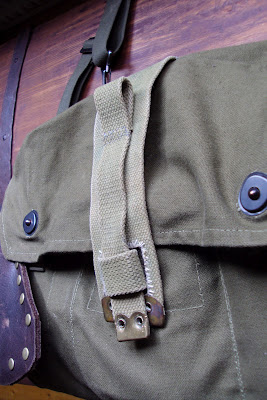
The opening in the strap has been cut out, using a new scalpelblade, after which I used two rows of blanketstitches to keep the threads in place. As a finishing touch I used superglue to cement the threads to the fabric, creating a stiff edge, which makes handling a lot easier. The loop is a part of the smaller strap, stitched round and fastened to the bagfront.

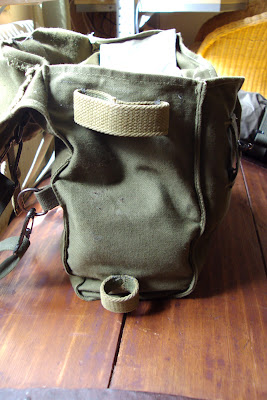
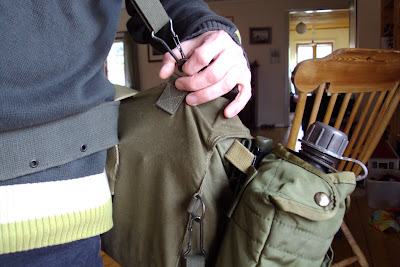
Like I previously said The wastebelt got caught up in stuff on my belt, including the knife. So I figured out a way to get around that problem. My solution? Adding loops to the front of the bag onto which I can clip my Mora. The straps are, again, leftovers from the webbingstraps and are therefor thick and sturdy. Ideal for holding knife and sheath! The top loop actually is double looped. There is a small loop at the back.
I stick the tip of the sheath in the bottomloop, clip the top over both straps and the thing sits real tight. No dangling and tapping against your leg, while moving and within easy reach for me as a righthander. And when the bag is not being used I just pop the knife of and hang it on my belt again.

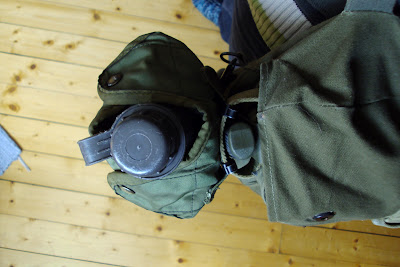
Here's the reason for the double loop. I measured it in such a way that I can hang a US canteenpouch over the knife. This pouch has a double Aliceclip.
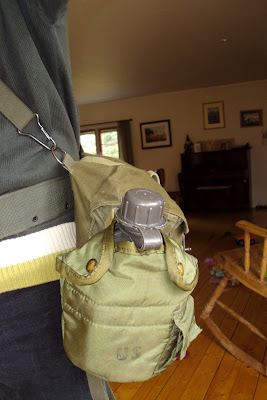
As you can see; easy access to both knife and canteen.
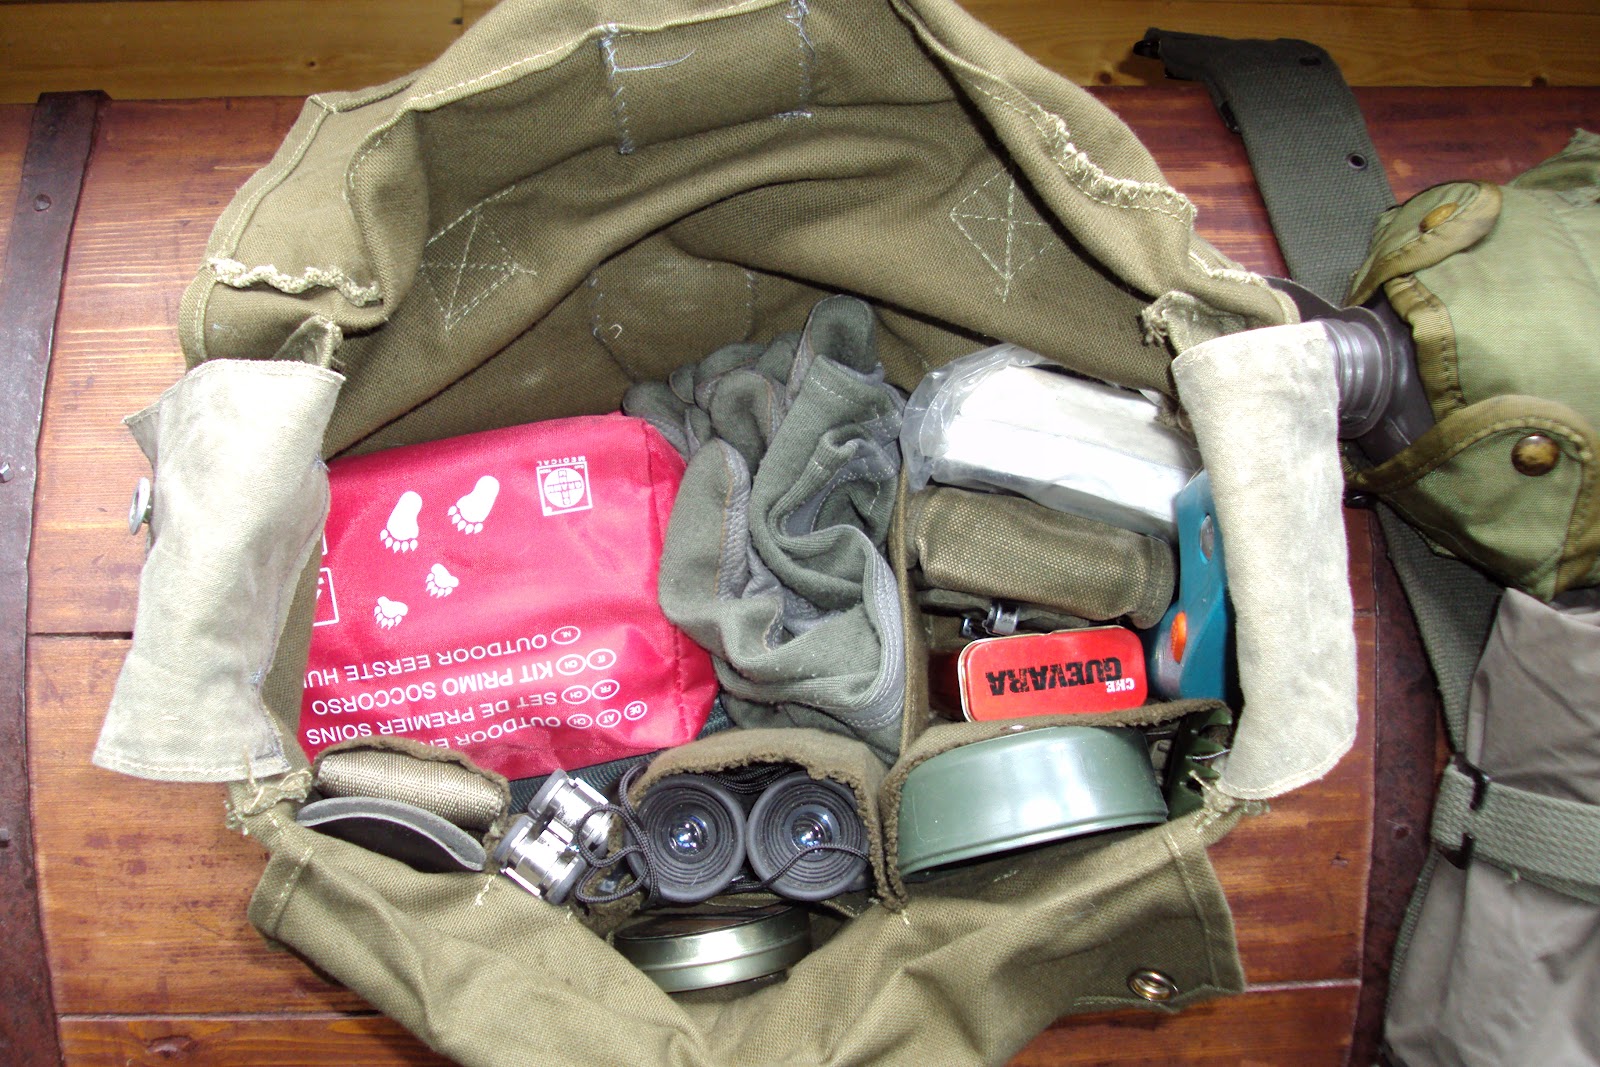
An extra feature is the wide beltloop at the back. The webbing strap extends all the way down, giving me the oppotunity to include this loop. This way I can use it to hang it from an older standard (Dutch) NATO webbingbelt, which makes it easier to add more stuff should I need it. Adding an extra canteen, pouches and such makes for a nice modular system. I can also take gear from the Finnbag, such as my FAK, my compaspouch, firesteelpouch, camerapouch, reducing the contents from the bag by another 50%, leaving more room for food and anything else I think I need.
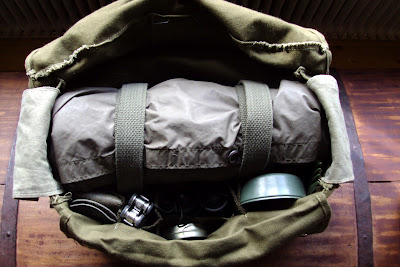
I rearranged the loadout and reduced it, too. This way I have more than enough room to even put the poncho in the bag. I found out that by using this loadout I have another nifty gadget; the multitool on the left bottom has one have squeezed into a narrowpouch, allowing the other half to fold open and reveal the small slashlight built in. I can fold in open, while it still remains attached to the bag and light it. This way I have a bag with built-in lightsource... leaving both hands free to search through the bag, in darkness.


When all is packed I use another extra I added; 2 closing flaps.
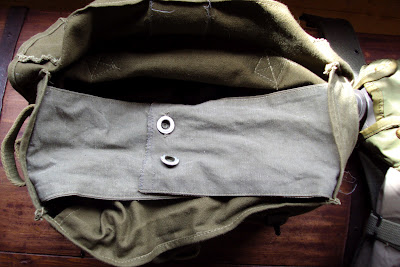
These flaps serve a double purpose; they keep the shape of the bag, even when fully loaded, so that strain on the snaps is reduced and by keeping the shape they pull in the sides and keeping those under the flap, so no mess falls into the bag and no gear falls out. These flaps are made from shelterhalf leftovers. That's where the buttons and matching holes come from.

You can stick an axe or hatchet through the loops where the receiving end of the snaps are attached and it will hold.... sort of. So when my hatchetrestauration is done I will add yet one more strap to secure the hatchethead and sheath to the bag itself.

Now all I need to do is fieldtest these additions and find some nice badges to adorn the bag. A moose's head is an absolute must for me....
I did notice some shortcomings in this role. First of all I was quit tempted to overload this bag, making carrying it uncomfortable. It became to bulky and having the narrow crossbelt pressing down into your shoulder with every step is not my idea of comfortable either. Another problem was that the snaps tended to pop open all the time, highly increasing the risk of loosing stuff. A third issue I had with the bags was that the sides tended to bulge outward, leaving two gaps on either side, again increasing the risk of loosing gear, but also opening up opportunities for unwanted things to fall into the bag. Stuff like pineneedles, debris, small branches etc. I personally do not like that. The last issue I had (Yes, I know I have issues....) was that the narrow wastestrap got caught up in gear, when wearing a belt onto which that gear was attached. gear like canteens, knives, pouches.... This reduced carryingcomfort even more..... So..... Time to get to work!
My main concern, the popping open of the snaps, could only be solved by removing and/or replacing the existing snaps, which would enevitably leave to large holes in the closingflap. Fixing those would prove to be a challenge and I would have to add some other way of closing the bag. I was planning on using small leather straps, but somehow that didn't look right. Than I remembered that I had the old homemade straps from my backpack still sitting in my "sparesbox". Hmmm.... could I use those?? I turned out I could! Instead of bypassing or eliminating the existing snaps I kept them, but added an extra belt to reduce strain on the snaps and adding an extra way of preventing the bag to pop open.
The old WW2-vintage webbingbelts are a bitch to stitch! Excuse the language, but there is no other way of putting it! Using standard needles and thread?? Forget it! Bring out some leatherstitchingequipment (nice scrabbleword...)! A very pointy, sturdy needle, some pliers, a thimble and a cuttingmat were essential.
The very first thing I did, was add "padding" to the shoulderstrap. Nothing fancy, just a wider piece of webbing stitched to the strap, but in such a way that the clasp was covered, but I still could adjust the length of the strap.
I tried to keep the look of those belts as good as possible, but the previous owner was "smart" enough to rivet the narrower of the two onto the broader one and he (must have been a "he" given the solution used) popped the rivets thrue the small eyelets of the first, through the webbing of the latter, just above the copper end, hence the funny shape of the opening. While I was at it, I added an extra loop on the end of the small strap. Always comes in handy and made finishing off the end look good!


The opening in the strap has been cut out, using a new scalpelblade, after which I used two rows of blanketstitches to keep the threads in place. As a finishing touch I used superglue to cement the threads to the fabric, creating a stiff edge, which makes handling a lot easier. The loop is a part of the smaller strap, stitched round and fastened to the bagfront.
Like I previously said The wastebelt got caught up in stuff on my belt, including the knife. So I figured out a way to get around that problem. My solution? Adding loops to the front of the bag onto which I can clip my Mora. The straps are, again, leftovers from the webbingstraps and are therefor thick and sturdy. Ideal for holding knife and sheath! The top loop actually is double looped. There is a small loop at the back.

I stick the tip of the sheath in the bottomloop, clip the top over both straps and the thing sits real tight. No dangling and tapping against your leg, while moving and within easy reach for me as a righthander. And when the bag is not being used I just pop the knife of and hang it on my belt again.

Here's the reason for the double loop. I measured it in such a way that I can hang a US canteenpouch over the knife. This pouch has a double Aliceclip.
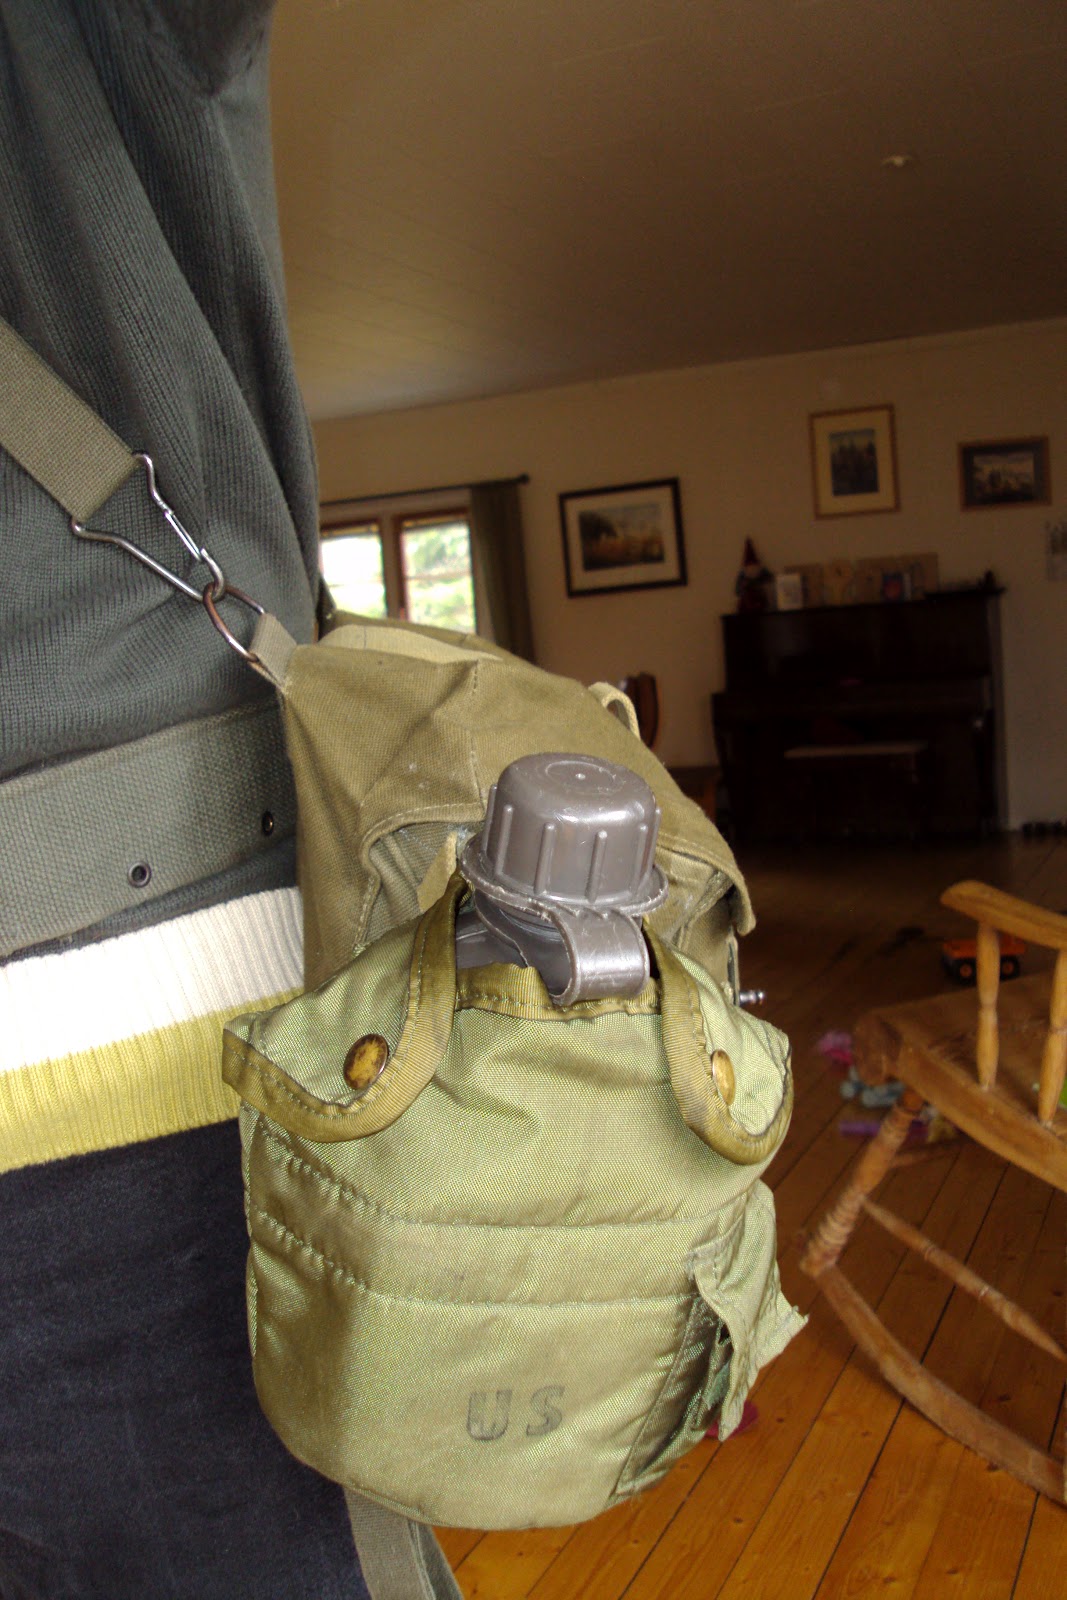
As you can see; easy access to both knife and canteen.

An extra feature is the wide beltloop at the back. The webbing strap extends all the way down, giving me the oppotunity to include this loop. This way I can use it to hang it from an older standard (Dutch) NATO webbingbelt, which makes it easier to add more stuff should I need it. Adding an extra canteen, pouches and such makes for a nice modular system. I can also take gear from the Finnbag, such as my FAK, my compaspouch, firesteelpouch, camerapouch, reducing the contents from the bag by another 50%, leaving more room for food and anything else I think I need.

I rearranged the loadout and reduced it, too. This way I have more than enough room to even put the poncho in the bag. I found out that by using this loadout I have another nifty gadget; the multitool on the left bottom has one have squeezed into a narrowpouch, allowing the other half to fold open and reveal the small slashlight built in. I can fold in open, while it still remains attached to the bag and light it. This way I have a bag with built-in lightsource... leaving both hands free to search through the bag, in darkness.


When all is packed I use another extra I added; 2 closing flaps.
These flaps serve a double purpose; they keep the shape of the bag, even when fully loaded, so that strain on the snaps is reduced and by keeping the shape they pull in the sides and keeping those under the flap, so no mess falls into the bag and no gear falls out. These flaps are made from shelterhalf leftovers. That's where the buttons and matching holes come from.


You can stick an axe or hatchet through the loops where the receiving end of the snaps are attached and it will hold.... sort of. So when my hatchetrestauration is done I will add yet one more strap to secure the hatchethead and sheath to the bag itself.
Now all I need to do is fieldtest these additions and find some nice badges to adorn the bag. A moose's head is an absolute must for me....
")