Birch spoon with first kolrosing emblem attempt

THOaken

Native
Jan 21, 2013
1,299
1
30
England(Scottish Native)
Hello, BCUK." Three spoons and a spatula" here.

I present to you my fourth woodcarving. He's not quite ready yet, he's having a bath...

I like to think I'm getting the hang of carving now. You can see my first kolrosing attempt at the bottom. "THON" means pine tree in Sindarin (http://tolkiengateway.net/wiki/Pines), which is my other online alias, and there's a mountain above that which actually acts as the "^" symbol above the "O". Clever, no?

As you can see I'm using the bath tub method of applying the oil for this carving. I've tried a few methods of oiling, such as putting on 4 coats in one day, 2 coats over 2 days and 3 coats over 3 days. Just experimentation, really. It's still a little confusing to me as 4 coats seems to give the same effect as 2 or 3 coats. Not quite sure what it's all about, but I guess it's just personal preference. I figured this is a quicker method as I won't have to wait three days or whatever other arbitrary number of coats I give it per day to show you the final product.

The handle is also not your average handle, it's got a little design to it right at the bottom. I'll show you that tomorrow, too.

Thanks everyone. I'll update this thread tomorrow.

53Tpnt2.jpg
 
Last edited:

THOaken

Native
Jan 21, 2013
1,299
1
30
England(Scottish Native)
Thanks everyone. Two Socks, it's actually several straight cuts. The O is very small and I'm not nearly skilled enough to do curves.

Again, I'll show you the final piece tomorrow. The end of the handle is actually a T shape, but it also looks a bit like an arrow head to me. It's quite unique and it's my first design orientated carving.
 

Two Socks

Settler
Jan 27, 2011
750
0
Norway
Two Socks, it's actually several straight cuts. The O is very small and I'm not nearly skilled enough to do curves.

Thanks. Reason I asked is that when I tried some kolrosing tight curves like that seemed nearly impossible and your O looks rather round on my phone screen. I hoped you had found a way around them, so to speak. :)
 

THOaken

Native
Jan 21, 2013
1,299
1
30
England(Scottish Native)
It may seem strange posting the spoon in this state, but I figured since it's in its last stage I might as well post the thread now. I also wanted some validation on the oiling method. It's a sort of teaser if you will...
 

THOaken

Native
Jan 21, 2013
1,299
1
30
England(Scottish Native)
mBCCOP7.jpg


Here's the final. I'm pretty pleased with this, although the main concern with the spoon is that it doesn't have a crank in it. This is mystifying to me as I spent a lot of time trying to get a real exaggerated crank in the handle, as you can see from the following picture:

T2R4qSo.jpg


As I started carving the crank just went away. Look at the side profile photo, it's almost straight. Any idea why?

The end of the spoon is supposed to be a sort of T shape. It also reminds me of an arrowhead.

The emblem looks a little bit faded. That's because I let wood particles drop in there. I cleared it up with some more oil though and it's now blacker. If you look closley, you'll see the cuts are a little messier than they looked from afar, I'm sure. Oh well, I'm happy with it for a first try.

Thanks everyone.
 
Last edited:

Clouston98

Woodsman & Beekeeper
Aug 19, 2013
4,364
2
26
Cumbria
Nice one :).

I'd say that if you carve the back of the spoon after the crank it makes it smaller. It helps to use a bent price of wood to carve a spoon is you want a large crank in it :).
 

Mesquite

It is what it is.
Mar 5, 2008
28,216
3,196
63
~Hemel Hempstead~
Nice bit of work there ThOaken, you're coming on leaps and bounds.

Regarding the lack of crank if you look at a spoon side on you'll see that the very front lip of the bowl actually points upwards.

In your roughed out blank you don't have that, the top of the bowl end is sloped downwards from the handle right to the front of the spoon which is why you didn't get a proper crank on the bowl.

To do the crank properly you have to cut an extremely shallow V which from the handle down to the back edge of the bowl and then up to the front edge of the bowl.
 

Two Socks

Settler
Jan 27, 2011
750
0
Norway
that kolrosing came out neat. The whole spoon came out neat! :)

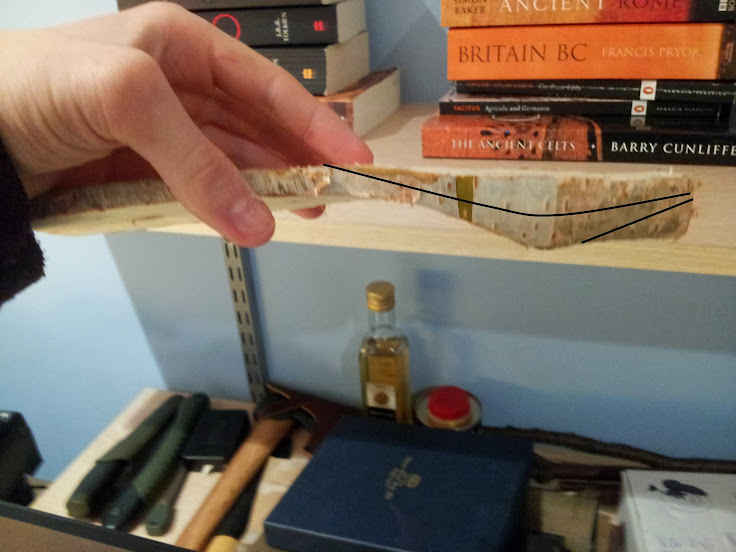
As for the crank: you prepared for the crank on the underside of the spoon. On the next blank you can chop away some of the top as well. Imagine an S-curve through the blank and carve wood away on both sides. The lines I drew here are a bit exaggerated, but it shows my point. Take some wood of the top of where the bowl is going to be, and that will get you a cranked spoon.

THOaken.jpg
 

THOaken

Native
Jan 21, 2013
1,299
1
30
England(Scottish Native)
Can I get BCUK's opinion on something?

I've been messaged by a volunteer at Butser about maybe selling one of my spoons to Neil Burridge, who is a bronze sword maker who sometimes does workshops at the Farm. I've never met him. I really don't think my work is of a quality to be sold. There are people who've been doing carving for a very long time and I'd feel strange about selling my stuff. I'm a complete novice and I barely know how to make a proper crank. I think this person assumes I've been making wood utensils for a long time simply because I have a "fancy" kolrosed symbol on my latest spoon. I may have learnt a lot over the past few weeks, but I'd much prefer to send someone from BCUK in my stead. Is this a... valid response? Am I silly to reject the offer? I guess it's all about principles for me. I'd feel bad getting money from what would be only my fifth carving. Most of you have been doing carving for years and years. I'm not even a real craftsman.
 

BCUK Shop

We have a a number of knives, T-Shirts and other items for sale.

SHOP HERE