As in the title. I'm trying to find what other Basswood carvers use as a best test for sharpness of blade after stropping or actually sharpening with stone belt grinder etc. I currently mainly use push cutting phonebook paper plus blade edge gripping the thumb nail. Would be interested to know if better, more "ultimate" tests have been found. Not convinced with arm hair shaving as I've done that but still found blades not as keen as id like when used on the carving. ATB. Pete.
Whats a "BEST TEST" for carving knife sharpness.
- Thread starter peteswright
- Start date
-
BushMoot: Come along to the amazing Summer Moot 31st July - 5th August (extended Moot : 27th July - 8th August), a festival of bushcrafting and camping in a beautiful woodland PLEASE CLICK HERE for more information.
You are using an out of date browser. It may not display this or other websites correctly.
You should upgrade or use an alternative browser.
You should upgrade or use an alternative browser.
I've been carving for a while. I test my gouges and knives in the woods that I carve.
In fact, I have "try sticks," typical of each wood, for test cuts. Birch, alder, mahogany, western red cedar and yellow cedar.
I have learned that 1,500 grit fine automotive sandpaper is as far as I need to go.
The finish is a honing on a strop of some sort (NOT leather) with CrOx/AlOx compound.
I don't test with arms and fingers as I do my best not to carve arms and fingers.
Sorry Pete. I didn't answer your real question. How do I know when I'm done "sharpening?" What test result am I looking for?
It's been experience to judge the "pushing effort" to get the edge to make a glassy (important word) cut with shavings/chips of variable thickness. Harder woods take shallow cuts, that sort of thing.
In hand work, I can feel the push getting harder over some 30-40 minutes. Time to hone 5-10 strokes will do. Carving again, I know it was time for a tune-up.
Far more difficult to judge with mallet work. The adzes just quit. They want to bounce out without a chip. Dangerous.
Assessment: which grit do I start with? If the edge is really an edge, there's nothing to reflect light.
However with use, the tool edges do get crumpled, either a little or a lot. In a bright light, these places do reflect light.
I call them "sparks". Experience once again. I'll paint the edge with black felt marker and try 800 grit to even out the edge.
Always going back to the bright light (little LED spotlight) to look for sparks. Maybe back up to 600 grit to work a little faster.
Then to 1,000. Then to 1500. Then maybe a dozen strokes on the strop. Test in the try stick as much as I like.
It's the honing on the strop that makes the most profound difference for me in "carving sharp" edge quality.
I used to sharpen to 4K on a waterstone but have found that I need not go that far.
I use coarse oil stones (80, 120 & 220) to repair serious damage and do axes and stone carving tools.
Excellent reply sir. Nice to hear from one who also takes this very seriously. I've been in touch with Cliff Stamp and others. He recommended 2000 grit paper laid on the strop for regular 20min edge touchups. Might try that on one of my cheaper blades to check for wear & sharpness. I guess the wood cut test is the obvious answer really. Gene Messer mentions this in one of his videos. The test sticks and cutting across the grain to see and feel the result I think could be my best bet. Thanks again. Real helpful. ATB. Pete. Ps would be interested to know why NOT LEATHER & what instead?Sorry Pete. I didn't answer your real question. How do I know when I'm done "sharpening?" What test result am I looking for?
It's been experience to judge the "pushing effort" to get the edge to make a glassy (important word) cut with shavings/chips of variable thickness. Harder woods take shallow cuts, that sort of thing.
In hand work, I can feel the push getting harder over some 30-40 minutes. Time to hone 5-10 strokes will do. Carving again, I know it was time for a tune-up.
Far more difficult to judge with mallet work. The adzes just quit. They want to bounce out without a chip. Dangerous.
Assessment: which grit do I start with? If the edge is really an edge, there's nothing to reflect light.
However with use, the tool edges do get crumpled, either a little or a lot. In a bright light, these places do reflect light.
I call them "sparks". Experience once again. I'll paint the edge with black felt marker and try 800 grit to even out the edge.
Always going back to the bright light (little LED spotlight) to look for sparks. Maybe back up to 600 grit to work a little faster.
Then to 1,000. Then to 1500. Then maybe a dozen strokes on the strop. Test in the try stick as much as I like.
It's the honing on the strop that makes the most profound difference for me in "carving sharp" edge quality.
I used to sharpen to 4K on a waterstone but have found that I need not go that far.
I use coarse oil stones (80, 120 & 220) to repair serious damage and do axes and stone carving tools.
Thanks. Your endorsement fee is in the mail. 2K paper would be a nice place to stop then hone for the final "carving sharp" edge.
I tell you what I do. I don't explain 3 or 4 other methods which all produce the same result. The trick is to pick one and learn it.
Strops. In the beginning, there was leather to hold whatever was found to be a suitable abrasive (if anything at all.)
These days, the honing compound of various metal oxides is suspended in some sort of waxy carrier, like a child's crayon.
You scribble that on the leather, a few tool strokes and you're done.
Over the years, the waxy carrier softens the leather, even if it was really hard to begin with.
Now, when you apply any pressure at all to the tool shank, the edge compresses the leather.
As the edge passes by, the leather rebounds right at the tool edge to round it off to something useless like 40 degrees.
I had a really nice 2-sided leather strop, the strips were glued to some smooth hardwood. It lasted about 10 years.
I've collected several hard flat surfaces since then such as plate glass, wood flooring and polished stone countertop cutoffs.
The strop is a length of smooth cardboard box from crackers, cookies, cereal and so on. Stuck with masking tape at the ends.
I scribble green CrOx/AlOx on the card as my strop. Clean, fresh, inexpensive and always fresh.
Fine. The abrasive is stationary and the tool edge moves across it.
Change to the adzes and the crooked knives used by the magnificent carvers of the Pacific Northwest native community.
Now the tool is stationary and you have to move the abrasive in a very controlled fashion.
Time to relearn most everything. After 5+ years of this, I'm beginning to get it right, most times.

Then, you can modify farrier's hoof knives into perfectly acceptable carving tools, scorps included.
The adzes are really awkward to sharpen and hone, not much wiggle room I buy the blades and all the woodwork is mine.
The blue Stubai is a factory handle.
I tell you what I do. I don't explain 3 or 4 other methods which all produce the same result. The trick is to pick one and learn it.
Strops. In the beginning, there was leather to hold whatever was found to be a suitable abrasive (if anything at all.)
These days, the honing compound of various metal oxides is suspended in some sort of waxy carrier, like a child's crayon.
You scribble that on the leather, a few tool strokes and you're done.
Over the years, the waxy carrier softens the leather, even if it was really hard to begin with.
Now, when you apply any pressure at all to the tool shank, the edge compresses the leather.
As the edge passes by, the leather rebounds right at the tool edge to round it off to something useless like 40 degrees.
I had a really nice 2-sided leather strop, the strips were glued to some smooth hardwood. It lasted about 10 years.
I've collected several hard flat surfaces since then such as plate glass, wood flooring and polished stone countertop cutoffs.
The strop is a length of smooth cardboard box from crackers, cookies, cereal and so on. Stuck with masking tape at the ends.
I scribble green CrOx/AlOx on the card as my strop. Clean, fresh, inexpensive and always fresh.
Fine. The abrasive is stationary and the tool edge moves across it.
Change to the adzes and the crooked knives used by the magnificent carvers of the Pacific Northwest native community.
Now the tool is stationary and you have to move the abrasive in a very controlled fashion.
Time to relearn most everything. After 5+ years of this, I'm beginning to get it right, most times.
Then, you can modify farrier's hoof knives into perfectly acceptable carving tools, scorps included.
The adzes are really awkward to sharpen and hone, not much wiggle room I buy the blades and all the woodwork is mine.
The blue Stubai is a factory handle.
Robson Valley. An impressive array of tools with excellent woodworking skills shown in the handles. I'm with you on the soft leather front. I use thin leather on hardwood surfaces on homemade strops to avoid the give which wraps itself up and around the edge causing rounding of the micro bevel. I've used card, newspaper and cardboard too. As you say its the compound that does the work but I am getting marginally better/quicker results on MDF lately unless its my imagination!. It cleans nicely with a little oil too to get the steel residue out bringing the MDF back to almost new. I'm still very new to all this but my god I'm learning day by day. Anyway your suggestions and advice have been taken on board. Thanks very much. ATB. Pete.
Very nice!! 👍👍Thanks. Your endorsement fee is in the mail. 2K paper would be a nice place to stop then hone for the final "carving sharp" edge.
I tell you what I do. I don't explain 3 or 4 other methods which all produce the same result. The trick is to pick one and learn it.
Strops. In the beginning, there was leather to hold whatever was found to be a suitable abrasive (if anything at all.)
These days, the honing compound of various metal oxides is suspended in some sort of waxy carrier, like a child's crayon.
You scribble that on the leather, a few tool strokes and you're done.
Over the years, the waxy carrier softens the leather, even if it was really hard to begin with.
Now, when you apply any pressure at all to the tool shank, the edge compresses the leather.
As the edge passes by, the leather rebounds right at the tool edge to round it off to something useless like 40 degrees.
I had a really nice 2-sided leather strop, the strips were glued to some smooth hardwood. It lasted about 10 years.
I've collected several hard flat surfaces since then such as plate glass, wood flooring and polished stone countertop cutoffs.
The strop is a length of smooth cardboard box from crackers, cookies, cereal and so on. Stuck with masking tape at the ends.
I scribble green CrOx/AlOx on the card as my strop. Clean, fresh, inexpensive and always fresh.
Fine. The abrasive is stationary and the tool edge moves across it.
Change to the adzes and the crooked knives used by the magnificent carvers of the Pacific Northwest native community.
Now the tool is stationary and you have to move the abrasive in a very controlled fashion.
Time to relearn most everything. After 5+ years of this, I'm beginning to get it right, most times.
Then, you can modify farrier's hoof knives into perfectly acceptable carving tools, scorps included.
The adzes are really awkward to sharpen and hone, not much wiggle room I buy the blades and all the woodwork is mine.
The blue Stubai is a factory handle.
I'd been carving with the conventional gouges for quite a long time.
I was sharpening edges for other people.
I was very well taught freehand sharpening in the beginning.
Then I began to wonder what was so special about the crooked knives and adzes which are so popular in the Pacific Northwest.
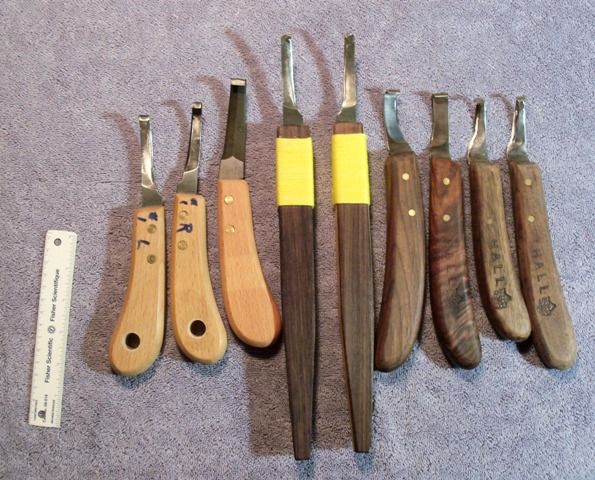
I labored under the false assumption that PacNW carvers made their own tools until I watched a native using Mora #171 (left hand pair, pic #2).
Change the bevels from 25 degrees to 12 degrees and get busy. Since then, I have revised maybe 15 farrier's knife blades.
I show these because they forced me to totally rethink how I sharpened and honed edges. I did that, successfully.
I think it's about 1/3 or more of what I needed to learn to have a really fun time making chips.
Then, I found a video (transferred from 16mm film) of the very old Kwakwaka'Wakw native carver, Mungo Martin.
Sharpened his best crooked knife with a rock and a bucket of water!
I was sharpening edges for other people.
I was very well taught freehand sharpening in the beginning.
Then I began to wonder what was so special about the crooked knives and adzes which are so popular in the Pacific Northwest.
I labored under the false assumption that PacNW carvers made their own tools until I watched a native using Mora #171 (left hand pair, pic #2).
Change the bevels from 25 degrees to 12 degrees and get busy. Since then, I have revised maybe 15 farrier's knife blades.
I show these because they forced me to totally rethink how I sharpened and honed edges. I did that, successfully.
I think it's about 1/3 or more of what I needed to learn to have a really fun time making chips.
Then, I found a video (transferred from 16mm film) of the very old Kwakwaka'Wakw native carver, Mungo Martin.
Sharpened his best crooked knife with a rock and a bucket of water!
I can relate to that last comment about the bucket and rock! Cliff Stamp's videos on knives & sharpening turned my head around by sharpening on a house brick to perfection and no stropping!!! Pete. https://www.youtube.com/watch?v=mSt2mCWGFII&list=PL0altu-Zk9P1UjjtcJhQWh8Qq6RkkRz8G&index=2 https://www.youtube.com/watch?v=OPGGo3W15HQ&list=PL0altu-Zk9P1UjjtcJhQWh8Qq6RkkRz8GI'd been carving with the conventional gouges for quite a long time.
I was sharpening edges for other people.
I was very well taught freehand sharpening in the beginning.
Then I began to wonder what was so special about the crooked knives and adzes which are so popular in the Pacific Northwest.
I labored under the false assumption that PacNW carvers made their own tools until I watched a native using Mora #171 (left hand pair, pic #2).
Change the bevels from 25 degrees to 12 degrees and get busy. Since then, I have revised maybe 15 farrier's knife blades.
I show these because they forced me to totally rethink how I sharpened and honed edges. I did that, successfully.
I think it's about 1/3 or more of what I needed to learn to have a really fun time making chips.
Then, I found a video (transferred from 16mm film) of the very old Kwakwaka'Wakw native carver, Mungo Martin.
Sharpened his best crooked knife with a rock and a bucket of water!
Last edited:
Get a piece of spalted alder, the sort that is bronze-gold with strawberry and vanilla ice cream coloured flecks with rotring black lines in it, and try doing a fine slicing cut across the end grain. If it produce a solid uncrumbling shaving with no scratches your blade is sharp. Or you could do the same with a piece of spalted birch, the sort that is like a cabury crunchie bar inside. Or try oily pitch pine, or a piece of soft cedar. Cedar especially will tear out in chunks if the blade isnt surgeon sharp. I use a 6x1 inch norton round stone to shape bent knifes, diamond files (flat and round) and green polish on flat or round strops.
Thanks for that info. Not heard that one before. It all helps. ATB. Pete.Get a piece of spalted alder, the sort that is bronze-gold with strawberry and vanilla ice cream coloured flecks with rotring black lines in it, and try doing a fine slicing cut across the end grain. If it produce a solid uncrumbling shaving with no scratches your blade is sharp. Or you could do the same with a piece of spalted birch, the sort that is like a cabury crunchie bar inside. Or try oily pitch pine, or a piece of soft cedar. Cedar especially will tear out in chunks if the blade isnt surgeon sharp. I use a 6x1 inch norton round stone to shape bent knifes, diamond files (flat and round) and green polish on flat or round strops.
Maybe you missed it. Have some "try-sticks" of the woods that you carve. Test your edges in those.
Never use some weird wood that you will never, ever carve.
Western Red Cedar is crap with less that 15 rings per inch. Gets really boney above 40 but still OK to carve.
Never use some weird wood that you will never, ever carve.
Western Red Cedar is crap with less that 15 rings per inch. Gets really boney above 40 but still OK to carve.
Similar threads
- Replies
- 27
- Views
- 6K
- Replies
- 24
- Views
- 3K
- Replies
- 0
- Views
- 3K
- Replies
- 10
- Views
- 4K