hi...ok, my first ever W.I.P. to celebrate the making of my long-awaited Sir Dave Budd Green Man sheath. I kept forgetting to take pics so i've just about managed to put together enough from the making of the 3 sheaths.
gotta say a few things...i make just about every sheath in my portfolio a different way...and do the procedures in slightly different orders etc etc...sometimes i'll stitch differently....sometimes i'll dye a sheath near the beginning....sometimes near the end...there are not really any rules so dont panic if anything seems weird and feel free to ask questions....this sheath was hard to get how i wanted and i approached it somewhat differently from usual but here goes and enjoy!
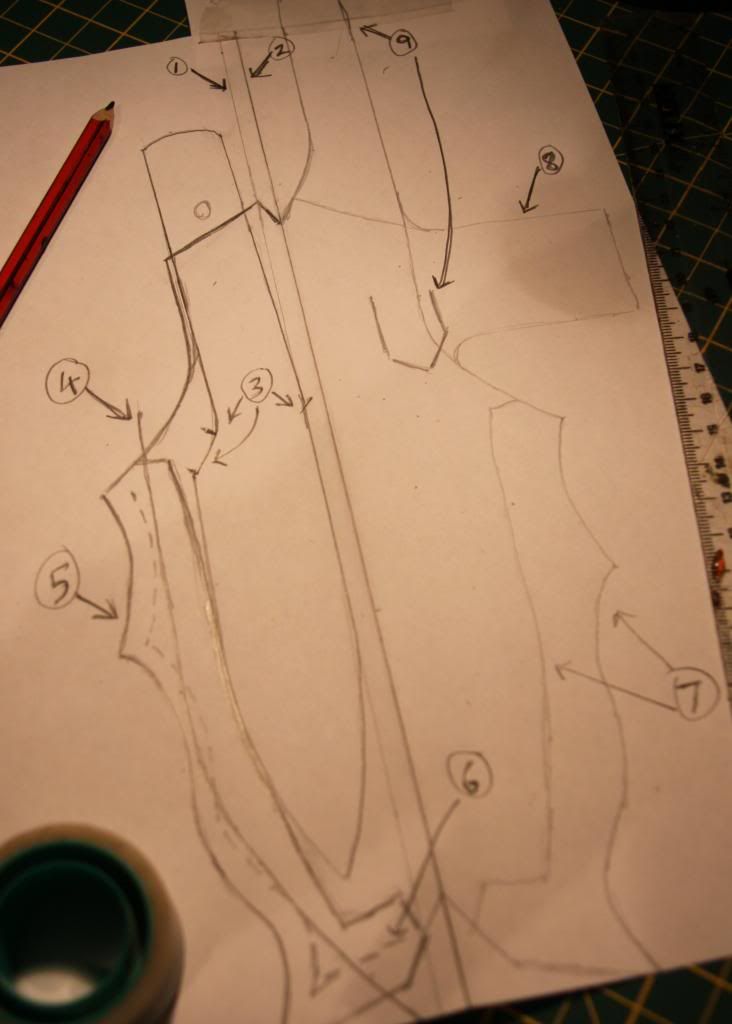
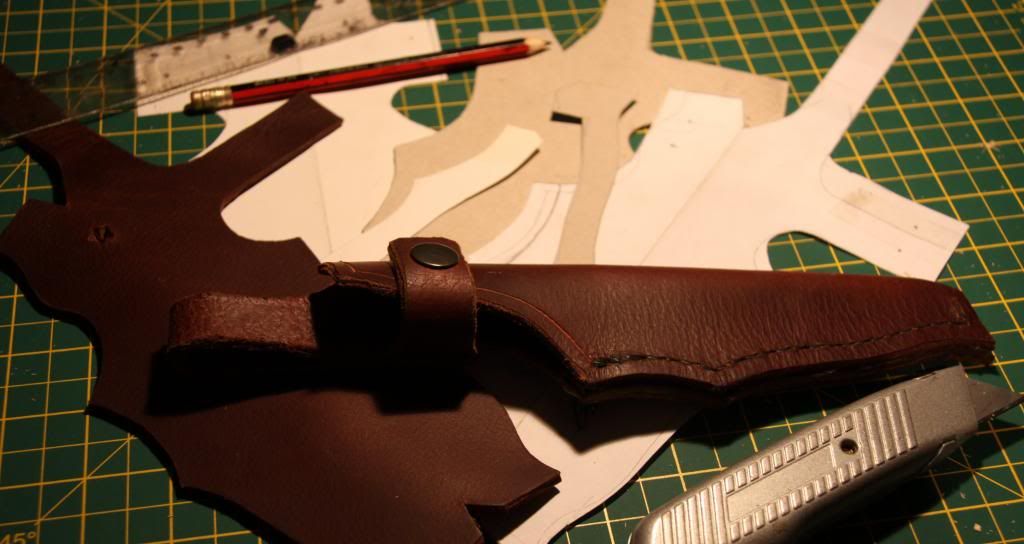
a...first of all i drew a straight line down the middle of a piece of paper....'1'. i then put the spine of the knife along the line and drew roughly around it. i then did a second line...'2'...5mm parallel to line '1'....this second line now becomes my centre line from which everything alse evolves (the extra 5mm becomes 1cm because the other half, yet to be drawn, makes it 5mmx2...and 1cm is the extra i usually allow as it will be lost when the thick 4mm leather is folded during assembly). Make note of any key areas to be accounted for...'3'. Draw a line at least 1cm away from the blade profile...this will be your welt...'4'. Add a shape if you so desire...'5'. Make note of where your stitching is going to be...'6'.
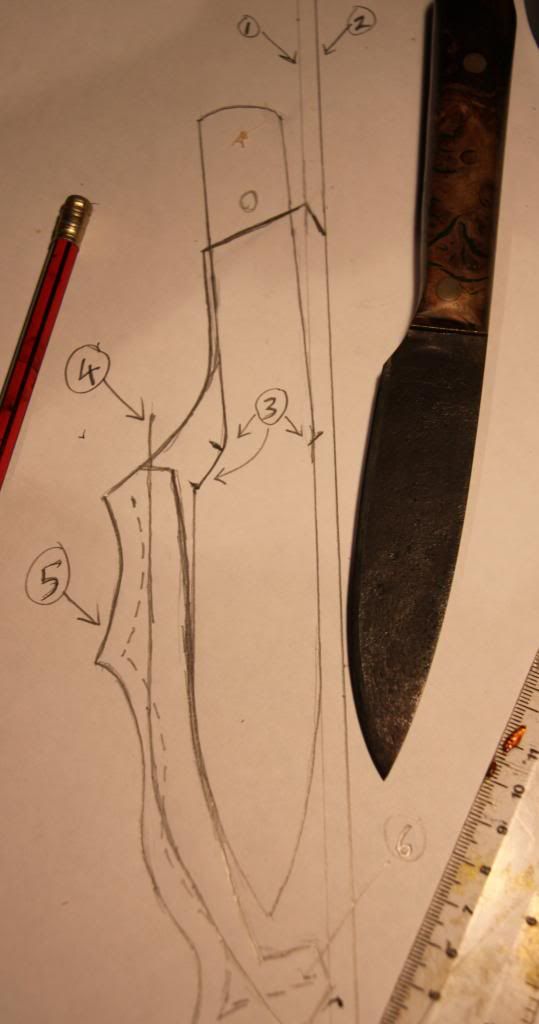
b...fold the paper along line 2 and trace...'7'. Draw the strap...'8'. Draw the loop and make note of where its end will be sewn down...'9'.
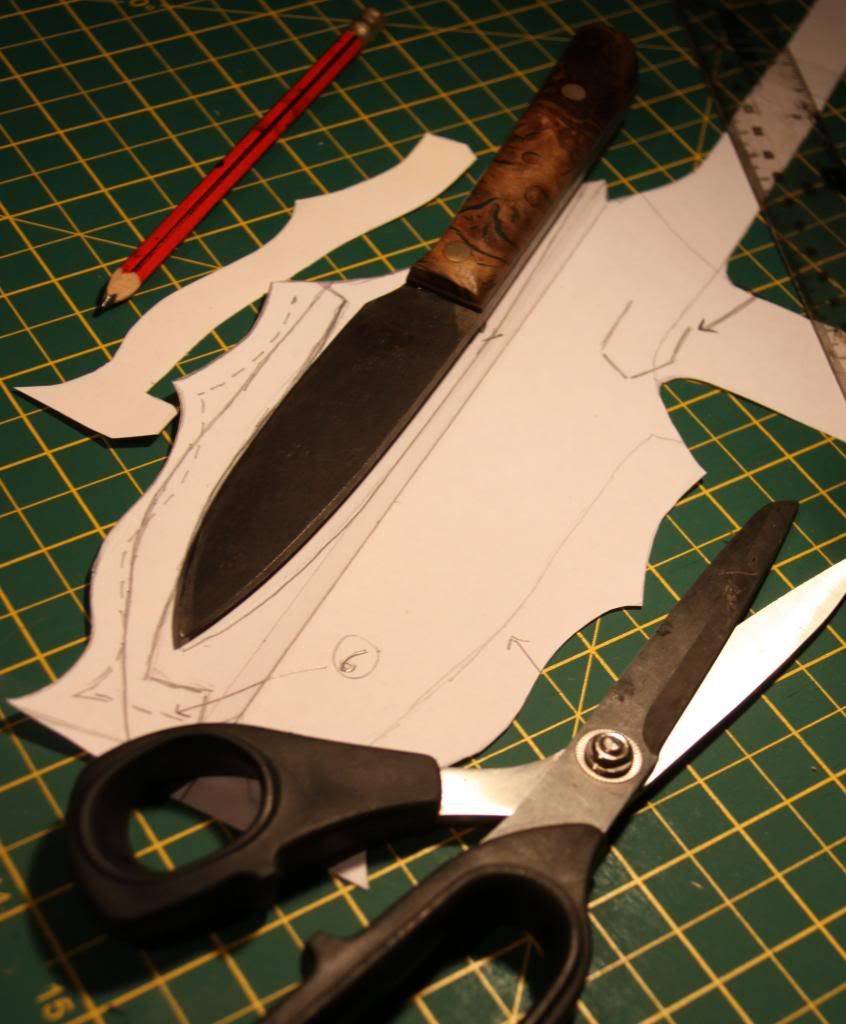
c...cut it out precisely, and the welt....the chances are that youll have to re-do the template at least once before youre happy to then transfer it to card and each time it will get a pencil line larger...resulting in a very loose result.
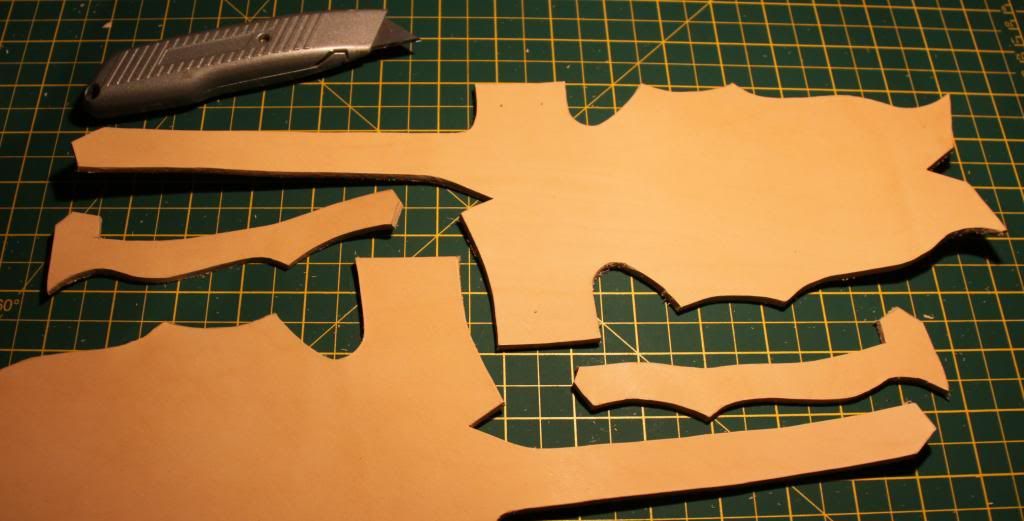
d...i knew this was going to be tricky so i decided to make a mock-up first out of cheaper similarly thick leather...good job i did because i was so far out i....
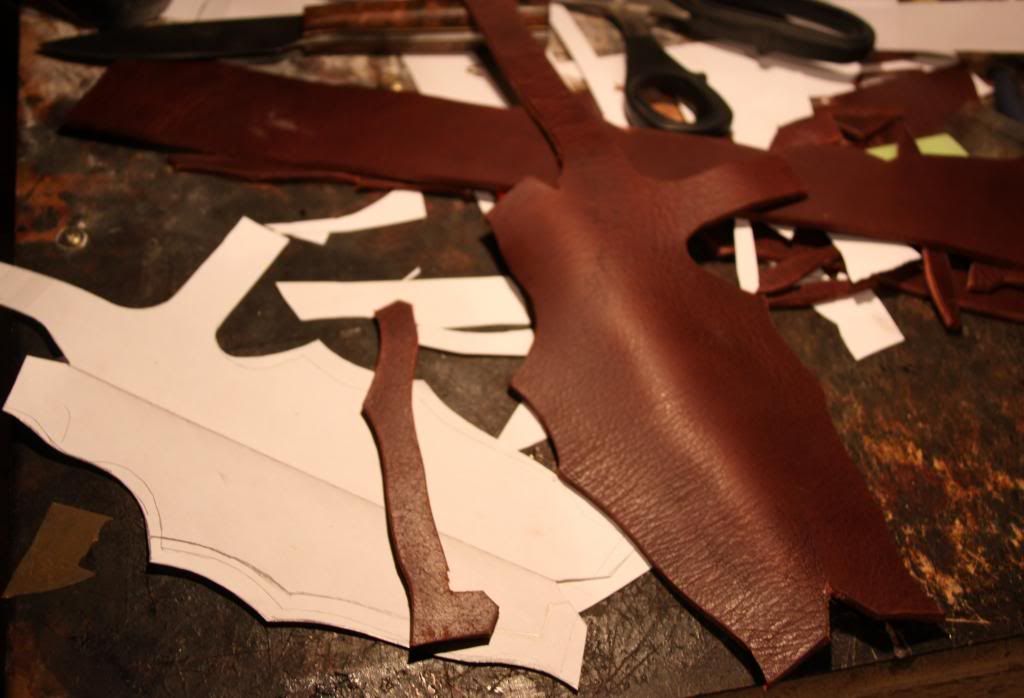
e...not only re-did the template but totally messed up a second mock-up too.
f...pretty sure i'd finally got it about right i then cut out using nice shoulder. now its time to mark any necessary holes...groove the stitch groove...bevel necessary edges...trim any corners off...score the welt and inside sheath to aid glue keying...and i also thin the leather all the way up the middle on the back because otherwise it wont bend easily and can even crack on the outside once dry. most people use a v-gouge or a skiver to do this.
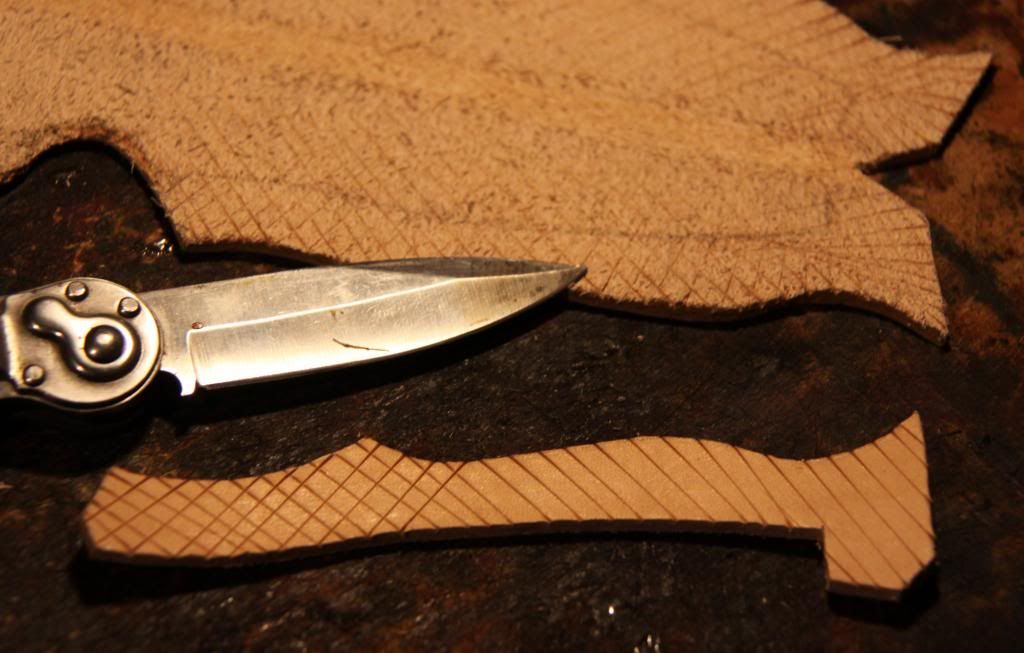
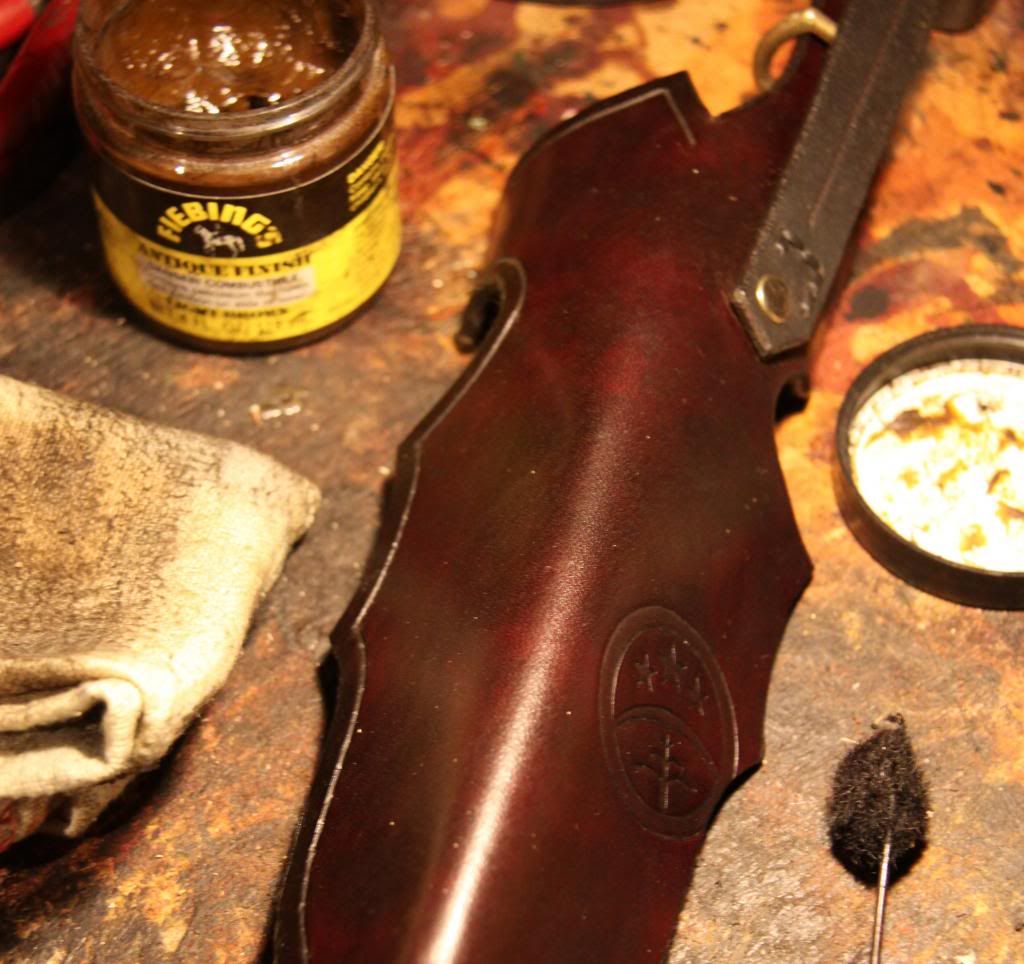
g...then dye it....you can apply with a sponge, dauber, cloth...whatever...get creative. slightly dampening the leather evenly with water first will aid smooth saturation of the dye. after dyeing i embossed my makers mark...and marked the stitch holes...when it was dry enough, took maybe an hour, not bone dry but not wet either...i applied antique finish...left 20 mins and buffed. if it doesnt shine up then its too wet lol! i also now burnish the edges...see 'n' below for more on this.
h...i then started to bend/shape the sheath...its easier to do this with damp leather as opposed to dry. then hang it up till fully dry...a coupla hours did it.
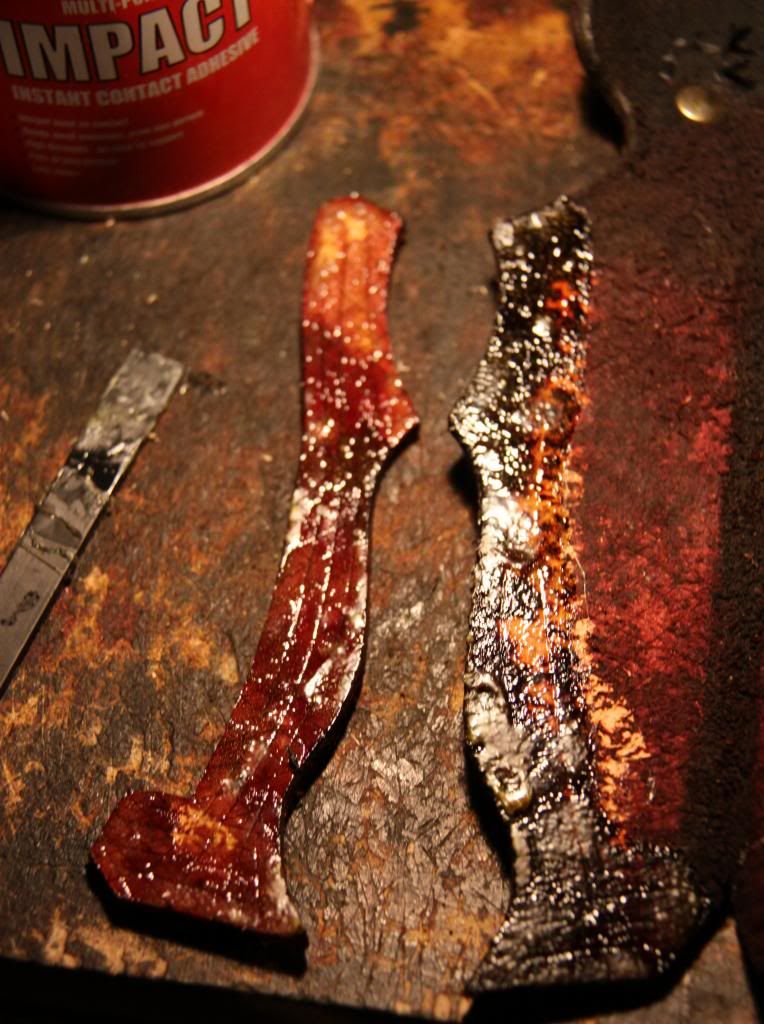
i...time to glue...i like evostik multipurpose impact contact adhesive...slap it on and wait till it looks like this and is dry/tacky, takes about 15mins...then stick in the welt...same again for other sides...
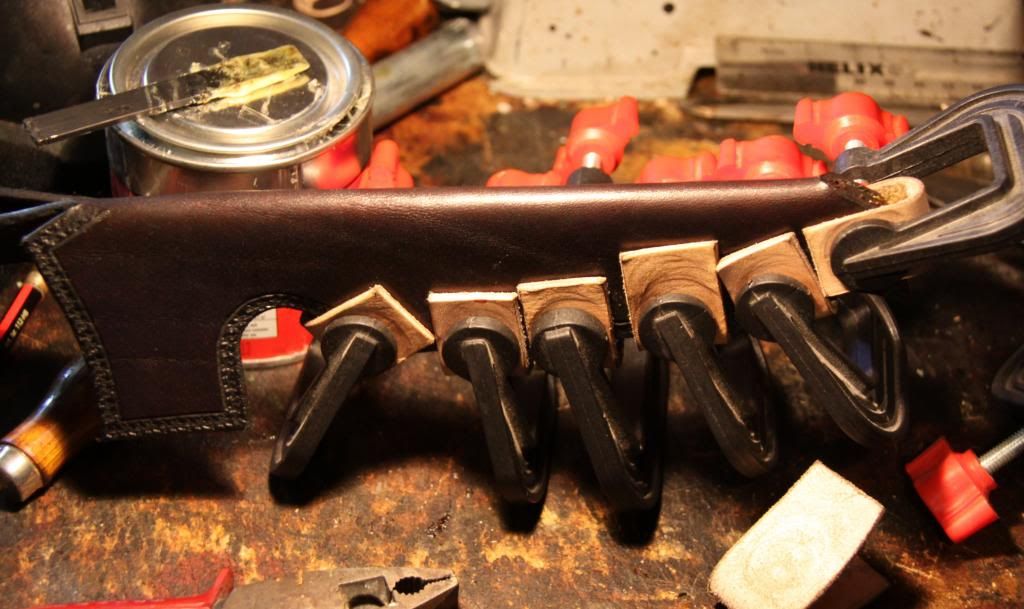
j...then clamp it. you should leave 24 hours but i was impatient and waited 5 or 6 for each. during the curing stage make sure all of the edge is clamped at some point and with even pressure too as otherwise youll get a wonky uneven edge....move the clamps about.
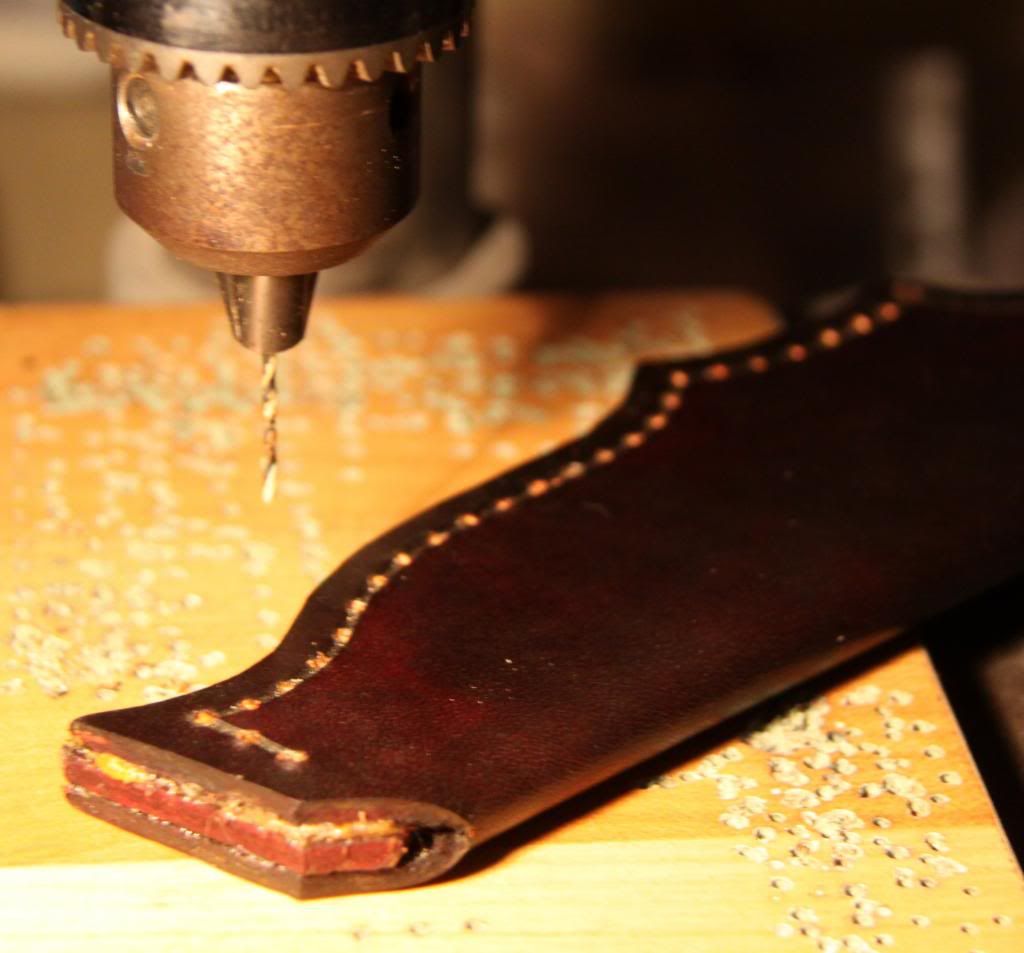
k...then drill the holes...i did 1.5mm holes...then stitch it...up and down, saddle, whatever works, dont panic...and any thick thread will do pretty much...obviously as your skill level gets better then you start worrying about the finer details and techniques.
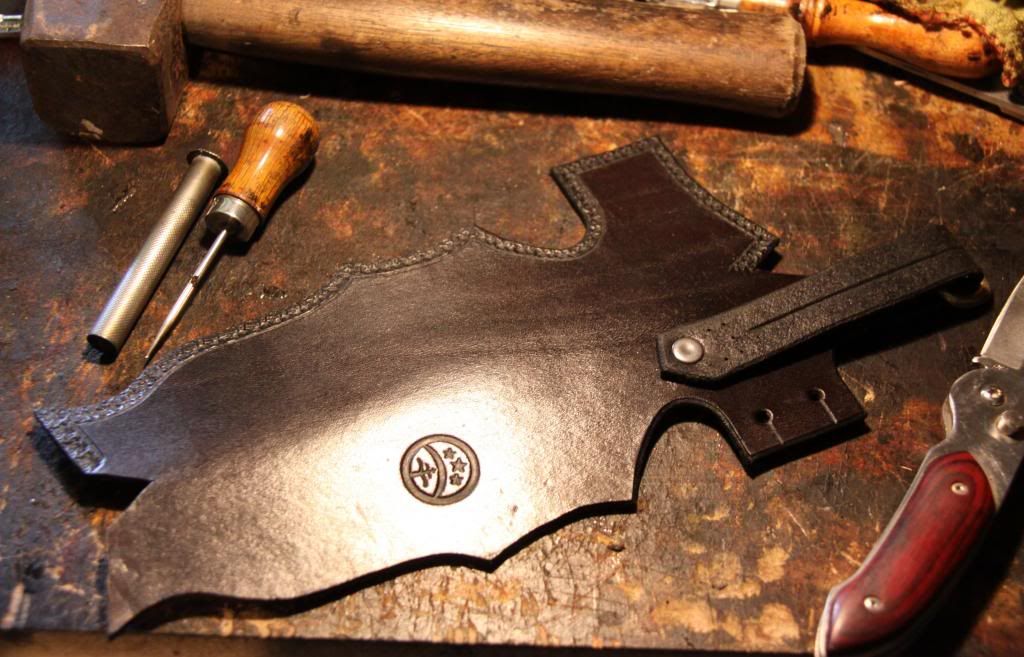
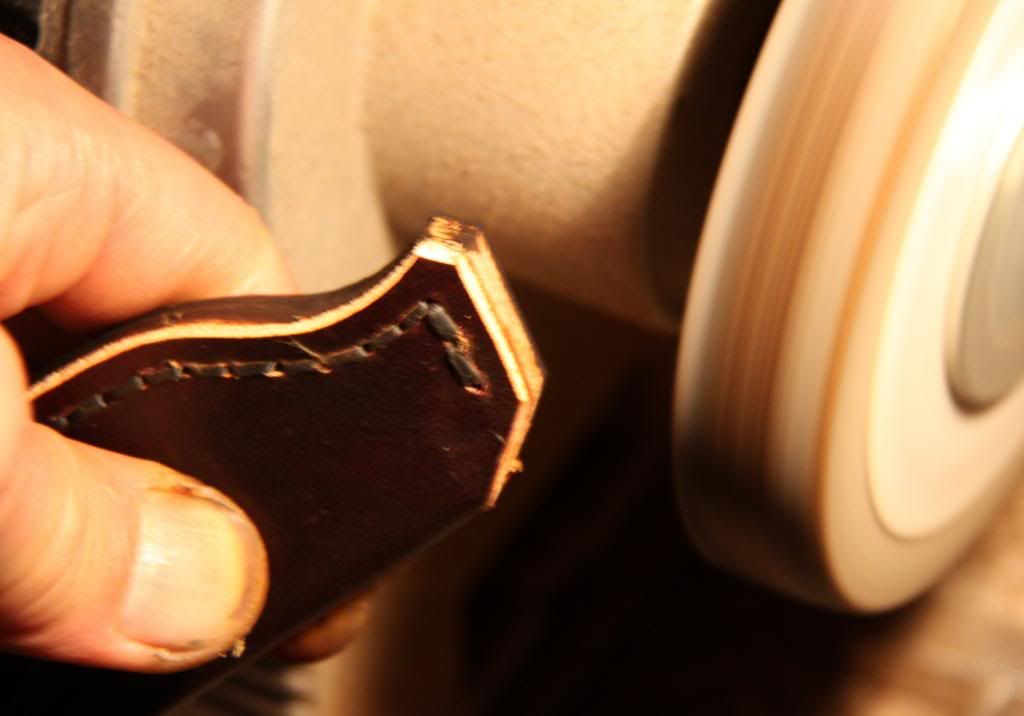
l...then grind and bevel the edges...some people clamp down an oversized sheath blank and then trim off the excess leather to achieve the required size and a good cleanly cut edge....either way works....and when i first started i used to do my edges with files and sandpaper lol.
m...then i mixed a very weak wash of dye and water and went over the thread and holes to colour any raw leather and bits caused by the drilling...then rub firmly over with cloth to flatten the thread right down and settle everything in.
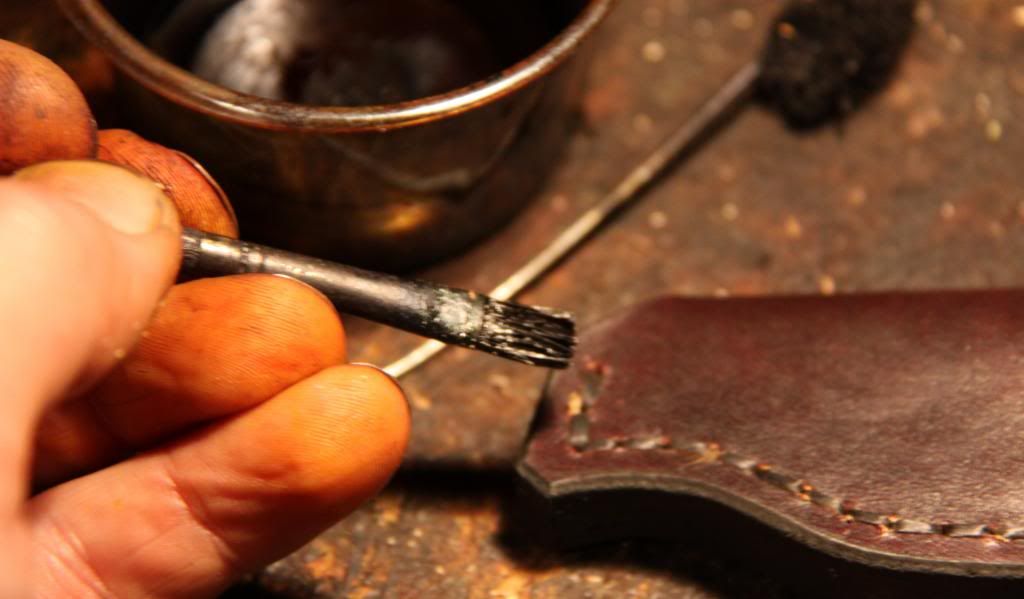
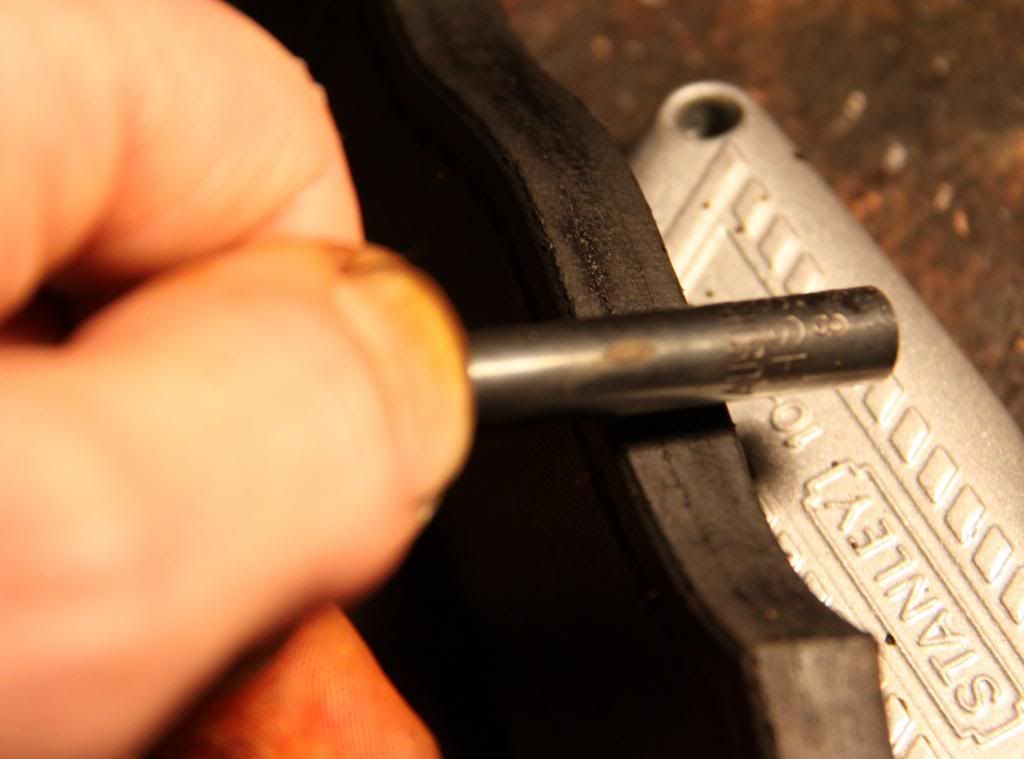
n...now i dye the freshly ground edge and burnish whilst damp....burnishing is at its simplest level the pressing down of dampened severed/loose leather fibres with something hard and smooth. in this case i used a drill bit. simple as that...up and down. burnishing is one of the several things in leatherwork that beginners talk about in hushed tones as if its some kind of higher magic only known by a rumoured elite. i do this for a coupla minutes until it starts to look a bit harder and shinier. then i hang it up to dry for a good few hours...get a small brush and handpaint the edge with edgekote...then give a final light coat of again, finish, or sometimes carnauba wax.
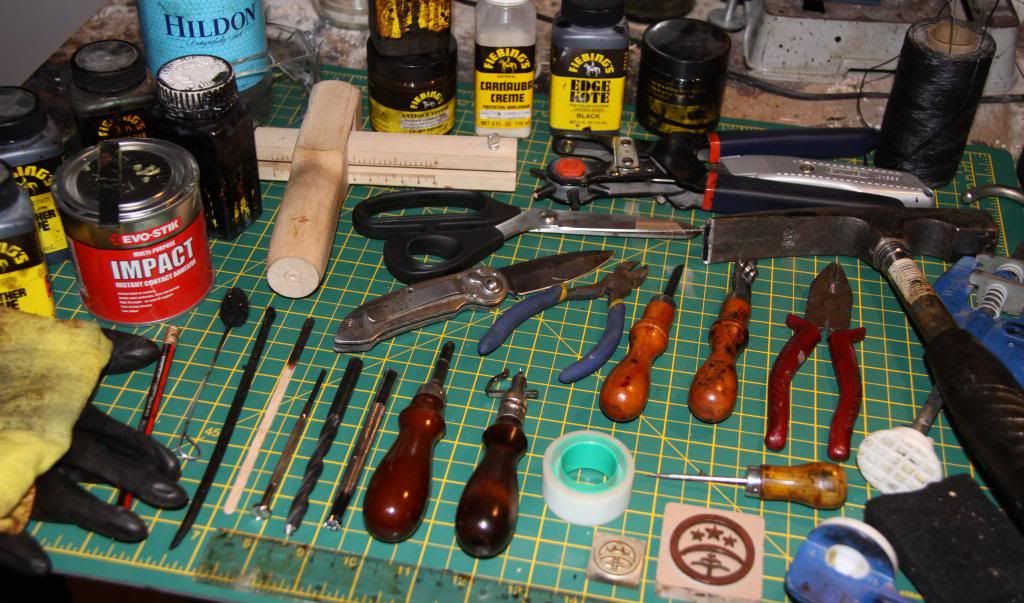
o...and heres a pic of just about everything i used during the making of the 3 sheaths...i think the only things missing are the bench drill and grinder...you dont of course need all this when youre starting out:
any questions or comments are welcome! regards....
sonni
*************to be finished tomorrow with the release of Mark III...its 3.48am and i need sleep*************
gotta say a few things...i make just about every sheath in my portfolio a different way...and do the procedures in slightly different orders etc etc...sometimes i'll stitch differently....sometimes i'll dye a sheath near the beginning....sometimes near the end...there are not really any rules so dont panic if anything seems weird and feel free to ask questions....this sheath was hard to get how i wanted and i approached it somewhat differently from usual but here goes and enjoy!
a...first of all i drew a straight line down the middle of a piece of paper....'1'. i then put the spine of the knife along the line and drew roughly around it. i then did a second line...'2'...5mm parallel to line '1'....this second line now becomes my centre line from which everything alse evolves (the extra 5mm becomes 1cm because the other half, yet to be drawn, makes it 5mmx2...and 1cm is the extra i usually allow as it will be lost when the thick 4mm leather is folded during assembly). Make note of any key areas to be accounted for...'3'. Draw a line at least 1cm away from the blade profile...this will be your welt...'4'. Add a shape if you so desire...'5'. Make note of where your stitching is going to be...'6'.

b...fold the paper along line 2 and trace...'7'. Draw the strap...'8'. Draw the loop and make note of where its end will be sewn down...'9'.

c...cut it out precisely, and the welt....the chances are that youll have to re-do the template at least once before youre happy to then transfer it to card and each time it will get a pencil line larger...resulting in a very loose result.

d...i knew this was going to be tricky so i decided to make a mock-up first out of cheaper similarly thick leather...good job i did because i was so far out i....

e...not only re-did the template but totally messed up a second mock-up too.

f...pretty sure i'd finally got it about right i then cut out using nice shoulder. now its time to mark any necessary holes...groove the stitch groove...bevel necessary edges...trim any corners off...score the welt and inside sheath to aid glue keying...and i also thin the leather all the way up the middle on the back because otherwise it wont bend easily and can even crack on the outside once dry. most people use a v-gouge or a skiver to do this.


g...then dye it....you can apply with a sponge, dauber, cloth...whatever...get creative. slightly dampening the leather evenly with water first will aid smooth saturation of the dye. after dyeing i embossed my makers mark...and marked the stitch holes...when it was dry enough, took maybe an hour, not bone dry but not wet either...i applied antique finish...left 20 mins and buffed. if it doesnt shine up then its too wet lol! i also now burnish the edges...see 'n' below for more on this.

h...i then started to bend/shape the sheath...its easier to do this with damp leather as opposed to dry. then hang it up till fully dry...a coupla hours did it.

i...time to glue...i like evostik multipurpose impact contact adhesive...slap it on and wait till it looks like this and is dry/tacky, takes about 15mins...then stick in the welt...same again for other sides...

j...then clamp it. you should leave 24 hours but i was impatient and waited 5 or 6 for each. during the curing stage make sure all of the edge is clamped at some point and with even pressure too as otherwise youll get a wonky uneven edge....move the clamps about.

k...then drill the holes...i did 1.5mm holes...then stitch it...up and down, saddle, whatever works, dont panic...and any thick thread will do pretty much...obviously as your skill level gets better then you start worrying about the finer details and techniques.

l...then grind and bevel the edges...some people clamp down an oversized sheath blank and then trim off the excess leather to achieve the required size and a good cleanly cut edge....either way works....and when i first started i used to do my edges with files and sandpaper lol.

m...then i mixed a very weak wash of dye and water and went over the thread and holes to colour any raw leather and bits caused by the drilling...then rub firmly over with cloth to flatten the thread right down and settle everything in.

n...now i dye the freshly ground edge and burnish whilst damp....burnishing is at its simplest level the pressing down of dampened severed/loose leather fibres with something hard and smooth. in this case i used a drill bit. simple as that...up and down. burnishing is one of the several things in leatherwork that beginners talk about in hushed tones as if its some kind of higher magic only known by a rumoured elite. i do this for a coupla minutes until it starts to look a bit harder and shinier. then i hang it up to dry for a good few hours...get a small brush and handpaint the edge with edgekote...then give a final light coat of again, finish, or sometimes carnauba wax.

o...and heres a pic of just about everything i used during the making of the 3 sheaths...i think the only things missing are the bench drill and grinder...you dont of course need all this when youre starting out:

any questions or comments are welcome! regards....
sonni
*************to be finished tomorrow with the release of Mark III...its 3.48am and i need sleep*************
Last edited:
")
")
 )
)