Well, it seems I’ve made a bit of a Charlie of myself, doesn’t it?
What with me being new to this bush craft game and all, I ended up getting hoodwinked good and proper by that posh numpty on the Telly, Mr Bear what’s-his-chops, by suggesting he was a bit tasty on the old fire bow. Here’s my embarrassing original post:
http://www.bushcraftuk.com/forum/showthread.php?t=48319
I can’t believe I fell for it. And needless to say a couple of jokers replied to the thread and pointed out the error of my ways. Fair enough, but now it seems my reputation is in tatters with you more knowledgeable bush crafters, and reputation is a commodity Randy Randle has never taken lightly, especially in my location. Let me tell you, I ain’t the sort of person who normally gets taken for a mug by some TV lovey - other than that time Bill Oddie took a liberty and look what happened to him, he hasn’t been back on Autumn Watch since.
So anyway, I had a couple of acquaintances have a quiet word in Bear’s ear – nothing menacing you understand, but just to mark his card. Well, it seems he was highly apologetic and even admitted that it was all a joke. He said he was surprised anyone took him seriously. Well fair play to the lad for coming clean, that’s what I say, even if he has made me look a prize plant pot. But every man deserves a second chance; God knows I do, so as far as I’m concerned that’s the end of the matter. Needless to say though, if it happens again he’ll be going the way of Oddie, but I don’t think even he’s that foolish.
Of course, this all leaves me in a bit of an awkward position. As now I’m considered something of a laughing stock on the esteemed Bushcraft UK forum, with some Muppet even going so far as to suggest that I’m a ‘wind up merchant’ – the cheek of it! So anyway, in an attempt to restore my reputation, and clear my name so to speak (something I’ve tried and failed to do before in Her Majesty’s court system), I’ve come to the conclusion that my only recourse is to post some interesting and useful bush craft info for the good readers of this site, in the hope that my reputation can be salvaged. It won’t be easy.
What follows then is my attempt to do so with a write up of my experiences making pump drills last week. Luckily for me the Guvnor owed me a favour, so he got his hands on the necessaries so I could have a go. I scratch his back and he scratches mine, if you get my meaning. What a lovely man, Gord bless him. Enjoy.
The Pump Drill, by Randy Randle (O.B.E).
The pump drill is one of numerous traditional methods of creating a fire by friction. That is, of creating a self sustaining smouldering ember from ‘rubbing’ one wooden surface against another in order to create the necessary heat to ignite a given fuel; normally small particles of wood dust formed as a by-product of the friction. Other ‘external’ fuels distinct from the friction process can likewise by used, such as certain types of dried animal excrement or fungi. However, such practices are less common.
Although the act of creating a fire by friction is often generically referred to as ‘rubbing two sticks together’, to attach such implied simplicity to the pump drill is something of a disservice to the ingenious technology used in the process.
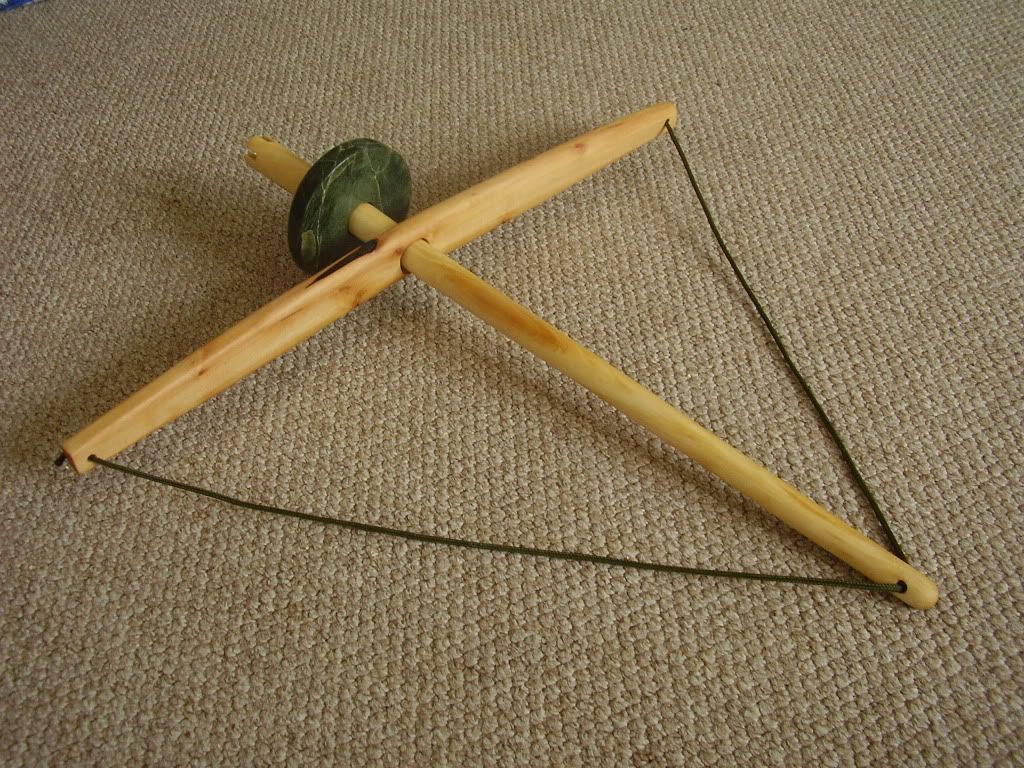
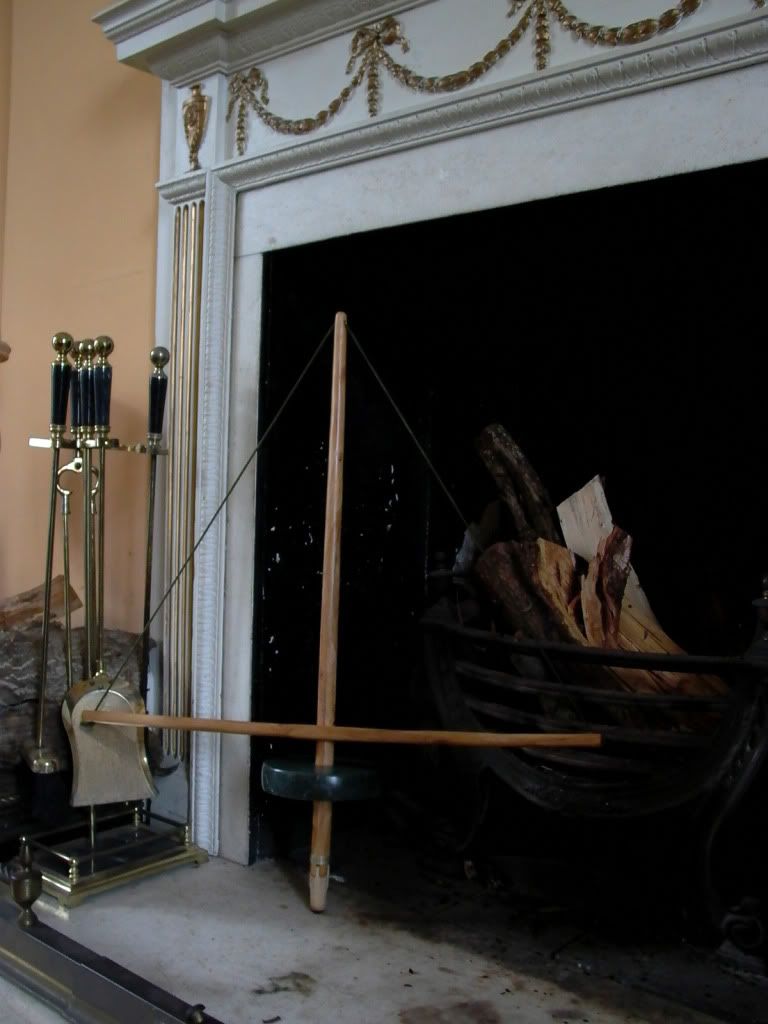
A pump drill itself consists of four main components: A long straight vertical drill, a long straight horizontal handle with a hole in its centre in order to facilitate it sliding up and down the drill, a flywheel counterweight which is attached to the lower end of the drill and a cord that is strung from either end of the handle and around the drill. Thus, when downward pressure is applied to the handle, the drill rotates. And, thanks to the flywheel, this momentum is captured, which when released at the end of the cycle rotates the spindle in the opposite direction as the cord is rewound. This continuous alternating rotation is applied to a wooden surface underneath (known as a hearth board) in order to generate the necessary friction to create the heat which is transferred to the fuel (in this case wood dust) to create a smouldering ember. This can then be placed in a fine bundle of tinder and coaxed through sustained breaths or the action of the wind, into a flame.
The pump drill dates back to as early as Roman times (*1), when it was used predominantly for the drilling of holes, which it is equally adept at doing when fitted with a stone drill bit. Its origins in other parts of the world are less clear. Several Native American nations used the pump drill both to create fire and to drill holes; the former being predominantly for ceremonial use. Some hold that the pump drill was introduced to the Americas by the Spanish in the 1500s, whereas other writers contest that the technology originated prior to European contact. Those who credit it with being invented on the North American continent often recognise the Iroquois (*2) as the pump drill’s inventors. Other Native American nations known to have used the pump drill are the Lenni Lenape (*3) and, more recently, the Cherokees (*4), who are believed to have started using it as recently as around the turn of the 1900s.
In Africa it may also have been used. I have seen photos from a friend’s trip to Kenya, in which a local tribe used a pump drill to create fire. Whether this was their traditional method of doing so, which predated European colonialism, I have no idea.
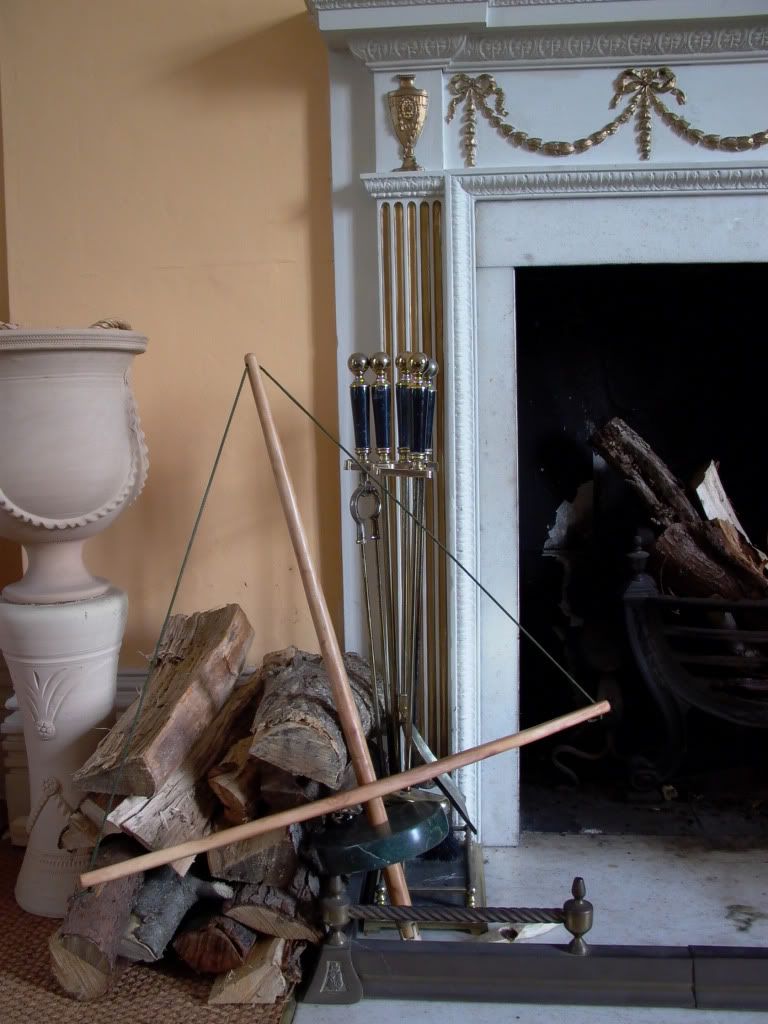
Making a pump drill is a time consuming, although immensely satisfying task. If made properly, when finished you will have a beautiful piece of equipment that it is extremely easy to create an ember with. Due to the length of time needed to fashion a pump drill, it is not so much a survival tool (although it has some value in that department and can be created in more ‘primitive’ and hasty ways), but more a tool for longer term wilderness living, perhaps to be kept at a permanent base camp. It also makes a nice demonstration piece or simply an interesting yet functional work of art.
For the construction of my pump drill I decided to restrict myself to the use of an axe, a knife and some sandpaper, although I cheated slightly and drilled the holes in the handle with a power drill. To achieve the desired finish took considerable time, but this is easily achievable with the investment of such.
DIMENSIONS
One crucial factor that few people seem to be aware of when constructing a pump drill, is the relationship between the length of the handle, the length of the cord and the length of the drill. Although different lengths will work, the optimum ratio between the three is one of 3:4:5. That is, 3 for half the handle, 4 for the upper spindle (from its tip to the handle) and 5 for half the string. Below is an easy to follow diagrammatic representation of this.
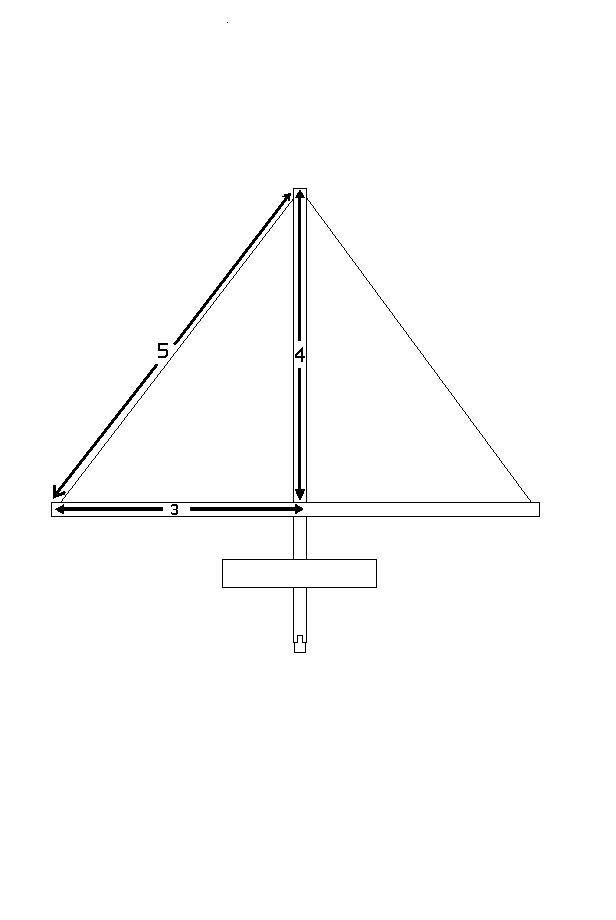
Therefore, if you decide to make a longer handle, in order to maintain the optimum 3:4:5 ratio, you must likewise increase the string length, which will in turn increase the distance the handle moves down the drill.
I first became aware of this through an excellent article written by American survival expert Charles Worsham, published in the Bulletin of Primitive Technology in 1993. Another great bit of advice in this article was to make the pump handle nearly as long as the drill itself, in order to have a ‘crisper’ working, more ‘powerful’ tool.
However, when constructing my first pump drill I did not fully heed this advice and made a 34 inch drill, a 22.5 inch handle, and a 4.5 inch diameter flywheel. Despite the effort in carving and sanding the equipment to a high finish, the function of the tool itself was found lacking. It was slow, the cord didn’t seem to ‘grip’ the drill enough and it lacked ‘crispness’ in application. With this in mind I decided to construct two pump drills instead of one. I would construct a smaller drill to go with the existing handle and flywheel, and make a bigger flywheel and handle to go with the larger drill. I decided against just cutting the drill down as it was such a nice long piece of what is quite a rare wood that it seemed a bit of a waste. The final dimensions of the smaller pump drill were 24.5 inches for the drill length, 22.5 inches for the handle, and 4.5 inches in diameter for the flywheel, which was 1.5 inches thick. The dimensions for the larger pump drill were 34 inches for the drill length, 33 inches for the handle, and 8 inches in diameter for the flywheel, which was 2 inches thick.
DRILL AND HANDLE
For the drill and the handle you will need a strong durable wood. Since a removable plug is attached to the base of the drill, it is unnecessary to use a wood that is itself a good material for creating an ember. What you are looking for is something solid enough to take the force of the vigorous rotations as well as the weight of the flywheel, which can be significant.
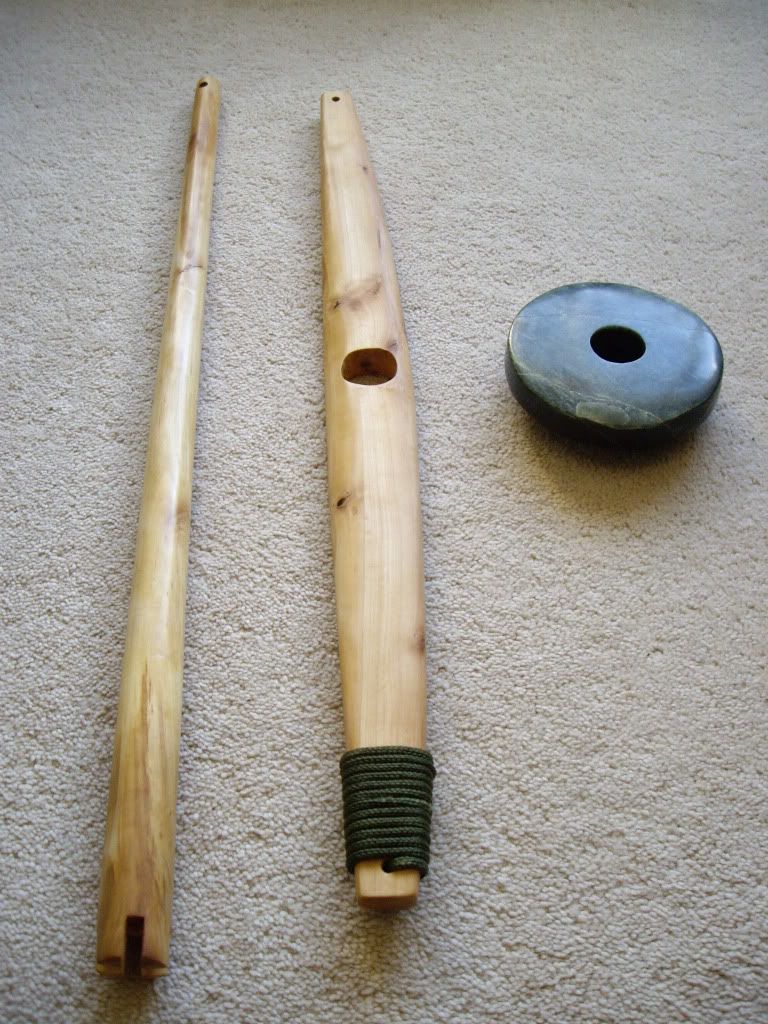
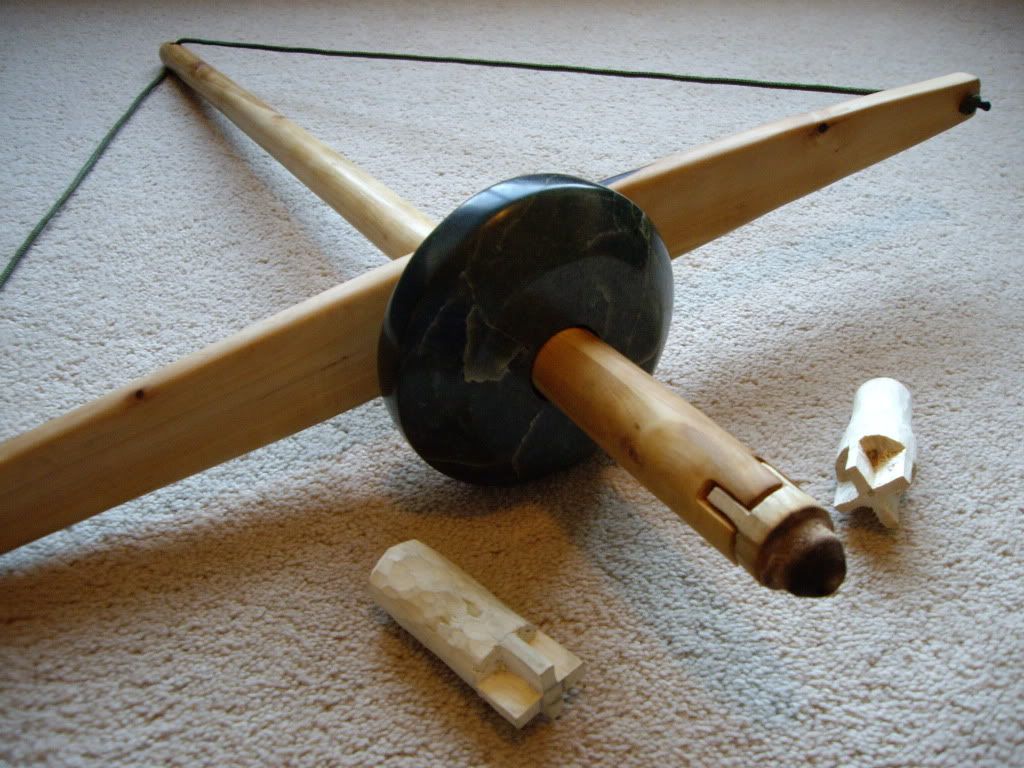
Both the drills and handle shown in the photographs below were made out of wood from the Wild Service Tree (Sorbus torminalis). This is a wonderful wood to use, being strong, hard and attractively grained. It is, however, sadly, rather rare in the UK. I was lucky enough to acquire several pieces from a towering ancient Wild Service Tree on Hampstead Heath, when a large branch fell due to pronounced fungal infection at the branch bark collar. The wood’s finish is similar to that of pear.
Due to its scarcity, Wild Service Tree wood is not really a feasible option for most people to use when constructing a pump drill. Other strong more common native woods include Hornbeam (Carpinus betulus - traditionally used for butcher’s blocks and windmill cogs it is so hard), Oak (Quercus spp.), Apple (Malus spp.) and Beech (Fagus sylvatica), amongst others. Any of the above will be durable enough for the drill and handle, although the harder they are the more difficult they will be to work, especially if you decide not to use power tools.
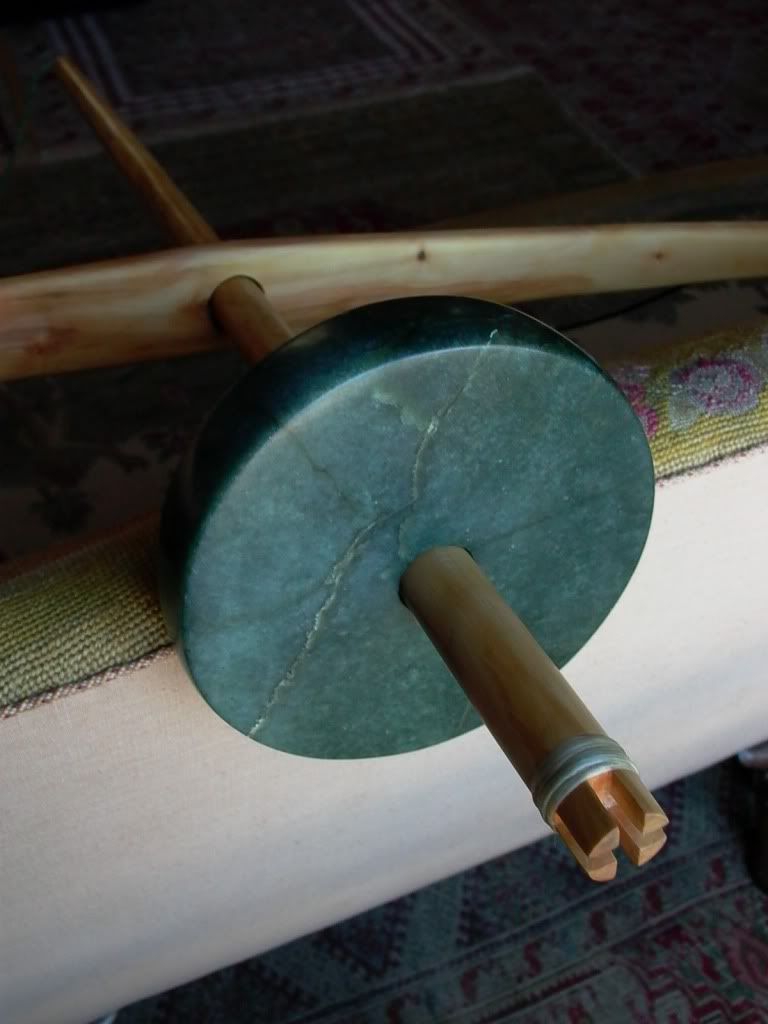
Traditionally, the Cherokees used to carve a square section on the lower drill in order to firmly secure the flywheel (*5) which would be carved with a square central hole. However, this is unnecessary, as by simply carving the drill in a tapered manner the flywheel will sit snugly in place.
PLUG AND HEARTH BOARD
There are several different methods that can be used to secure the plug at the base of the drill. Below is a diagram of some of these as well as examples of ways to attach the cord to the drill.
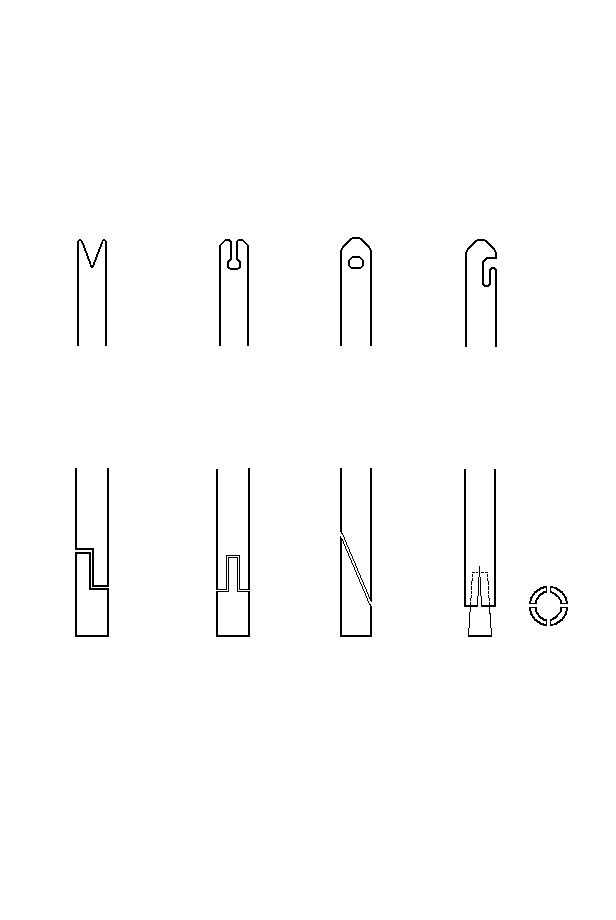
After experimenting with various traditional plug methods and being unhappy with the results, which were a wobbly loose fitting plug that required lashing to the drill; I decided to try something different. Below is what I came up with:

This cross shaped design works fantastically and is one I would highly recommend, as it fits snugly in place and requires no lashing to hold it there. It is, however, quite fiddly to carve both the male and female parts, so if you envisage using your pump drill on a regular basis (and therefore needing a lot of plugs) then it might be better to consider a different simpler plug design. There are many different woods that can be used for the plug. Amongst the best in the UK are Ivy (Hedera spp.), Sycamore (Acer pseudoplatanus), Willow (Salix spp.), Lime (Tilia spp.) and Poplar (Poplus spp.).
It is often better to use the same wood for both the plug and hearth board, although many different combinations do work. The hearth board is simply a flat piece of wood about a half inch thick. It should be long enough to secure under your foot without impeding the drilling, and wide enough to accommodate the plug’s rotation.

It needs a small depression carved into it, to which the pump drill can then be applied. When this starts smoking like a pregnant teenager on a council estate, a round depression the same diameter as the plug should have formed. A small notch measuring 1/8th the size of the depression should now be carved. This is where the hot dust will ignite into an ember.

Whoops, how did that get in there? My Shirley in the Canaries…what a beaut!
FLYWHEEL
The size of the flywheel is all important and generally speaking, the bigger the better. The wider the flywheel, the more momentum it can absorb and therefore impart on the drill’s upwards rotation. Its other function is to apply downward pressure on the upwards rotation through its weight. For these reasons it is best to make the flywheel as large as the drill’s strength can handle.
Flywheels can be made from a variety of materials including heavy hardwood, soapstone, greenstone and concrete. For my pump drills I chose soapstone. Soapstone is a metamorphic rock which is the raw material for talcum powder, and can be polished up to an eye-catching finish. It is soft in structure, making it excellent for carving, although it is prone to unforeseen breakage along fault lines if you’re not careful. If this happens it can be SuperGlued back together, and when sanded the original crack will be virtually invisible. Soapstone has been put to all manner of traditional uses around the world including the bowls of Native American smoking pipes (it is particularly suitable for this due to its lack of heat conduction, meaning that the bowl won’t heat up to an uncomfortable degree) and of course for their pump drill flywheels.
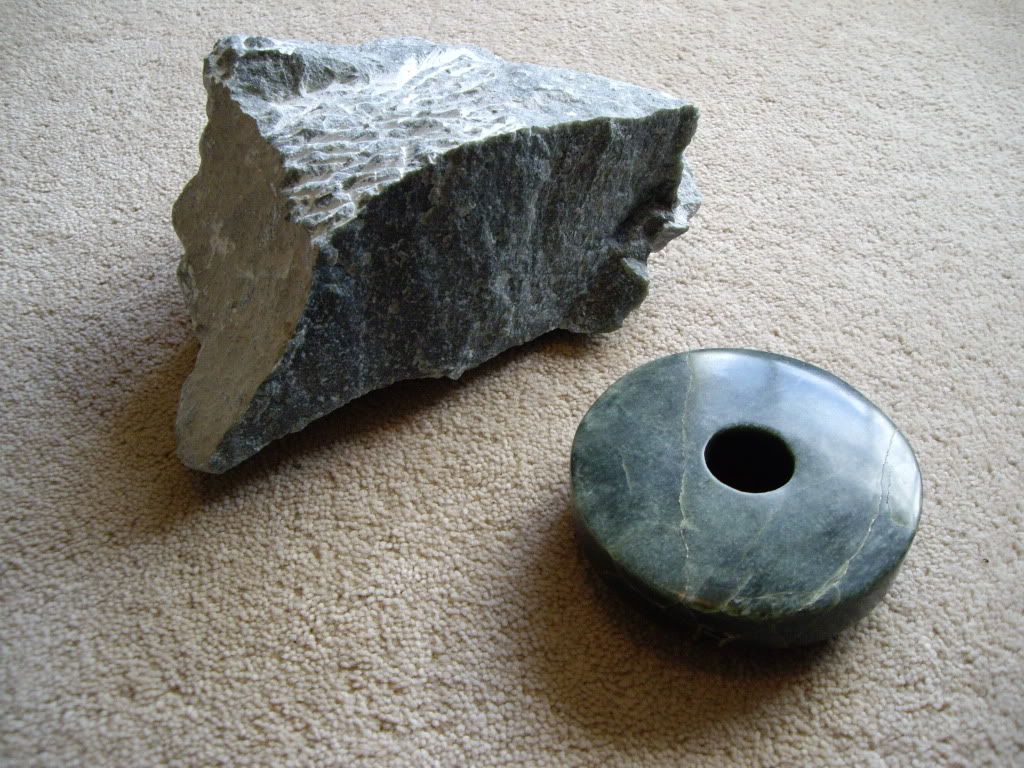
There are many ways to work soapstone but due to its soft structure it is possible to use an old knife and chisel (it will blunt the hell out of them) and some sandpaper of various grits; working down to a super fine grit in order to polish the stone. When carved and sanded to the desired shape, rinse and clean the stone, then add a little linseed oil to the surface to liberate the myriad patterns in the material.
Although a somewhat difficult material to obtain in the UK, soapstone can be purchased from Tiranti Model supplies (http://www.tiranti.co.uk/index.asp) in London and Berkshire (be prepared to be bored senseless by their monotone, comatose, and humourless shop staff though).
CONCLUSION AND TECHNIQUE
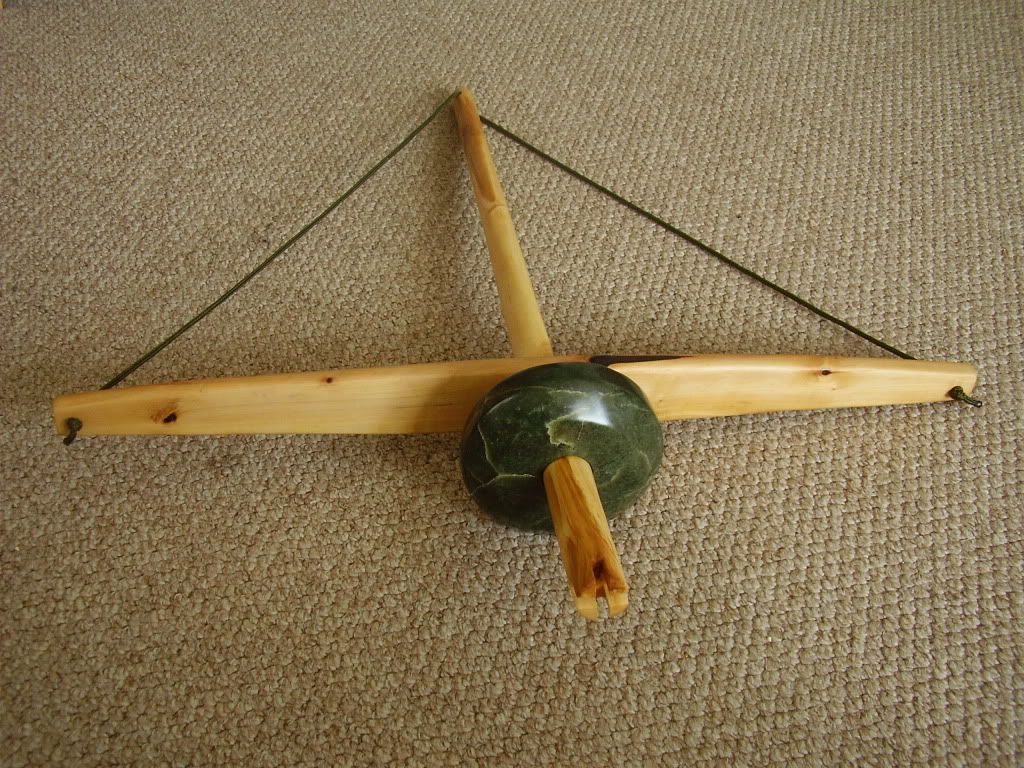
When all of the above pieces are fitted together you should have a working pump drill.
Both my pump drills work and work well, but the bigger of the two kicks out huge embers with only the bare minimum effort. They really are incredibly easy to use and you can get the hang of them in minutes. The only real technique to learn in their application, is to not apply pressure for the entirety of the downwards stoke. About two thirds of the way will do it, at which stage you sort of let your hand ‘ride’ the last bit so that when the handle starts its flywheel propelled upwards rotation your arms are not static and blocking its way, thus killing its momentum. For this reason you need to remain rather ‘loose’ on the upwards run.

For me, the beauty of the pump drill is that it can be used by someone with little or no previous experience or knowledge of lighting a fire by friction, and they can then experience, often on their first go, the magic of conjuring a glowing ember from a seemingly inert material.
I found the whole process involved in the construction of my pump drills to be thoroughly enjoyable and satisfying, although at times challenging. For anyone interested in woodwork, bushcraft or simply passing the time in the nick, I would highly recommend giving the construction of one of these less common friction fire starters a go.
References and sources:
(*1) 2009 - Online addition. Encyclopaedia Britannica.
(*2) 1963 - Harrington. P. The Indians of New Jersey: Dickon Among the Lenapes. New Brunswick: Rutgers University Press
(*3) 1890 - Hough. W. Fire Making Apparatus in the U.S. Museum. Annual report of the Board of Regents of the Smithsonian Institute. Washington: Smithsonian Institution.
(*4) 1993 - Worsham. C. Bulletin of Primitive Technology.
1945 - Jaegar. E. Wildwood Wisdom. Bolinas: Shelter Publications.
1970 - Leftwich. R. L. Arts and Crafts of the Cherokee. Cherokee: Cherokee Publications.
1989 - Lyford. C. Iroquois: Their Art and Crafts. Blaine: Hancock House Publications.
1962 - Morgan. L.H. League of the Iroquois. New York: Carol Communications.
2008 – Thompson R. Screwed: The Truth about Life as a Prison Officer: Headline
What with me being new to this bush craft game and all, I ended up getting hoodwinked good and proper by that posh numpty on the Telly, Mr Bear what’s-his-chops, by suggesting he was a bit tasty on the old fire bow. Here’s my embarrassing original post:
http://www.bushcraftuk.com/forum/showthread.php?t=48319
I can’t believe I fell for it. And needless to say a couple of jokers replied to the thread and pointed out the error of my ways. Fair enough, but now it seems my reputation is in tatters with you more knowledgeable bush crafters, and reputation is a commodity Randy Randle has never taken lightly, especially in my location. Let me tell you, I ain’t the sort of person who normally gets taken for a mug by some TV lovey - other than that time Bill Oddie took a liberty and look what happened to him, he hasn’t been back on Autumn Watch since.
So anyway, I had a couple of acquaintances have a quiet word in Bear’s ear – nothing menacing you understand, but just to mark his card. Well, it seems he was highly apologetic and even admitted that it was all a joke. He said he was surprised anyone took him seriously. Well fair play to the lad for coming clean, that’s what I say, even if he has made me look a prize plant pot. But every man deserves a second chance; God knows I do, so as far as I’m concerned that’s the end of the matter. Needless to say though, if it happens again he’ll be going the way of Oddie, but I don’t think even he’s that foolish.
Of course, this all leaves me in a bit of an awkward position. As now I’m considered something of a laughing stock on the esteemed Bushcraft UK forum, with some Muppet even going so far as to suggest that I’m a ‘wind up merchant’ – the cheek of it! So anyway, in an attempt to restore my reputation, and clear my name so to speak (something I’ve tried and failed to do before in Her Majesty’s court system), I’ve come to the conclusion that my only recourse is to post some interesting and useful bush craft info for the good readers of this site, in the hope that my reputation can be salvaged. It won’t be easy.
What follows then is my attempt to do so with a write up of my experiences making pump drills last week. Luckily for me the Guvnor owed me a favour, so he got his hands on the necessaries so I could have a go. I scratch his back and he scratches mine, if you get my meaning. What a lovely man, Gord bless him. Enjoy.
The Pump Drill, by Randy Randle (O.B.E).
The pump drill is one of numerous traditional methods of creating a fire by friction. That is, of creating a self sustaining smouldering ember from ‘rubbing’ one wooden surface against another in order to create the necessary heat to ignite a given fuel; normally small particles of wood dust formed as a by-product of the friction. Other ‘external’ fuels distinct from the friction process can likewise by used, such as certain types of dried animal excrement or fungi. However, such practices are less common.
Although the act of creating a fire by friction is often generically referred to as ‘rubbing two sticks together’, to attach such implied simplicity to the pump drill is something of a disservice to the ingenious technology used in the process.
A pump drill itself consists of four main components: A long straight vertical drill, a long straight horizontal handle with a hole in its centre in order to facilitate it sliding up and down the drill, a flywheel counterweight which is attached to the lower end of the drill and a cord that is strung from either end of the handle and around the drill. Thus, when downward pressure is applied to the handle, the drill rotates. And, thanks to the flywheel, this momentum is captured, which when released at the end of the cycle rotates the spindle in the opposite direction as the cord is rewound. This continuous alternating rotation is applied to a wooden surface underneath (known as a hearth board) in order to generate the necessary friction to create the heat which is transferred to the fuel (in this case wood dust) to create a smouldering ember. This can then be placed in a fine bundle of tinder and coaxed through sustained breaths or the action of the wind, into a flame.
The pump drill dates back to as early as Roman times (*1), when it was used predominantly for the drilling of holes, which it is equally adept at doing when fitted with a stone drill bit. Its origins in other parts of the world are less clear. Several Native American nations used the pump drill both to create fire and to drill holes; the former being predominantly for ceremonial use. Some hold that the pump drill was introduced to the Americas by the Spanish in the 1500s, whereas other writers contest that the technology originated prior to European contact. Those who credit it with being invented on the North American continent often recognise the Iroquois (*2) as the pump drill’s inventors. Other Native American nations known to have used the pump drill are the Lenni Lenape (*3) and, more recently, the Cherokees (*4), who are believed to have started using it as recently as around the turn of the 1900s.
In Africa it may also have been used. I have seen photos from a friend’s trip to Kenya, in which a local tribe used a pump drill to create fire. Whether this was their traditional method of doing so, which predated European colonialism, I have no idea.
Making a pump drill is a time consuming, although immensely satisfying task. If made properly, when finished you will have a beautiful piece of equipment that it is extremely easy to create an ember with. Due to the length of time needed to fashion a pump drill, it is not so much a survival tool (although it has some value in that department and can be created in more ‘primitive’ and hasty ways), but more a tool for longer term wilderness living, perhaps to be kept at a permanent base camp. It also makes a nice demonstration piece or simply an interesting yet functional work of art.
For the construction of my pump drill I decided to restrict myself to the use of an axe, a knife and some sandpaper, although I cheated slightly and drilled the holes in the handle with a power drill. To achieve the desired finish took considerable time, but this is easily achievable with the investment of such.
DIMENSIONS
One crucial factor that few people seem to be aware of when constructing a pump drill, is the relationship between the length of the handle, the length of the cord and the length of the drill. Although different lengths will work, the optimum ratio between the three is one of 3:4:5. That is, 3 for half the handle, 4 for the upper spindle (from its tip to the handle) and 5 for half the string. Below is an easy to follow diagrammatic representation of this.
Therefore, if you decide to make a longer handle, in order to maintain the optimum 3:4:5 ratio, you must likewise increase the string length, which will in turn increase the distance the handle moves down the drill.
I first became aware of this through an excellent article written by American survival expert Charles Worsham, published in the Bulletin of Primitive Technology in 1993. Another great bit of advice in this article was to make the pump handle nearly as long as the drill itself, in order to have a ‘crisper’ working, more ‘powerful’ tool.
However, when constructing my first pump drill I did not fully heed this advice and made a 34 inch drill, a 22.5 inch handle, and a 4.5 inch diameter flywheel. Despite the effort in carving and sanding the equipment to a high finish, the function of the tool itself was found lacking. It was slow, the cord didn’t seem to ‘grip’ the drill enough and it lacked ‘crispness’ in application. With this in mind I decided to construct two pump drills instead of one. I would construct a smaller drill to go with the existing handle and flywheel, and make a bigger flywheel and handle to go with the larger drill. I decided against just cutting the drill down as it was such a nice long piece of what is quite a rare wood that it seemed a bit of a waste. The final dimensions of the smaller pump drill were 24.5 inches for the drill length, 22.5 inches for the handle, and 4.5 inches in diameter for the flywheel, which was 1.5 inches thick. The dimensions for the larger pump drill were 34 inches for the drill length, 33 inches for the handle, and 8 inches in diameter for the flywheel, which was 2 inches thick.
DRILL AND HANDLE
For the drill and the handle you will need a strong durable wood. Since a removable plug is attached to the base of the drill, it is unnecessary to use a wood that is itself a good material for creating an ember. What you are looking for is something solid enough to take the force of the vigorous rotations as well as the weight of the flywheel, which can be significant.
Both the drills and handle shown in the photographs below were made out of wood from the Wild Service Tree (Sorbus torminalis). This is a wonderful wood to use, being strong, hard and attractively grained. It is, however, sadly, rather rare in the UK. I was lucky enough to acquire several pieces from a towering ancient Wild Service Tree on Hampstead Heath, when a large branch fell due to pronounced fungal infection at the branch bark collar. The wood’s finish is similar to that of pear.
Due to its scarcity, Wild Service Tree wood is not really a feasible option for most people to use when constructing a pump drill. Other strong more common native woods include Hornbeam (Carpinus betulus - traditionally used for butcher’s blocks and windmill cogs it is so hard), Oak (Quercus spp.), Apple (Malus spp.) and Beech (Fagus sylvatica), amongst others. Any of the above will be durable enough for the drill and handle, although the harder they are the more difficult they will be to work, especially if you decide not to use power tools.
Traditionally, the Cherokees used to carve a square section on the lower drill in order to firmly secure the flywheel (*5) which would be carved with a square central hole. However, this is unnecessary, as by simply carving the drill in a tapered manner the flywheel will sit snugly in place.
PLUG AND HEARTH BOARD
There are several different methods that can be used to secure the plug at the base of the drill. Below is a diagram of some of these as well as examples of ways to attach the cord to the drill.
After experimenting with various traditional plug methods and being unhappy with the results, which were a wobbly loose fitting plug that required lashing to the drill; I decided to try something different. Below is what I came up with:
This cross shaped design works fantastically and is one I would highly recommend, as it fits snugly in place and requires no lashing to hold it there. It is, however, quite fiddly to carve both the male and female parts, so if you envisage using your pump drill on a regular basis (and therefore needing a lot of plugs) then it might be better to consider a different simpler plug design. There are many different woods that can be used for the plug. Amongst the best in the UK are Ivy (Hedera spp.), Sycamore (Acer pseudoplatanus), Willow (Salix spp.), Lime (Tilia spp.) and Poplar (Poplus spp.).
It is often better to use the same wood for both the plug and hearth board, although many different combinations do work. The hearth board is simply a flat piece of wood about a half inch thick. It should be long enough to secure under your foot without impeding the drilling, and wide enough to accommodate the plug’s rotation.
It needs a small depression carved into it, to which the pump drill can then be applied. When this starts smoking like a pregnant teenager on a council estate, a round depression the same diameter as the plug should have formed. A small notch measuring 1/8th the size of the depression should now be carved. This is where the hot dust will ignite into an ember.
Whoops, how did that get in there? My Shirley in the Canaries…what a beaut!
FLYWHEEL
The size of the flywheel is all important and generally speaking, the bigger the better. The wider the flywheel, the more momentum it can absorb and therefore impart on the drill’s upwards rotation. Its other function is to apply downward pressure on the upwards rotation through its weight. For these reasons it is best to make the flywheel as large as the drill’s strength can handle.
Flywheels can be made from a variety of materials including heavy hardwood, soapstone, greenstone and concrete. For my pump drills I chose soapstone. Soapstone is a metamorphic rock which is the raw material for talcum powder, and can be polished up to an eye-catching finish. It is soft in structure, making it excellent for carving, although it is prone to unforeseen breakage along fault lines if you’re not careful. If this happens it can be SuperGlued back together, and when sanded the original crack will be virtually invisible. Soapstone has been put to all manner of traditional uses around the world including the bowls of Native American smoking pipes (it is particularly suitable for this due to its lack of heat conduction, meaning that the bowl won’t heat up to an uncomfortable degree) and of course for their pump drill flywheels.
There are many ways to work soapstone but due to its soft structure it is possible to use an old knife and chisel (it will blunt the hell out of them) and some sandpaper of various grits; working down to a super fine grit in order to polish the stone. When carved and sanded to the desired shape, rinse and clean the stone, then add a little linseed oil to the surface to liberate the myriad patterns in the material.
Although a somewhat difficult material to obtain in the UK, soapstone can be purchased from Tiranti Model supplies (http://www.tiranti.co.uk/index.asp) in London and Berkshire (be prepared to be bored senseless by their monotone, comatose, and humourless shop staff though).
CONCLUSION AND TECHNIQUE
When all of the above pieces are fitted together you should have a working pump drill.
Both my pump drills work and work well, but the bigger of the two kicks out huge embers with only the bare minimum effort. They really are incredibly easy to use and you can get the hang of them in minutes. The only real technique to learn in their application, is to not apply pressure for the entirety of the downwards stoke. About two thirds of the way will do it, at which stage you sort of let your hand ‘ride’ the last bit so that when the handle starts its flywheel propelled upwards rotation your arms are not static and blocking its way, thus killing its momentum. For this reason you need to remain rather ‘loose’ on the upwards run.
For me, the beauty of the pump drill is that it can be used by someone with little or no previous experience or knowledge of lighting a fire by friction, and they can then experience, often on their first go, the magic of conjuring a glowing ember from a seemingly inert material.
I found the whole process involved in the construction of my pump drills to be thoroughly enjoyable and satisfying, although at times challenging. For anyone interested in woodwork, bushcraft or simply passing the time in the nick, I would highly recommend giving the construction of one of these less common friction fire starters a go.
References and sources:
(*1) 2009 - Online addition. Encyclopaedia Britannica.
(*2) 1963 - Harrington. P. The Indians of New Jersey: Dickon Among the Lenapes. New Brunswick: Rutgers University Press
(*3) 1890 - Hough. W. Fire Making Apparatus in the U.S. Museum. Annual report of the Board of Regents of the Smithsonian Institute. Washington: Smithsonian Institution.
(*4) 1993 - Worsham. C. Bulletin of Primitive Technology.
1945 - Jaegar. E. Wildwood Wisdom. Bolinas: Shelter Publications.
1970 - Leftwich. R. L. Arts and Crafts of the Cherokee. Cherokee: Cherokee Publications.
1989 - Lyford. C. Iroquois: Their Art and Crafts. Blaine: Hancock House Publications.
1962 - Morgan. L.H. League of the Iroquois. New York: Carol Communications.
2008 – Thompson R. Screwed: The Truth about Life as a Prison Officer: Headline
Last edited:
 But your workmanship is beautiful

")


 (The fireplace looks good but thankfully not familiar)