MOD Modifications

Oliver G

Full Member
Sep 15, 2012
393
286
Ravenstone, Leicestershire
Good Afternoon All,

I've been told by the other half that I need to take myself and the dog out of the way this weekend while she paints the bathroom, so my plan is to take the dog for a nice run in the morning and then we can chill in the basement (she likes the cold floor).

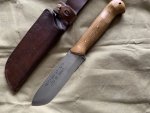
Now i have all my tools down in the basement and one of the projects I want to occupy myself with is modifying my MOD survival knife to make it a bit more usable. So far I plan to:

Sand down the scales to fit in the hand better
File the back to reduce the knife depth
possibly file off the finger guards so it will slide in a sheath better.

Has anyone done a similar job before and if so what were the results?

Secondary question, I quite like the tip shape of the RM woodlore knife, does anyone have the curve dimensions?

Cheers,

Ollie
 

Oliver G

Full Member
Sep 15, 2012
393
286
Ravenstone, Leicestershire
I reckon it'll be about 1/4" along the top of the spine with the curve moving to 1/2" to bring the tip to the centre of the knife body rather than towards the spine, I'm sure I'll go through plenty of layout blue before I'm happy with the layout then it's a case of attacking it with the millenicut file.
 

Greg

Full Member
Jul 16, 2006
4,335
260
Pembrokeshire
So you want to get rid of the weight at the point end by dropping the point into the center.. I think, and I am no expert, that you will have to lose a lot of metal.
 

gra_farmer

Full Member
Mar 29, 2016
1,907
1,086
Kent
It sounds like you will be at it for a while, but sounds like it could look interesting...you should do before and after pictures.

I have had a similar project in the past for a friend, I increased the sabre grind higher, and then zero ground it, then a mirco bevel. Spear shaped the front and then did a 90 degree edge on the back.

The heat treat was not great, and although I was very careful, the work on the blade edge was messed up quite quickly....shame
 

swotty

Full Member
Apr 25, 2009
1,880
249
Somerset
Here's mine, just the guard removed and oak scales fitted.
fdaa56be7e09af74628ccb1bc00ede86.jpg


Sent from my moto g(7) power using Tapatalk
 

dnarcher

Full Member
Jul 21, 2016
59
15
Sheffield
I'd worry less about the cosmetics, and more about the structure. Change the very thick sabre grind, maybe to a convex. File the wood scales back to the tang, and slim them down a little. If you have a powerfile, it makes the work a lot easier.
 
  • Like
Reactions: plastic-ninja

Oliver G

Full Member
Sep 15, 2012
393
286
Ravenstone, Leicestershire
Morning All,

Thought I'd best give a quick update. Unfortunately the weekend was busier than I thought so I only started at 3 on Sunday, I've laid out the lines I want on the blade. I've run a centreline along the side and mirrored the curve of the edge to the spine. I've had a go at it for an hour or so with the file and it's nearly there, hopefully I'll finish the shaping tonight. turns out either I'm out of practice with the file or it's a harder steel than I was expecting.

20200712_163734.jpg

The next job is to remove the the finger guard, I want that off so it will slip into a leather sheath without catching.

(I've found you can get a really good mould with a leather sheath if you oversize it by half an inch or so then vacuum seal the sheath and knife, you then run the final stitching and trim the edges)

To do this I think I'll have to remove the scales and break the spot welds with a cold chisel, it should then just slide off and I can pop it on at a later date if i change my mind.

Does anyone have any sources of scales and rivets? I think some brass rives would look smart on this, I'm not too fussed about galvanic corrosion as this should be hidden by the scales.
 

dnarcher

Full Member
Jul 21, 2016
59
15
Sheffield
Could just grind back the finger guard? It's not particularly hard. Are you intending to sharpen the new spearpoint? Why that design? Just interested. Keep posting photos, I'm watching your progress with interest.
Darren
 

Oliver G

Full Member
Sep 15, 2012
393
286
Ravenstone, Leicestershire
I could do but the more I look at it I want to change the handle for something else, possibly a bit brighter than the existing handle material. If I am going to take the scales off then the easiest way to remove the finger guard is to break the weld with a cold chisel and slide the guard off the handle. That also saves the guard in case I want to refit it at a later date.

I've picked up a bench grinder which has made the task of grinding the blade significantly easier, to answer your question Darren I'm keeping the spine of the blade flat, I've never had to use two sides of a blade at the same time and I don't want to have a sharpened edge on the same side as a flat spine if I end up reinforcing the cut with my thumb.

I wanted the tip in the centre of the blade as this is just below where the handle is, I find it's a much more comfortable grip for me.

I'm planning on removing the dinky little ricasso and replacing it with a choil in order to allow me to sharpen the knife more easily, I'll have to be careful with the geometry so I don't create a stress riser.

I should have some more photos this weekend as I'll have a bit more time on my hands. Does anyone know what diameter the holes are for the rivets on the knife?
 

MCNZ

Member
Jul 1, 2020
25
16
41
Newcastle
You might like to check these out for inspiration if you haven't already...
 

Oliver G

Full Member
Sep 15, 2012
393
286
Ravenstone, Leicestershire
Afternoon All,

Apologies there hasn't been an update recently, It's been quite busy at home.

I was however thinking that I wasn't quite happy with how the tip worked out, it was a bit blunt for my liking. I struggle to picture things in my head so I sat down with autocad for 10 minutes and produced the document attached.

Basically I wanted to visualise the tip of the knife and it occurred to me that the tip is made of a base and two radii so what I've drawn out is a 40mm base (the thickness of the knife) and two arcs of varying radii that are tangential to the base and the other radii. where the radii are equal you get an equal blade, where they are different you can shift the point up or down. There are three sets of points in the drawing, one with equal radii, one with the right radius being 1.5 time the left and one with 2 times the left.

If you print this off in a4 the base should be 40mm, you just then need to lay that out on your knife and etch the pattern you want. (I'll let someone else count the number of different options on there but I think its the number of radii squared)

If someone wants the base a different size let me know and I can redraw it, the radii increase on the left by 10mm at a time.

I'll update on the knife when there has been a change.
 

Attachments

  • A4 Sheet-Ollie.pdf
    62.8 KB · Views: 16

BCUK Shop

We have a a number of knives, T-Shirts and other items for sale.

SHOP HERE