As requested, a full write up of the wetform sheath I made recently.
Piccs and words by me - all skill and talent belong entirely to Singteck. Errors in the write up are mine!
Part 1 Introduction
This is a fairly lengthy tutorial on how to make a wet formed leather sheath to exactly fit your knife of choice. Ill describe the use of the proper tools, but most could be made or something common substituted without too much difficulty. What you absolutely will need is some thick leather, some very strong thread, some stout needles, some wax and an awl.
Before you start, mess about with paper, a pen and scissors planning out the shape you will need to make your sheath. You can adjust the exact dimensions as you go (in fact you should), but having a close idea of what you are going to make is very important.
The best advice I can give you? Take your time! Dont plan to finish in one evening or even two. Go slow and steady, measuring ,checking and re-checking as you go.
Lets define a few terms and the things you will need
Hide leather
Flesh side - the inside rough part of the hide.
Grain side the outside smooth part of the hide
Awl A sharp point or blade on a handle used for poking holes.
Saddlers awl a diamond shaped awl used for making most of the stitch holes
Round awl a circular shaped awl used for making the start and end holes or a row
Blunt awl used to re-open stitch holes and mark the hide
(an awl can be made with a nail and a bit of broom handle)
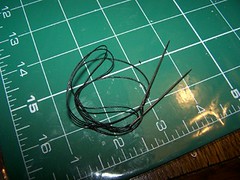
Thread I used strong 18/03 linen thread (18 is the thickness, 3 the number of strands)
(Using the real thing is best here although there are lots of types of strong thread including synthetic sinew.)
Needles I sued size 1 saddlers needles
(Saddlers needles are blunt which is good and strong. They are also very cheap. You could use darning needles though)
Overstitch wheel looks a bit like a spur. Used to mark where stitch holes should be.
(A stitch marker or even a fork could be substituted)
Beeswax used to grease the thread to make it run ore easily.
(Use a wax candle if you have to)
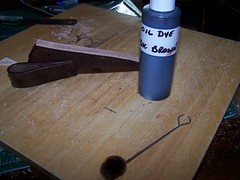
Oil dye used to dye the leather
(You can leave it natural or even make dyes)
Dauber used to apply the dye
(You could make one or use a soft brush)
Dividers like a compass with a point at each end used to mark edges and keep stitches even from the edge
(Very handy but a school compass could be rigged up)
Edge beveller trims the edges to an angle to make them look neat
(You could skip this altogether)
Cork Board a good thick one is used to support the leather when piercing the stitch holes
(any giving surface could be used)
Cutting Board for slicing against when cutting leather. An end grain butchers board is ideal.
(nick one from the kitchen)
Glue either PVA wood glue (dont use the waterproof stuff) or contact adhesive.
(Cheap school PVA white glue will do)
Gum Trag for cleaning up the edges
(You could omit this or use old fashioned gum arabic)
80 Grit sandpaper for sanding the edges
Craft knife a good sharp knife is a must I used my folding Stanley and wore both ends of a blade out
Skiving knife a chisel ground (one bevel) piece of steel
(You can live without this but its useful to both thin leather joints and flush cut edges after stitching)
Oil and cling film - for wrapping your knife whilst wet forming
(not doing this could cause your knife to rust)
A pen (to mark lines)
Some elastic bands and / or padded bulldog clips (for holding things whilst glueing)
A bone folder a polished round ended flat piece of bone for polishing and forming
(You could use a spoon back for polishing and a butter knife for wet forming)
A steel rule used for marking and cutting
(Any straight edge will do)
A set of circle and curve templates used for drawing smooth curves
(You could use coins, jar lids etc.)
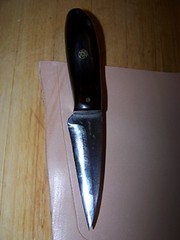
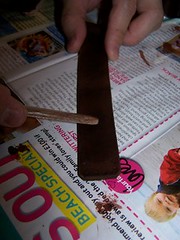
The basic shape we are going to use here is a triangle with a rounded side at the handle end. The triangle will fold over to form the pouch and have a belt loop stitched to the back. It will become more obvious what that looks like as we go through.
Part 2 Beginning Cutting Out
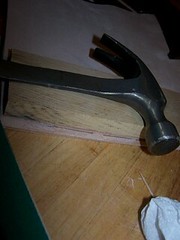
First you will make a welt. The welt is an extra piece of leather that will be sandwiched between the stitched edges of the sheath. The welt faces the cutting edge of the knife and prevents the cutting edge cutting through the stitches.
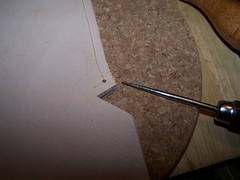
The hide is laid out (grain side uppermost) and the knife placed on an edge of the hide to the height the sheath is intended to come to. Using the steel rule, curves and a blunt awl, scribe a line on the hide to indicate the inside edge of the welt.
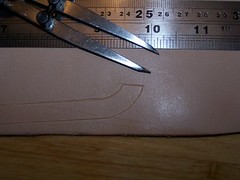
We want the welt to have a depth of 8mm. So set the dividers to 8mm apart and trace out the same line marking two parallel line. The welt needs to come to the line of the point so join the two lines there.
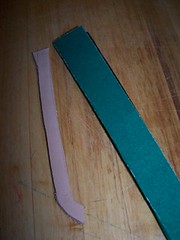
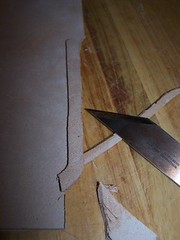
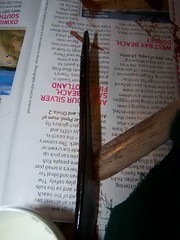
Using the rule and Stanley knife cut out the welt

The welt needs to be glued to the sheath. Gluing the flesh side is fine, but the grain side of the welt is quite shiny, so rough it up a bit so it will adhere properly
Lay out your hide in a big enough piece to make the sheath. It needs to be flesh side uppermost as the welt is to be glued to the inside of the sheath (the grain side forms the outside of the sheath)
Draw around the welt near to the edge of the leather. Make sure you have the welt the right way round the cutting edge of the knife should fit into the lines drawn near the edge of the sheath
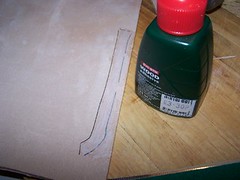
Put PVA glue inside the lines. It doesnt matter if it goes outside the lines towards the edge, but dont go over the line on the inside the glue stops the dye taking
Put the welt on the lines so it lines up exactly. Put something flat on top and add a weight to ensure it lies flat. Wait until the glue has gone off. This is quicker with contact adhesive but PVA gives a nice finish and is easier to re-position.
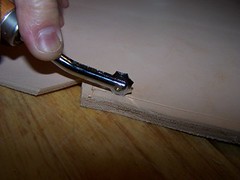
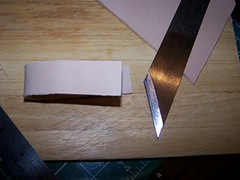
Cut away the outside edge of the welt. I used the skiving knife here using it to slice through like a guillotine, but you could use a Stanley knife.
Next we need to mark the stitch line over the welt. Adjust your dividers to half the previous width (about 4mm)
Flip the leather over and using the divider, scribe a shallow line in the leather that runs the length of the welt. The line should begin 4mm from the end of the welt and end 4mm from the other end to prevent the stitches tearing out.
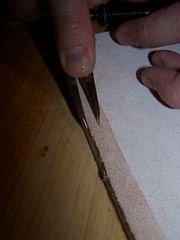
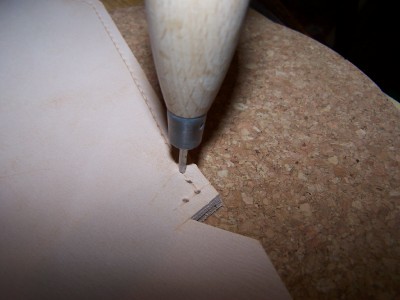
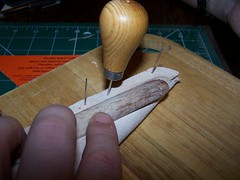
Using your round awl, push a hole through the first stitch hole at the end of the welt. First and last holes use the round awl. The remainder use the diamond shaped saddlers awl. Put your cork mat under the leather so that you have something safe to pierce into.
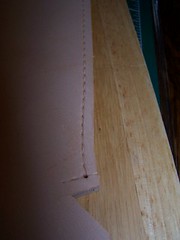
Take your overstitch wheel. This is a no 5 wheel this means it marks 5 stitches to the inch. Locate one of the spurs in the starting hole and then pressing firmly, slowly run the wheel down the stitch line that you marked
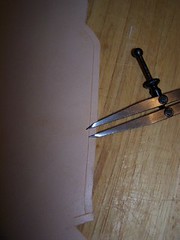
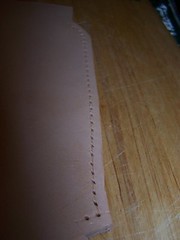
When you have finished, this is how your marked stitch line will look
Take your saddlers awl and pierce each marked stitch hole. The awl should be oriented so that the awl leaves holes at 90 degrees to the stitch line.
When you have pieced the entire stitch line it will look like this
Part 3 Cutting Out
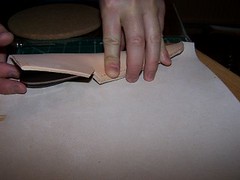
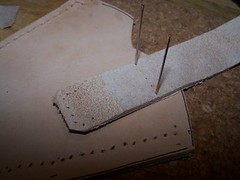
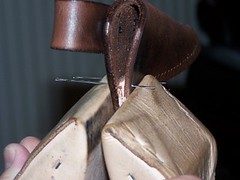
Now that we have formed one edge, we can place the hide grain side down and place the knife on the hide with the blade 1mm from the welt. The leather can then be folded over the knife to give the first idea of the sheath shape.
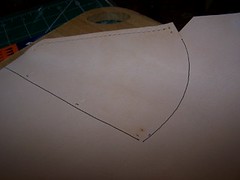
After folding over, use the blunt awl to mark through the first and last holes and a centre line.
Flip the hide back over and using a pen, put a few dots next to where the holes are marked through to indicate where the edge of the sheath should come. Then draw a cut line 10mm out from there this means a piece of leather will project after the sheath is glued up and stitched. The excess can be cut off to leave a perfectly symmetrical edge. It should look something like this
Having marked up the outline of your sheath and using a steel rule and craft knife, cut out the basic sheath shape
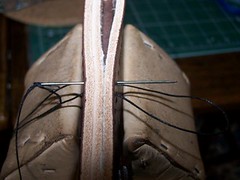
Now you have cut the sheath out, fold it over but inside out. Use a few needles to line up the first, last and centre holes to keep every thing lined up (you can tap them into a wooden cutting board). Make sure you leave the extra piece projecting and line up welt up to the line you drew a couple of steps ago.
Now take your blunt awl, because the sheath is inside out, you can lightly mark the grain side of the leather on the side where there are no stitch holes yet
Having marked the line, use your dividers to confirm the stitch line and your overstitch wheel to check the spacing. Then use your saddlers awl to pierce the stitch holes. There is a twist though. Put the holes at the opposite 45 degree angle. This means that when the two stitch holes are laid over each other, they form an X shape. This will centre the thread between the two sides and leave a neat zig-zag stitch pattern.
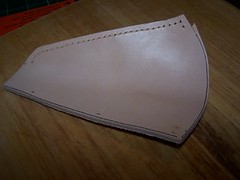
Now you have a basic sheath with stitch holes. Set the knife back into the cut out sheath and make any adjustments to the top line that you need to make it snug on the knife. I cut a curved shape out from the front to accommodate the large handle.
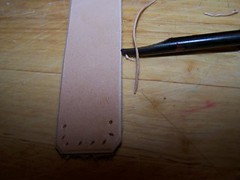
Next comes the strap. You will need a piece of leather about an inch wide. The leather needs to be at least twice as long as your belt is wide plus 2 inches. I wanted mine to fit a 2 belt so two lots of two inches (its folded over) and 2 inches for the stitched down ends.
It looks nice to trim the corners off the ends of the leather (the two ends will be stitched together so trim them together so that they are even).
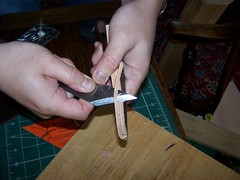
Having trimmed the corners its a good idea to skive the ends of the leather this is taking thin slices off the flesh side of the hide to thin it. Then when its stitched together it sits flat.
Hold the two ends together and on the inner side using a steel rule mark a U shape 5mm from the bottom. Pierce holes with your round awl (start, end and corner holes) and saddlers awl through both sides of the belt loop. Offer the loop up to the sheath and find a line 8cm below the top of the sheath and pierce a line of stitch holes on the inner side only. Using needles and cork board, pin the inner side of the belt loop to the back of the sheath (triple check it is the back). Mark through the stitch holes onto the sheath with your blunt awl
Remove the belt loop and pierce the stitch holes in the sheath.

Take your edge beveller and take the angle off all the edges of the belt loop and any of the top edges of the sheath that will be in contact with the loop. You can skip this if you like it just tidies the look up
Part 4 Time to Dye
Take your Sheath and strap and dampen them under a tap. Take a bottle of dye (I used profession oil based dye) and a dauber (fluff on a stick). Put plenty of paper down here its called dye for a reason!
Using the dauber wipe an even layer of dye over the grain side of the sheath. Dont forget the edges! We will trim a few bits later but dye them all for now.
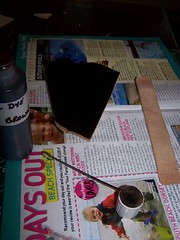
Flip the sheath over and dye the flesh side. Don not dye the welt or the area the welt touches on the other side. They will need to be glued later and the dye resists the glue
Repeat the dye process on the belt loop. When the dye has dried (I left mine overnight), you can use the bone folder (or the back of a spoon) to rub the leather. This flattens the grain and polishes it up. Before leaving your work spot, mix a couple of teaspoons of water with a couple of good pinches of gum trag powder and leave it to swell overnight to a wall paper paste consistency
Take your belt loop strap and dip a finger into the gum trag mix. And rub it along all the edges. Leave a minute to soak in and then rub the grain flat with your bone folder or a butter knife. This flattens the grain at the edge. Then take a layer of cloth over your finger and rub hard and fast on the gum it polishes to a high shine. You can skip this if you want it just gives a nice sealed and finished look to raw leather edges.
Part 5 Getting ready to Sew
Having left the sheath and strap overnight, you will notice they are no very stiff. Its time to sew them up now. Before we begin, I need to describe how to do this. You are going to use saddle stitch and two needles to do it.
To do this task, you are going to need, some stout threat, size 1 saddlers needles, some beeswax and a little later your blunt awl and PVA glue.
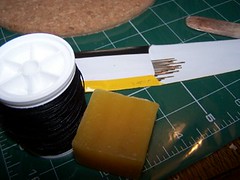
Cut a piece the right length for your task. I find double the length of the seam to be sewn, plus 12 is about right. This is because the threads constantly cross and so you need double the apparent distance to be sewn plus 3 of doubled thread to attach the needle at each end. Always go too long rather than too short!
Take your cut piece of thread in your right hand and press the thread into the beeswax with your left hand. Draw the thread over the wax pressing down to coat it in wax do this three times.
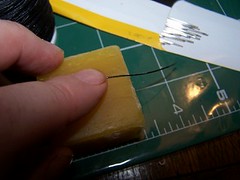
Next put the thread on the cutting surface and neatly cut the end at 45 degrees. Use a needle to slightly flatten the end so it passes easily through the eye. Draw 3 of cotton through the eye. Near the end of the short section, untwist the cotton and pass the needle through the loop created
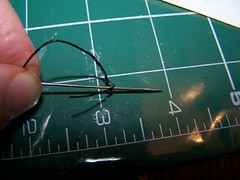
Pass the needle all the way through the hole, re-twist the fibres and twist the short and long lengths together. Your needle is now secure and will not come off the thread. Repeat this at the other end so you have a needle at both ends.
Now, when sewing you start at the beginning right? Wrong! Start a couple of holes down, sew back to the beginning, an then sew the full length of the seam sewing back over a couple of holes at the other end this reinforces the start and end of the seam that take the most stress.
So lets start sewing. Take one needle and pass it through a hole so that you have one needle on the left and one on the right with an equal amount of thread each side. Take the needle on the right and push it through the next hole but leave a loop of cotton on the right like this

Take the needle hanging from the first hole on the left and push it through the hole you just came through from the right but only push it half way through. In effect, you have put both needles through opposite sides of the same hole.

With your needle poking through the hole, take a loop of the cotton thats passing through the same hole and pass it over the needle as shown in the picture above. Use one loop over in every stitch and two (as illustrated) when starting and finishing to tie of the thread.
So to recap as this is important.
1. Pass a needle through a hole until you have a needle on the right (needle 1) and a needle on the left (needle 2) with an equal amount of thread each side.
2. Take needle 1 and push through the next hole along leaving a loop of thread on the right hand side
3. Take needle 2 and push it halfway through the same hole you just pushed needle 1 through.
4. There is a piece of thread in the same hole that needle 2 is halfway through. Pass a loop of that cotton over needle 2 (or two loops if this is a start or end stitch)
5. Pull both needles tight
6. Repeat steps 2-6 for each hole remembering to oversew the first and last holes
I hope thats clear.
Part 6 stitching the belt loop
The first stitching we need to do is attach the inside of the belt loop to the top of the back of the sheath
Because there are only five holes here, I sewed from the centre line to the last hole on the right, then back all the way to the left and then back to the centre line.
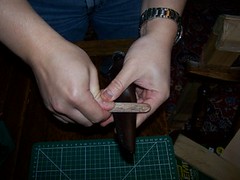
Then fold the belt loop over and put some PVA glue between the two skived side of the loop. Stitch round the U shape making sure you oversew the beginning and the end. I found that lining up the holes of three layers of leather a little tricky and used the blunt awl to line them all up before passing the first needle through a new hole
It will end up like this. I quite liked this bit as I felt I could really see some progress now!
Part 7 Stitch up the sheath.
This is really just a larger version of what you did stitching on the belt loop. There are a couple of tips though. Some padded bulldog clips are very handy to hold the sheath together. Also, use a few spare needles to line up all the holes before stitching.
You will be gluing again, but this bit takes a while. I found it best to put the glue in a little pot and spread it will a lolly stick just a couple of inches (ten stitch holes) in front of where I had got to. Then it didnt dry before I got to it.
You will be stitching through three full layers of leather, so use a blunt awl to line up and open each hole before stitching it it will make you life much easier.
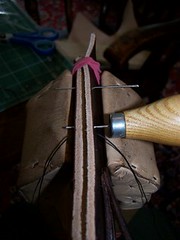
You can see Im holding the sheath in two padded jaws. This is a device called a saddlers clamp. I plan to make my own (I borrowed Singtecks here) so Ill do a separate tutorial on this. However a few elastic bands or well padded bulldog clips work just fine
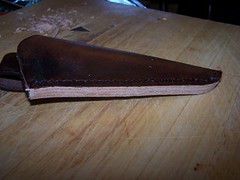
Before long you will have stitched the whole sheath (not forgetting to oversew the ends)
Step 8 Finishing and Fitting
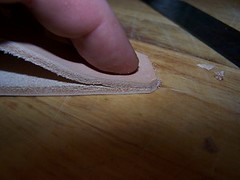
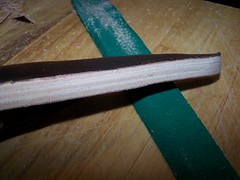
You can see now that the little excess you left will need to be trimmed off. _ an easy job for the skiving or craft knife
You can get it fairly smooth with the knife, but rub it down with 80 grit sandpaper (always along the line of the sheath) to get it really nice
Take your edge beveller and bevel the edges you have just trimmed and sanded
Using dye and dauber, dye all the trimmed edges
Leave the dye to dry overnight and then use gun trag to polish up the dyed edges.
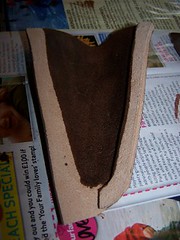
Now we are ready to fit the knife and wet form the sheath. Oil the knife blade and wrap the whole knife in two layers of cling film to protect it
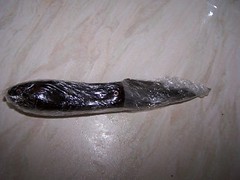
Wet the sheath down until its damp inside and out. It doesnt need to be soaked but run it under a slow running tap inside and out for a couple of seconds
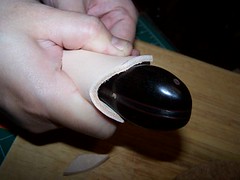
Push the knife firmly into the sheath you will need to push firmly to form the sheath around the knife handle
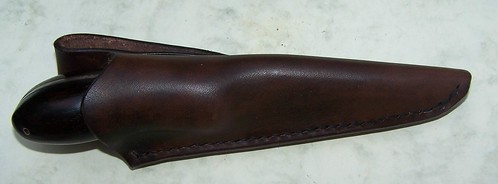
Using a bone folder or spoon and butter knife smooth and push the leather until it takes on the shape of the knife handle.
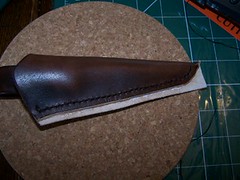
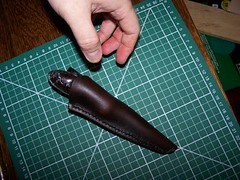
Remove the knife from the sheath and leave the sheath to dry slowly for 24 hours or longer if not hard and completely dry.
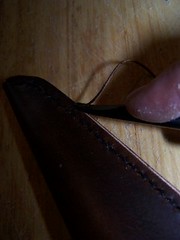
There you have it a fully fitted, welted custom sheath.
Red
Piccs and words by me - all skill and talent belong entirely to Singteck. Errors in the write up are mine!
Part 1 Introduction
This is a fairly lengthy tutorial on how to make a wet formed leather sheath to exactly fit your knife of choice. Ill describe the use of the proper tools, but most could be made or something common substituted without too much difficulty. What you absolutely will need is some thick leather, some very strong thread, some stout needles, some wax and an awl.
Before you start, mess about with paper, a pen and scissors planning out the shape you will need to make your sheath. You can adjust the exact dimensions as you go (in fact you should), but having a close idea of what you are going to make is very important.
The best advice I can give you? Take your time! Dont plan to finish in one evening or even two. Go slow and steady, measuring ,checking and re-checking as you go.
Lets define a few terms and the things you will need
Hide leather
Flesh side - the inside rough part of the hide.
Grain side the outside smooth part of the hide
Awl A sharp point or blade on a handle used for poking holes.
Saddlers awl a diamond shaped awl used for making most of the stitch holes
Round awl a circular shaped awl used for making the start and end holes or a row
Blunt awl used to re-open stitch holes and mark the hide
(an awl can be made with a nail and a bit of broom handle)
Thread I used strong 18/03 linen thread (18 is the thickness, 3 the number of strands)
(Using the real thing is best here although there are lots of types of strong thread including synthetic sinew.)
Needles I sued size 1 saddlers needles
(Saddlers needles are blunt which is good and strong. They are also very cheap. You could use darning needles though)
Overstitch wheel looks a bit like a spur. Used to mark where stitch holes should be.
(A stitch marker or even a fork could be substituted)
Beeswax used to grease the thread to make it run ore easily.
(Use a wax candle if you have to)
Oil dye used to dye the leather
(You can leave it natural or even make dyes)
Dauber used to apply the dye
(You could make one or use a soft brush)
Dividers like a compass with a point at each end used to mark edges and keep stitches even from the edge
(Very handy but a school compass could be rigged up)
Edge beveller trims the edges to an angle to make them look neat
(You could skip this altogether)
Cork Board a good thick one is used to support the leather when piercing the stitch holes
(any giving surface could be used)
Cutting Board for slicing against when cutting leather. An end grain butchers board is ideal.
(nick one from the kitchen)
Glue either PVA wood glue (dont use the waterproof stuff) or contact adhesive.
(Cheap school PVA white glue will do)
Gum Trag for cleaning up the edges
(You could omit this or use old fashioned gum arabic)
80 Grit sandpaper for sanding the edges
Craft knife a good sharp knife is a must I used my folding Stanley and wore both ends of a blade out
Skiving knife a chisel ground (one bevel) piece of steel
(You can live without this but its useful to both thin leather joints and flush cut edges after stitching)
Oil and cling film - for wrapping your knife whilst wet forming
(not doing this could cause your knife to rust)
A pen (to mark lines)
Some elastic bands and / or padded bulldog clips (for holding things whilst glueing)
A bone folder a polished round ended flat piece of bone for polishing and forming
(You could use a spoon back for polishing and a butter knife for wet forming)
A steel rule used for marking and cutting
(Any straight edge will do)
A set of circle and curve templates used for drawing smooth curves
(You could use coins, jar lids etc.)
The basic shape we are going to use here is a triangle with a rounded side at the handle end. The triangle will fold over to form the pouch and have a belt loop stitched to the back. It will become more obvious what that looks like as we go through.
Part 2 Beginning Cutting Out
First you will make a welt. The welt is an extra piece of leather that will be sandwiched between the stitched edges of the sheath. The welt faces the cutting edge of the knife and prevents the cutting edge cutting through the stitches.
The hide is laid out (grain side uppermost) and the knife placed on an edge of the hide to the height the sheath is intended to come to. Using the steel rule, curves and a blunt awl, scribe a line on the hide to indicate the inside edge of the welt.
We want the welt to have a depth of 8mm. So set the dividers to 8mm apart and trace out the same line marking two parallel line. The welt needs to come to the line of the point so join the two lines there.
Using the rule and Stanley knife cut out the welt
The welt needs to be glued to the sheath. Gluing the flesh side is fine, but the grain side of the welt is quite shiny, so rough it up a bit so it will adhere properly
Lay out your hide in a big enough piece to make the sheath. It needs to be flesh side uppermost as the welt is to be glued to the inside of the sheath (the grain side forms the outside of the sheath)
Draw around the welt near to the edge of the leather. Make sure you have the welt the right way round the cutting edge of the knife should fit into the lines drawn near the edge of the sheath
Put PVA glue inside the lines. It doesnt matter if it goes outside the lines towards the edge, but dont go over the line on the inside the glue stops the dye taking
Put the welt on the lines so it lines up exactly. Put something flat on top and add a weight to ensure it lies flat. Wait until the glue has gone off. This is quicker with contact adhesive but PVA gives a nice finish and is easier to re-position.
Cut away the outside edge of the welt. I used the skiving knife here using it to slice through like a guillotine, but you could use a Stanley knife.
Next we need to mark the stitch line over the welt. Adjust your dividers to half the previous width (about 4mm)
Flip the leather over and using the divider, scribe a shallow line in the leather that runs the length of the welt. The line should begin 4mm from the end of the welt and end 4mm from the other end to prevent the stitches tearing out.
Using your round awl, push a hole through the first stitch hole at the end of the welt. First and last holes use the round awl. The remainder use the diamond shaped saddlers awl. Put your cork mat under the leather so that you have something safe to pierce into.
Take your overstitch wheel. This is a no 5 wheel this means it marks 5 stitches to the inch. Locate one of the spurs in the starting hole and then pressing firmly, slowly run the wheel down the stitch line that you marked
When you have finished, this is how your marked stitch line will look
Take your saddlers awl and pierce each marked stitch hole. The awl should be oriented so that the awl leaves holes at 90 degrees to the stitch line.
When you have pieced the entire stitch line it will look like this
Part 3 Cutting Out
Now that we have formed one edge, we can place the hide grain side down and place the knife on the hide with the blade 1mm from the welt. The leather can then be folded over the knife to give the first idea of the sheath shape.
After folding over, use the blunt awl to mark through the first and last holes and a centre line.
Flip the hide back over and using a pen, put a few dots next to where the holes are marked through to indicate where the edge of the sheath should come. Then draw a cut line 10mm out from there this means a piece of leather will project after the sheath is glued up and stitched. The excess can be cut off to leave a perfectly symmetrical edge. It should look something like this
Having marked up the outline of your sheath and using a steel rule and craft knife, cut out the basic sheath shape
Now you have cut the sheath out, fold it over but inside out. Use a few needles to line up the first, last and centre holes to keep every thing lined up (you can tap them into a wooden cutting board). Make sure you leave the extra piece projecting and line up welt up to the line you drew a couple of steps ago.
Now take your blunt awl, because the sheath is inside out, you can lightly mark the grain side of the leather on the side where there are no stitch holes yet
Having marked the line, use your dividers to confirm the stitch line and your overstitch wheel to check the spacing. Then use your saddlers awl to pierce the stitch holes. There is a twist though. Put the holes at the opposite 45 degree angle. This means that when the two stitch holes are laid over each other, they form an X shape. This will centre the thread between the two sides and leave a neat zig-zag stitch pattern.
Now you have a basic sheath with stitch holes. Set the knife back into the cut out sheath and make any adjustments to the top line that you need to make it snug on the knife. I cut a curved shape out from the front to accommodate the large handle.
Next comes the strap. You will need a piece of leather about an inch wide. The leather needs to be at least twice as long as your belt is wide plus 2 inches. I wanted mine to fit a 2 belt so two lots of two inches (its folded over) and 2 inches for the stitched down ends.
It looks nice to trim the corners off the ends of the leather (the two ends will be stitched together so trim them together so that they are even).
Having trimmed the corners its a good idea to skive the ends of the leather this is taking thin slices off the flesh side of the hide to thin it. Then when its stitched together it sits flat.
Hold the two ends together and on the inner side using a steel rule mark a U shape 5mm from the bottom. Pierce holes with your round awl (start, end and corner holes) and saddlers awl through both sides of the belt loop. Offer the loop up to the sheath and find a line 8cm below the top of the sheath and pierce a line of stitch holes on the inner side only. Using needles and cork board, pin the inner side of the belt loop to the back of the sheath (triple check it is the back). Mark through the stitch holes onto the sheath with your blunt awl
Remove the belt loop and pierce the stitch holes in the sheath.
Take your edge beveller and take the angle off all the edges of the belt loop and any of the top edges of the sheath that will be in contact with the loop. You can skip this if you like it just tidies the look up
Part 4 Time to Dye
Take your Sheath and strap and dampen them under a tap. Take a bottle of dye (I used profession oil based dye) and a dauber (fluff on a stick). Put plenty of paper down here its called dye for a reason!
Using the dauber wipe an even layer of dye over the grain side of the sheath. Dont forget the edges! We will trim a few bits later but dye them all for now.
Flip the sheath over and dye the flesh side. Don not dye the welt or the area the welt touches on the other side. They will need to be glued later and the dye resists the glue
Repeat the dye process on the belt loop. When the dye has dried (I left mine overnight), you can use the bone folder (or the back of a spoon) to rub the leather. This flattens the grain and polishes it up. Before leaving your work spot, mix a couple of teaspoons of water with a couple of good pinches of gum trag powder and leave it to swell overnight to a wall paper paste consistency
Take your belt loop strap and dip a finger into the gum trag mix. And rub it along all the edges. Leave a minute to soak in and then rub the grain flat with your bone folder or a butter knife. This flattens the grain at the edge. Then take a layer of cloth over your finger and rub hard and fast on the gum it polishes to a high shine. You can skip this if you want it just gives a nice sealed and finished look to raw leather edges.
Part 5 Getting ready to Sew
Having left the sheath and strap overnight, you will notice they are no very stiff. Its time to sew them up now. Before we begin, I need to describe how to do this. You are going to use saddle stitch and two needles to do it.
To do this task, you are going to need, some stout threat, size 1 saddlers needles, some beeswax and a little later your blunt awl and PVA glue.
Cut a piece the right length for your task. I find double the length of the seam to be sewn, plus 12 is about right. This is because the threads constantly cross and so you need double the apparent distance to be sewn plus 3 of doubled thread to attach the needle at each end. Always go too long rather than too short!
Take your cut piece of thread in your right hand and press the thread into the beeswax with your left hand. Draw the thread over the wax pressing down to coat it in wax do this three times.
Next put the thread on the cutting surface and neatly cut the end at 45 degrees. Use a needle to slightly flatten the end so it passes easily through the eye. Draw 3 of cotton through the eye. Near the end of the short section, untwist the cotton and pass the needle through the loop created
Pass the needle all the way through the hole, re-twist the fibres and twist the short and long lengths together. Your needle is now secure and will not come off the thread. Repeat this at the other end so you have a needle at both ends.
Now, when sewing you start at the beginning right? Wrong! Start a couple of holes down, sew back to the beginning, an then sew the full length of the seam sewing back over a couple of holes at the other end this reinforces the start and end of the seam that take the most stress.
So lets start sewing. Take one needle and pass it through a hole so that you have one needle on the left and one on the right with an equal amount of thread each side. Take the needle on the right and push it through the next hole but leave a loop of cotton on the right like this
Take the needle hanging from the first hole on the left and push it through the hole you just came through from the right but only push it half way through. In effect, you have put both needles through opposite sides of the same hole.
With your needle poking through the hole, take a loop of the cotton thats passing through the same hole and pass it over the needle as shown in the picture above. Use one loop over in every stitch and two (as illustrated) when starting and finishing to tie of the thread.
So to recap as this is important.
1. Pass a needle through a hole until you have a needle on the right (needle 1) and a needle on the left (needle 2) with an equal amount of thread each side.
2. Take needle 1 and push through the next hole along leaving a loop of thread on the right hand side
3. Take needle 2 and push it halfway through the same hole you just pushed needle 1 through.
4. There is a piece of thread in the same hole that needle 2 is halfway through. Pass a loop of that cotton over needle 2 (or two loops if this is a start or end stitch)
5. Pull both needles tight
6. Repeat steps 2-6 for each hole remembering to oversew the first and last holes
I hope thats clear.
Part 6 stitching the belt loop
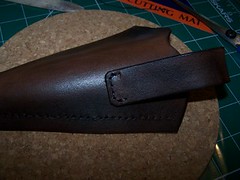
The first stitching we need to do is attach the inside of the belt loop to the top of the back of the sheath
Because there are only five holes here, I sewed from the centre line to the last hole on the right, then back all the way to the left and then back to the centre line.
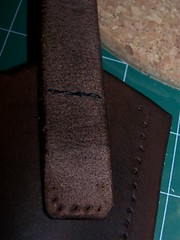
Then fold the belt loop over and put some PVA glue between the two skived side of the loop. Stitch round the U shape making sure you oversew the beginning and the end. I found that lining up the holes of three layers of leather a little tricky and used the blunt awl to line them all up before passing the first needle through a new hole
It will end up like this. I quite liked this bit as I felt I could really see some progress now!
Part 7 Stitch up the sheath.
This is really just a larger version of what you did stitching on the belt loop. There are a couple of tips though. Some padded bulldog clips are very handy to hold the sheath together. Also, use a few spare needles to line up all the holes before stitching.
You will be gluing again, but this bit takes a while. I found it best to put the glue in a little pot and spread it will a lolly stick just a couple of inches (ten stitch holes) in front of where I had got to. Then it didnt dry before I got to it.
You will be stitching through three full layers of leather, so use a blunt awl to line up and open each hole before stitching it it will make you life much easier.
You can see Im holding the sheath in two padded jaws. This is a device called a saddlers clamp. I plan to make my own (I borrowed Singtecks here) so Ill do a separate tutorial on this. However a few elastic bands or well padded bulldog clips work just fine
Before long you will have stitched the whole sheath (not forgetting to oversew the ends)
Step 8 Finishing and Fitting
You can see now that the little excess you left will need to be trimmed off. _ an easy job for the skiving or craft knife
You can get it fairly smooth with the knife, but rub it down with 80 grit sandpaper (always along the line of the sheath) to get it really nice
Take your edge beveller and bevel the edges you have just trimmed and sanded
Using dye and dauber, dye all the trimmed edges
Leave the dye to dry overnight and then use gun trag to polish up the dyed edges.
Now we are ready to fit the knife and wet form the sheath. Oil the knife blade and wrap the whole knife in two layers of cling film to protect it
Wet the sheath down until its damp inside and out. It doesnt need to be soaked but run it under a slow running tap inside and out for a couple of seconds
Push the knife firmly into the sheath you will need to push firmly to form the sheath around the knife handle
Using a bone folder or spoon and butter knife smooth and push the leather until it takes on the shape of the knife handle.
Remove the knife from the sheath and leave the sheath to dry slowly for 24 hours or longer if not hard and completely dry.
There you have it a fully fitted, welted custom sheath.
Red

 ) quick question; is there anywhere that you can buy a few of the basic leather working tools together? Like in a bundle? A list of a few recommended suppliers for tools and materials might be a good idea to add to the bottom of the tutorial.
")
 . Making and fitting the welt, then wrapping the leather around it and the knife, like you and Singteck have done, seems a better solution. I'll give that a go tonight, hopefully I'll get it right before I run out of leather.