Making a shaving horse on the cheap

  • Hey Guest, Early bird pricing on the Summer Moot (29th July - 10th August) available until April 6th, we'd love you to come. PLEASE CLICK HERE to early bird price and get more information.

tombear

On a new journey
Jul 9, 2004
4,494
556
54
Rossendale, Lancashire
On the off chance this will be of interest ill be recording the construction of a basic English style shaving horse, pretty much a per the one on pages 20 and 21 of Ray Tabors "Green woodworking pattern book " 2005 ISBN 0713489146.

Having yet again blown all my money on second hand tools and cream buns and not having access to woodland to process my own I was without the materials to make a shave horse, something that would make my faffing about a lot easier. Less frustrating at the least ! But last week herself brought home a car full of 3 x 9 x 45 " planks, ex a garages inspection pit. Unfortunately on closer inspection the boards were shot, cracked, rotten and chewed up in places so were going to be taken to her scout troop for firewood. Anyroad, a couple of days later I had another look at it and decided to cut out the good pieces and see if there was enough to make a shave horse. Breaking a band saw blade delayed it but as of today I have most of the parts rough cut out.

The main, seat, part is currently clamped together, being made up of four strips glued together back to about the size of one of the original planks, 3 x 9 1/4 x 45". The plan called for 48" but ill have to add a extension if required or just scale down certain parts.

To strengthen this I've bought 4 x half inch by 9 long coach bolts, nuts and washers ( cost about 4 pounds total ) which I will try and fit tomorrow, insetting the heads and nuts so I will be able to plane all the muck and uneven bits off. Realistically ill lose up to a inch each end and a 1/8 th of a inch on the sides, top and bottom, although I may leave the under side rough to get as much thickness as I can. It would have probably been cheaper to buy just threaded rod and nuts and washers to fit, or use reclaimed bolts. I had to get threaded rod for the pivot anyway as no one local had 13 inch bolts.

image.jpg1_zpscohtqopt.jpg


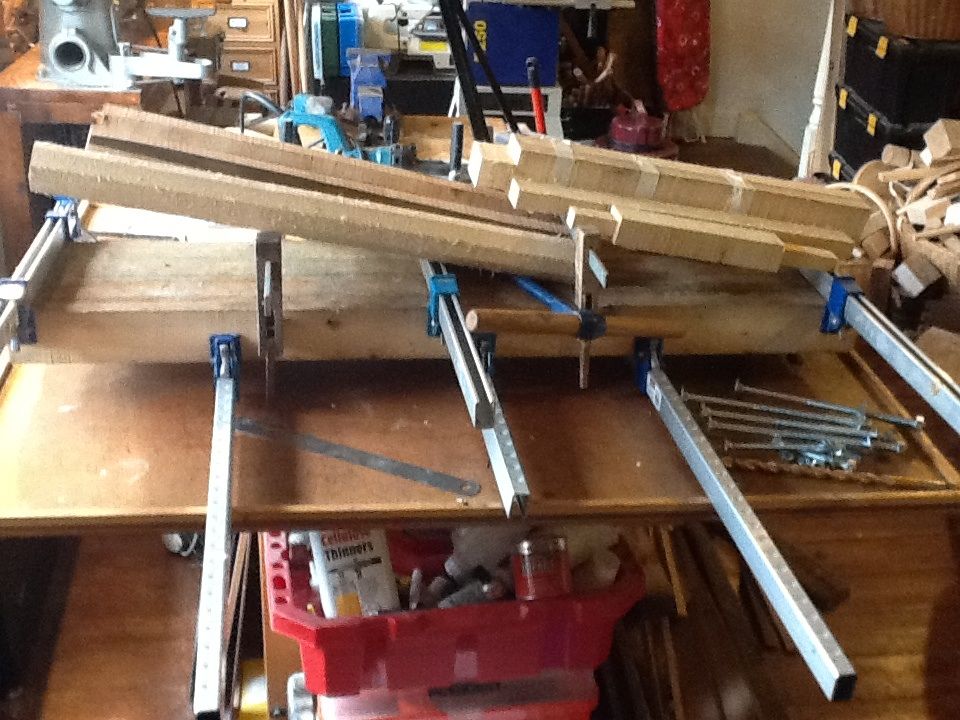
i still need to sort the 1x 6 x 28" pivot board and the wedge ( 12 long, 4.5 " high, about 4 or 5 wide. ) but here's the parts so far

The rear legs are beech but the rest of the wood is a mystery, I picked the heaviest, most closely grained wood for the horses parts, most of the rest went off to scouts about a hour ago, less some bits that will make a cradle to carry the 1cwt anvil I got last week . I've roughly sawed the legs into hexagon section to go on the lathe .

That's enough for today,

ATB

Tom
 
Last edited:

richardhomer

Settler
Aug 23, 2012
775
7
STOURBRIDGE
Thanks for sharing, I look forward to seeing how this turns out. (Just the Job I'm sure) I would also like to make a shave hoarse at some point too, So this thread is of interest too me.
 

tombear

On a new journey
Jul 9, 2004
4,494
556
54
Rossendale, Lancashire
Didnt get much done today, just turned the front leg fron some slightly dubious reclaimed wood.

image.jpg1_zpszbieo8yh.jpg


Between the cuts it's 17.5 inches, the last 4 inches turned down after a step to a tad over 1.5 inches dia. That being the size of my largest auger. Ill sand and scrape to get the tightest fit possible.

Next i'll do the two rear legs the same. I intend to make a block/guide for the auger I can clamp on so all three legs will be at the same angle when they are hammered in and wedged.

To get them cut the same length I will stand the main board so it's level with the feet a few inches off the ground and use what will be the same as a skirt length marker ( it will make more sense with photos ) to mark where to cut the legs so the bottoms are parallel to the floor.

ATB

Tom
 
Last edited:

VaughnT

Forager
Oct 23, 2013
185
61
Lost in South Carolina
Looking forward to how this turns out. I made a bodger's horse some time ago and found that I liked the wrap-around dumbhead design more than the pass-through style so common in America. I used 1/4" round stock for the pivot, but would have been had and shoulders better off if I had used a section of pipe instead. We get so fixated on using bolts and such for the axle that it never occurs to us that anything cylindrical will do the job. I had a pile of 3/4" thin-wall conduit that would have made a dandy pivot for the thing... .but I ran down to the hardware store to get some flimsy 1/4" round stock without even thinking about it.
 

tombear

On a new journey
Jul 9, 2004
4,494
556
54
Rossendale, Lancashire
Cheers!

yup, I did the same thing, bought threaded rod when I had a suitable thick bar of steel I could have used for the pivot, I could have put threads on the ends and only had to buy a couple of correct side nuts. Or turned a thick bar and just pegged it onto the frame thing. To stop the thread chewing into the wood ill scrounge some just big enough tube and line the hole though the base.

I'll try and be honest and admit when things ho wrong, if they do. I learn more from my mistakes than my successes!

ATB

Tom
 

tombear

On a new journey
Jul 9, 2004
4,494
556
54
Rossendale, Lancashire
I actually missed that, D'oh.

Theres no actually need to turn the legs, If you have the big auger but no lathe you could always carve the ends of the legs to fit or use square chiselled out holes and square legs, or bolt legs on the outside (I'd inset into the seat to stop them twisting). It all depends on the tools and materials you have.

This morning i'm just turning a rear leg, lovely piece of beech. There's a old rusty bolt hole going from side to side where the 1.5" section will be but I've rigged it so that will be in the middle of the plank/seat when it's wedged in and will hammer a plug in before its inserted. The 5 or 6 inch left over bit of the blank ill turn into a handle for a file before I saw the leg out of it, just not to waste the wood.

ATB

Tom
 

mr dazzler

Native
Aug 28, 2004
1,722
83
uk
you can make a fantasic little router jig to make perfect round and parallel tennons, basically a simple plywood box with a 1 1/4 inch hole in the side (if you want 1 1/4 inch round tennons) You have a router bit (round bottomed) coming in at 90 degrees to it (think of the router bit where normally a grub screw would be....), set so that the tip is exactly on the 1 1/4 inch perimeter. You have to taper the wood a little to start it in but essentially you feed the wood into the hole, and the router bit carves a nice cylinder for you. It works brilliantly. The pre drilled hole acts as an accurate guide template. You get a nice rounded shoulder, but if you used a straight bit you would get a nice square shoulder instead. I made the crudest possible version out of manky bits of shuttering ply and used a very weak old B&D 1/4 inch router, still worked fine.
BTW wasnt making fun of your project, just liked the "how this turns out" pun :)
 
Last edited:

mr dazzler

Native
Aug 28, 2004
1,722
83
uk
PS dont forget to put plenty of splay on the legs when you fit them to the seat/top, if they are too near the vertical you will find yourself constantly struggling to stay sat on the thing without it tipping over and it becomes awkward and uncomfartable to pull heavy cuts. 30 degrees back and 30 degrees to the side isnt too much (voice of bitter experiences) LOL
 

tombear

On a new journey
Jul 9, 2004
4,494
556
54
Rossendale, Lancashire
I think I may have the dead same router, a B&D bought about 20 years ago and used once to see if it worked. For some reason I've never got around to using it! As all my old B&D stuff has died due to hard use and been replaced by Makitas ( my heroin ) it's the one splash of bright orange left in the shed...

i didn't take offence! Just I'm normally the one making the bad puns!

Cheers for the tip on the legs. The plan called for a splay at 60 degrees, well 120 from the other side! Hang on, just to make sure I've got this right before I start drilling holes, the 30 degrees is that 30 degrees off of the vertical 90 degrees which is 60 degrees from the bench/seat bottom side. As you may have guessed, maths is not my strong point....

Its too late to finish the leg tonight but I should get it and its mate done tomorrow. I'll then sand the parts of the vice as well and use the plunge saw to do the holes for the tennons to go in. Ill make them small and pare them to size with a chisel.

ATB

Tom
 

mr dazzler

Native
Aug 28, 2004
1,722
83
uk
That sounds about right. 90 degrees is vertical, so 90 + 30 == 120 degrees

When you look from the side elevation, the leg should be sloping back at approx 30 degrees, and when you see it from the end elevation it will be also sloping out to the side at a 30 dergee angle too (compound angles)

Here is something like it

http://www.forestryforum.com/gallery/albums/userpics/16191/Shaving_horse2.jpg


I once made one that was too narrow set and it was wobbly, but otherwise was working fine. So rather than scrap it I nailed a 4 foot 4 x 2 lath under the back legs and the problem was solved.
Any way I hope it works out whichever methods you use, as long as it grips the work pieces, and is solid and stable, thats the main thing. Using beech as you have increases the weight which helps to make the thing more solid too.
 
Last edited:

tombear

On a new journey
Jul 9, 2004
4,494
556
54
Rossendale, Lancashire
Cheers! Thanks for that. In the end I got nowt done on it today, instead the eldest and I went on a 7 hour round trip by in the end 7 buses to Bolton to buy him ( technically me ) his first air rifle, a shiny new HW99S.

i'm going nowhere tomorrow and will be on my lonesome soishould get plenty done after the youngest two are off to school for the last day of term. Likewise Wednesday they are off to Blackpool so ill get ome I disturbed time then.

ATB

Tom
 

tombear

On a new journey
Jul 9, 2004
4,494
556
54
Rossendale, Lancashire
Just got the 2nd leg finished, and used up the end turning a super chunky handle for the huge Victorian file I did up a couple of weeks back. I just need some thick, one inch internal diameter brass tube to make a collar.

image.jpg2_zpsnecrsw8j.jpg


Despite what it looks the two legs are both exactly 17.5 inches between the cuts and the ends are 4 inches long before the step and both a tiny amount over 1.5" dia. I'll scrape/sand in a tiny taper once the holes are drilled for them.

Will set up the last leg for turning now.


ATB

Tom
 
Last edited:

tombear

On a new journey
Jul 9, 2004
4,494
556
54
Rossendale, Lancashire
And in my ongoing series of remarkably similar photos, the last leg!

image.jpg1_zpskghzvntt.jpg


Again rather than waste the end piece or lose it while waiting to be turned into something else,I turned another chunky tool handle of the size it's difficult to buy.

That's enough for today.

ATB

Tom
 
Last edited:

tombear

On a new journey
Jul 9, 2004
4,494
556
54
Rossendale, Lancashire
Today I worked on the arm contraption that holds the job down that you controll with your feet. I belt sanded them smooth after I'd drilled the pivot holes and cut out the mortis for the tennons ( or the other way around, I made the holes anyway. The plunge saw ( you could have drilled and chiseled them ) made it a quick job after I'd accurately marked them out

image.jpg1_zpsko46rwti.jpg


Then a final hand sand and a test assembly. A major cock up that thankfully sanded out was denting the edge of the holes when levering the waste out. This stuff really soft and I'm very glad I left everything good and chunky.

image.jpg2_zpsl04c7ror.jpg


After a late dinner I'll glue and peg the foot board and top piece in place. The woods so horrid and stained I think I'm going to use some stained Dannish oil on it all, hopefully if I use different amounts on each different type of wood I can get them all to vaguely match! Not really a must but I get to use up the oil rather than the linseed I bought full whack.


ATB

Tom
 
Last edited:

tombear

On a new journey
Jul 9, 2004
4,494
556
54
Rossendale, Lancashire
Thanks! I got on with it a bit more today and yesterday.

first off ill tell you how I started doing this, then how by the end the method I should have used. Allowing for where I want the legs to go and a bolt hole or two at the fore end, I used a power drill in a guide to drill pilot holes as deep as a 1/4 drill would go from the side most near to 90 degrees from the top ( had it been out i would have made it so ) then used a same sized scotch eye auger to drill all the way through, onto a wooden block to reduce splitting, thankfully they all came out just about where I wanted them to.

Now this I'd where I went wrong as I then drilled through from both sides, meeting in the middle with the size drill to take the bolt with a minimal amount of hammering. I then tried to used a brace and bit to make the recess for the coach bolt head and opposing washer and nut. Unfortunately the wood was too prone to splintering, the bits are good and sharp so I can only blame my own lack of skill and the wood! I then had a go with a 32 mm flat bit in a power drill and this worked much much better, especially when taken slowly. I used a temp plug in the holes to centre the flat bitt each time, repeating for both sides. Eventually, with a lot of swearing, I got all 4 bolts through, marked them, hammered them out again and cut them to size, filed them smooth, hammered them back in and tightened up the nuts onto the washers until a mill or less of the bolt protruded from the nut, which I riveted over with a ball pein.

image.jpg1_zpszzdodvdu.jpg


Heres what I was doing by the end/ what I reckon would have worked best.

Do the pilot hole as before, you can get long wood drills from even pound shops now, then the recess with the flat bit, through some clamped on scrap wood if I wanted a really crisp edge, each side. A Fostner bit would probably do the job best if you have one big enough. Drill through from both sides, ideally through the washer thats sized to fit the recess on the nut side. If you have a drill long enough to go all the way through I still suggest you go just over half way from each side rather than all the way through. Use a thin dowel of similar to mark the length each bolt needs to be so you ont need to knock the bolt out after marking where to cut.

Next I used a belt sander and a power plane to square off the sides and top, getting the cleanest and flattest surfaces I could without losing too much of the reclaimed wood. It was quite hard not to go made and get down to the perfect wood deep inside, if I had I doubt it would have ended much over 2 inch thick! Currently without the bottom levelled off its 2 and 7/8ths . Length is just over 43 inches.

Since we are off to a mates in Nottinghamshire for the weekend , coming back via reenactment do at Newark on Trent if the weathers not foul, I've cleaned up and the middle son has put all the tools away. As the woods extremely dry, patchy in colour and stained and I picked up two litre tins for 3 quid the lot I have slapped on lots of Danish oil that has a brown stain in it, nominally " Jacobean oak ". The woods very thirsty , it's sucking it in at a great rate and the woods looking less nasty, not that it matters.

Here's the parts as they stand now.

image.jpg3_zpscaxbzq0j.jpg


I need to drill the vertical bolt hole at the front the job rest will be held by and the horizontal one the cross pin on the arm contraption will pivot through. I'd rather like to line the pivot hole with metal tubing if I can score some the right internal diameter. Then I need to make the guide for drilling the holes for the legs, Then it's just a 6 x 28 x 1 inch board with a 1/2 in bolt hole at one end and the wedge.

ATB

Tom
 
Last edited:

tombear

On a new journey
Jul 9, 2004
4,494
556
54
Rossendale, Lancashire
Herself ( who thankfully has enough no shame to counterbalance my painful shyness) cadged another load of sycamore from some nice unsuspecting chaps clearing trees on a brownfield site in Manchester so most of today has been spent chopping it up along various natural cracks in the hope it won't split. I've been very lucky with the last lot, the stuff cut down into bits suitable for turning small things or spoon and ladle blanks haven't split but the big chunk for the hat blank is riddled with shakes.

Anyroad, I managed to make the 12 inch long, 4 inch wide and 4.5 inch high wedge from a section of branch. It will certainly crack but I have nothing seasoned big enough and if it starts to come apart it doesn't matter if I stick bolts through it or squirt superglue into it. I also tidied up ( it could do with more to flatten it completely ) the 28 inch by just shy of 6 and 1 piece of pine I got to make the job support piece. That needs a hole drilling in it but ill leave that for the final assembly stage.

image.jpg1_zpsbop51gsv.jpg


For the wedge I cut at foot long section of log , planed down a side until there was a flat section 4.5 inch wide, flipped it and working to the flat section planned down the top until it was parallel 4 inches up. After a bit if checking and marking out I used the band saw to cut the sides 4.5 inch apart and then two equal wedges from the wooden brick I had made.

When I assemble it I will be adding pegged on guide strips for the wedge as per the instructions.

So I need to make the guide to help me drill the sloping holes for the legs, cut the tops of the legs to take wedges, make the wedges and drill the hole for the pivot on the arm/vice bit.

ATB

Tom
 
Last edited:

tombear

On a new journey
Jul 9, 2004
4,494
556
54
Rossendale, Lancashire
We bashed on at the horse and got this far.

image.jpg3_zpsjxsndx7l.jpg


One of the back legs is way off the mark, some how the 2nd hole we drilled was off by a few degrees so I had to turn a extension to that leg, drilled a inch wide hole into the leg and glued it into place.

The legs just hammered into place, no need for a wedge or glue even. There were some gaps so I mixed sawdust with PVA and used it as a filler.

To level the legs I stood the seat on top of a couple of identical paint tins with been cans on top so the thing was level with the legs dangling with the longest one just above the work bench top it was all standing on. I then found a little pot the right height and taped a sharpie to the top. I could then draw lines parallel to the bench top on the legs as a guide to sawing them level as long as I could make them. If I hadn't extended the leg mentioned above I'd have had to cut so much off the other two to get them the same length that the foot bar on the swinging clamp would have hit the floor!

Anyway, mutant looking leg asside it's gone together pretty well. Tomorrow i'll finish sanding it down, adjust it as required, fit the 18 inch long guide bars for the wedge and oil/stain it to death. I'm thinking of tacking some rubber to the bottom of the legs to protect the varnish on the floor it will stand on most of the time.

ATB

Tom
 
Last edited:

BCUK Shop

We have a a number of knives, T-Shirts and other items for sale.

SHOP HERE