This may well be a mistake but hey ho, lest we try
A very non-definitive guide to how I make a leather bottle.
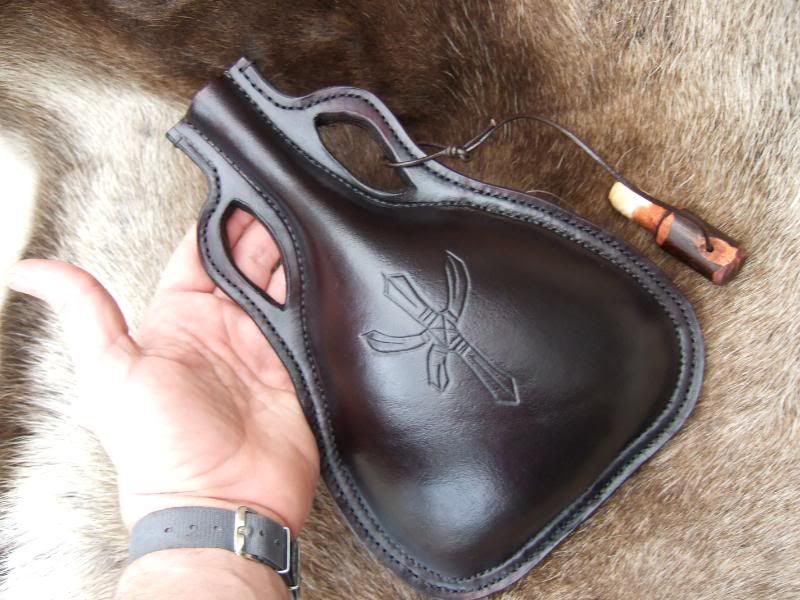
This bottle is based on the ones recovered from the wreck of the Mary Rose.
Bottles like this were commonly in use in Great Britain from the 11th century to the beginning of the 17th and hopefully this will be an example of traditional wax cuir bolli (soaked in boiling beeswax to create a great strength within the leather and a waterproof and fairly easily maintainable finish.
I should have really made this up first then posted but hey, lets do it live (well, almost), that way, when I get the final wax dipping wrong and the bottle ends up looking like overcooked bacon we can all either laugh, cry or try to work out what the hell I did! :O
Ill try to make this as painless as possible so bear with me and my apologies for missing out gert great bits; I think that some things need no pictures.
It starts out with a paper pattern and some 3.5mm (ish) veg tan shoulder

I have a master pattern in card but use paper on actual cutting.

Cut out the two halves and then the welt.
Some of the recovered bottles only had a partial welt, it seems to preserve the round shaping of the neck but I have found that the full welt not only adds much to the strength but also, when combined with a narrow edge prevents any warping of the leather.

The above shows the two halves and welt glued and the stitching pattern marked out with an adjustable groover. You need to be a little more creative with the stitch marks around the handle sections, just a matter of care, time and patience.
If Im going to add any decoration I scribe in the design at this stage, be very careful not to go through the surface of the hide, if you do it can split open when it wet moulded.
After Im happy with the stitching layout the holes are drilled out (1.5mm) then the bottle is saddle stitched with waxed linen.

Once I have got this far and am happy that it looks ok I mark the handle holes and cut them out. Now its looking more like a bottle, hopefully!

Now its off to the bath. I soak a bottle this size in several changes of hot water for a couple of hours, at least until the leather stops fizzing.
Pointless picture of leather fizz .

Once Im happy the leather is pliable enough its time for shaping. I used to use sand but found it a bit of a pain really and now use pearl barley (thanks Eric!). Its still traditional and much easier to remove from the item.
Packing the barley take a bit of time and the judicious use of a length of dowel to make sure it takes the shape you are after. Its a fair effort too, a guide being that if you push hard enough to break the dowel then thats too hard!
You also need to take care that you dont mark the surface of the leather; any scratches on it now can be a pain to remove later.

Ive just used a cork to seal the top here and will now let the poor thing rest on some scrap leather till its dry, weather permitting a couple of days. Any hint of water in the bottle can ruin the wax dipping so its really worth waiting.

It at least looks more like the final shape now.
Thanks for taking the time to read this, if any of you have got this far and are still interested then Ill post the next steps when this bottle dries out.
Cheers
Mike
A very non-definitive guide to how I make a leather bottle.
This bottle is based on the ones recovered from the wreck of the Mary Rose.
Bottles like this were commonly in use in Great Britain from the 11th century to the beginning of the 17th and hopefully this will be an example of traditional wax cuir bolli (soaked in boiling beeswax to create a great strength within the leather and a waterproof and fairly easily maintainable finish.
I should have really made this up first then posted but hey, lets do it live (well, almost), that way, when I get the final wax dipping wrong and the bottle ends up looking like overcooked bacon we can all either laugh, cry or try to work out what the hell I did! :O
Ill try to make this as painless as possible so bear with me and my apologies for missing out gert great bits; I think that some things need no pictures.
It starts out with a paper pattern and some 3.5mm (ish) veg tan shoulder
I have a master pattern in card but use paper on actual cutting.
Cut out the two halves and then the welt.
Some of the recovered bottles only had a partial welt, it seems to preserve the round shaping of the neck but I have found that the full welt not only adds much to the strength but also, when combined with a narrow edge prevents any warping of the leather.
The above shows the two halves and welt glued and the stitching pattern marked out with an adjustable groover. You need to be a little more creative with the stitch marks around the handle sections, just a matter of care, time and patience.
If Im going to add any decoration I scribe in the design at this stage, be very careful not to go through the surface of the hide, if you do it can split open when it wet moulded.
After Im happy with the stitching layout the holes are drilled out (1.5mm) then the bottle is saddle stitched with waxed linen.
Once I have got this far and am happy that it looks ok I mark the handle holes and cut them out. Now its looking more like a bottle, hopefully!
Now its off to the bath. I soak a bottle this size in several changes of hot water for a couple of hours, at least until the leather stops fizzing.
Pointless picture of leather fizz .
Once Im happy the leather is pliable enough its time for shaping. I used to use sand but found it a bit of a pain really and now use pearl barley (thanks Eric!). Its still traditional and much easier to remove from the item.
Packing the barley take a bit of time and the judicious use of a length of dowel to make sure it takes the shape you are after. Its a fair effort too, a guide being that if you push hard enough to break the dowel then thats too hard!
You also need to take care that you dont mark the surface of the leather; any scratches on it now can be a pain to remove later.
Ive just used a cork to seal the top here and will now let the poor thing rest on some scrap leather till its dry, weather permitting a couple of days. Any hint of water in the bottle can ruin the wax dipping so its really worth waiting.
It at least looks more like the final shape now.
Thanks for taking the time to read this, if any of you have got this far and are still interested then Ill post the next steps when this bottle dries out.
Cheers
Mike