[FONT="] I thought I'd do a quick tutorial on my current hammock set up. It may not be useful to everyone, but hopefully it will benefit those folk who are thinking of buying a hammock, or are not sure on set ups.
Obviously there are a number of ways to set up a hammock - and this is just my way - to be used for information purposes only.
Overview
[/FONT]
The DD Frontline Hammock (in my opinion) is the best offering from DD Hammocks.
What DD say about the Frontline:
The hammock comes with built on mosquito net. It has zips on either side of the mosquito net which allow for very quick entry / exit either side of the hammock, it also allows the mosquito net to be tied above the hammock out of the way when not needed and it can be dropped back down in seconds as soon as required.
It has a two layer base which is made from an ultra comfy form of polyester (with Velcro patches between the layers). It is not waterproof (an advantage as it makes it extremely breathable and you can also cocoon yourself between the layers if you wish). As well as for use in the UK / Europe this hammock is a great jungle hammock due to its breathability and built in fine mesh mosquito net.
[FONT="] All of the above is correct, and when my Frontline first arrived, I was very impressed with the build quality, and features. It does exactly what it says on the tin. At a very reasonable price too!

The Karabiner Mod
This is a very useful (and relatively inexpensive) modification you can do that will make your setup and pack away time very quick indeed.
Firstly, I went to my local Go Outdoors, and purchased 20metres of climbing tape (25mm wide). Then I cut 2 lengths at 3ft each and sealed the ends.
The next step is to remove the existing webbing straps from your Hammock, and replace them with one of the 3ft lengths of climbing tape at each end. The easiest way to do this, is to attach your new tapes to your existing ones using sticky tape and pull it all the way through. Tie the ends together using a Double Fishermans knot (important!!).
Next, cut yourself 2 lengths of Climbing Tape at approximately 7metres each. Double each one in half and tie the ends together using an Overhand Knot, then continue to tie the same knot approximately every 10 inches (roughly every two fists), stopping around 2ft from the end.

The basic modification is now complete. All that is required is a pair of climbing Karabiners. You can use any Karabiner, aslong as its rated for climbing use. The amount of load that is applied to the straps laterally is roughly 10 times your body weight, so a good Karabiner is a must. Mine are Petzel OK ones in black. These are available from a range of places.
The Setup
Take your new straps and sling one around each tree passing the knotted end through the loop end.
Then simply link your hammock you hammock to the straps using the Karabiner. The knots in the straps form the tension. If you cannot quite get the tension you require, just add another knot.


Next, remove the Hammock sleeve (if you have one), and you are ready to test your setup for the first time!
One very useful addition to my setup is a pair of spreader bars. These are used to spread the mosquito net, thus providing headroom inside once you are all zipped in etc.
You can make spreader bars each time you use the hammock by whittling the ends of a pair of sticks to a point. Personally, I got fed up of doing this, and made a pair of permanent ones.
These are made from a pair of carbon fibre tent poles (which you can but in twin packs as spares for very little money). They will usually have a metal sleeve on one end - cut this off to give you a length of 17in.

The final step is to fit the spreader bars, and attach a pair of bungees to the loops on the mosquito net then to each of your supporting trees - this pulls the mosquito net upwards providing you with decent space inside.

[FONT="] Thats it. You are ready for a comfy night in the wild!
[/FONT]
[/FONT]
Obviously there are a number of ways to set up a hammock - and this is just my way - to be used for information purposes only.
Overview
[/FONT]
The DD Frontline Hammock (in my opinion) is the best offering from DD Hammocks.
What DD say about the Frontline:
The hammock comes with built on mosquito net. It has zips on either side of the mosquito net which allow for very quick entry / exit either side of the hammock, it also allows the mosquito net to be tied above the hammock out of the way when not needed and it can be dropped back down in seconds as soon as required.
It has a two layer base which is made from an ultra comfy form of polyester (with Velcro patches between the layers). It is not waterproof (an advantage as it makes it extremely breathable and you can also cocoon yourself between the layers if you wish). As well as for use in the UK / Europe this hammock is a great jungle hammock due to its breathability and built in fine mesh mosquito net.
[FONT="] All of the above is correct, and when my Frontline first arrived, I was very impressed with the build quality, and features. It does exactly what it says on the tin. At a very reasonable price too!
The Karabiner Mod
This is a very useful (and relatively inexpensive) modification you can do that will make your setup and pack away time very quick indeed.
Firstly, I went to my local Go Outdoors, and purchased 20metres of climbing tape (25mm wide). Then I cut 2 lengths at 3ft each and sealed the ends.
The next step is to remove the existing webbing straps from your Hammock, and replace them with one of the 3ft lengths of climbing tape at each end. The easiest way to do this, is to attach your new tapes to your existing ones using sticky tape and pull it all the way through. Tie the ends together using a Double Fishermans knot (important!!).
Next, cut yourself 2 lengths of Climbing Tape at approximately 7metres each. Double each one in half and tie the ends together using an Overhand Knot, then continue to tie the same knot approximately every 10 inches (roughly every two fists), stopping around 2ft from the end.
The basic modification is now complete. All that is required is a pair of climbing Karabiners. You can use any Karabiner, aslong as its rated for climbing use. The amount of load that is applied to the straps laterally is roughly 10 times your body weight, so a good Karabiner is a must. Mine are Petzel OK ones in black. These are available from a range of places.
The Setup
Take your new straps and sling one around each tree passing the knotted end through the loop end.
Then simply link your hammock you hammock to the straps using the Karabiner. The knots in the straps form the tension. If you cannot quite get the tension you require, just add another knot.
Next, remove the Hammock sleeve (if you have one), and you are ready to test your setup for the first time!
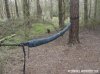
One very useful addition to my setup is a pair of spreader bars. These are used to spread the mosquito net, thus providing headroom inside once you are all zipped in etc.
You can make spreader bars each time you use the hammock by whittling the ends of a pair of sticks to a point. Personally, I got fed up of doing this, and made a pair of permanent ones.
These are made from a pair of carbon fibre tent poles (which you can but in twin packs as spares for very little money). They will usually have a metal sleeve on one end - cut this off to give you a length of 17in.
The final step is to fit the spreader bars, and attach a pair of bungees to the loops on the mosquito net then to each of your supporting trees - this pulls the mosquito net upwards providing you with decent space inside.
Note - in the image above, you will notice a Clingon, and Paracord is used
DO NOT USE PARACORD
I only used this for demo purposes as I misplaced my bungees when doing this review.
YOU MUST USE BUNGEES
They need to stretch when you enter your hammock - if not, you will tear your mosquito net to pieces!!
[FONT="] Thats it. You are ready for a comfy night in the wild!
[/FONT]
[/FONT]

")