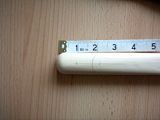
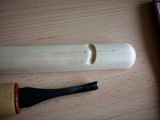
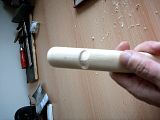
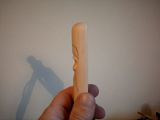
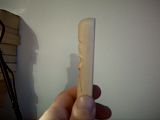
Ok, you asked for it so I'll do my best! I'm using a piece of Lime for this as I'm making a load of incence holders for sale. The prcedure is the same as for a branch or stick though, just debark an area about 1/3 the diameter by 2 or 3 inches, depending on the size of the wood. This one is on an inch wide piece. *edit* forgot to say, all pics are thumbnails linked to the full-size pics on my photobucket acct.
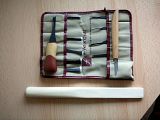
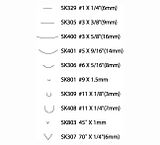
Here's the tools I'll be using - the Flexcut 11-piece travel set from Axminster Tools ( LINK ) and the piece of Lime I'll be carving. I've cut the square length into a wedge shape so I got 2 bits from the one length and I've rounded off the thick end ready for carving. . I've added a pic showing the profiles of the tools I'm using.
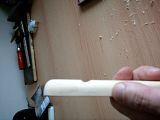
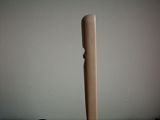
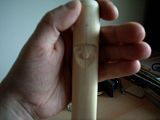
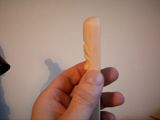
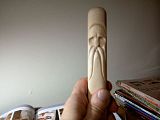
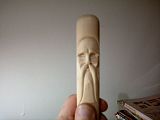
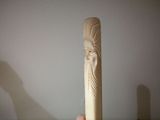
Draw a centre line down the middle and decide where you want the eyes to be. Draw a curved line at that point. Using the 1/4" veiner (SK408) carve out the curved line. Once that's done take off the sharp edges with one of the flatter gouges (I use the 305 or the 306). You just want to take the edge off the top as that will be the eyebrows. On the bottom of the cut take more off until the profile looks like the last pic.
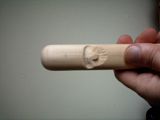
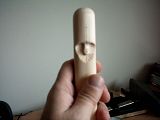
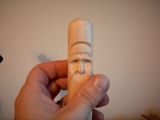
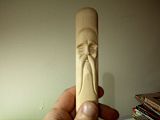
Going back to the 1/4" veiner, drive the bit into the wood, starting off at an angle and bringing it upright as you go in. This will form the bottom of the nose. Go to the 306 gouge and carve away the wood from the base of the nose as shown, you want it to end up something like the porfile shown.
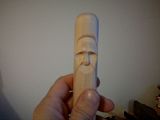
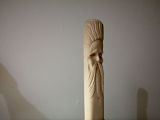
Draw in the centre line again then draw the profile of the nose and eye sockets (you can just about make them out in the pic). Using the veiner again carve the wood away from thelines up towards the bridge of the noes then as you reach the bridge turn the gouge and carve out the eye sockets. Don't go too deep as you still need some wood to form the eye but take it deep enough to lift the nose away from the eye area.
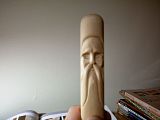
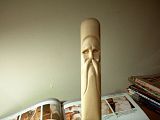
Draw in the eyebrow ridge and the outside of the moustache lines. Using the 1/8" veiner carve out the eyebrows. Use the knife to round off the edge of the brows. Draw in the hairline as shown.
Using the V-gouge (SK307) carve out a deep vee on the hairline, fading the cut out as you reach the eyeline. You can use the side of the V-gouge or a knife to round over the edges of the cut. Use a knife or one of the flatter gouges to flatten the forehead between the eyebrow cut and the hairline.
Now we turn to the moustache. These lines are up to you, how you want the beard and moustache to come out depends on the placing of these lines. Cut out the outside line you marked earlier with the V-gouge, making the cut nice and deep. Fade it out towards the end of the cut. This cut also gives you the cheekbones. Mark in the bottom of the moustache and carve these out in the same way. Round off the edges of the cuts with a knife. Mark the bottom lip in as shown.
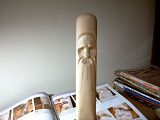
Going carefully, using the 1/8" veiner, cut the wood from the lower lip and round things off with a knife or small gouge. You want the area under the lip to slope gently to the lip. This area will be the beard. For the mouth you take a small but deep triangular chip from the area above the lip up to the nose. Use a good sharp thin-bladed knife for this and get it as deep as you can - you want a nice deep shadow here. Don't make it too wide, just the distance between the moustaches, and don't forget to leave enough wood for the lower lip.
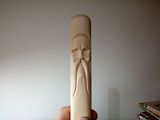
Hopefully, you can see I've marked two sort've 'S' shaped lines alongside the face. These are the next area to carve and will form the sides of the face. Use one of the veiners to cut these. Go straight into the wood and carefully lever the gouge outwards so you take a scoop out of the wood. Make the cuts fairly deep as you'll need to round off the top edge to form the cheeks and the edges of the eye sockets.
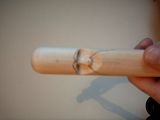
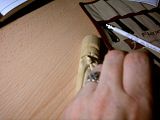
Ok, now we go on to a new tool for the eyelids, the SK801. This is a very small veiner in effect. I've tried to give you an action shot here to demonstrate what you need to do. You want to gouge out a line in the underside of the eyebrow ridge to give you both a bit of an overhang on the brows and a line for the upper eyelid. The dark shadow in front of my tooltip is where I've carved the line. Next you want to draw the eyes in. I'm sorry the pic isn't that clear but basically you want 3 lines on each side, 2 to form the oval of the eye and one to form the bags under the eyes. Make this one nice and droopy and don't worry too much about symmetry as these figures are usually cariacatures. Another new tool now, the tiny V-gouge SK803. This is the tool you need to use to carve out the lines for the eyes. Then go back to the 801 veiner for the 3rd line, the one to delineate the bags under the eyes. Smooth the lower edge of this cut into the cheeks.
Now for the eyes. This is going to be difficult as my camera just isn't good enough to show any detail here so you're going to have to go from descriptions I'm afraid. I did find this excellent eye-carving instructional link that may be of help, it doesn't do things quite the same way I do but is probably better all round (I just haven't learned this way yet") ) Eye Study Stick
) Eye Study Stick
How I do it is to take my knife and run it round the bottom of the v-cuts you made earlier to deepen the cut. You're not taking any wood out with these cuts, just deepening the one you made with the gouge. Now what you really want is the finest, sharpest, thinnest and pointiest knife you've got! Mine, the one in the pic at the start of this thread, is really far too big in the point. An X-Acto type knife would be ideal, or a proper carvers detail knife if you can get one. Now, take a triangular chip from each of the corners of the eye to give a bit of depth and shadow to those areas then carefully round off the eyeball with the tip of the knife. This is a right pig of a job on the bottom of the eyeball as you have to be really careful you don't carve chunks out of the eyebrow while you're rounding off the eyeball. This is where the nice pointy knife would be really handy! Once you've rounded off the eyeball you want to take out a little divot with the 801 veiner. This is the pupil. Don't have the guy looking straight ahead as it makes him look either scared or stoned Try to ensure the eyes are looking in the same direction too Next add small curved cuts to the eyeball to delineate the iris. Is that the right term? Separate the coloured bit from the white anyway. Last job on the eyes is to use the tiny V-gouge to make the crows feet at the edge of the eye.
I just realised I didn't take any shots of the nose and ours is still rather shapeless. Well, it's not really that difficult. First give it a bit of shape with the 1/8" veiner, starting from just above the base of the nose to make the nostrils stand out from the body of the nose itself. I use my knife to round off the nose. For the nostrils, use the same technique you used for the pupil - take out a small divot from under each side of the nose with the 801 veiner.
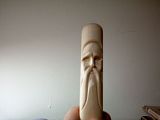
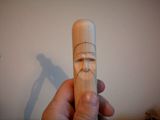
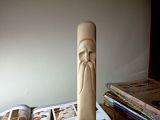
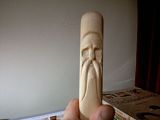
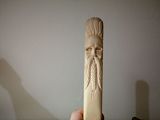
Ok, we're nearly at the end! Take a good look at the face and see if there's any areas where you need to tidy it up, make any changes, smooth anything out etc., etc.. Then it's onto the hair and beard. This is all down to individual preference and I try not to do two with the same style What you want is a mixture of deeper vee cuts interspersed with shallower ones. Don't make them straight as it looks bloody awful - I know! Use sweeping 'S' shaped cuts and fade them out at the ends. Make some long cuts and others shorter. It's something you only really get with practice - my early hair and beards were absolutely terrible!
Well, that's it! If you have any questions or if there's any way I can help, just shout. I'll see what I can do - after I get some sleep! It took me as long to write this as it did to carve it and it's gotten just a tad later than I was expecting.
Good luck, and I expect to see a few woodspirits posted on here soon!
Here's the tools I'll be using - the Flexcut 11-piece travel set from Axminster Tools ( LINK ) and the piece of Lime I'll be carving. I've cut the square length into a wedge shape so I got 2 bits from the one length and I've rounded off the thick end ready for carving. . I've added a pic showing the profiles of the tools I'm using.


Draw a centre line down the middle and decide where you want the eyes to be. Draw a curved line at that point. Using the 1/4" veiner (SK408) carve out the curved line. Once that's done take off the sharp edges with one of the flatter gouges (I use the 305 or the 306). You just want to take the edge off the top as that will be the eyebrows. On the bottom of the cut take more off until the profile looks like the last pic.


Going back to the 1/4" veiner, drive the bit into the wood, starting off at an angle and bringing it upright as you go in. This will form the bottom of the nose. Go to the 306 gouge and carve away the wood from the base of the nose as shown, you want it to end up something like the porfile shown.


Draw in the centre line again then draw the profile of the nose and eye sockets (you can just about make them out in the pic). Using the veiner again carve the wood away from thelines up towards the bridge of the noes then as you reach the bridge turn the gouge and carve out the eye sockets. Don't go too deep as you still need some wood to form the eye but take it deep enough to lift the nose away from the eye area.


Draw in the eyebrow ridge and the outside of the moustache lines. Using the 1/8" veiner carve out the eyebrows. Use the knife to round off the edge of the brows. Draw in the hairline as shown.


Using the V-gouge (SK307) carve out a deep vee on the hairline, fading the cut out as you reach the eyeline. You can use the side of the V-gouge or a knife to round over the edges of the cut. Use a knife or one of the flatter gouges to flatten the forehead between the eyebrow cut and the hairline.


Now we turn to the moustache. These lines are up to you, how you want the beard and moustache to come out depends on the placing of these lines. Cut out the outside line you marked earlier with the V-gouge, making the cut nice and deep. Fade it out towards the end of the cut. This cut also gives you the cheekbones. Mark in the bottom of the moustache and carve these out in the same way. Round off the edges of the cuts with a knife. Mark the bottom lip in as shown.


Going carefully, using the 1/8" veiner, cut the wood from the lower lip and round things off with a knife or small gouge. You want the area under the lip to slope gently to the lip. This area will be the beard. For the mouth you take a small but deep triangular chip from the area above the lip up to the nose. Use a good sharp thin-bladed knife for this and get it as deep as you can - you want a nice deep shadow here. Don't make it too wide, just the distance between the moustaches, and don't forget to leave enough wood for the lower lip.
Hopefully, you can see I've marked two sort've 'S' shaped lines alongside the face. These are the next area to carve and will form the sides of the face. Use one of the veiners to cut these. Go straight into the wood and carefully lever the gouge outwards so you take a scoop out of the wood. Make the cuts fairly deep as you'll need to round off the top edge to form the cheeks and the edges of the eye sockets.


Ok, now we go on to a new tool for the eyelids, the SK801. This is a very small veiner in effect. I've tried to give you an action shot here to demonstrate what you need to do. You want to gouge out a line in the underside of the eyebrow ridge to give you both a bit of an overhang on the brows and a line for the upper eyelid. The dark shadow in front of my tooltip is where I've carved the line. Next you want to draw the eyes in. I'm sorry the pic isn't that clear but basically you want 3 lines on each side, 2 to form the oval of the eye and one to form the bags under the eyes. Make this one nice and droopy and don't worry too much about symmetry as these figures are usually cariacatures. Another new tool now, the tiny V-gouge SK803. This is the tool you need to use to carve out the lines for the eyes. Then go back to the 801 veiner for the 3rd line, the one to delineate the bags under the eyes. Smooth the lower edge of this cut into the cheeks.


Now for the eyes. This is going to be difficult as my camera just isn't good enough to show any detail here so you're going to have to go from descriptions I'm afraid. I did find this excellent eye-carving instructional link that may be of help, it doesn't do things quite the same way I do but is probably better all round (I just haven't learned this way yet
) Eye Study StickHow I do it is to take my knife and run it round the bottom of the v-cuts you made earlier to deepen the cut. You're not taking any wood out with these cuts, just deepening the one you made with the gouge. Now what you really want is the finest, sharpest, thinnest and pointiest knife you've got! Mine, the one in the pic at the start of this thread, is really far too big in the point. An X-Acto type knife would be ideal, or a proper carvers detail knife if you can get one. Now, take a triangular chip from each of the corners of the eye to give a bit of depth and shadow to those areas then carefully round off the eyeball with the tip of the knife. This is a right pig of a job on the bottom of the eyeball as you have to be really careful you don't carve chunks out of the eyebrow while you're rounding off the eyeball. This is where the nice pointy knife would be really handy! Once you've rounded off the eyeball you want to take out a little divot with the 801 veiner. This is the pupil. Don't have the guy looking straight ahead as it makes him look either scared or stoned
Try to ensure the eyes are looking in the same direction too Next add small curved cuts to the eyeball to delineate the iris. Is that the right term? Separate the coloured bit from the white anyway. Last job on the eyes is to use the tiny V-gouge to make the crows feet at the edge of the eye.I just realised I didn't take any shots of the nose and ours is still rather shapeless. Well, it's not really that difficult. First give it a bit of shape with the 1/8" veiner, starting from just above the base of the nose to make the nostrils stand out from the body of the nose itself. I use my knife to round off the nose. For the nostrils, use the same technique you used for the pupil - take out a small divot from under each side of the nose with the 801 veiner.


Ok, we're nearly at the end! Take a good look at the face and see if there's any areas where you need to tidy it up, make any changes, smooth anything out etc., etc.. Then it's onto the hair and beard. This is all down to individual preference and I try not to do two with the same style
What you want is a mixture of deeper vee cuts interspersed with shallower ones. Don't make them straight as it looks bloody awful - I know! Use sweeping 'S' shaped cuts and fade them out at the ends. Make some long cuts and others shorter. It's something you only really get with practice - my early hair and beards were absolutely terrible!


Well, that's it! If you have any questions or if there's any way I can help, just shout. I'll see what I can do - after I get some sleep! It took me as long to write this as it did to carve it
and it's gotten just a tad later than I was expecting.Good luck, and I expect to see a few woodspirits posted on here soon!
