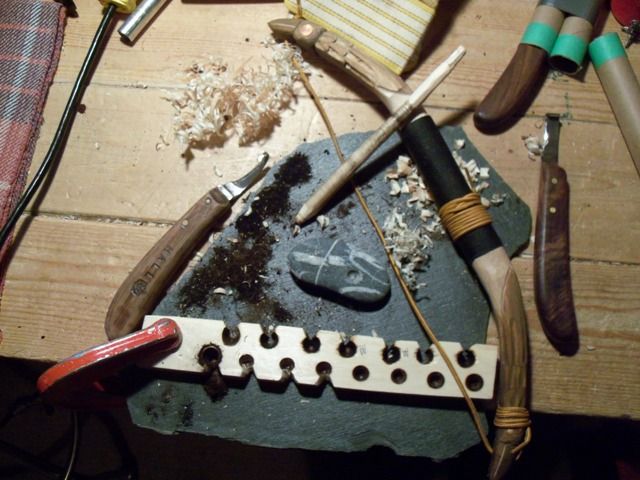
Bowdrill Fire Kit

  • Hey Guest, Early bird pricing on the Summer Moot (29th July - 10th August) available until April 6th, we'd love you to come. PLEASE CLICK HERE to early bird price and get more information.

Robson Valley

Full Member
Nov 24, 2014
9,959
2,665
McBride, BC
The bow is birch.
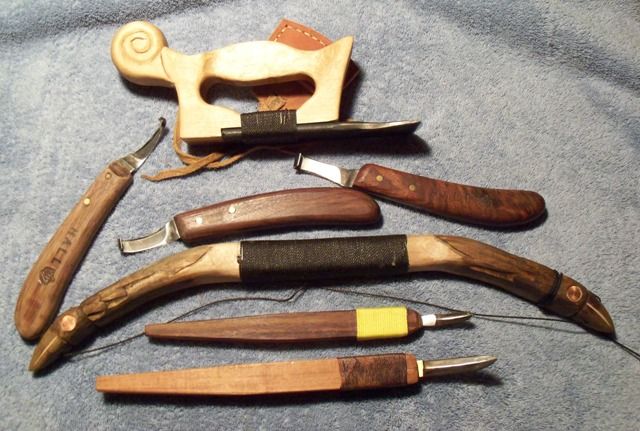
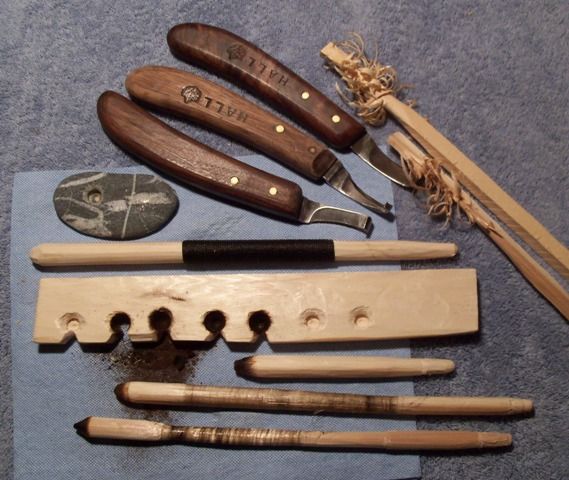
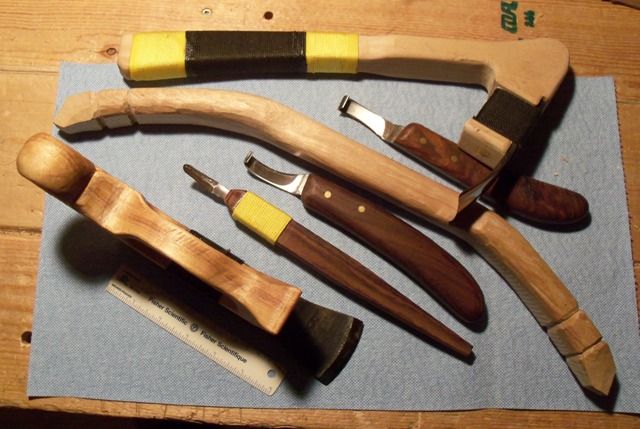
1. The pair of carved Ravens hold the cord in their beaks. The tarred black #18 nylon seine line was too slippery so it was replaced with boot lace. That spins the drills in both directions very well.
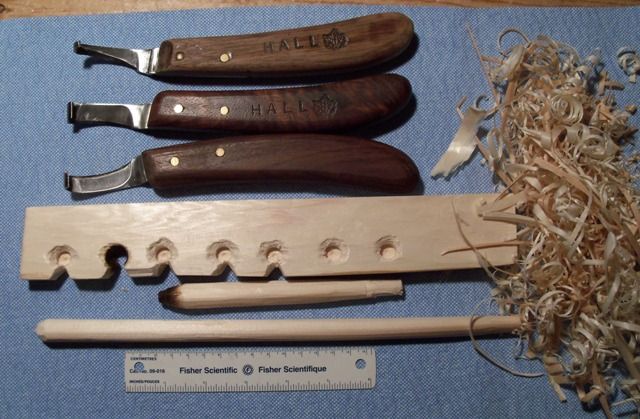
2. Both the hearth board and the drills are very dry western red cedar sapwood. I have lots of that, making more is easy.
3. I buy the blades for the Pacific Northwest style wood carving tools and make up all the wood work myself.
4. I'm sure everybody recognizes everything.
5. I am open to suggestions to see embers instead of nothing but a whole lot of smoke! For example, look carefully at the drill diameters. More?


BowB_zpscyun2pms.jpg


DrillrodB_zpshuoaknl0.jpg


DrillrodC_zps3bovbsw6.jpg


BowE_zpsp5hr7ul8.jpg


BowA_zpsmfxykc5a.jpg
 
Hi. This is so different from everything I've seen and used... :)
It's hard to tell why you're not getting an ember without actually seeing what you're doing. You may be pressing to hard (I noticed you've already drilled through and through once). But I think one thing you can experiment with first is to get your spindles a bit thicker. Don't press too hard at first, don't try to rush it. There's also a method I came up with that allows you to see through the smoke so you know exactly when to stop. Tie a short piece of string to the lower end of your spindle, about an inch over the drilling end, and leave two 3/4" ends of the string sticking out like a little propeller. This blows the smoke away allowing you to see you dust pile and oxygenates the pile, which in my opinion helps with coal forming too.
 
Last edited:

Robson Valley

Full Member
Nov 24, 2014
9,959
2,665
McBride, BC
I guess that you haven't seen many bow drills put together by a wood carver with little else to do!
I've got 2 more roughed out, one will have a pair of frogs and the other a pair of Dragonflies at the ends.

Thanks. I wonder if drill size isn't the larger part of the puzzle.
Nothing but smoke with the thin ones.

In the second and third pictures, you see a short, fat drill.
That was the only success I ever had and it was spinning in my electric drill!
Not as fast as I expected (I know nothing) and it did prove the concept.

I'll make some thick ones today and add the string "flappers" at your suggestion.
 

MegaWoodsWalker

Forager
Jul 10, 2014
230
3
Connecticut USA
Dang I gotta do something like this one of these days. Nice work. Here are a few sugestions which will probably result in an ember.

1. There is way too much friction on the sides of the spindle. Remember that you only want friction in the fireboard. Not the sides of the spindle and not the bearing block. Go with the thicker line in the bottom photo.

2. The bearing block end of the spindle is way too blunt. Think vampire stake pointed. That alone almost assures there will be too much friction in the wrong place.

3. Don't carve the notch and large divot first. That's what the burn-in is for. This will allow a easy mating of the fireboard and spindle.

4. The V-notch should be at least 8% of the burn-in. I prefer to have it go all the way to the center as this assures proper placement for dust collecting.

A good example of a V-goove.


If you like to carve here is where you can have some fun. The combustion triangle is always on my mind. Heat, Oxygen and Fuel are all needed to get a friction fire. To increase oxygen I like to carve the notch like so.


See. I am taking material off the bottom to increase airflow. Heck, need all the help I can get.


Here is a good example of a burn in. This will mate the fireboard with the spindle. You want to be near enough to the edge that the V-groove can easily be cut but not so near the spindle will fly out.


Notice how the bearing block end of the spindle is still reasonably sharp and fireboard end blunt. It's ok to sharpen the bearing block end and ruff up the fireboard end after the burn in and during 2nd or 3rd attempt. After more than 4 tries I tend to abandon the set unless the dust looks really promising. I know right away if things are going well.


Once you get your coal time is one thing yea got. Let is solidify before transfer to the tinder bundle.


All this said I just got back inside from an hours worth of friction fire practice in the cold. The result? Failure. LOL! With temps in the lower teens F and no gloves I froze my hands off. So yea I occasionally fail and so does everyone else. Think science but also remember that on many levels this is magic. Take a few seconds before your attempt to remember this is what propelled us out of the mud. Take a few breaths then spin at an even pace at first till the dust fills up the groove then apply more speed and if necessary pressure. That should do it.
 
Last edited:

atlatlman

Settler
Dec 21, 2006
750
0
ipswich
You could plumb my well of ignorance and find it bottomless.
How is bow shape involved?

You will get more tension with a flexible bow with just a slight bend in it. Longer bow also means less strokes. For the bow I use a piece of hazel the length from my armpit to the tips of my fingers.
 
Last edited:

Fraxinus

Settler
Oct 26, 2008
935
31
Canterbury
Beautiful set Robson, my only observation from your pics( as I think our friends posts above have covered the rest) is that the drilling end of the drill appears to be too pointy, blunter is better and as wide as a fat thumb = greater surface friction area.
I just reviewed the pics... are you also trying to do this while the fireboard is clamped to the bench? if so the amount of sideways waggle may well impede your attempts, most people lock the bearing block holding wrist against their lower leg to prevent waggle.

Rob.
 

Robson Valley

Full Member
Nov 24, 2014
9,959
2,665
McBride, BC
Fraxinus: I admire your powers of observation of the minutae.

Great suggestions. Need to clear off some bench today and make some new drills.
Custom black-smithed froe. 3lb wooden log mallet. 40lb shake block of western red cedar.
Have to determine which way was "up" and always split down to avoid runouts.

My only fear of getting down on the concrete shop floor for a real trial is the trouble I'll have getting up again!
 
Feb 22, 2015
5
0
Scotland
One thing I notice is you are fashioning the handle in the middle of the bow, I think it would be very difficult to operate the bow holding it in the middle. I hold mine right at the end and concentrate on the pull more than the push to develop more power. And I would second or third the notions that your bow is way too short and spindle to skinny. I always reshape the business end before going for an ember by cutting notches all the way round so it has some 'teeth' to bit into the wood with - hope this makes sense. Last tip - find some Lime, it's way easier than Cedar in my experience.
Cheers, Andy
 

Toddy

Mod
Mod
Jan 21, 2005
38,987
4,632
S. Lanarkshire
I use a short bow. I was first taught to make fire using a bow while I was working at the Crannog centre. We only use short bows there and we demonstrate making fire by friction (successfully) up to twenty times a day.
My own bow is made of hawthorn and was made by Patrick McGlinchey. I don't use a thick spindle, I use a hazel one less than the thickness of my thumb (and I have wee hands).
It's a get everything set first type skill, and then it's posture and pressure and smooth acting speed. Make your own body weight act as the pressure, saves you forcing that when you're trying hard enough to breathe :eek:

I'll put up some photos tomorrow, but though I know some folks swear by the long straight stick….try finding one, a wee bent one is easy by comparison…..I genuinely find the short one the better option by a long way.

Incidentally, among those peoples who have no other method of making fire in the past, the short bow is more usual, as is the spindle that takes replaceable tips.

This is one of Patrick's sets :D :notworthy:
http://www.bushcraftuk.com/forum/showthread.php?t=81318&page=2
see post 39

M
 

Robson Valley

Full Member
Nov 24, 2014
9,959
2,665
McBride, BC
The thin section in the middle was an attempt to get rid of some weight. The carved Raven feathers at each end make marvelous grips.
The bow is 19" long, more or less what I could pull out of a scrap pile without chewing into another 72" x 6" x 1.5" plank.
Carved birch is very smooth and slippery, I whipped the middle more to give me some grip on the dang thing for carving and a nice place to stockpile some useful cordage.

Some idle day, I'll peel that cord off and maybe carve a Sisiutl.
This is a mythical 2- headed snake with a human face in the middle.
Culturally, it represents an attempt to have balance in your life.

Western Red Cedar (Thuja plicata) sapwood is softer than basswood (Tilia americana) which again is softer than your lime (T. vulgaris, hybrids and others.)
Clearly, this firemaking kit must have utilized different species in different biogeoclimatic zones.

The concensus is very clear = my drills must be far thicker. A point very easily overlooked in my ignorance. I'll do that part first.
My next 2 bow roughouts are even thinner in the middles = maybe a little more flexible/elastic.
 

Toddy

Mod
Mod
Jan 21, 2005
38,987
4,632
S. Lanarkshire
I disagree, I wouldn't make the drill any thicker, I'd just make sure it was clearly balanced in the cord; even if you have to use the Egyptian twist on it to do it.

Each to their own, but why make work for yourself when it's already an effort ? Folks who make fire using a spindle use a thin shaft not a thick one.

M
 

Robson Valley

Full Member
Nov 24, 2014
9,959
2,665
McBride, BC
Thanks Toddy. What an elegant bowdrill kit. Rib of ?????? for the bow???
I'm going to guess that many of the variable get fine-tuned to the available equipment.

Well, the little short fat one was the only one that worked, albeit in my electric drill.
No joy from any of the skinny ones, so I'll test the diameter thing first.
 

Robson Valley

Full Member
Nov 24, 2014
9,959
2,665
McBride, BC
Well, I'm done for the day.
2 new 10" drills in western red cedar. One about 7/8", the other about 3/4". Carved with farrier knives. Didn't hit myself once!
New hearth board. Carved some pits in it with the hook at the tips of the Hall farrier's knives blades.
My Raven bow spins them both very well. Very happy about that. Left the drill surfaces quite rough.
Got down on the concrete floor, my left foot on the board. Cap stone in my left hand, against the side of my leg for stability.
Each "push" stroke with the bow counted as "one." 200 strokes with each drill failed to even brown the pits I carved.
However, chucked in my electric drill, smoke in less than a minute.
The puzzle persists.
 

Toddy

Mod
Mod
Jan 21, 2005
38,987
4,632
S. Lanarkshire
Are you positioning yourself forward enough that your left shoulder is over the drill ? It feels kind of hunched up, but it lets your body weight work with your position to stabilise things and force the drill into contact more with the hearth.

atb,

M
 

Robson Valley

Full Member
Nov 24, 2014
9,959
2,665
McBride, BC
Yes. That's a Pacific Northwest coast carving "D-adze." Blade forged by Kestrel Tool.
I'm not a very swift carver so added the snail when I carved the birch handle.
Weighs about 400g/14oz. The only thing that can stop it is a bone in your leg.

Next are 3 Hall (Canada) farrier's knives, all revised to 12 degree bevels. Expensive and worth every nickle (Canada has no pennies anymore.)
The copper inlay for the Ravens' eyes signifies prosperity (I've seen none yet!)
In a past life the little knife was a UKAL/Supervet (France) farrier's blade for sheep & goats. Steel as wonderfully hard as the Hall.
The bottom blade is a Pacific Northwest coast crooked knife. I built the bottom 2 and bought the blades.
 
Yes. That's a Pacific Northwest coast carving "D-adze."

that's an interesting style- never heard of them or seen them before----> maybe because i have never been to this part of the world (nor will ever go there)....

i have seen the adzes used by maori/ polynesians on my trips to NZ (sadly only in museums and not in action) and photos of japanese adzes (not seen them in action, yet) which look totally different from yours but i guess the purpose is similiar?!
 

BCUK Shop

We have a a number of knives, T-Shirts and other items for sale.

SHOP HERE