Hi there,
I spent a great morning practicing fire by friction and I have since decided to put this together in order to help those of us who are wanting to learn or are still trying. Although the winter isn't the normal time for people to learn this skill, with perseverance, its still doable. Use this to supplement other threads and the info in books such as Bushcraft by Ray Mears. Enjoy!
Basics of the Bowdrill
The bowdrill works because of friction, in essence, rubbing two things together creates heat energy that we can use to our advantage in the form of friction firelighting. The basic components of a set are: (skip this if you already understand the bowdrill workings)
(Don't worry if this all sounds confusing, it will be explained in more detail further on)
A bow - A slightly curved, light and rigid branch with a slack length of string (perhaps paracord) tied between its two ends. This component needs little in terms of shaping and the branch you choose is mostly down to what you find comfortable. I tend to go for one about an inch in diameter and as long as my inside leg.
A drill - This is a cylindrical length of wood that fits into a notch on the hearth board. It is proppelled by the bow and pressure is applied to it by the bearing block. I tend to go for one about as long as a bahco folding saw") and again about an inch is diameter. One end is tapered and the other is domed.
and again about an inch is diameter. One end is tapered and the other is domed.
A hearth - This is drilled down into and a notch is carved into the hearth where the dust from the drilling may collect.
A bearing block - simply a piece of wood that comfortably fits your hand allowing you to apply pressure to the top of the drill.
In terms of wood choices, I tend to go for hazel. If you look in Ray Mear's Bushcraft book for instance, you can see the wide range of timbers that can be used. Your choice is purely down to what you have available in your region. I have used a few different types of wood and I tend to get the best results when using a drill and hearth of the same type. The bearing block just needs to be something very hard.
Tips of Making your set
When I started out, my problems were not in making the set, but in my technique in using it. Therefore I will concentrate on the latter. However, there are a few design pointers that make the whole thing easier.
I am going to assume you have already collected the materials, they are dry and you can use knives axes etc safely.
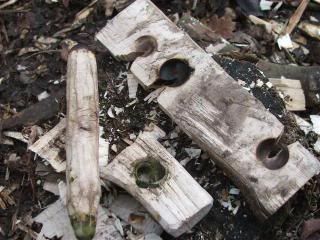
Firstly , look at this well used set:
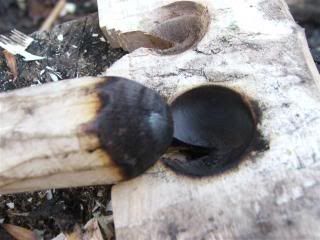
The drill and a socket are like hand and glove. This is because the burning has smoothed off the rough points of the tip and made it fit properly. Therefore we don't need to worry to much about getting a perfect fit when carving it out.
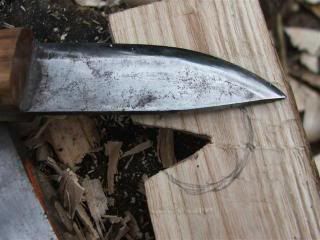
I have sketched onto this piece the shape that needs to be carved:
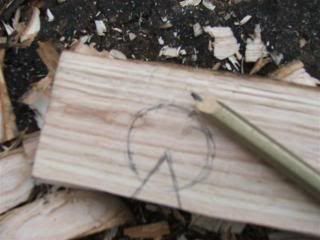
I don't normally sketch it on, but it shows what we are aiming for. A circular depression and an 1/8th section notch with straight sides. I tend to chop the section out with axe and knife, but you could use a saw.
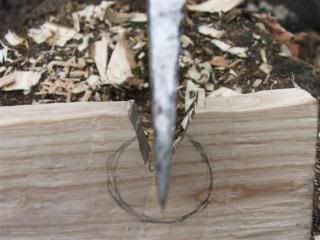
I then carve the notch with a spoon knife. This can be done with a regular knife, but I personally prefer the ease of the former tool.
The drill should be domed at the end to fit into the notch, but don't worry to much about an airtight fit, the heat will burn it smooth.
The other end needs to be well lubricated. I use leaves, try and choose one that is quite tough, it lasts longer in the block. At this time of year, holly and spit work well.
Making Fire !
Teaching technique without actually being there to watch to actually watch your every move is tough. However,as no one taught me (instead I relied on books and threads on this site), I am confident that it is possible to troubleshoot your own mistakes. When you assemble your set for the first time, on one of your first strokes the drill will pop out of the socket and spin across the floor. Therefoer beore trying properly to make an ember, get used to running the bow back and forth, keeping the drill vertical, at an even pace. Now we can begin. Look at the picture below:
The bow looks much shorter than it actually is, but other than the essentials are there; vertical drill and perpendicular bow. Things to note here are that the foot is almost touching the drill, very important. Also, what you can't see is my posture. When starting out, practicing really hurt my back as I had poor posture. Try not to lean over the set to much, but sit up more. This allows you to use more than just your arm muscles to drive the bow. On the floor here is a couple of bits of wood. Their job is to insulate the set from the floor, giving the resultant dust more chance of becoming an ember. It can easily be substituted with some flat birch bark or a piece of wood split from a large dry log. The final thing here is that the drill is not in between the cord and bow, buton the other side of the string. This prevents it from jamming at either end.
As you increase pressure on the drill the volume of smoke will increase.
It is important to consider the balance between pressure and speed. At the start, I tend to drill fast with steady pressure, slowing down quite considerably whilst forcing the drill a lot harder into the hearth as the smoke increases. You cannot force it at the beginning, as the wood on the end of the drill is not soft and charred. As you get more consistent at making embers, you will start to understand how the amount of smoke being produced relates to the ember beneath it. However for your first ember, drill either until the drill pops out, or you cannot continue due to fatigue.
With luck you should have filled the entire notch with dust, you will know its an ember if it continues to smoke after you have removed your drill and block, As below:
Note the fine stringy nature of the dust around the edge of the notch on top of the hearth, this is the sort we are looking for. Also, underneath the hearth is a shaving from earlier, this will become important when we come to move the ember. If I had blown on it a lot before removing it from the hearth, you would see it glow red. However this would waste precious fuel, and therefore cut down the chances of you making fire.
Roll back the hearth and ***** the ember out with a twig. Unfortunately mine fell over here, but that matters little as it stays alight just fine.
\you now need to find your tinder. Here you have to options, either put the ember straight into the tinder bundle, or add something to it such as a cramp ball (King Alfred's Cake) to sustai the ember. I did both methods for this tutorial but decided to only include the latter as there is a greater chance of success with a small first time ember.
Adding the ember alone
Adding half a cramp ball, ignited by the ember
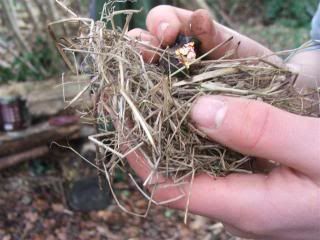
Curl the tinder around your ember, blowing and pressing it down onto red/white hot bits in order to make maximum use of its heat. Consistent long blows work best for me rather than short sharp puffs, it means the ember has a good oxygen supply for longer. Unfortunately if you chose to use the cramp ball method you are lumped with a slightly pungent smoke, unlike the ember alone which just smells of sweet woodsmoke. Not that you are likely to care though .
The tinder here I am using is just dead grass, very prevalent at this time of year. Dry it out inside your clothes but not right up against you body. Choosing dry grass to begin with, or having already dried some out will make this stage easier and more likely to be successful.
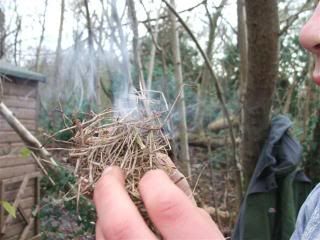
Note the size of bundle. Often we see a larger bundle being used in pictures and on TV. I personally find this unnecessary whilst often collecting dry useful tinder in such large quantities to be difficult to do.
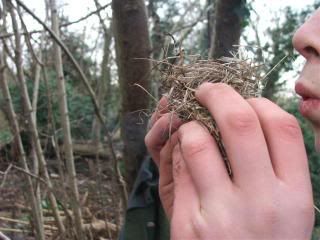
I have included the picture above as it shows how close I bring it to my mouth to blow. Not actually lip to grass, but not at arms length either. As you continue to blow, the smoke will thicken. You will know when it is just about to ignite as a different coloured smoke appears much darker, thicker and with a greenish tint (or that might just be me). When I see this, a few good hard blows will ignite the bundle.
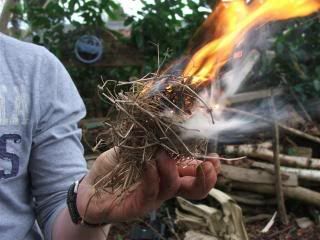
Congratulations, you have fire. This should then be transfered to you kindling etc and away you go.
**Trouble shooting**
> Bad Back! - Try adjusting your posture, remind yourself not to hunch over too much and if you are hurting, take a break, do something else then come back to it. Also a brief warm up can help especially on a winter's day in order to get your arms and muscles moving
> Shiny Depression in Hearth - When this happens, the roles of hearth and bearing block often reverse ans moke starts coming out near your hand !? Often this is formed by the wrong pressure/drilling speed balance. Stop, scratch off the shine on the drill and hearth, reassess your technique then continue. If the problem continues, it could be due to the wrong wood choice.
> No smoke - probably because you are not pressing down enough or it has gone shiny.
Further Reading
I mentioned above I had noone to teach me the bowdrill, instead I relied on literature. Below are some of my favourites:
Ray Mears Bushcraft (Large edition as it has more info)
Ray Mears Outdoor Handbook (No photos but some differnt info to his other books)
Bowdrilling with Damp Materials - useful article for days like these.
Loads of good bowdrill links here! - this site never ceases to amze me with its wealth of info, even if I don't agrree with it all.
Note this method of firelighting takes extreme perseverance, just as long as you don't give up you will get there, I'm certain. I have tried to be as comprehensive as possible here, including all the tips I can think of. Any questions on the bowdrill feel free to ask, I am not a bowdrill expert, but if I can't answer it, someone else on this forum will!
cheers, woodwalker
I spent a great morning practicing fire by friction and I have since decided to put this together in order to help those of us who are wanting to learn or are still trying. Although the winter isn't the normal time for people to learn this skill, with perseverance, its still doable. Use this to supplement other threads and the info in books such as Bushcraft by Ray Mears. Enjoy!
Basics of the Bowdrill
The bowdrill works because of friction, in essence, rubbing two things together creates heat energy that we can use to our advantage in the form of friction firelighting. The basic components of a set are: (skip this if you already understand the bowdrill workings)
(Don't worry if this all sounds confusing, it will be explained in more detail further on)
A bow - A slightly curved, light and rigid branch with a slack length of string (perhaps paracord) tied between its two ends. This component needs little in terms of shaping and the branch you choose is mostly down to what you find comfortable. I tend to go for one about an inch in diameter and as long as my inside leg.
A drill - This is a cylindrical length of wood that fits into a notch on the hearth board. It is proppelled by the bow and pressure is applied to it by the bearing block. I tend to go for one about as long as a bahco folding saw
and again about an inch is diameter. One end is tapered and the other is domed.A hearth - This is drilled down into and a notch is carved into the hearth where the dust from the drilling may collect.
A bearing block - simply a piece of wood that comfortably fits your hand allowing you to apply pressure to the top of the drill.
In terms of wood choices, I tend to go for hazel. If you look in Ray Mear's Bushcraft book for instance, you can see the wide range of timbers that can be used. Your choice is purely down to what you have available in your region. I have used a few different types of wood and I tend to get the best results when using a drill and hearth of the same type. The bearing block just needs to be something very hard.
Tips of Making your set
When I started out, my problems were not in making the set, but in my technique in using it. Therefore I will concentrate on the latter. However, there are a few design pointers that make the whole thing easier.
I am going to assume you have already collected the materials, they are dry and you can use knives axes etc safely.
Firstly , look at this well used set:
The drill and a socket are like hand and glove. This is because the burning has smoothed off the rough points of the tip and made it fit properly. Therefore we don't need to worry to much about getting a perfect fit when carving it out.
I have sketched onto this piece the shape that needs to be carved:
I don't normally sketch it on, but it shows what we are aiming for. A circular depression and an 1/8th section notch with straight sides. I tend to chop the section out with axe and knife, but you could use a saw.
I then carve the notch with a spoon knife. This can be done with a regular knife, but I personally prefer the ease of the former tool.
The drill should be domed at the end to fit into the notch, but don't worry to much about an airtight fit, the heat will burn it smooth.
The other end needs to be well lubricated. I use leaves, try and choose one that is quite tough, it lasts longer in the block. At this time of year, holly and spit work well.
Making Fire !
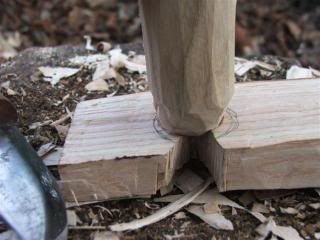
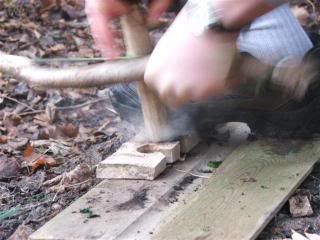
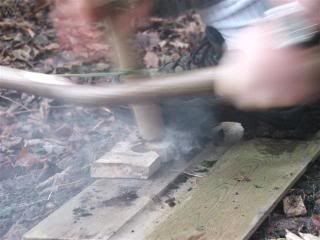
Teaching technique without actually being there to watch to actually watch your every move is tough. However,as no one taught me (instead I relied on books and threads on this site), I am confident that it is possible to troubleshoot your own mistakes. When you assemble your set for the first time, on one of your first strokes the drill will pop out of the socket and spin across the floor. Therefoer beore trying properly to make an ember, get used to running the bow back and forth, keeping the drill vertical, at an even pace. Now we can begin. Look at the picture below:
The bow looks much shorter than it actually is, but other than the essentials are there; vertical drill and perpendicular bow. Things to note here are that the foot is almost touching the drill, very important. Also, what you can't see is my posture. When starting out, practicing really hurt my back as I had poor posture. Try not to lean over the set to much, but sit up more. This allows you to use more than just your arm muscles to drive the bow. On the floor here is a couple of bits of wood. Their job is to insulate the set from the floor, giving the resultant dust more chance of becoming an ember. It can easily be substituted with some flat birch bark or a piece of wood split from a large dry log. The final thing here is that the drill is not in between the cord and bow, buton the other side of the string. This prevents it from jamming at either end.
As you increase pressure on the drill the volume of smoke will increase.
It is important to consider the balance between pressure and speed. At the start, I tend to drill fast with steady pressure, slowing down quite considerably whilst forcing the drill a lot harder into the hearth as the smoke increases. You cannot force it at the beginning, as the wood on the end of the drill is not soft and charred. As you get more consistent at making embers, you will start to understand how the amount of smoke being produced relates to the ember beneath it. However for your first ember, drill either until the drill pops out, or you cannot continue due to fatigue.
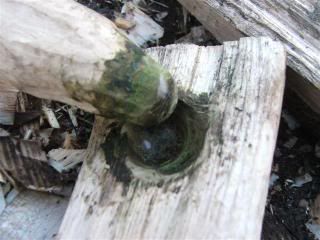
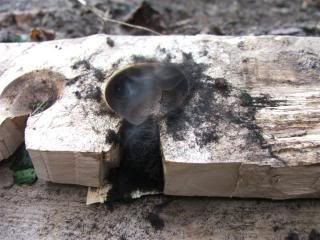
With luck you should have filled the entire notch with dust, you will know its an ember if it continues to smoke after you have removed your drill and block, As below:
Note the fine stringy nature of the dust around the edge of the notch on top of the hearth, this is the sort we are looking for. Also, underneath the hearth is a shaving from earlier, this will become important when we come to move the ember. If I had blown on it a lot before removing it from the hearth, you would see it glow red. However this would waste precious fuel, and therefore cut down the chances of you making fire.
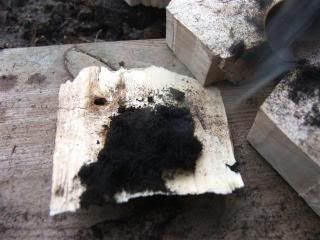
Roll back the hearth and ***** the ember out with a twig. Unfortunately mine fell over here, but that matters little as it stays alight just fine.
\you now need to find your tinder. Here you have to options, either put the ember straight into the tinder bundle, or add something to it such as a cramp ball (King Alfred's Cake) to sustai the ember. I did both methods for this tutorial but decided to only include the latter as there is a greater chance of success with a small first time ember.
Adding the ember alone
Adding half a cramp ball, ignited by the ember
Curl the tinder around your ember, blowing and pressing it down onto red/white hot bits in order to make maximum use of its heat. Consistent long blows work best for me rather than short sharp puffs, it means the ember has a good oxygen supply for longer. Unfortunately if you chose to use the cramp ball method you are lumped with a slightly pungent smoke, unlike the ember alone which just smells of sweet woodsmoke. Not that you are likely to care though
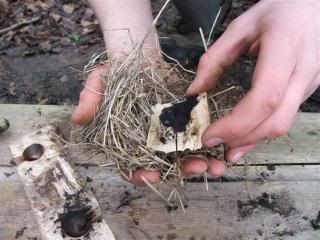
.The tinder here I am using is just dead grass, very prevalent at this time of year. Dry it out inside your clothes but not right up against you body. Choosing dry grass to begin with, or having already dried some out will make this stage easier and more likely to be successful.
Note the size of bundle. Often we see a larger bundle being used in pictures and on TV. I personally find this unnecessary whilst often collecting dry useful tinder in such large quantities to be difficult to do.
I have included the picture above as it shows how close I bring it to my mouth to blow. Not actually lip to grass, but not at arms length either. As you continue to blow, the smoke will thicken. You will know when it is just about to ignite as a different coloured smoke appears much darker, thicker and with a greenish tint (or that might just be me). When I see this, a few good hard blows will ignite the bundle.
Congratulations, you have fire. This should then be transfered to you kindling etc and away you go.
**Trouble shooting**
> Bad Back! - Try adjusting your posture, remind yourself not to hunch over too much and if you are hurting, take a break, do something else then come back to it. Also a brief warm up can help especially on a winter's day in order to get your arms and muscles moving
> Shiny Depression in Hearth - When this happens, the roles of hearth and bearing block often reverse ans moke starts coming out near your hand !? Often this is formed by the wrong pressure/drilling speed balance. Stop, scratch off the shine on the drill and hearth, reassess your technique then continue. If the problem continues, it could be due to the wrong wood choice.
> No smoke - probably because you are not pressing down enough or it has gone shiny.
Further Reading
I mentioned above I had noone to teach me the bowdrill, instead I relied on literature. Below are some of my favourites:
Ray Mears Bushcraft (Large edition as it has more info)
Ray Mears Outdoor Handbook (No photos but some differnt info to his other books)
Bowdrilling with Damp Materials - useful article for days like these.
Loads of good bowdrill links here! - this site never ceases to amze me with its wealth of info, even if I don't agrree with it all.
Note this method of firelighting takes extreme perseverance, just as long as you don't give up you will get there, I'm certain. I have tried to be as comprehensive as possible here, including all the tips I can think of. Any questions on the bowdrill feel free to ask, I am not a bowdrill expert, but if I can't answer it, someone else on this forum will!
cheers, woodwalker