Knife Handle Tutorial
by Rapidboy
First published 15/02/07
It’s about time i put together a little knife and sheath making tutorial.
This is not the only way to do this but it works for me and hopefully it will encourage those who have not yet tried to have a go at putting together their own knife.
This is aimed at someone with no previous experience and requires very few tools.
I have used some power tools simply because this was a quick one day project but everything can be done by hand.
 A full tang knife is a fairly simple first knife project.
Choice of blade depends on to what you intend to use the knife for but for a first attempt it’s probably a good idea to start with something cheap and simple.
I choose a Russell Green River Works blade.
It’s a classic outdoors knife with loads of history.
A favourite of mountain men, trappers and fur traders in the 1800’s who needed a simple, cheap and reliable knife.
The blades are quite cheap and as they are working knives the fit and finish doesn’t have to be perfect.
Along with the blade you will need scale material and pins.
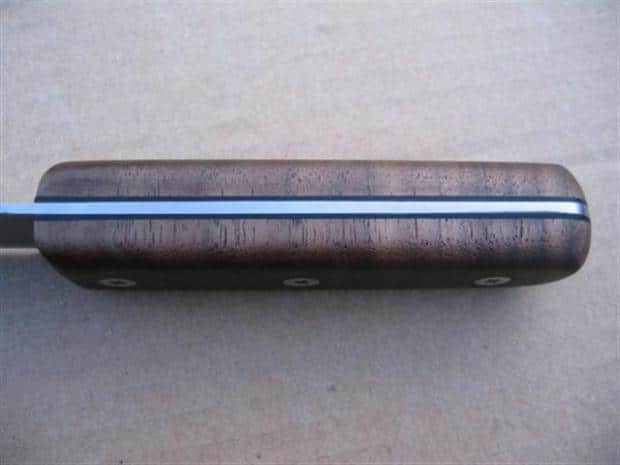
 Starting with the scale material, i had a piece of walnut from a gun stock.
I cut the wood to size with a band saw but it can be done by hand with a regular cross cut saw.
Next you need to flatten one side of the scales, this is easily achieved by using a sheet of sand paper laid on a flat surface.
This lets you see the grain pattern and ensures a good fit onto the tang.
Take your time to select a nice grain pattern and get a good flat surface. I like to add a piece of vulcanised fibre material between my scales and the tang, it looks good and ensures the back of the scales is protected from moisture ingress.
 Mix up some 2 part adhesive, apply and position the spacer material, then clamp the two together.

While the scales are setting we turn our attention to the blade.
First protect the blade and more importantly your fingers by applying some tape.  I start by cleaning up the edges of tang.[/TD]


I want to use mosaic pins so the holes have to be opened up.

The blade is hardened so a normal HSS drill bit is no use but it’s easy work using a standard masonry drill bit.
Care must be taken not to let the tang get too hot so i cool it in ice water between holes.
You can expect a few sparks when drilling the tang but don’t worry, just be sure and keep the blade cool.

The scales and liners are now set and so i cut them down to size.
I use a disc sander but again it’s quite possible to do it by hand …. just a little slower.

I bevelled the front of the scale.

At this stage you need to finish shaping and sanding the front of the scale as it’s difficult to work at this part when the scales are attached to the tang.
Using the tang as a template, drill the holes in the scales.

If your being fussy you can now line up the mosaic pins, attention to detail like this will help the overall aesthetic of the knife later.

Then more 2 part adhesive and clamping.
When it’s all set it’s just a matter of using a file or rasp and then sandpaper to shape the handle.


The finish is down to how much effort you want to put into it but a really smooth finish is not necessarily best as it will be harder to grip especially when wet.
The Sheath Making Tutorial explains making the sheath for this knife, and any other knife for that matter…
Rapidboy
The Sheath Making tutorial for this knife can be found here.
Copyright ©2003-2016 Bushcraft UK


Leave A Comment
You must be logged in to post a comment.