Wood fired smelter - Mark I

  • Hey Guest, Early bird pricing on the Summer Moot (29th July - 10th August) available until April 6th, we'd love you to come. PLEASE CLICK HERE to early bird price and get more information.

rich59

Maker
Aug 28, 2005
2,217
25
65
London
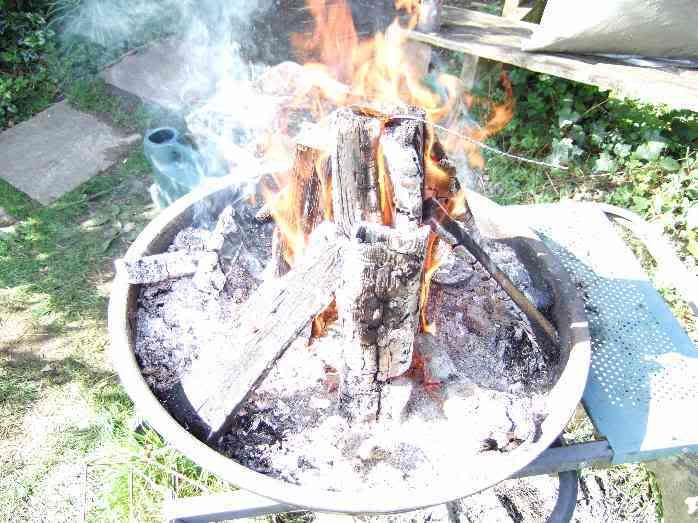
By a round about way I found I wanted to melt copper - to make tips for atlatl darts by repeatedly dipping them in molten copper of course. I thought about the opinion that wood fire doesn't get hot enough to melt copper (or get it from its ore). I decided to have a go.
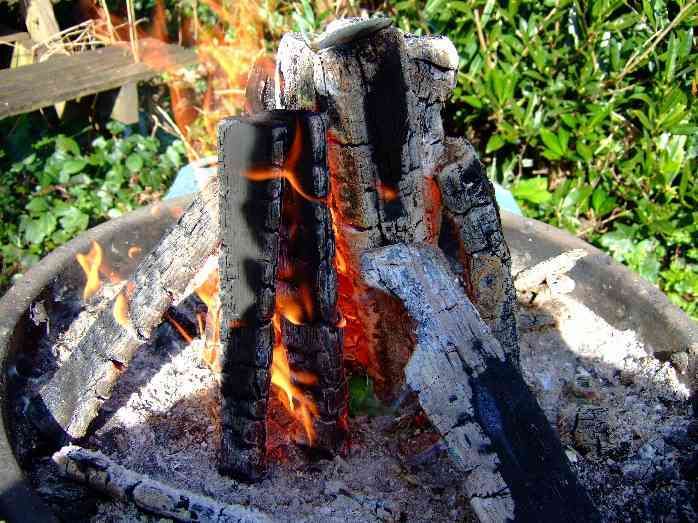
Here it is:-

SMELTER.jpg


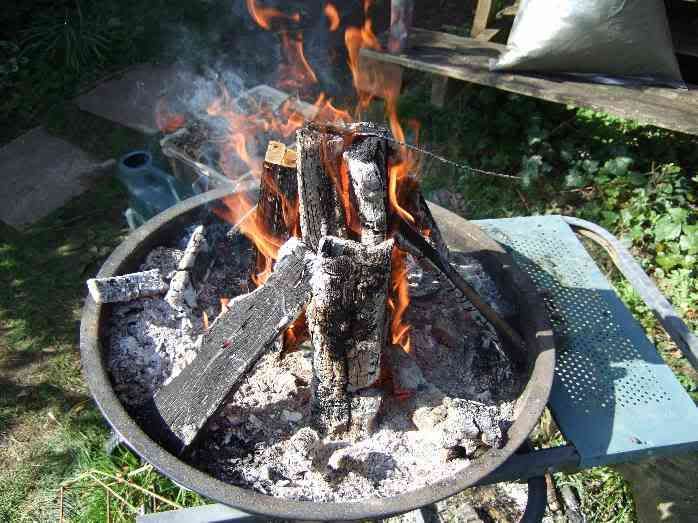
And here is the copper wire I succeeded in melting:-

COPPER.jpg


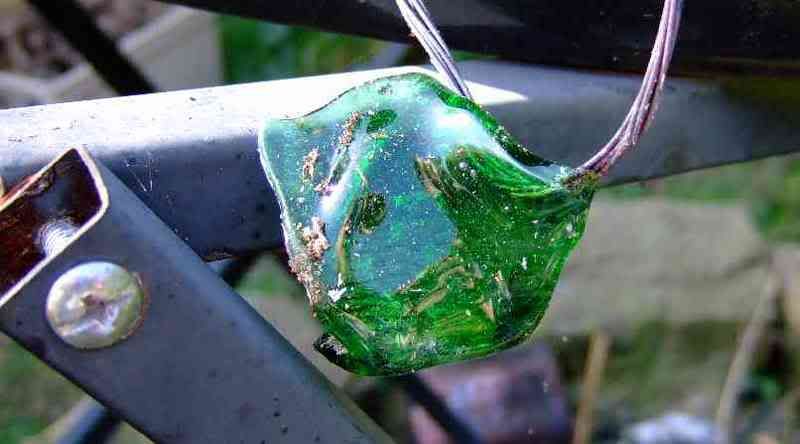
and here is what happened to the bottom of a green glass bottom along the way:-

GLASS.jpg


So I have proved it can be done. But I didn't get anything like a whole mass of copper melted. That would be for Mark II. Any suggestions on an improved design?

The furnace is 3 logs stood upright over a 3-4 inch hole in the bottom of an old barbecue and wedged and packed around with more wood.

I think the copper only melted when I put the piece of glass over the top and may have acted as a lid.
 

BobFromHolland

Need to contact Admin...
Jan 9, 2006
199
1
52
Rotterdam, NL
Did you use any forced air flow through the hole?
I'm quite sure things will get hot enough when you 'help' the fire a bit. If not at the wood-burning stage then for sure at the charcoal stage.

best of luck!

Bob
 

spamel

Banned
Feb 15, 2005
6,833
21
48
Silkstone, Blighty!
Good stuff, even though the comments about forced air are true enough, I couldn't help laugh to myself as it made me think of a joke that I will tell to amuse the late nighters here. No offense is intended in any way, so please take it in the humour it is intended.

Here we go: Did you hear about the Irish Bomber who tried to blow up a car?


He burnt his lips on the exhaust!!!!!!!!!
 

rich59

Maker
Aug 28, 2005
2,217
25
65
London
Thanks for the encouragements.

Here is a couple more pictures of my furnace. (taken in bright sunshine note) I perhaps didn't make clear that the heart of the method was a wooden tube formed from 3 bits of oak 3 by 4 inch. You can make out my copper wire going down into the top of the tube. Anyone mad enough to follow my posts might see the connection between this and some of my tinder ideas. In fact it was a doddle to light. Make the tube, wedge it upright over a good size hole, stuff in some tinder and light it. The tinder almost immediately ignites the wooden walls of the tube (even if it was a bit damp) and from then on the fire is self sustaining with no need for any kindling.

FIRE1.jpg


FIRE2.jpg


With the wooden tube you get quite a strong updraft so there is already a pretty good flow of air. I was trying to keep it primitive so extra flow's of air were a bit contrary to the ideas. But yes a better draft and it should go better. Also, better insulation and bigger mass of burning material , along with longer tube would all help I guess.

I am thinking that mark II might go underground for insulation. I am thinking that I might have 2 holes connected by a tunnel. One hole would form the inlet. The tunnel would hold the fuel (wood), this time laid lengthways,and my copper sample. The 2nd hole would form the chimney and have a stack over it to encourage the draw. I'd need to think about spacing of the wood fuel so that the air flow was optimal.

Watch this space.
 

spamel

Banned
Feb 15, 2005
6,833
21
48
Silkstone, Blighty!
You could incorporate a primitive style bellows, have you watched Time Team? They often smelt bronze and the like, and the bellows is simply a tube of leather, like a carrier bag with two sticks attatched along the rim. The bottom is fixed to something, not sure what as it is out of shot, maybe a piece of wood with a small hole to give the air a bit of pressure.

As you draw the bag up, you part the sticks, opening the top of the bellows and allowing air into the bellows. As you get to the top, move the sticks together which closes the two bits of leather together (the top of the carrier bag say) and you plunge downwards creating a blast of air. This air could be directed to your fire through an underground channel. Food for thought!!
 

Ogri the trog

Mod
Mod
Apr 29, 2005
7,182
71
60
Mid Wales UK
Hey Rich, looks like a fun project,
The Mk2 sounds as though it'll generate a more controlable heat, but might create further problems with access to the molten material. Have you thought about melting the copper in a crucible - perhaps a clay fired pot, with an arrowhead-shaped-bottom! I don't quite get what you mean by repeated dipping, do you mean dipping the wire - to swell the one end, or dipping a wooden shaft into the molten metal - to create a bullet shaped cone of copper?

Good luck

Ogri the trog
 

rich59

Maker
Aug 28, 2005
2,217
25
65
London
Spamel - any good internet links to some descriptions of "Time Teams" techniques?


Ogri - I am glad you brought up the crucible question. I do need to contain my molten copper. My first attempt used a bit of broken glazed pottery with a copper nail on it. But the pottery piece EXPLODED quite impressively, so after that I put on the safety glasses. What would be a stable crucible under high heat conditons?
 

Mike Ameling

Need to contact Admin...
Jan 18, 2007
872
1
Iowa U.S.A.
www.angelfire.com
Last summer I took a break from traditional blacksmithing, and I spent a couple days forging copper. I used all my normal blacksmithing tools and forge, but I started with copper. The hardest part is getting a big enough chunk of copper to start with. I scrounged up a copper wire, Lightning Rod aroung 9/16 inches round, and a big electrical Buss Bar 1 1/2 inch by 2 inches. I heated the copper up in my blacksmith forge. When it was glowing red, I then cut it into smaller chunks, and then forged those into the shapes I wanted.

CopperCulture1a.jpg


I was making some replicas of some early Indian Copper Culture pieces for a park/museum up by the Great Lakes. The picture shows a group of fish hooks, a small tanged spear head, two awls, and several knife blades. I can't find the picture of the two big socketed spear heads.

I did the major forging/shaping with the copper hot - glowing red. I then finished each item by cold hammering them. The cold hammering hardens the copper, but too much makes it brittle and causes it to split/crack. Plus copper and brass heat-treat the opposite of steel. To heat-treat it hard, you let it air-cool. To soften it, you quench it in water.

Interesting little project. The pieces turned out pretty darn close to original artifacts. But it's is easy to tell the difference, since I started with modern refined copper. Now, I did pick up some raw copper nuggets to take it to the next level - work with the copper in it's original dug/found condition, and see how that works. These next pieces I better deeply mark - they would be too easy for someone to pass them off as originals. But forging copper is much harder than forging iron/steel. Copper absorbs the hammer blow, where iron/steel has some "rebound". So you have to work harder to bring the hammer back up after each blow. This will wear out your arm much much faster than you think it should.

So, I would advise you to find a bigger chunk of copper to start with to forge up your arrowheads. Big electrical junction boxes have copper Buss Bars in them. A scrap yard should have some scrap ones laying around. And they might have a copper grounding rod, also called a lightening rod - but make sure that it is solid copper and not just copper coated. You can buy new from an electric supply company, but you would end up paying a high price.

A wood fire will get copper hot enough to work - glowing red. Have a big enough wood fire with a good bed of coals. Adding a little extra air helps a lot. I have used a length of 1/4 inch pipe as a Blow-Tube to help the fire.

I hope this helps. Good luck on your adventure into working copper. But a word of warning. Blacksmithing is Addictive! And working copper is a close cousin!

yhs
Mike Ameling
 

Ogri the trog

Mod
Mod
Apr 29, 2005
7,182
71
60
Mid Wales UK
rich59 said:
Ogri - I am glad you brought up the crucible question. I do need to contain my molten copper. My first attempt used a bit of broken glazed pottery with a copper nail on it. But the pottery piece EXPLODED quite impressively, so after that I put on the safety glasses. What would be a stable crucible under high heat conditons?
Ooer, that sounds a bit dodgey,
I had imagined something like a small earthenware plant pot with a moulded bottom plug - so that after the smelt, the plug could be shaken loose and then broken or crumbled away from the reformed copper ingot. I have no experience whatsoever in this field, I'm just going by gut feeling. Also, gut feeling tells me that safety goggles would be a good idea anyway, as would ensuring that any additional pottery was dry beyond doubt.

Again, good luck, I wish I had the time to do a few of these projects myself.

ATB

Ogri the trog
 

spamel

Banned
Feb 15, 2005
6,833
21
48
Silkstone, Blighty!
Edit: Some of these videos are a bit long so may take a while on a dial up connection. I took about twenty minutes writing this post whilst searching for video clips and the third clip is most relevant to this thread. It is about 15 seconds long so shouldn't take too long to download!

I found this which has nothing to do with the way you are trying to do it, but it shows a gas powered forge which is quite nice, just in case anyone is interested. Is that the guy from the Cold Steel videos?

http://www.youtube.com/watch?v=rZ04Lhlfdz8

Still looking on you tube for a video clip that will show this method. I found this clip and about three minutes in you see a forge, but they are more like the bellows we know. I still have to watch the rest of this clip but it is quite a nice clip to watch with some olde world music and a few medieval cars!!

http://www.youtube.com/watch?v=rswKrvCjDMI

I think I may have found it!! Try this link: http://www.youtube.com/watch?v=mxJNCatZpjg

As you can imagine, the pressure isn't so great as the bag they are using is very elongated and cannot be fully compressed, I think the smaller the bag, the better the pressure but I may be wrong. Hope that helps!!
 

pothunter

Settler
Jun 6, 2006
510
4
Wyre Forest Worcestershire
Hi Rich

Saw your post earlier but was unable to reply so hope none of the below has already been covered:

In India early smelting was often done at the top of rock faces, where possible building the furnace over a fissure and using the natural updraft as an air supply, as mentioned by others bellows were used all over Europe during the bronze age. Often two bellows working opposite to ensure a constant smooth air supply.

The Romans built furnaces for firing bricks and tiles on hill sides again using the natural updraft, although for tiles and bricks the temperature is not so high but the firing is longer.

You may be able to increase the efficiency of your furnace by amplifying the chimney effect you already have, if I remember correctly you are in London so may have an easily obtainable source of clay this could be used to encase the timber that you are using ensuring that air only enters from the bottom. The clay can also be used for a crucible and moulds as mentioned by others.

I think from your post you were using oak which of course gives good heat but is also the best source for making charcoal so any part burnt, charred timber can be used in the next firing and I think this will also increase temperature.

Next step of course is to add a bit of tin about 15% should do it.
 

anthonyyy

Settler
Mar 5, 2005
655
6
ireland
The copper age was an interesting phase in human history. The copper age lasted much longer than the bronze age. Ötzi the Iceman carried a copper axe and a flint knife.
 

BobFromHolland

Need to contact Admin...
Jan 9, 2006
199
1
52
Rotterdam, NL
spamel said:
Good stuff, even though the comments about forced air are true enough, I couldn't help laugh to myself as it made me think of a joke that I will tell to amuse the late nighters here. No offense is intended in any way, so please take it in the humour it is intended.

LOL! Although I (normally) am able to make myself clear in English I do miss out on some subtle finesses. I must add that the forced air I'm thinking of now contributes more to the fuel than to the oxigen levels. :D

:beerchug: Bob
 

lannyman8

Bushcrafter (boy, I've got a lot to say!)
Jan 18, 2009
4,005
3
Dark side of the Moon
to get real heat you need forced air, also consider the fact that the copper will burn if there is too much air/oxygen in the mix......

this can be overcome by useing a bed of hot coals, it keeps the air out and heat in.... your looking at adleast 3-4 inches of good coals for a good bed to work on, also wood is not ideal, it can be done but charcoal or coke is much better.....

i wish you all the best with your smelting old chap, and keep us posted......

regards.

chris...
 

BCUK Shop

We have a a number of knives, T-Shirts and other items for sale.

SHOP HERE