Red and BBs home.....the adventure continues
- Thread starter British Red
- Start date
-
BushMoot: Come along to the amazing Summer Moot 31st July - 5th August (extended Moot : 27th July - 8th August), a festival of bushcrafting and camping in a beautiful woodland PLEASE CLICK HERE for more information.
You are using an out of date browser. It may not display this or other websites correctly.
You should upgrade or use an alternative browser.
You should upgrade or use an alternative browser.
Feel free to come and have a gander at ours Wattsy once we have them established. I can reccomend a great guy in Lincolnshire for courses, bee nucleii etc.
Red
Red
been wanting to have bees on my allotment for ages but despite the contract stating that it's allowed the council are umming and aahhing about whether I can or not
One of the allotments where I have a project running are some bee hives, 4 I think.
The owner has made a cage of fine green mesh netting that stands about 8ft high and the hives sit inside this cage. The idea behind that is that the bees are forced to climb well above head height to enter or leave the hives meaning the bees have a lot less 'encounters' with his fellow plot holders.
")
If you like I'll get a picture of the setup next time I visit the site.
I'm sure the BBKA would be happy to make representations on your behalf Watsy....our regional rep is the guy I mentioned.....good for pollination, British agriculture depends on amateur beekeepers etc.
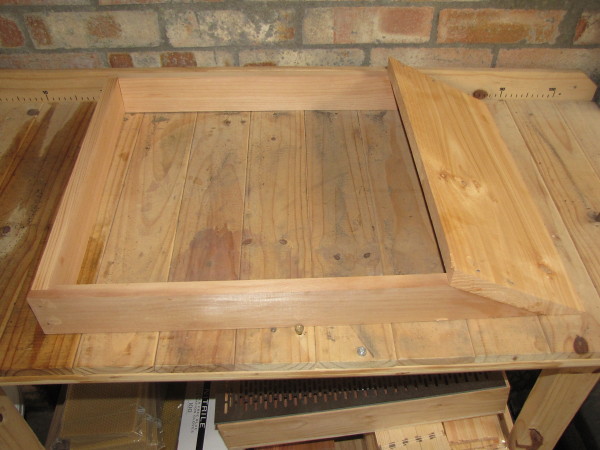
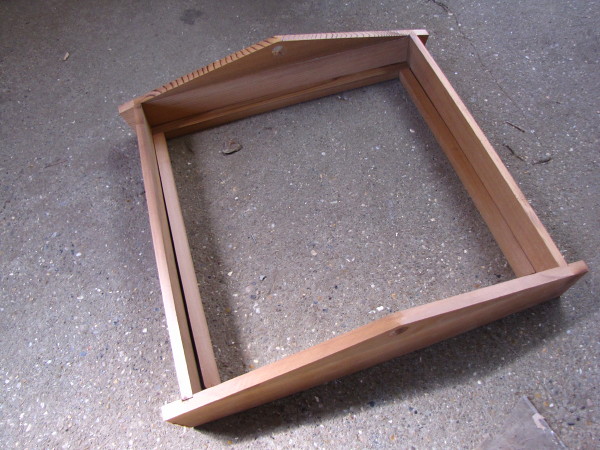
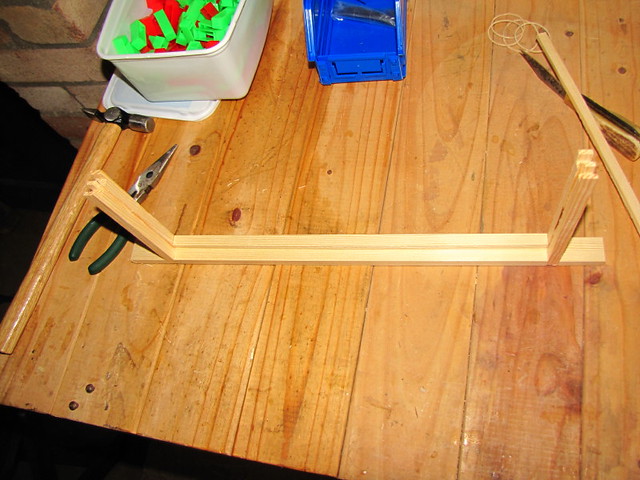
In this little write up I'm going to cover assembling a hive stand. As I understand it, you don't really need a hive stand - but raising the hive up does make the hive easier to work on without bending as much. We have gone for a 6" raised sloping front stand
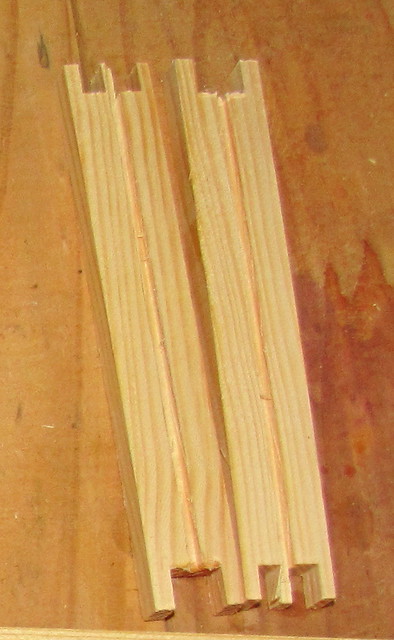
This is the sides and back of the stand - as you can see, the front is angled

1 Hive stand sides and back by British Red, on Flickr
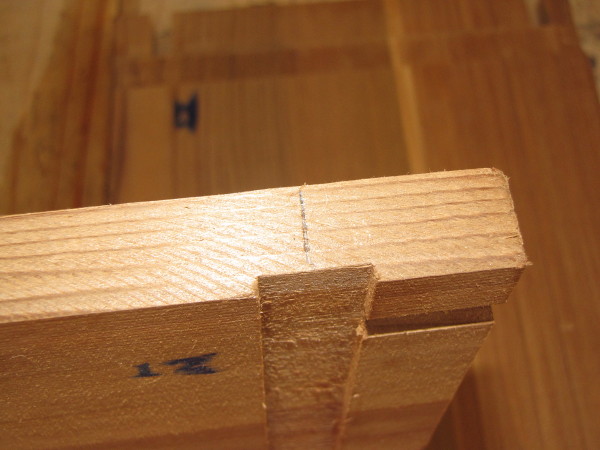
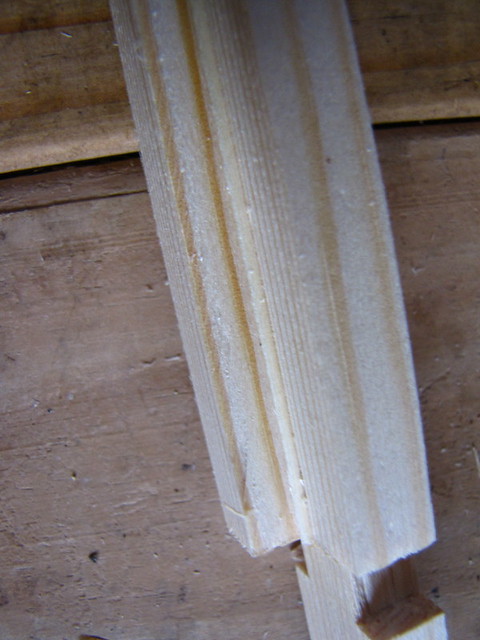
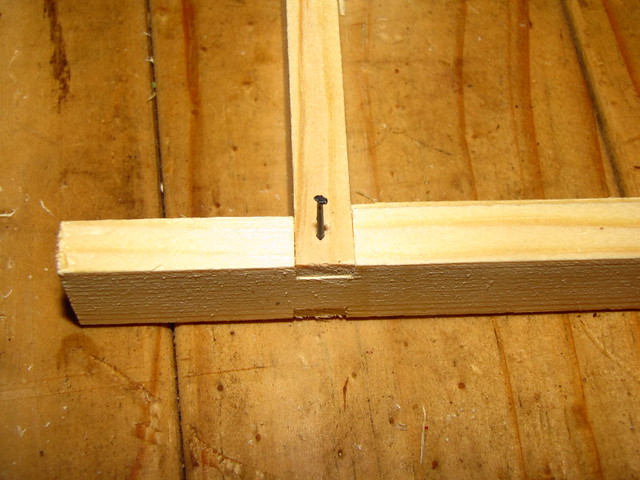
As you can see - there is a rebate in the rear of each of the sides into which to insert the back

2 Hive stand joints by British Red, on Flickr
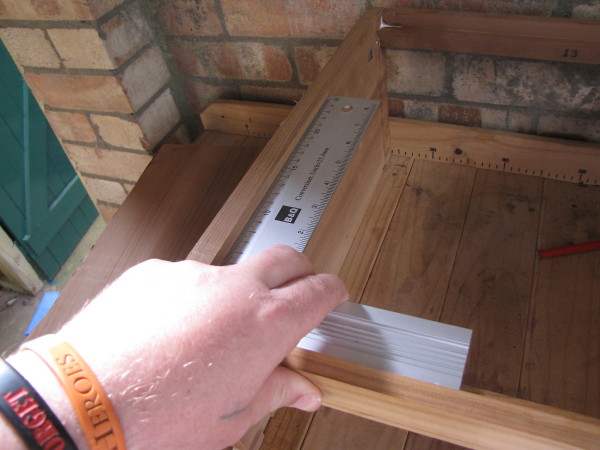
In assembling the stand and hive, each joint is glued and pinned. Its worth taking time to get this stron, square and regular. Hives parts just stand on top of each other - if parts are "off square" , gaps will be created that admit vermin, and ruin temperature control inside the hive. The bees will endeavour to repair the gaps - this will "glue" hive parts together making access more complex
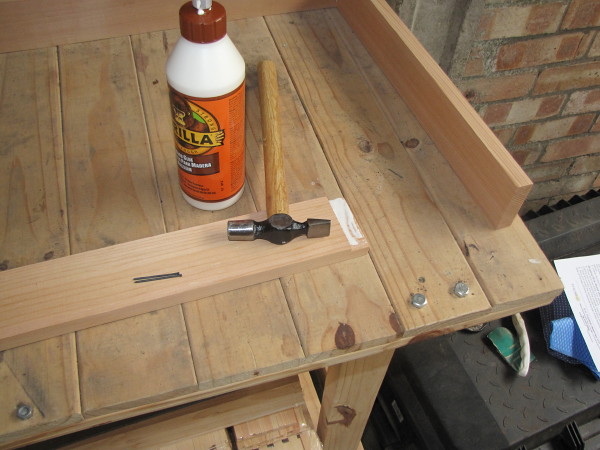
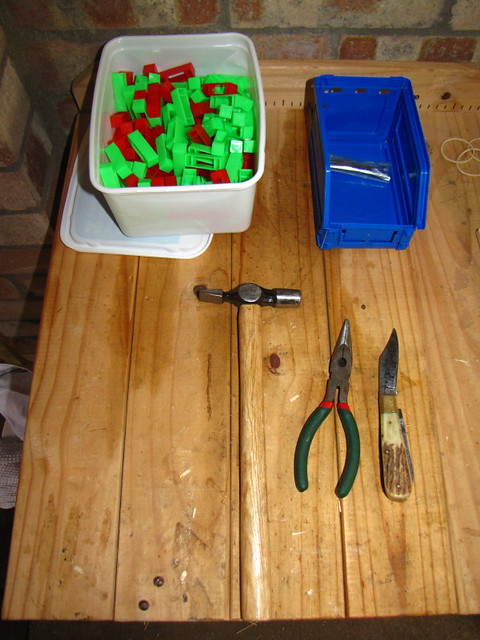
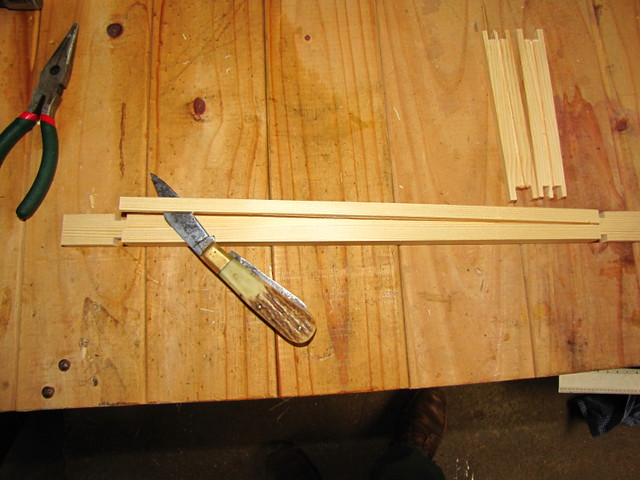
3 tools by British Red, on Flickr
The sides are pinned to the back with inch and a half panel pins

4 Stand sides attached by British Red, on Flickr
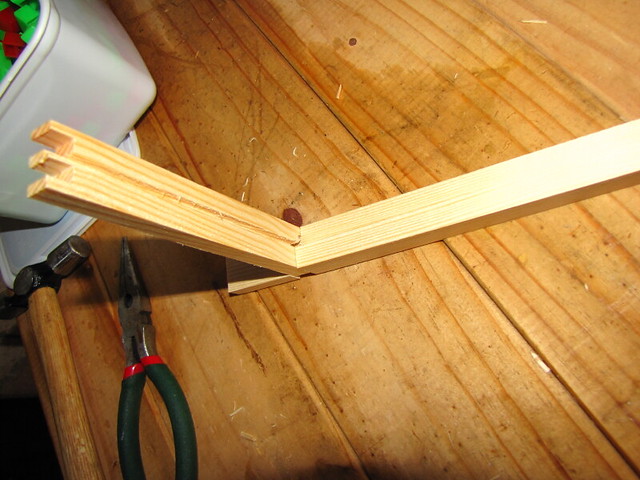
The front is attached with glue and 2" nails. Note that the upper edge of the side rails and inside edge of the sloping front form a 90 degree angle. The floor of the hive will butt up tight against this
5 Stand Front Attached by British Red, on Flickr
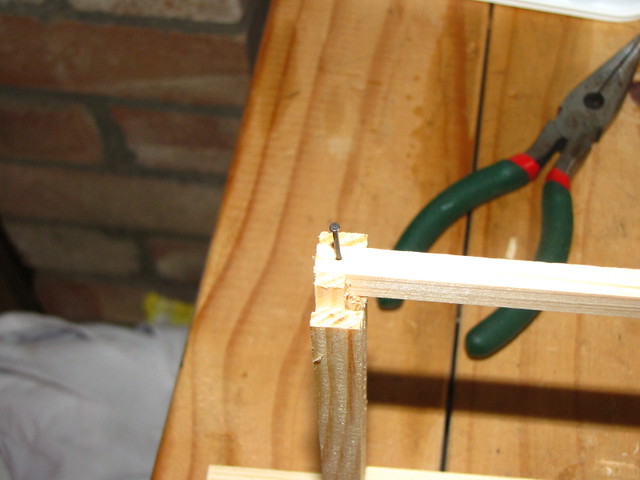
The legs attach to the inside of the side rails.
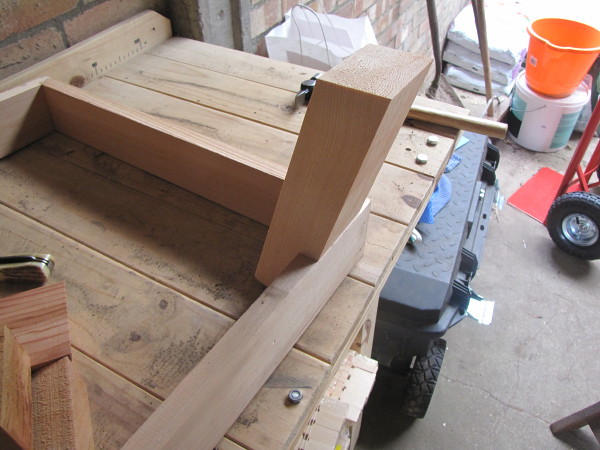
6 Stand Leg by British Red, on Flickr
Rather than pinned the legs are screwed in place (still glued though). A power drill and power driver will speed this along and prevent wood splitting
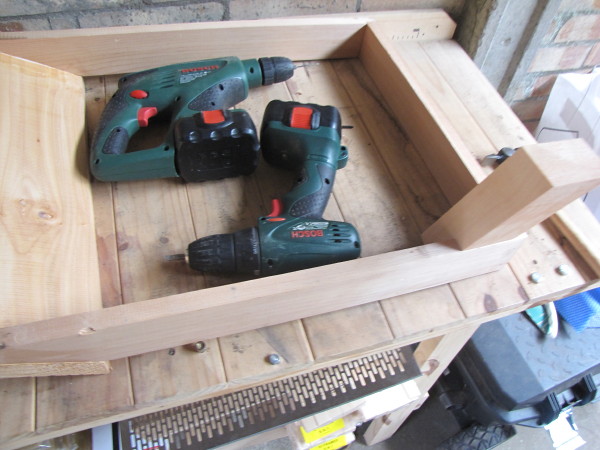
7 Drill and Driver by British Red, on Flickr
The finished stand will look like this
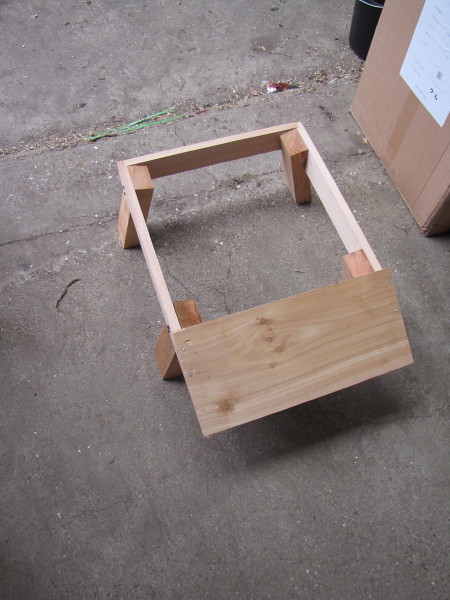
Hive Stand by British Red, on Flickr
Next...hive building
Red
This is the sides and back of the stand - as you can see, the front is angled
1 Hive stand sides and back by British Red, on Flickr
As you can see - there is a rebate in the rear of each of the sides into which to insert the back
2 Hive stand joints by British Red, on Flickr
In assembling the stand and hive, each joint is glued and pinned. Its worth taking time to get this stron, square and regular. Hives parts just stand on top of each other - if parts are "off square" , gaps will be created that admit vermin, and ruin temperature control inside the hive. The bees will endeavour to repair the gaps - this will "glue" hive parts together making access more complex
3 tools by British Red, on Flickr
The sides are pinned to the back with inch and a half panel pins
4 Stand sides attached by British Red, on Flickr
The front is attached with glue and 2" nails. Note that the upper edge of the side rails and inside edge of the sloping front form a 90 degree angle. The floor of the hive will butt up tight against this
5 Stand Front Attached by British Red, on Flickr
The legs attach to the inside of the side rails.
6 Stand Leg by British Red, on Flickr
Rather than pinned the legs are screwed in place (still glued though). A power drill and power driver will speed this along and prevent wood splitting
7 Drill and Driver by British Red, on Flickr
The finished stand will look like this
Hive Stand by British Red, on Flickr
Next...hive building
Red
We ordered our hives in "kit form" - this saves between fifty and a hundred quid a hive!
Hives come in various types - WBC (the "traditional" type), British National (most common in the UK), Commercial (larger than the Nationals) and other types such as top bar hives.
Its worth spending time on deciding which tyoe you want. We went for Nationals because the Commercial type are heavier. When full of honey this can be more than BB wants to lift. WBC are twin walled and can be harder to clean / maintain. They do look nice though. As a result we picked a sloping roof for our National hives - it is perhaps a little less practical but it suits our older property.
We also picked Cedar hives - they are naturally more rot proof and lower maintenance than cheaper materials.
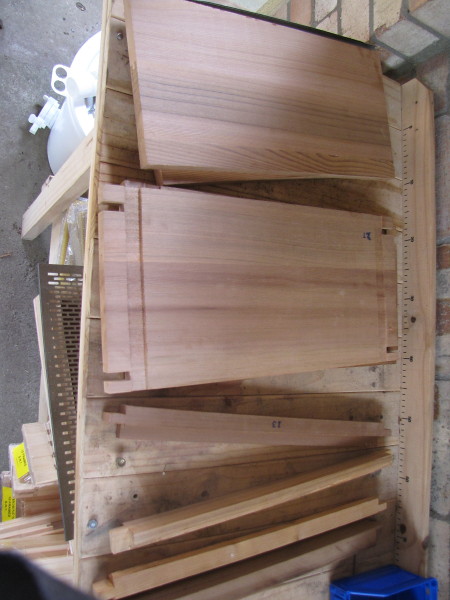
Opening the box did give rise to an "Oh Gods" moment.....lots of parts
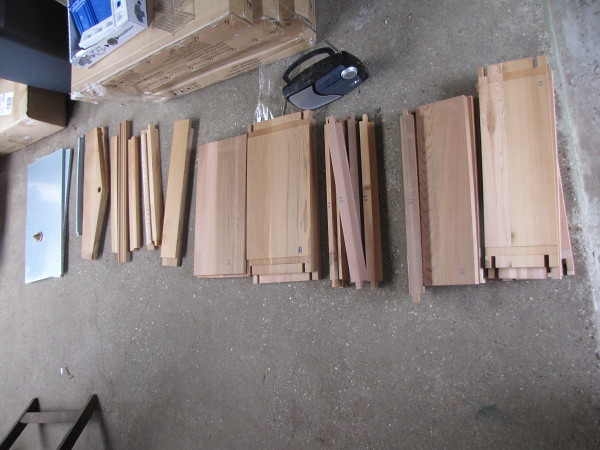
8 Hive pieces by British Red, on Flickr
My advice is give yourself loads of time to put your hive(s) together...its a longish job if done carefully and you don't want to be tackling it the night before you bees turn up
.
I plan to show the "building" elements first, then how to put a hive together from the built elements.
There are three major elements to assemble:
The Brood box (where the queen lives and lays "brood" - which becomes more bees)
Supers (where the bees create stores of honey)
The Roof
There are other elements of the hive, but these generally don't require much assembly. These include:
A floor
An "entrance block"
A "queen excluder" (this stops the queen moving up from the brood box into the supers)
A "crown board" that sids between the supers and the roof.
Given the plethora of parts, the first thing to do is sort out all the parts for the "brood box". I "dry fit" all the parts and joints first to ensure the whole thing will go together properly before breaking out glue and nails - nothing worse than finding out a joint needs adjusting when its covered in glue!
9 Brood Box Dry fit by British Red, on Flickr
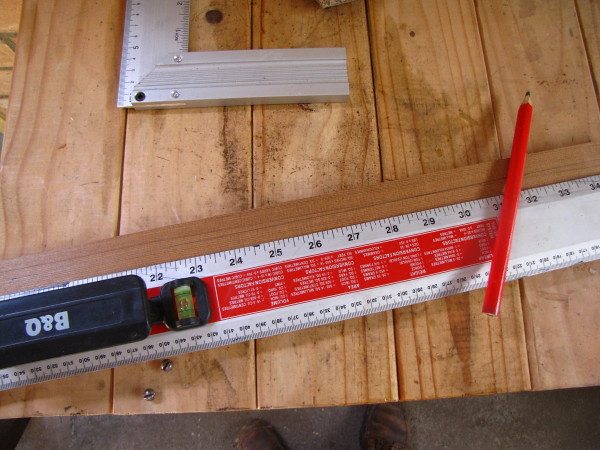
You are going to need some tools here - a pin hammer, regular hammer, glue and a carpenters square for checking angles. Mine has a measure which comes in handy. You will also need various lengths of panel pins.
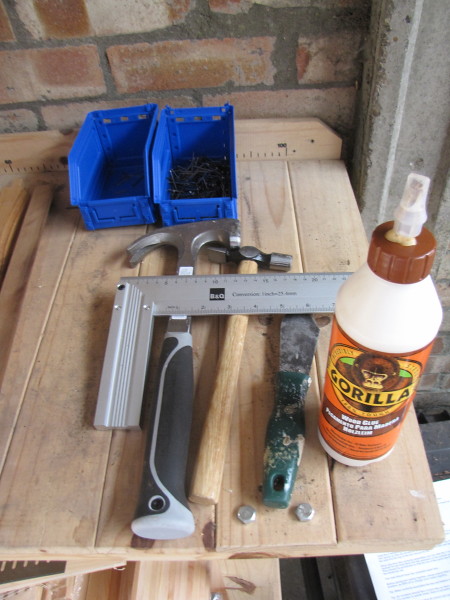
10 Tools by British Red, on Flickr
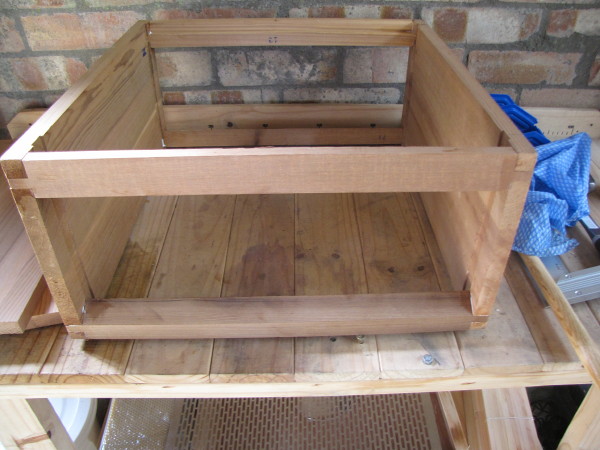
There are only ten parts to a brood box
Two long sides. These have a joints cut for top and bottom rails and a rebate for short sides routered in.
Two short sides
Two top rails -these are what the frames that hold the honey, brood etc. hang from
Two bottom rails - these "brace" the box
Two runners - these attach to the top rail and allow the frames to move easily.
11 Brood Box Parts by British Red, on Flickr
Before putting the parts together I marked the centre of the rebate on the long sides with a pencil
12 Marking Routed Rebate by British Red, on Flickr
Using the carpenters square I draw a line on the outside of the frame corresponding to the centre of the rebate. When I need to pin the sides together, this marks the line where the pins should go.
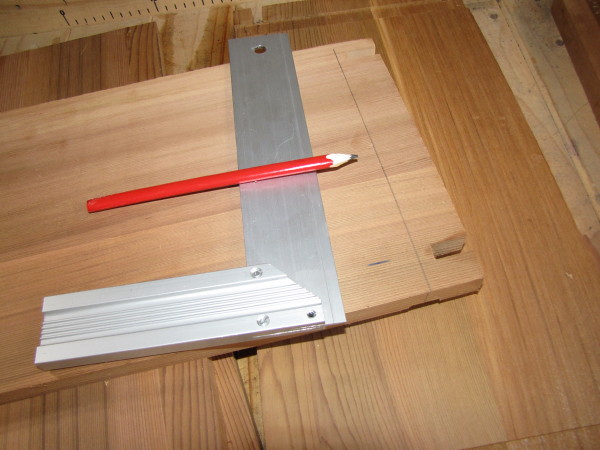
12 Pin Line by British Red, on Flickr
Next I glue and pin the top bars in place
13 Top Bars Fitted by British Red, on Flickr
You can see an internal "lip" on the top bar. This is the lip on which the frames for brood and honey will hang
Having fitted the top bars to both long sides, I use the square to check the angles
14 Check Square by British Red, on Flickr
Next I fit the bottom bars with glue and pins. The top plane of these bars slopes down and out to help the rain run off
15 Bottom Bars Fitted by British Red, on Flickr
Then the short sides are slid into the rebates and glued in. Its important that the top of the short sides fits level with the "shelf" formed inside the top bars - the frames hang across both parts
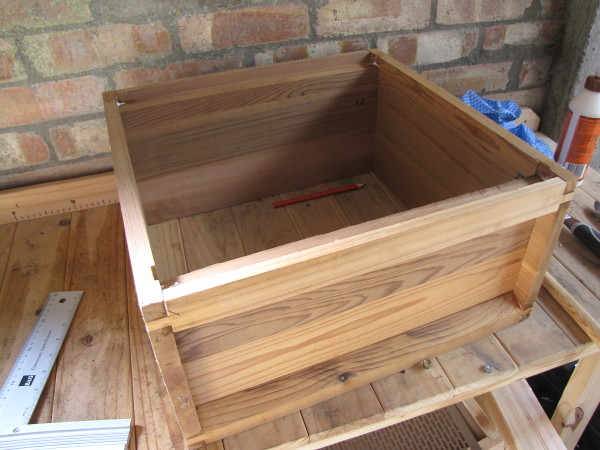
16 Short Sides Fitted by British Red, on Flickr
I check that each joint has been pinned

17 Joints pinned by British Red, on Flickr
Then the meat rails are glued and pinned to the top of the short sides
18 Rails Attached by British Red, on Flickr
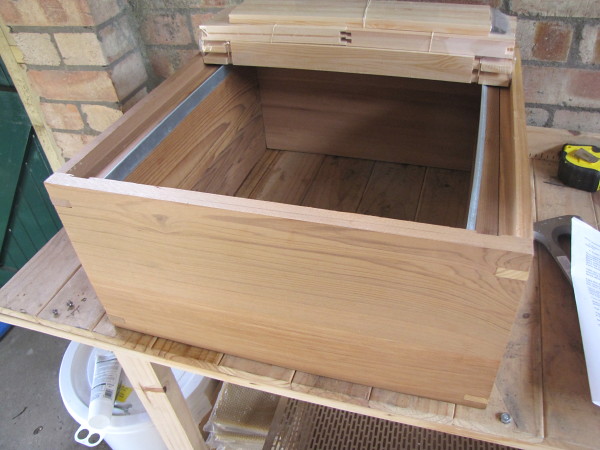
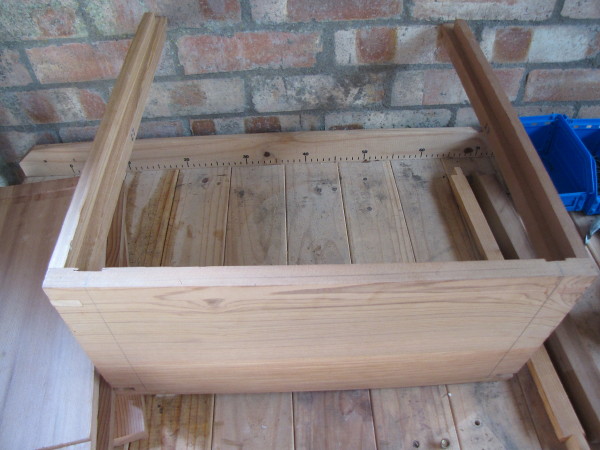
Thats it - the brood box is assembled
Supers go together exactly the same way - they are shallower than brood boxes but otherwise identical
Same sort of parts

19 Super Parts by British Red, on Flickr
Looks similar when built

20 Super Built by British Red, on Flickr
Next we will assemble the roof and put the hive together
Red
Hives come in various types - WBC (the "traditional" type), British National (most common in the UK), Commercial (larger than the Nationals) and other types such as top bar hives.
Its worth spending time on deciding which tyoe you want. We went for Nationals because the Commercial type are heavier. When full of honey this can be more than BB wants to lift. WBC are twin walled and can be harder to clean / maintain. They do look nice though. As a result we picked a sloping roof for our National hives - it is perhaps a little less practical but it suits our older property.
We also picked Cedar hives - they are naturally more rot proof and lower maintenance than cheaper materials.
Opening the box did give rise to an "Oh Gods" moment.....lots of parts
8 Hive pieces by British Red, on Flickr
My advice is give yourself loads of time to put your hive(s) together...its a longish job if done carefully and you don't want to be tackling it the night before you bees turn up
.
I plan to show the "building" elements first, then how to put a hive together from the built elements.
There are three major elements to assemble:
The Brood box (where the queen lives and lays "brood" - which becomes more bees)
Supers (where the bees create stores of honey)
The Roof
There are other elements of the hive, but these generally don't require much assembly. These include:
A floor
An "entrance block"
A "queen excluder" (this stops the queen moving up from the brood box into the supers)
A "crown board" that sids between the supers and the roof.
Given the plethora of parts, the first thing to do is sort out all the parts for the "brood box". I "dry fit" all the parts and joints first to ensure the whole thing will go together properly before breaking out glue and nails - nothing worse than finding out a joint needs adjusting when its covered in glue!
9 Brood Box Dry fit by British Red, on Flickr
You are going to need some tools here - a pin hammer, regular hammer, glue and a carpenters square for checking angles. Mine has a measure which comes in handy. You will also need various lengths of panel pins.
10 Tools by British Red, on Flickr
There are only ten parts to a brood box
Two long sides. These have a joints cut for top and bottom rails and a rebate for short sides routered in.
Two short sides
Two top rails -these are what the frames that hold the honey, brood etc. hang from
Two bottom rails - these "brace" the box
Two runners - these attach to the top rail and allow the frames to move easily.
11 Brood Box Parts by British Red, on Flickr
Before putting the parts together I marked the centre of the rebate on the long sides with a pencil
12 Marking Routed Rebate by British Red, on Flickr
Using the carpenters square I draw a line on the outside of the frame corresponding to the centre of the rebate. When I need to pin the sides together, this marks the line where the pins should go.
12 Pin Line by British Red, on Flickr
Next I glue and pin the top bars in place
13 Top Bars Fitted by British Red, on Flickr
You can see an internal "lip" on the top bar. This is the lip on which the frames for brood and honey will hang
Having fitted the top bars to both long sides, I use the square to check the angles
14 Check Square by British Red, on Flickr
Next I fit the bottom bars with glue and pins. The top plane of these bars slopes down and out to help the rain run off
15 Bottom Bars Fitted by British Red, on Flickr
Then the short sides are slid into the rebates and glued in. Its important that the top of the short sides fits level with the "shelf" formed inside the top bars - the frames hang across both parts
16 Short Sides Fitted by British Red, on Flickr
I check that each joint has been pinned
17 Joints pinned by British Red, on Flickr
Then the meat rails are glued and pinned to the top of the short sides
18 Rails Attached by British Red, on Flickr
Thats it - the brood box is assembled
Supers go together exactly the same way - they are shallower than brood boxes but otherwise identical
Same sort of parts
19 Super Parts by British Red, on Flickr
Looks similar when built
20 Super Built by British Red, on Flickr
Next we will assemble the roof and put the hive together
Red
The roof is probably the trickiest part of this assembly. Partly because we went with a tricky sloping design
As before its always worth "dry" fitting the parts first
21 Roof Dry Fitted by British Red, on Flickr
The roof consists of
2 Gable ends with ventilation holes
2 Side joists
2 long roof laths that fit inside the side joists
2 short roof laths that fit inside the gable ends
2 roof boards with metal covers
2 cone escapes that cover the holes in the gable ends
1 ridge piece
Before begining assembly, take a pencil and mark a line 1/2" from the bottomof the gable ends and side joists. The laths will attach to these.
Take your time and mark them exactly. The laths sit inside the roof and the roof is lowered over the whole hive do that the laths sit on the uppermost part of the hive. If they are not properly square the roof will wobble
22 Marking 1/2" Line by British Red, on Flickr
Glue and pin the sides to the gable ends
23 Assemble Roof by British Red, on Flickr
Carefully attach the battens inside the roof frame
24 Attach Baton by British Red, on Flickr
Attach the cone escapes to the gable ends
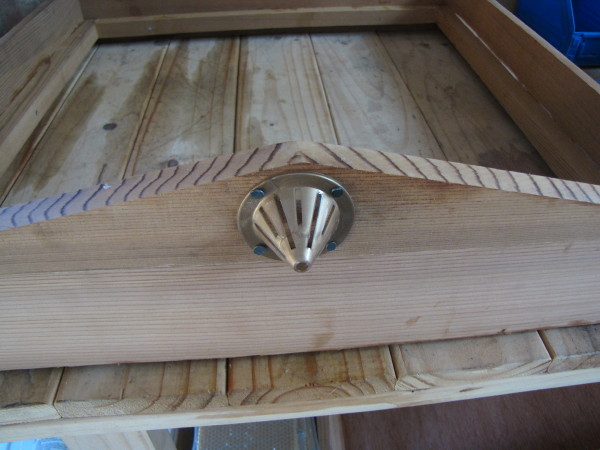
25 Attach cone escapes by British Red, on Flickr
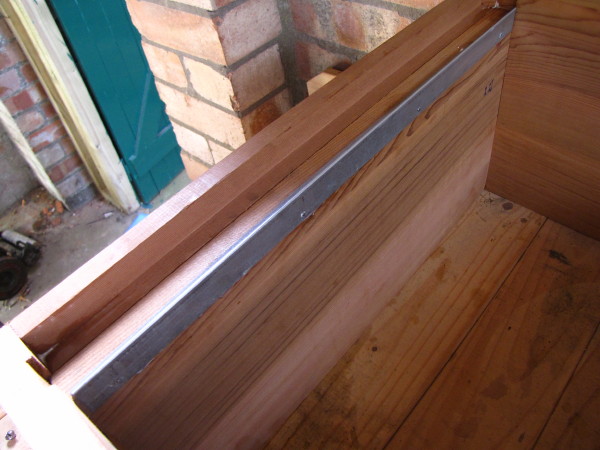
Pin the roof to the frame. I find drilling pilot holes to be wise as nailing through metal is fraught.
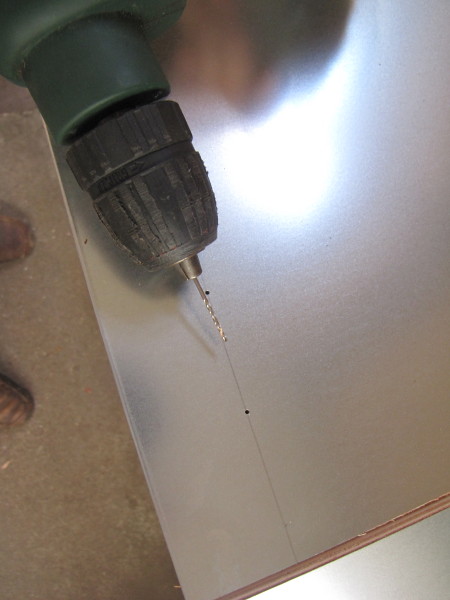
26 Drill Roof Boards by British Red, on Flickr
If you look carefully you will see that I have pencil marked the nail points throughout this operation.
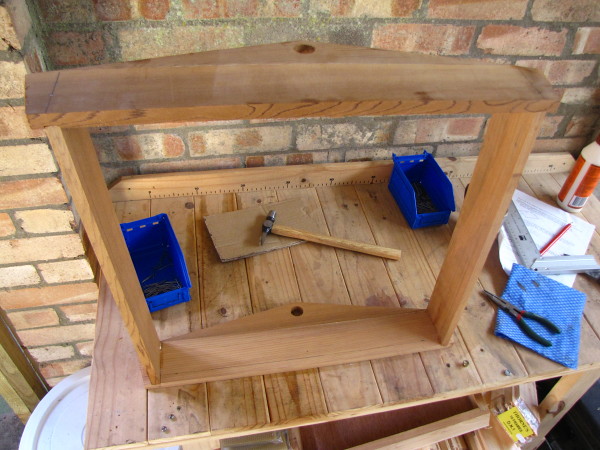
Having built the roof we can assemble the hive
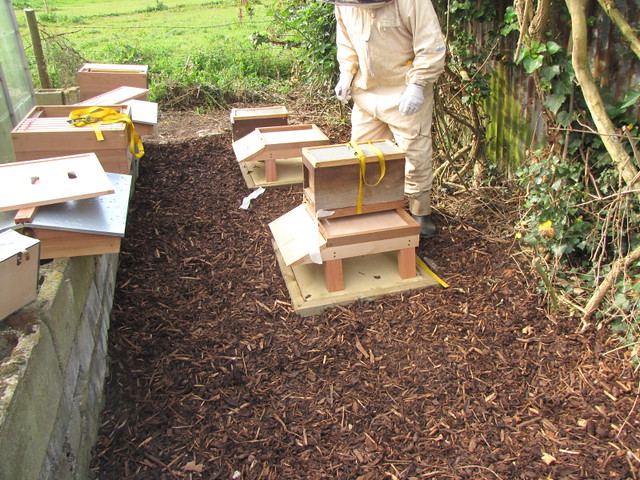
First position the stand
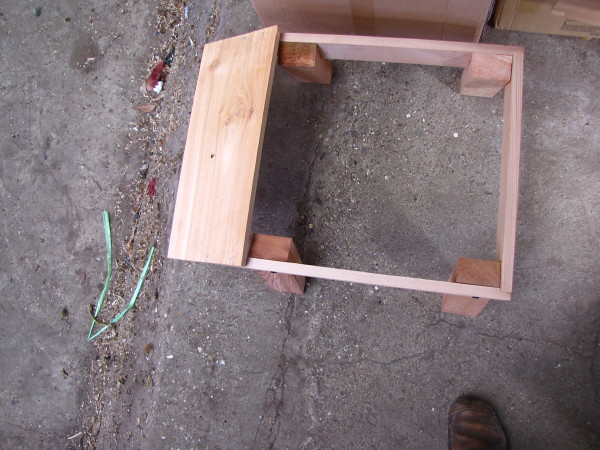
27 Stand by British Red, on Flickr
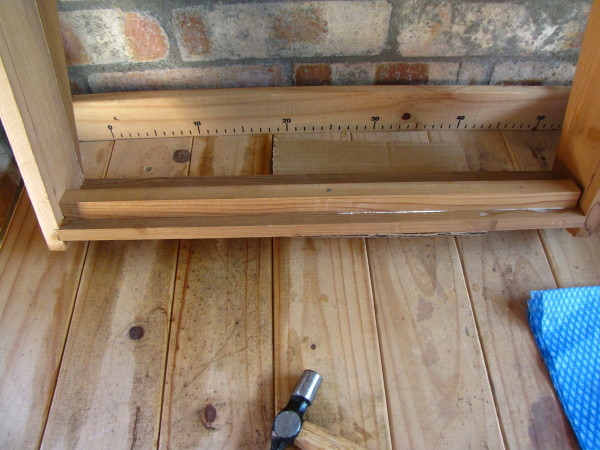
Then add the floor. The floor slides out for inspection and cleaning
28 Floor and slide by British Red, on Flickr
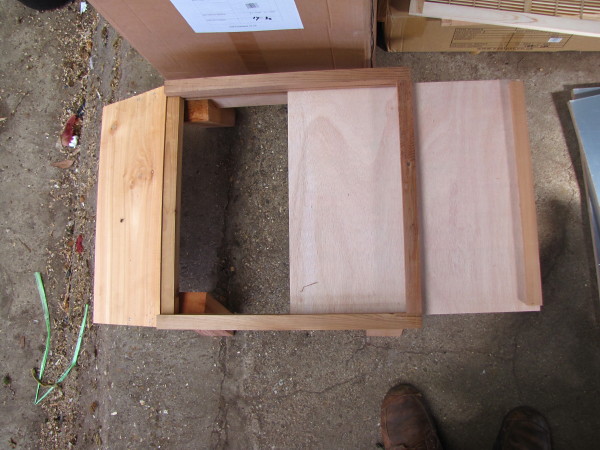
On top of the floor you sit the brood box. This is where the queen will live and where new bees are made
30 Brood Box by British Red, on Flickr
The brood box will be filled with frames of wax on which the bees can build comb - we will cover how to do that later.
On top of the brood box goes a queen excluder. This prevents the queen going further up the hive, ensuring that in the "supers" which are above the excluder you only get honey and wax and no "brood".
31 Queen Excluder by British Red, on Flickr
On top of the queen excluder goes a "super" (or, eventually, more than one super). These will also hold frames on which the bees will build comb to store honey
32 Supers by British Red, on Flickr
On top of the supers goes a crown board - this separates the supers from the roof and pervents the bees sticking the roof down. It can also be used with bee escapes (a sort of one way door) to get the bees out of the supers prior to honey extraction

33 Crown Board by British Red, on Flickr
On top of the crown board goes the roof
34 National Hive by British Red, on Flickr
There we have it - an assembled hive.
Next we will look at putting frames together....
Then the bees!
Red
As before its always worth "dry" fitting the parts first
21 Roof Dry Fitted by British Red, on Flickr
The roof consists of
2 Gable ends with ventilation holes
2 Side joists
2 long roof laths that fit inside the side joists
2 short roof laths that fit inside the gable ends
2 roof boards with metal covers
2 cone escapes that cover the holes in the gable ends
1 ridge piece
Before begining assembly, take a pencil and mark a line 1/2" from the bottomof the gable ends and side joists. The laths will attach to these.
Take your time and mark them exactly. The laths sit inside the roof and the roof is lowered over the whole hive do that the laths sit on the uppermost part of the hive. If they are not properly square the roof will wobble
22 Marking 1/2" Line by British Red, on Flickr
Glue and pin the sides to the gable ends
23 Assemble Roof by British Red, on Flickr
Carefully attach the battens inside the roof frame
24 Attach Baton by British Red, on Flickr
Attach the cone escapes to the gable ends
25 Attach cone escapes by British Red, on Flickr
Pin the roof to the frame. I find drilling pilot holes to be wise as nailing through metal is fraught.
26 Drill Roof Boards by British Red, on Flickr
If you look carefully you will see that I have pencil marked the nail points throughout this operation.
Having built the roof we can assemble the hive
First position the stand
27 Stand by British Red, on Flickr
Then add the floor. The floor slides out for inspection and cleaning
28 Floor and slide by British Red, on Flickr
On top of the floor you sit the brood box. This is where the queen will live and where new bees are made
30 Brood Box by British Red, on Flickr
The brood box will be filled with frames of wax on which the bees can build comb - we will cover how to do that later.
On top of the brood box goes a queen excluder. This prevents the queen going further up the hive, ensuring that in the "supers" which are above the excluder you only get honey and wax and no "brood".
31 Queen Excluder by British Red, on Flickr
On top of the queen excluder goes a "super" (or, eventually, more than one super). These will also hold frames on which the bees will build comb to store honey
32 Supers by British Red, on Flickr
On top of the supers goes a crown board - this separates the supers from the roof and pervents the bees sticking the roof down. It can also be used with bee escapes (a sort of one way door) to get the bees out of the supers prior to honey extraction
33 Crown Board by British Red, on Flickr
On top of the crown board goes the roof
34 National Hive by British Red, on Flickr
There we have it - an assembled hive.
Next we will look at putting frames together....
Then the bees!
Red
The next part of the process is to assemble frames to go inside the hive.
Frames are wooden structures filled with a thin layer of wax (foundation). This wax is added to (drawn out) by the bees. The cells in this wax (honeycomb) is then filled with eggs (brood), stores (pollen for protein, honey from nectar for carbohydrate etc.) etc. It is then "capped" (sealed).
Frames are loose wooden structures that hang from the runners in the brood box and supers. They can be lifted out to inspect the brood, check for disease etc. Brood boxes are deeper so take deeper frames.
To assemble frames you will need some simple tools - a pin hammer, some nose pliers and a knife
1) Tools by British Red, on Flickr
You can buy frames assembled, as flat pack kits or as individual components, foundation is sold separately as it comes in various grades and types with or without re-enforcing wires.

2) Frame Kit by British Red, on Flickr
To make a single frame we will need
A sheet of wired foundation
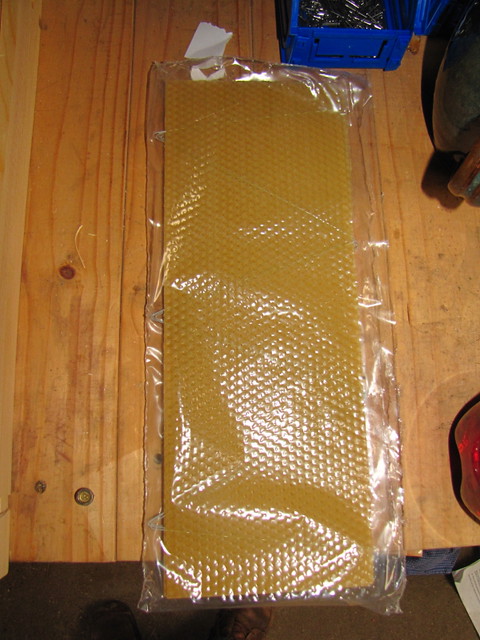
3) Wired Foundation by British Red, on Flickr
One top bar, two bottom bars and two sides
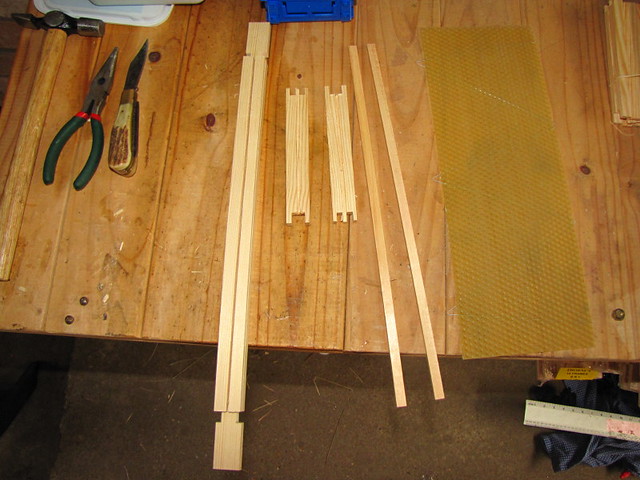
4) Components for one frame by British Red, on Flickr
To assemble we start with the top bar. If you look at the picture you will see a horizontl line across the bar. This is because on half of the bottom of the bar is designed to be split off
5) Frame top by British Red, on Flickr
Use your knife to remove the relevant section
6) Split side by British Red, on Flickr
Use the edge of your blade to clean up the rebate left by removing the breakaway section
7) Clean rebate by British Red, on Flickr
Next take a side and examine it - as you can see one end has a double notch, one end a wide single notch
Frame sides by British Red, on Flickr
You need to push the wide single notch onto the top part of the frame, ensuring the groove is facing to the inside of the frame (the wax slides into the groove)
8) Tap in side by British Red, on Flickr
Tap in with a hammer if required and repeat with the other side
9) add second side by British Red, on Flickr
Pin the ends into place on both sides
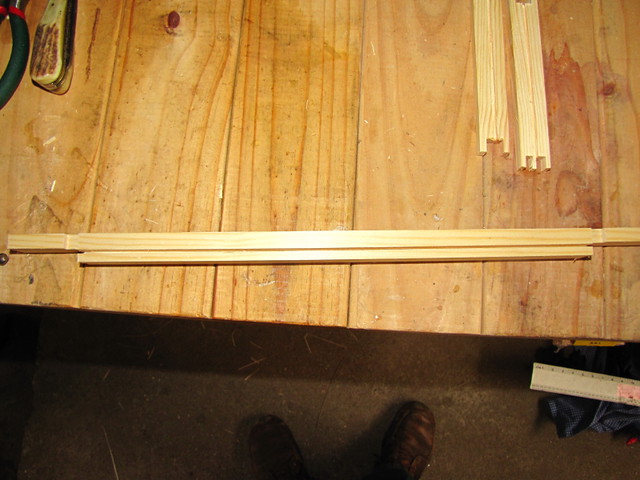
10) Pin both sides by British Red, on Flickr
Next insert one of the bottom bars of the frame - you want to insert this above the full part of the top frame

11) Add one bottom section by British Red, on Flickr
Pin both ends of the bottom bar
12) Pin bottom section by British Red, on Flickr
Next take a piece of wired foundation (unwired foundation is available if required - this is more fragile, but preferred if you want to cut out sections of honeycomb). You can see the zig zagged wire in the photo
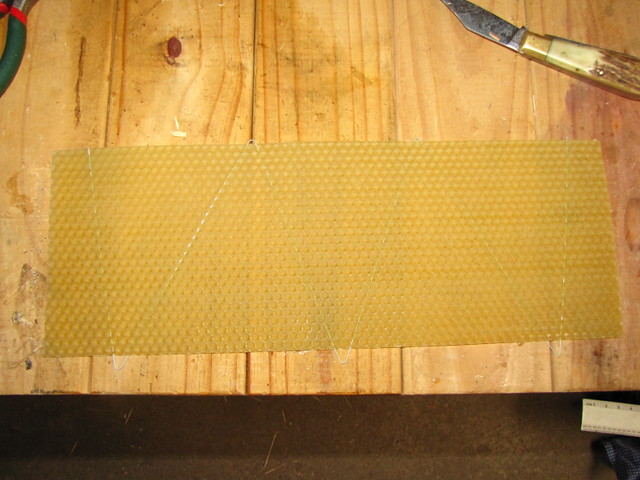
13) Take wired foundation by British Red, on Flickr
On one long side of the foundation, you will see three wire loops - one at each end and one in the middle
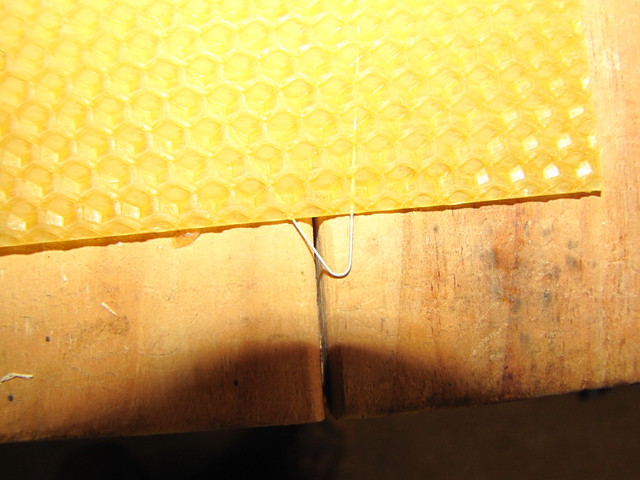
14) Wire loop by British Red, on Flickr
Bend these loops over so they are at right angles to the foundation
15) Loops bent 90 degrees by British Red, on Flickr
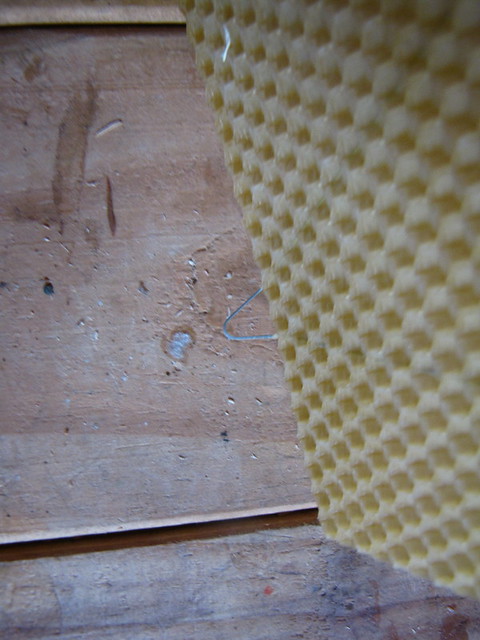
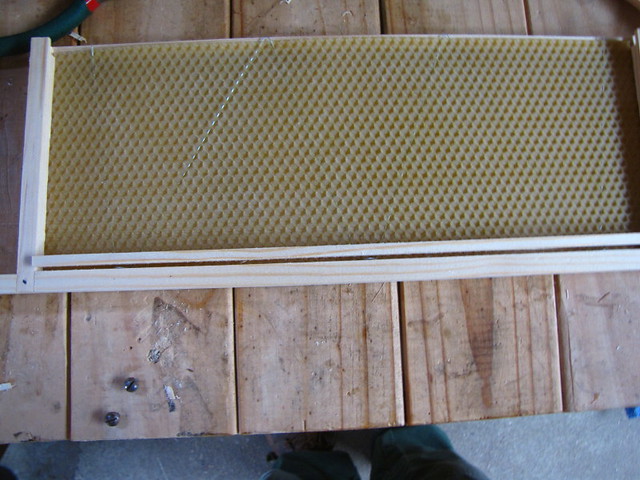
With the bent over loops at the bottom, slide the foundation into the grooves in the sides of the frame - trim the foundation a little if necessary
16) Foundation in rebate by British Red, on Flickr
Slide the foundation right to the end of the frame
17) Foundation in place by British Red, on Flickr
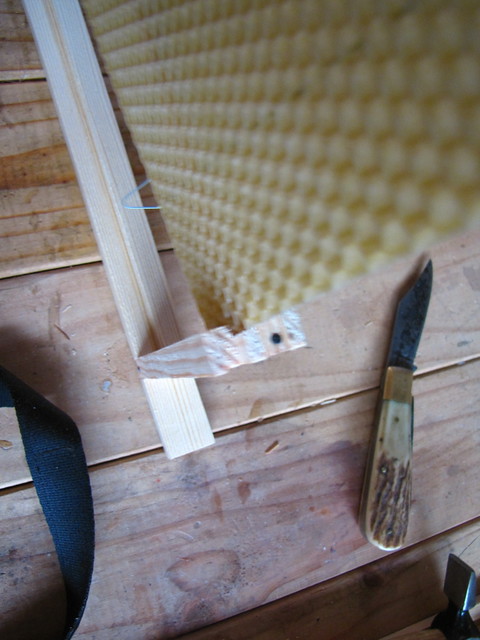
Replace the section of the frame top that you removed earlier
18) Replace top section by British Red, on Flickr
Pin the removed section in place with three pins - the pins should pass through the wires embedded in the foundation
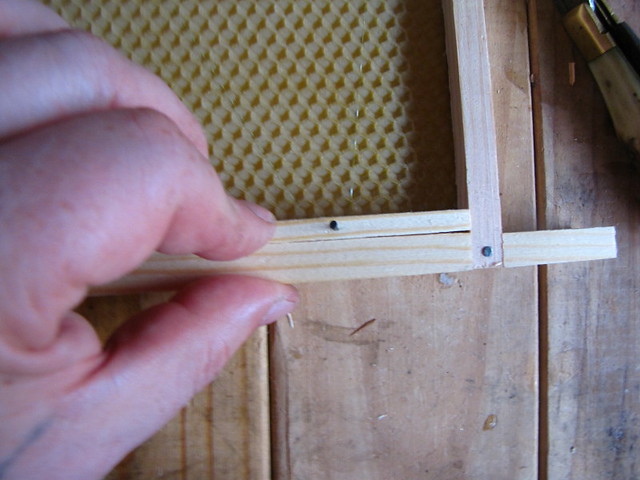
19) Squeeze and pin through wire by British Red, on Flickr

20) top replaced by British Red, on Flickr
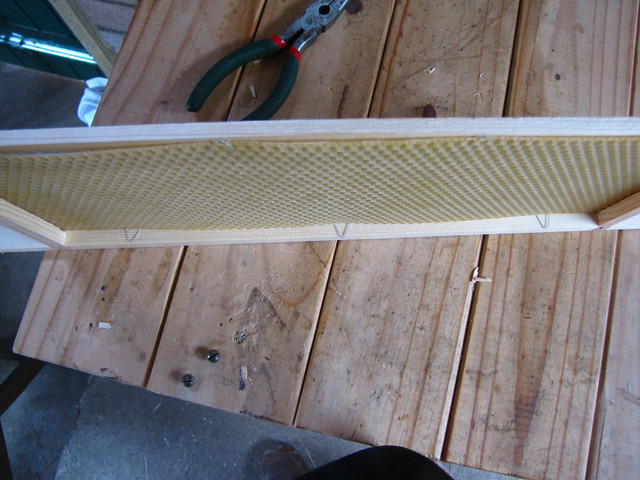
Insert the second bottom bar, bowing it outwards slightly so that it doesn't hit the foundation when pushed into place

21) Add second bottom strip by British Red, on Flickr
Finally put spacers on the frame. These ensure that there is "bee space" between the frames. Bee space between frames ensures that two bees can work back to back
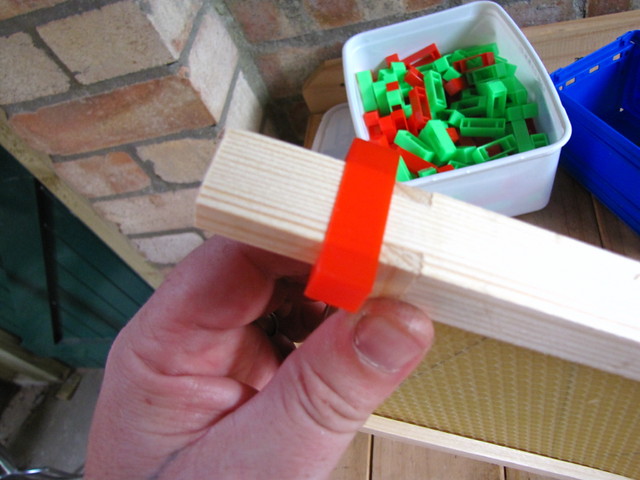
22) Spacers by British Red, on Flickr
Pop the frames into the super or brood box. You will notice that we use different coloured spacers at each end. This is so that we know which way round to replace them when inspecting them - bees do not draw out the foundation evenly, so a colour code helps to ensure they go back in the smae orientation - this is particularly important in the brood box.
Thats it for assembling the frames.
All we need right now is a brood box and about 6 frames for each hive. We have ordered a "nucleus" colony for each hive. The nucleus we have ordered is delivered on five brood frames. If we add six new frames to this we will give the nucleus a full brood box to populate. Thats all they can manage this year...next year in the Spring there will hopefully be a vibrant young colony ready to go. Then we can add supers for them to store honey in.
Next post will be the arrival of the bees....a big day for us
Red
Frames are wooden structures filled with a thin layer of wax (foundation). This wax is added to (drawn out) by the bees. The cells in this wax (honeycomb) is then filled with eggs (brood), stores (pollen for protein, honey from nectar for carbohydrate etc.) etc. It is then "capped" (sealed).
Frames are loose wooden structures that hang from the runners in the brood box and supers. They can be lifted out to inspect the brood, check for disease etc. Brood boxes are deeper so take deeper frames.
To assemble frames you will need some simple tools - a pin hammer, some nose pliers and a knife
1) Tools by British Red, on Flickr
You can buy frames assembled, as flat pack kits or as individual components, foundation is sold separately as it comes in various grades and types with or without re-enforcing wires.
2) Frame Kit by British Red, on Flickr
To make a single frame we will need
A sheet of wired foundation
3) Wired Foundation by British Red, on Flickr
One top bar, two bottom bars and two sides
4) Components for one frame by British Red, on Flickr
To assemble we start with the top bar. If you look at the picture you will see a horizontl line across the bar. This is because on half of the bottom of the bar is designed to be split off
5) Frame top by British Red, on Flickr
Use your knife to remove the relevant section
6) Split side by British Red, on Flickr
Use the edge of your blade to clean up the rebate left by removing the breakaway section
7) Clean rebate by British Red, on Flickr
Next take a side and examine it - as you can see one end has a double notch, one end a wide single notch
Frame sides by British Red, on Flickr
You need to push the wide single notch onto the top part of the frame, ensuring the groove is facing to the inside of the frame (the wax slides into the groove)
8) Tap in side by British Red, on Flickr
Tap in with a hammer if required and repeat with the other side
9) add second side by British Red, on Flickr
Pin the ends into place on both sides
10) Pin both sides by British Red, on Flickr
Next insert one of the bottom bars of the frame - you want to insert this above the full part of the top frame
11) Add one bottom section by British Red, on Flickr
Pin both ends of the bottom bar
12) Pin bottom section by British Red, on Flickr
Next take a piece of wired foundation (unwired foundation is available if required - this is more fragile, but preferred if you want to cut out sections of honeycomb). You can see the zig zagged wire in the photo
13) Take wired foundation by British Red, on Flickr
On one long side of the foundation, you will see three wire loops - one at each end and one in the middle
14) Wire loop by British Red, on Flickr
Bend these loops over so they are at right angles to the foundation
15) Loops bent 90 degrees by British Red, on Flickr
With the bent over loops at the bottom, slide the foundation into the grooves in the sides of the frame - trim the foundation a little if necessary
16) Foundation in rebate by British Red, on Flickr
Slide the foundation right to the end of the frame
17) Foundation in place by British Red, on Flickr
Replace the section of the frame top that you removed earlier
18) Replace top section by British Red, on Flickr
Pin the removed section in place with three pins - the pins should pass through the wires embedded in the foundation
19) Squeeze and pin through wire by British Red, on Flickr
20) top replaced by British Red, on Flickr
Insert the second bottom bar, bowing it outwards slightly so that it doesn't hit the foundation when pushed into place
21) Add second bottom strip by British Red, on Flickr
Finally put spacers on the frame. These ensure that there is "bee space" between the frames. Bee space between frames ensures that two bees can work back to back
22) Spacers by British Red, on Flickr
Pop the frames into the super or brood box. You will notice that we use different coloured spacers at each end. This is so that we know which way round to replace them when inspecting them - bees do not draw out the foundation evenly, so a colour code helps to ensure they go back in the smae orientation - this is particularly important in the brood box.
Thats it for assembling the frames.
All we need right now is a brood box and about 6 frames for each hive. We have ordered a "nucleus" colony for each hive. The nucleus we have ordered is delivered on five brood frames. If we add six new frames to this we will give the nucleus a full brood box to populate. Thats all they can manage this year...next year in the Spring there will hopefully be a vibrant young colony ready to go. Then we can add supers for them to store honey in.
Next post will be the arrival of the bees....a big day for us
Red
Well, on Friday our bees arrived.
We bought two nucleii from our local bee mentor.
We decided to try two strains to see which does best
One strain are Buckfast bees (I grew up in Devon and have visited Buckfast Abbey where the legendary beekeeper Brother Adam developed the gentle Buckfast strain)
http://www.buckfast.org.uk/site.php?use=bees
The other are a strain developed by our bee mentor - he has been selectively breeding them in Lincolnshire for over forty years.
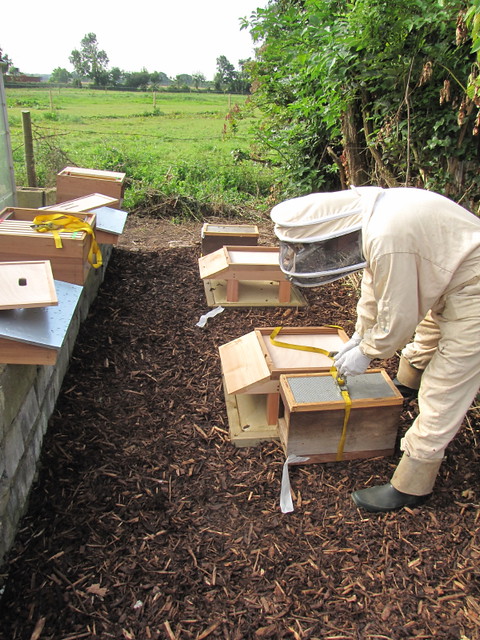
So here are the bees arriving...
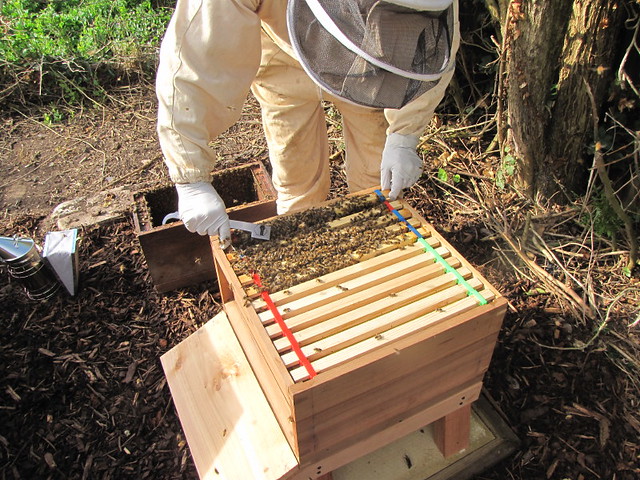
The bees arrived in the nucleus with the entrances blocked and hive straps securing them for travelling
Unfastening transport straps by British Red, on Flickr
The first job was to remove the hive straps.
Then the nucs are placed on the stands and the entrances unblocked
Nucleus on hive site by British Red, on Flickr
The bees were left in the nucs for half an hour - we went off for a cuppa. The bees wandered out to inspect their new surroundings
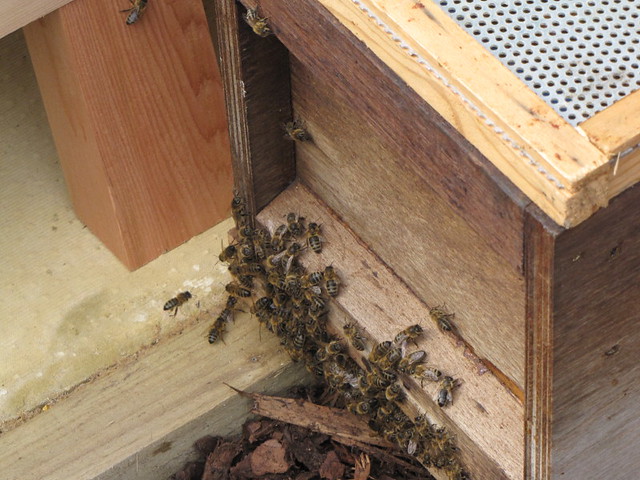
Letting out the bees by British Red, on Flickr
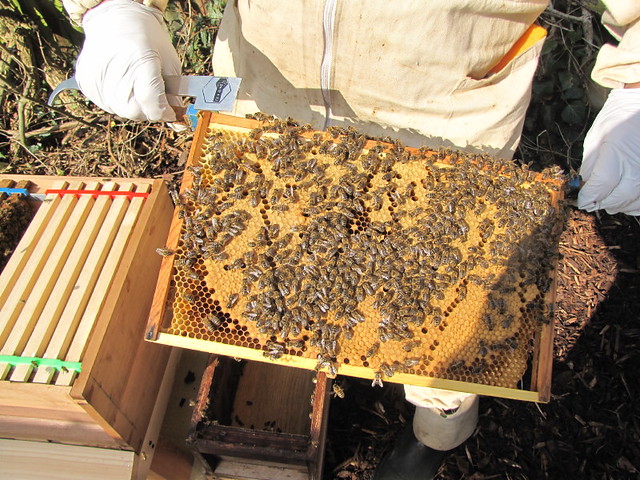
The nucs contain five frames. Our National Hives hold eleven frames in the brood box so six frames of foundation were put on one side of the brood box.
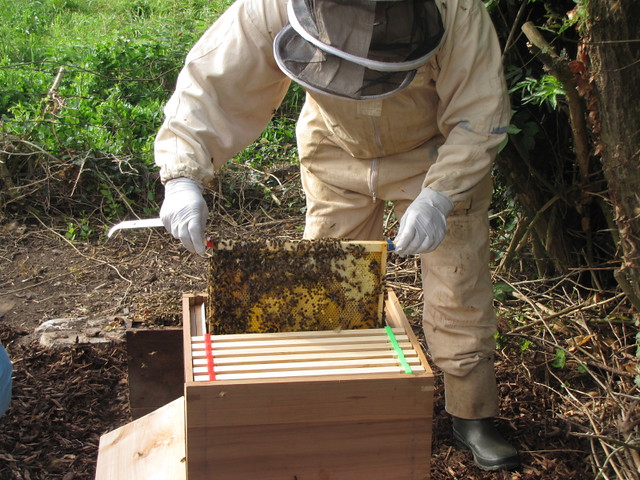
The first frame was removed from the nuc and checked for the queen and general health

Taking frames out of nucleus by British Red, on Flickr
Each frame is transferred to our shiny new hive
Moving frames into brood box by British Red, on Flickr
The remaining frames were removed from the nuc, checked and transferred to the hive - we did find the queen (the bees will stay with the queen so its vital to ensure she is transferred)
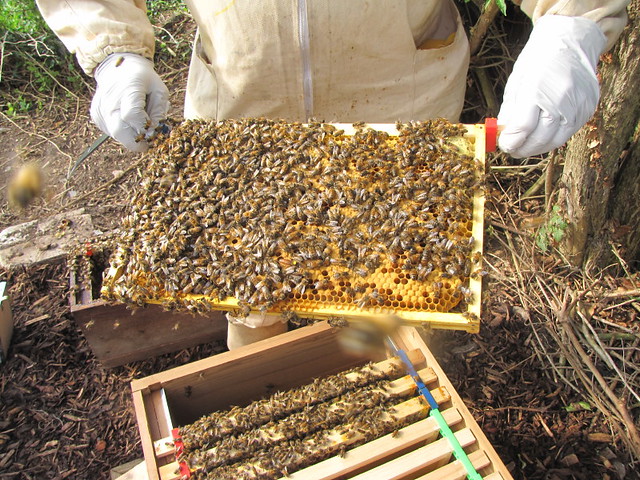
Looking for the queen by British Red, on Flickr
Sealed brood by British Red, on Flickr
Everntually the hive was filled
Brood next to new frames by British Red, on Flickr
The crown board was replaced and the bees given a feed (more on this in a later post). The roof was replaced on each hive and the bees left to settle in
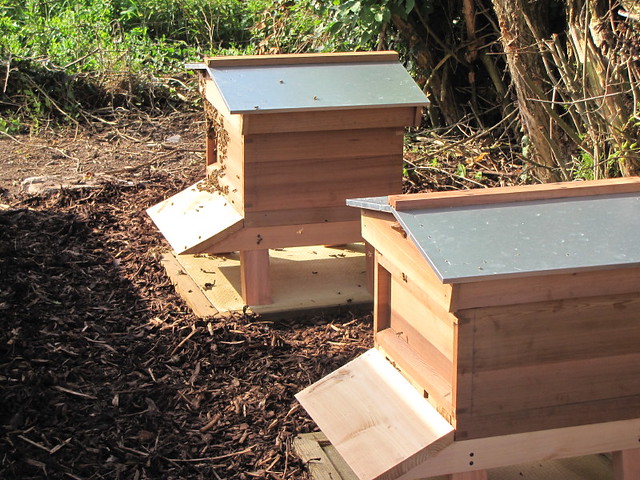
Completed hives by British Red, on Flickr
Red
We bought two nucleii from our local bee mentor.
We decided to try two strains to see which does best
One strain are Buckfast bees (I grew up in Devon and have visited Buckfast Abbey where the legendary beekeeper Brother Adam developed the gentle Buckfast strain)
http://www.buckfast.org.uk/site.php?use=bees
The other are a strain developed by our bee mentor - he has been selectively breeding them in Lincolnshire for over forty years.
So here are the bees arriving...
The bees arrived in the nucleus with the entrances blocked and hive straps securing them for travelling
Unfastening transport straps by British Red, on Flickr
The first job was to remove the hive straps.
Then the nucs are placed on the stands and the entrances unblocked
Nucleus on hive site by British Red, on Flickr
The bees were left in the nucs for half an hour - we went off for a cuppa. The bees wandered out to inspect their new surroundings
Letting out the bees by British Red, on Flickr
The nucs contain five frames. Our National Hives hold eleven frames in the brood box so six frames of foundation were put on one side of the brood box.
The first frame was removed from the nuc and checked for the queen and general health
Taking frames out of nucleus by British Red, on Flickr
Each frame is transferred to our shiny new hive
Moving frames into brood box by British Red, on Flickr
The remaining frames were removed from the nuc, checked and transferred to the hive - we did find the queen (the bees will stay with the queen so its vital to ensure she is transferred)
Looking for the queen by British Red, on Flickr
Sealed brood by British Red, on Flickr
Everntually the hive was filled
Brood next to new frames by British Red, on Flickr
The crown board was replaced and the bees given a feed (more on this in a later post). The roof was replaced on each hive and the bees left to settle in
Completed hives by British Red, on Flickr
Red
We were treating for Varroa today (I'll do a post on it later) so I took the opportunity to have a peek at the new foundation that we put in on Friday to see if the bees had started to "draw it out" into full comb
Have they ever! Now I understand "as busy as a bee"
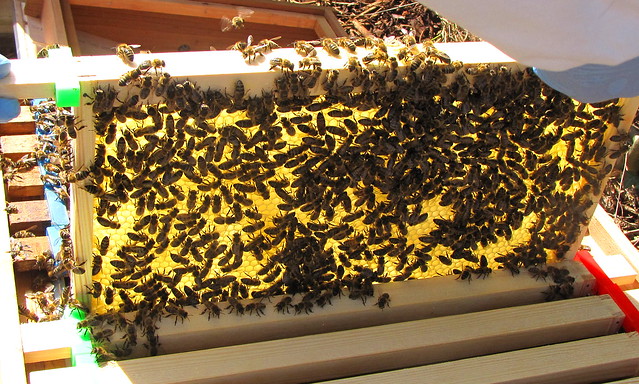
Drawing comb on new frames by British Red, on Flickr
Go little buzzies go
Red
Have they ever! Now I understand "as busy as a bee"
Drawing comb on new frames by British Red, on Flickr
Go little buzzies go
Red
How do these mites spread, actually?
Do they hop from one bee to another or do they lay in ambush on flowers or what?
Do they hop from one bee to another or do they lay in ambush on flowers or what?
How do these mites spread, actually?
Do they hop from one bee to another or do they lay in ambush on flowers or what?
They live in the hive - almost every bee colony has them (in Britain). They lay eggs in with the bee larvae and emerge at the same time as the brood - they suck bee blood (hemolymph) and leave wounds that admit viruses.
Interestingly bumble bees will not tolerate them and efforts are being made to breed honey bees that also eliminate them. In the meantime we have to treat with a variety of means - we are using a thymol and oxalic acid regimen.
Okay, next post in the "beginners beekeeping"
For a colony to make it through the winter, they must have at least 15 kilos of stores. Stores are the name for stored honey, pollen etc. (foodstuffs).
The reason that bee colonies make honey is to set back stores for the Winter. Of course, then we robe their stores! The way around that is to either:
Leave them at least 15 kilos of honey for the Winter
Supplementary feed sugar syrup in the Autumn to compensate for lost stores
Because honey costs a lot more than sugar, many beekeepers extract as much hiney as possible and supplementary feed as a matter of routine. Clearly if the bees were to be "self supporting" then less honey could be extracted - about 11kg a year can be extracted in a normal year leaving plenty for Winter feed.
Since we have only just established our colonies, they haven't had a chance to accumulate enough stores. Lets bear in mind the poor buzzies have to fly 55,000 miles to make a pound of honey! As a result we need to feed them over this Autumn to let them make their Winter stores.
Each hive needs to be fed 15kg of sugar as a syrup. This is simple to make and fed through bee feeders. A bee feeder can be as simple as a "contact feeder" (a simple firmly lidded pot with some tiny holes in the lid or a mesh area - when inverted vacuum holds the syrup in place and the bees consume it through the small holes). We will use the "Brother Adam" type bulk feeder...I'll explain how they work later.
Okay, enough waffle, lets make some syrup. Syrup normally comes in two mixes 1:1 (Sugar:Water) or 2:1. Generally Autumn - Winter is 2:1 and 1:1 can be used as a Spring supplementary feed. Everything in these ratios is done by weight. Fortunately a litre of water weighs 1 kg - so for Autumn feed its 1 litre of water to 2 kilos of sugar. My mentor doesn't bother with measures! He gets a 30 litre bucket, dumps in a load of sugar, adds hot water just above the level the sugar is at (he marks a line with a permanent marker after putting in the dry sugar). Then he blends the lot with a plaster whisk in a power drill . Mind you he makes feed 100 litres at a time :shock:
So we need 2.5 litres of hot (not boiling water)
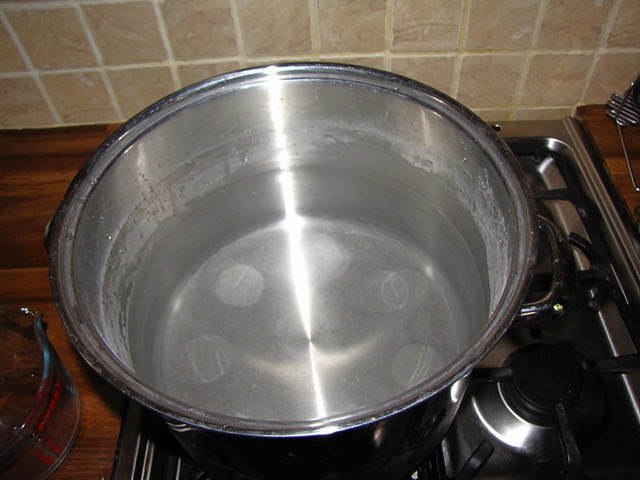
1) 2.5 litre water by British Red, on Flickr
Then we add a 5 kilo bag of sugar (£4 from Tesco)
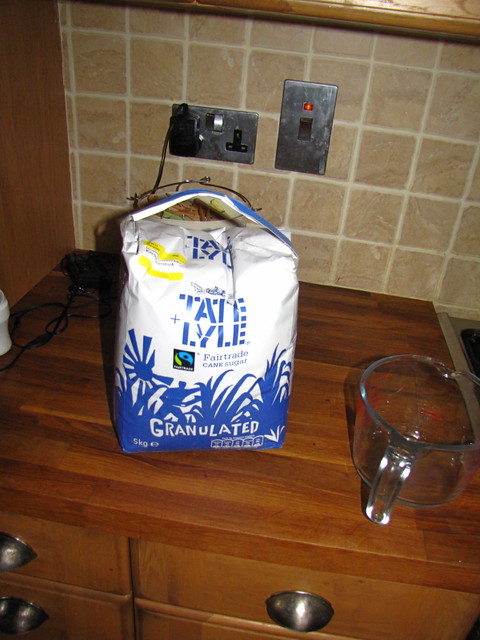
2) 5 kilos Sugar by British Red, on Flickr
Added together it looks like this
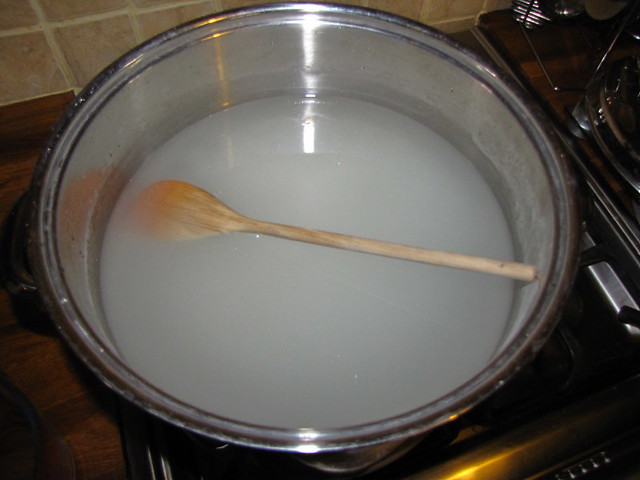
3) Mix and warm by British Red, on Flickr
I stir well with a wooden spoon and put it on a low heat...you don't need to boil it, just keep warm till all the sugar dissolves
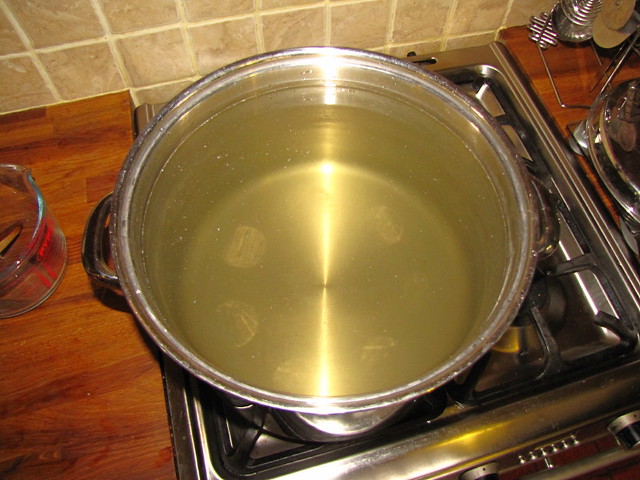
4) Dissolved Sugar by British Red, on Flickr
Then let it cool. Interestingly - when its still warm, the bees like it better than cold - if its cold they have to warm it up. Pleasantly warm to the touch is great (they are happy with cold though).
Right - feeders. We made a mistake here. We bought this type to start with
5) Small Feeder by British Red, on Flickr
They work by sitting over one of the holes in the crown board....you remember them right?
33 Crown Board by British Red, on Flickr
Now, if you recall, we put our nucleus on one side of the brood box and the frames of new foundation on the other side. So the way to feed them is to put the left hand hole over the frames of brood from the nucleus and the hole in the middle of the feeder over that hole. The other hole is blocked with a tile. The bees can then crawl up the hole and down the (ridged) outside to consume the feed. A cover fits over the hole and cone to prevent bees inside the roof space falling into the syrup and drowning.
This we did. The feeders worked as advertised. So what was the problem? Well our mentor when he delivered the bees said two words "too small"! He was right. These green feeders hold just over a litre. Each hive emptied them in less than a day. So we bought cheap white basic economy feeders. These hold 6 litres apiece.
On Saturday we swapped over...
First, we suit up and give the bees a whiff of smoke
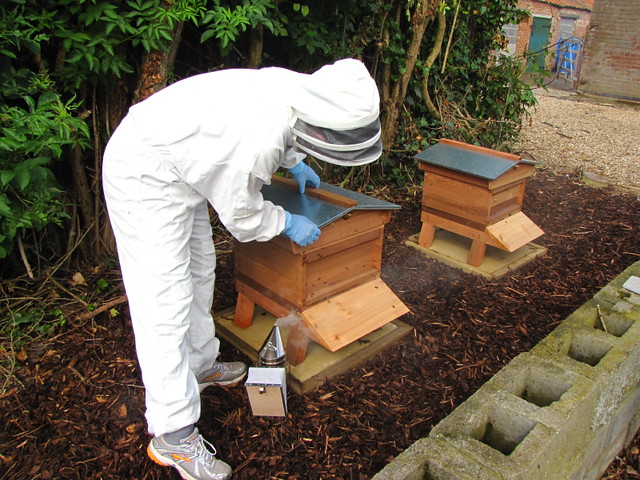
6) Whiff of smoke by British Red, on Flickr
Then the large white feeders go in on top of the crown board. These large feeders seem to be lasting the bees several days. Their "greedy" consumption is a great sign - we really want them making up stores and stashing the food away - but we don't want to be disturbing the hive every day - so we hope the big feeders will enable both to happen
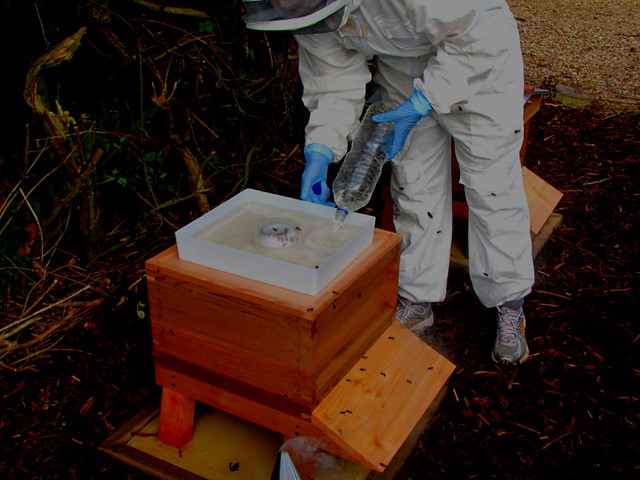
7) 6 Litre Economy Feeder by British Red, on Flickr
Thats it - we will continue making up syrup and topping up feeders until at least 15kg of sugar has been stored by each hive.
The good news?
Remember those new frames of foundation we put in on Friday? Well this was the one nearest the brood on Tuesday
Drawing comb on new frames by British Red, on Flickr
The foundation is being quickly drawn out into comb to store those sustaining stores!
Next post will be on Varroa control
Red
For a colony to make it through the winter, they must have at least 15 kilos of stores. Stores are the name for stored honey, pollen etc. (foodstuffs).
The reason that bee colonies make honey is to set back stores for the Winter. Of course, then we robe their stores! The way around that is to either:
Leave them at least 15 kilos of honey for the Winter
Supplementary feed sugar syrup in the Autumn to compensate for lost stores
Because honey costs a lot more than sugar, many beekeepers extract as much hiney as possible and supplementary feed as a matter of routine. Clearly if the bees were to be "self supporting" then less honey could be extracted - about 11kg a year can be extracted in a normal year leaving plenty for Winter feed.
Since we have only just established our colonies, they haven't had a chance to accumulate enough stores. Lets bear in mind the poor buzzies have to fly 55,000 miles to make a pound of honey! As a result we need to feed them over this Autumn to let them make their Winter stores.
Each hive needs to be fed 15kg of sugar as a syrup. This is simple to make and fed through bee feeders. A bee feeder can be as simple as a "contact feeder" (a simple firmly lidded pot with some tiny holes in the lid or a mesh area - when inverted vacuum holds the syrup in place and the bees consume it through the small holes). We will use the "Brother Adam" type bulk feeder...I'll explain how they work later.
Okay, enough waffle, lets make some syrup. Syrup normally comes in two mixes 1:1 (Sugar:Water) or 2:1. Generally Autumn - Winter is 2:1 and 1:1 can be used as a Spring supplementary feed. Everything in these ratios is done by weight. Fortunately a litre of water weighs 1 kg - so for Autumn feed its 1 litre of water to 2 kilos of sugar. My mentor doesn't bother with measures! He gets a 30 litre bucket, dumps in a load of sugar, adds hot water just above the level the sugar is at (he marks a line with a permanent marker after putting in the dry sugar). Then he blends the lot with a plaster whisk in a power drill
. Mind you he makes feed 100 litres at a time :shock: So we need 2.5 litres of hot (not boiling water)
1) 2.5 litre water by British Red, on Flickr
Then we add a 5 kilo bag of sugar (£4 from Tesco)
2) 5 kilos Sugar by British Red, on Flickr
Added together it looks like this
3) Mix and warm by British Red, on Flickr
I stir well with a wooden spoon and put it on a low heat...you don't need to boil it, just keep warm till all the sugar dissolves
4) Dissolved Sugar by British Red, on Flickr
Then let it cool. Interestingly - when its still warm, the bees like it better than cold - if its cold they have to warm it up. Pleasantly warm to the touch is great (they are happy with cold though).
Right - feeders. We made a mistake here. We bought this type to start with
5) Small Feeder by British Red, on Flickr
They work by sitting over one of the holes in the crown board....you remember them right?
33 Crown Board by British Red, on Flickr
Now, if you recall, we put our nucleus on one side of the brood box and the frames of new foundation on the other side. So the way to feed them is to put the left hand hole over the frames of brood from the nucleus and the hole in the middle of the feeder over that hole. The other hole is blocked with a tile. The bees can then crawl up the hole and down the (ridged) outside to consume the feed. A cover fits over the hole and cone to prevent bees inside the roof space falling into the syrup and drowning.
This we did. The feeders worked as advertised. So what was the problem? Well our mentor when he delivered the bees said two words "too small"! He was right. These green feeders hold just over a litre. Each hive emptied them in less than a day. So we bought cheap white basic economy feeders. These hold 6 litres apiece.
On Saturday we swapped over...
First, we suit up and give the bees a whiff of smoke
6) Whiff of smoke by British Red, on Flickr
Then the large white feeders go in on top of the crown board. These large feeders seem to be lasting the bees several days. Their "greedy" consumption is a great sign - we really want them making up stores and stashing the food away - but we don't want to be disturbing the hive every day - so we hope the big feeders will enable both to happen
7) 6 Litre Economy Feeder by British Red, on Flickr
Thats it - we will continue making up syrup and topping up feeders until at least 15kg of sugar has been stored by each hive.
The good news?
Remember those new frames of foundation we put in on Friday? Well this was the one nearest the brood on Tuesday
Drawing comb on new frames by British Red, on Flickr
The foundation is being quickly drawn out into comb to store those sustaining stores!
Next post will be on Varroa control
Red
Great stuff Hugh really enjoying the thread. A question, I seem to remember a programme, may have been river cottage where the mice were getting into the hives and eating the bees, you foresee this beign a problem, or do you have it covered?
It certainly can happen - usually in Winter. As the weather cools down we will fit a "mouse guard" to the entrance block. This is made of metal and turns the standard entrance into a number of narrow (8-9 mm) apertures -wide enough for a single bee only. Our mentor advises not to use these in busy feeding times as they cause a "traffic jam" and can abrade the wings on worker bees when they are active shortening their useful lives
In the UK the Varroa mite was discovered in 1992 - it now infects the majority of hives. Varroa are a little red mite (about 1 to 2mm) - it is present on every continent now except Australia.
Varroa mites reproduce on a 10 day cycle - the female mite lays eggs in sealed brood and the young emerge with the new bee and are spread through the colony.
Adult mites suck bee blood (hemolymph) leaving open wounds and transmitting infections.
If left untreated the bee colony will weaken. If not treated in the Autumn when the production of drone (male brood) ceases, the Varroa will switch attention to the workers causing population decline and ultimately hive collapse.
The suggested approach to Varroa is an Integrated Pest Management Approach - using a combination of treatments to control numbers
The normal approach is a combination of Thymol crystals and oxalic acid.
Thymol crystals produce a fumigation effect - they need a sealed floor and roof. Timing is critical as Thymol can "taint" honey so a treatment should take place after Supers are removed but while the weather is warm enough to vapourise the crystals. Given it works on vapour, its only really effective on Varroa that is on adult bees - the stuff in brood is relatively safe. Repeating the treatment twice at two week intervals means that young Varroa protected by being sealed in brood get caught after hatching by the second treatment.
The normal mechanism is to put an "eke" on top of the frames (an eke is a wooden square that lifts the roof up a bit) and put the thymol on top of the frames in a sachet. The thymol needs at least 8mm above it so that bees will walk it through the colony.
The problem with adding an eke it can inhibit feeder use - so our mentor recommends a slightly different approach. This approach is shown below.
How do I know I have Varroa?
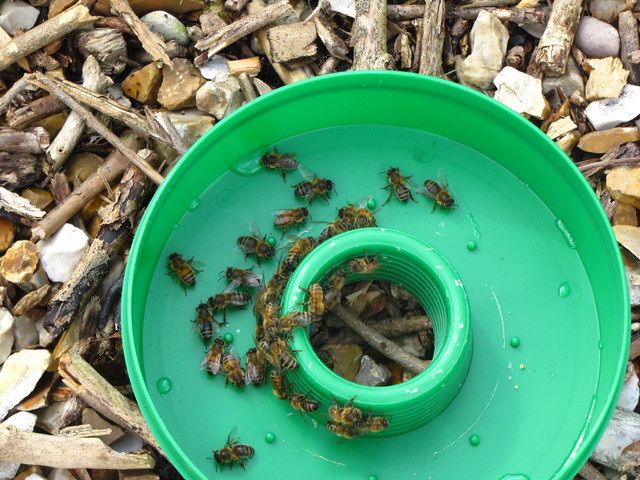
Well, you open up your hive floor - when you these orangey red pests - you've got Varroa
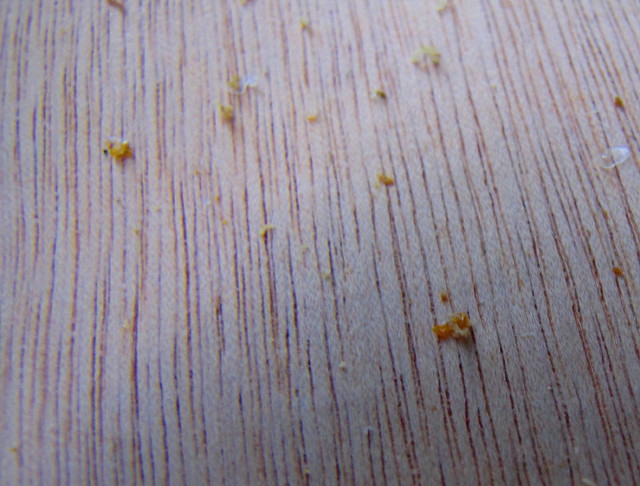
Varroa Floor by British Red, on Flickr
There are count formulae available that you can use to check the amount of mites dropped in a period on an area to see how bad the infection is
https://secure.fera.defra.gov.uk/beebase/index.cfm?pageid=93
Okay so we have no Supers on - time for thymol treatment.
The most common form used here is Apiguard - a gel. If used in the basic form, the crystals will vapourise at different rates depending on air temperature. Suspending them in a gel helps even this out - it also allows the bees to carry it through the hive.
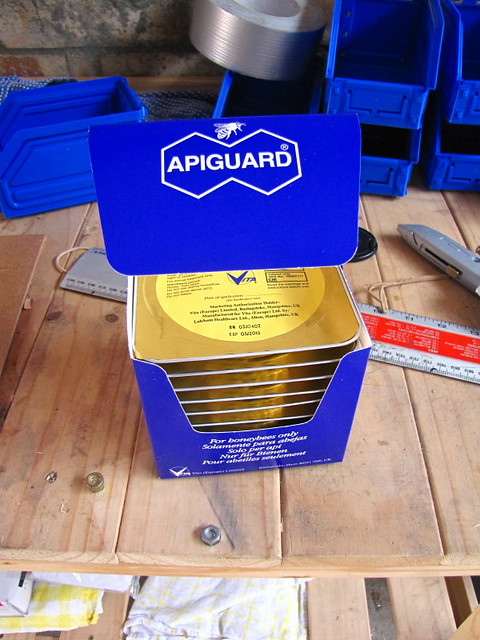
Apiguard Pack by British Red, on Flickr
The normal treatment is one sachet per hive - repeated in two weeks. The treatment also needs to be repeated in Spring
The Sachets are quite deep
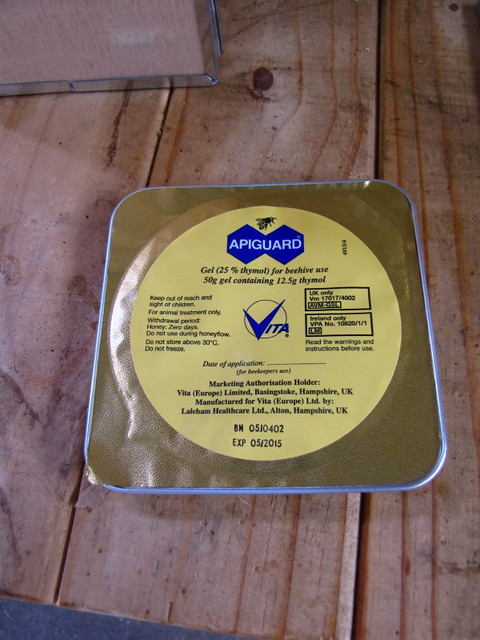
Apiguard Sachet by British Red, on Flickr
In order to allow "bee space" above the sachets, an eke has to be added.
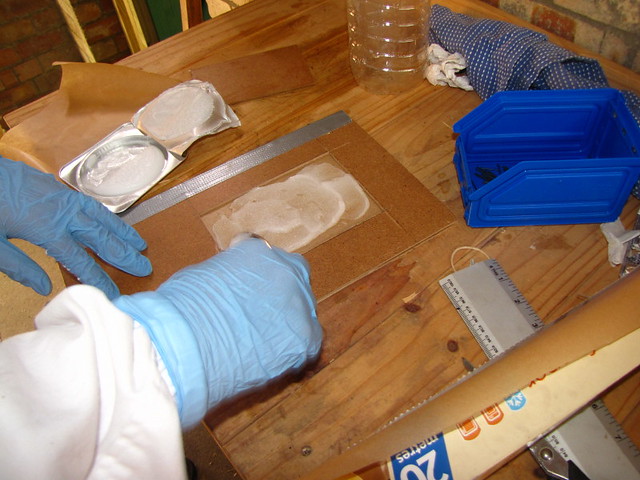
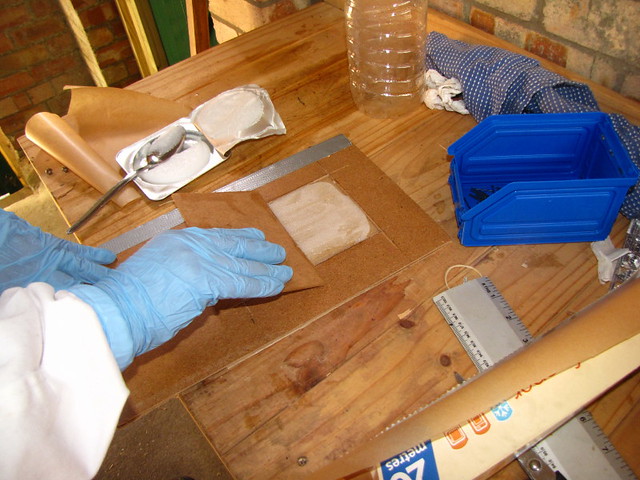
However if made thinner, the gel can be put directly on the bars. Spreading it thinly on something works - but Bees will consume normal paper and the gel soaks in - so greasproof paper is better.
To spread it to the right depth, my mentor found that a 6" x 4" area works. He uses a hardboard frame to even this out - I use the "Thymol Book".
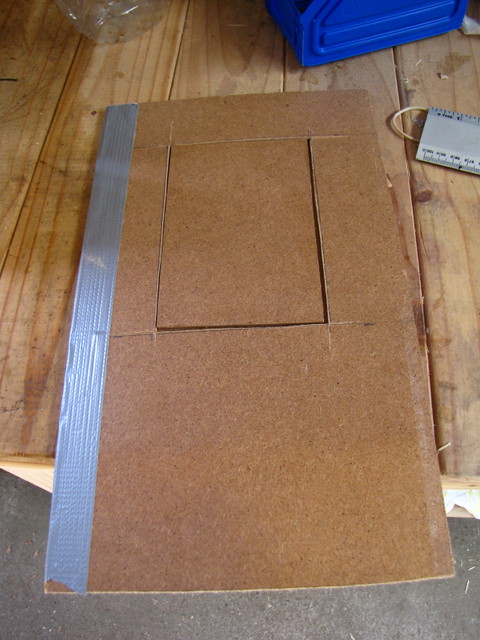
Thymol Book by British Red, on Flickr
This is really high tech (not). Two sheets of hardboard duck taped together with a 6x4 window cut out of the top board.
A sheet of greaseproof is cut to size and goes inside the "book"
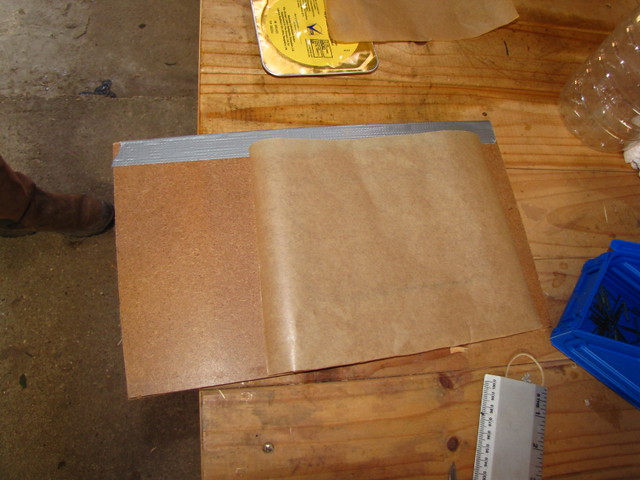
Greaseproof cut to size by British Red, on Flickr
The Apiguard sachet is opened
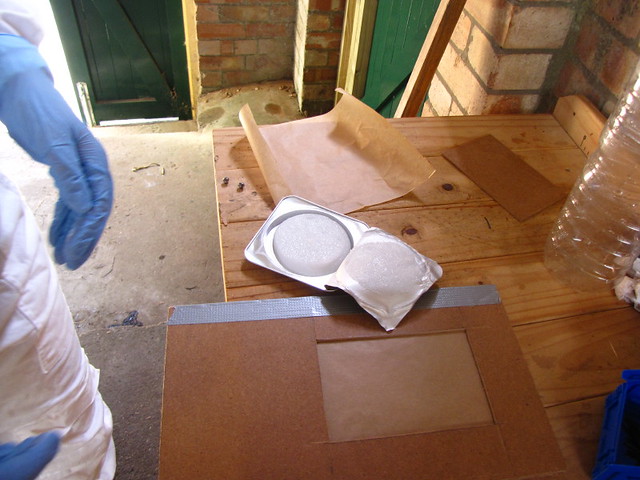
Open Apiguard by British Red, on Flickr
Its spread in the opening
Put Apiguard in opening by British Red, on Flickr
Then scraped flat
Scrape flat by British Red, on Flickr
Take this (in the book - it stops it blowing around) to the hive. Give the bees some smoke

Smoker by British Red, on Flickr
Remove the roof and crown board
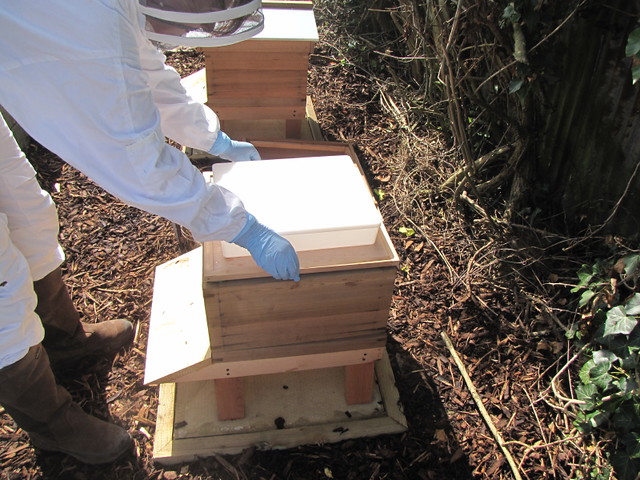
Remove Crown Board by British Red, on Flickr
Place the thymol sheet on top of the frames
Thymol in place by British Red, on Flickr
Replace the crown board, feeder and roof
Replace crown board by British Red, on Flickr
Note that thymol can change the bees mood for a few days.
We will cover Oxalic acid treatment in the Spring
Red
Varroa mites reproduce on a 10 day cycle - the female mite lays eggs in sealed brood and the young emerge with the new bee and are spread through the colony.
Adult mites suck bee blood (hemolymph) leaving open wounds and transmitting infections.
If left untreated the bee colony will weaken. If not treated in the Autumn when the production of drone (male brood) ceases, the Varroa will switch attention to the workers causing population decline and ultimately hive collapse.
The suggested approach to Varroa is an Integrated Pest Management Approach - using a combination of treatments to control numbers
The normal approach is a combination of Thymol crystals and oxalic acid.
Thymol crystals produce a fumigation effect - they need a sealed floor and roof. Timing is critical as Thymol can "taint" honey so a treatment should take place after Supers are removed but while the weather is warm enough to vapourise the crystals. Given it works on vapour, its only really effective on Varroa that is on adult bees - the stuff in brood is relatively safe. Repeating the treatment twice at two week intervals means that young Varroa protected by being sealed in brood get caught after hatching by the second treatment.
The normal mechanism is to put an "eke" on top of the frames (an eke is a wooden square that lifts the roof up a bit) and put the thymol on top of the frames in a sachet. The thymol needs at least 8mm above it so that bees will walk it through the colony.
The problem with adding an eke it can inhibit feeder use - so our mentor recommends a slightly different approach. This approach is shown below.
How do I know I have Varroa?
Well, you open up your hive floor - when you these orangey red pests - you've got Varroa
Varroa Floor by British Red, on Flickr
There are count formulae available that you can use to check the amount of mites dropped in a period on an area to see how bad the infection is
https://secure.fera.defra.gov.uk/beebase/index.cfm?pageid=93
Okay so we have no Supers on - time for thymol treatment.
The most common form used here is Apiguard - a gel. If used in the basic form, the crystals will vapourise at different rates depending on air temperature. Suspending them in a gel helps even this out - it also allows the bees to carry it through the hive.
Apiguard Pack by British Red, on Flickr
The normal treatment is one sachet per hive - repeated in two weeks. The treatment also needs to be repeated in Spring
The Sachets are quite deep
Apiguard Sachet by British Red, on Flickr
In order to allow "bee space" above the sachets, an eke has to be added.
However if made thinner, the gel can be put directly on the bars. Spreading it thinly on something works - but Bees will consume normal paper and the gel soaks in - so greasproof paper is better.
To spread it to the right depth, my mentor found that a 6" x 4" area works. He uses a hardboard frame to even this out - I use the "Thymol Book".
Thymol Book by British Red, on Flickr
This is really high tech (not). Two sheets of hardboard duck taped together with a 6x4 window cut out of the top board.
A sheet of greaseproof is cut to size and goes inside the "book"
Greaseproof cut to size by British Red, on Flickr
The Apiguard sachet is opened
Open Apiguard by British Red, on Flickr
Its spread in the opening
Put Apiguard in opening by British Red, on Flickr
Then scraped flat
Scrape flat by British Red, on Flickr
Take this (in the book - it stops it blowing around) to the hive. Give the bees some smoke
Smoker by British Red, on Flickr
Remove the roof and crown board
Remove Crown Board by British Red, on Flickr
Place the thymol sheet on top of the frames
Thymol in place by British Red, on Flickr
Replace the crown board, feeder and roof
Replace crown board by British Red, on Flickr
Note that thymol can change the bees mood for a few days.
We will cover Oxalic acid treatment in the Spring
Red