I recently posted this article on BritishBlades, however now BCUK is back up, I shall repost it for those who did not see it before.
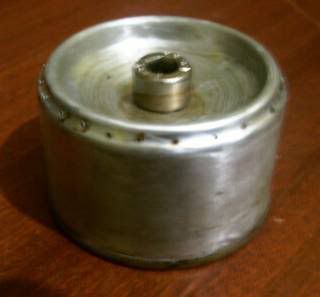
A few weeks ago, I decided to make one of Martyns excellent Photon stoves. All went very well and I am impressed by its abilities. Mine turned out slightly different to Martyns due to it being about 35mm tall and the holes for the jets being a little large. I used the pin method of making them and probably pushed a little hard. Also, as I had them to hand, I used an 8mm cap head bolt for the filler. However it worked fine and I was quite pleased with myself.
My Mk2 Photon
Shortly after, I acquired a 10cm billy can and decided the photon would be ideal for this. However due to the size I made the stove, it didnt fit in the top part of the billy, which is what I wanted it to do. I therefore made a second stove, this time only 30mm tall allowing it to fit snugly in the top part of the billy can. I also used a dremel with the smallest drill bit I could find to make the burner holes. This stove worked noticeably better than the original. When making this stove, I used a tomato puree tin as the local shop had run out of toast toppers. This tin seems to be a slightly wider diameter compared to the T/T can and required considerable sanding to allow it to fit. If possible use the T/T can. Its easier.
Next I needed to find a way to support the billy above the burner and to provide some kind of windshield. Some rummaging found the almost perfect item. An empty 250ml paint tin, with a diameter of 9cm. The type with the prise out metal lid. This will allow the billy to sit securely above the burner, the lid can be used as a priming pan for the photon and both will stow away inside the billy when not in use. The first thing to do is remove all the dried on paint. Soaking with cellulose thinners for a few hours followed by scraping with a wooden stick and finally scrubbing with hot soapy water accomplished this.
Support Ring
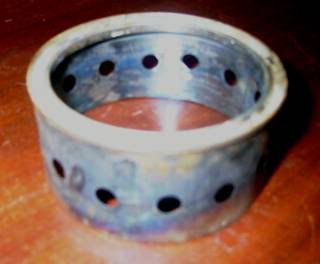
Now, for some metal work. Some tests with the burner showed the total height from the base of the stove to tip of the flames to be between 4550 mm so therefore I decided the pan support should be just over 45mm tall. Before doing any marking and cutting, rum down the outside of the tin with wet and dry paper to remove all the markings and label etc. It will be much harder to do this later. I marked around the paint tin ready for cutting. Before cutting the tin, I decided to make the air holes, thinking it easier to do now, as the can will be stronger and less likely to get crushed during drilling. The circumference of the paint tin was just over 28cm. I decided to drill 14 x 8mm holes on 2cm centres. The centre of these, is at 15mm from the top edge of the can. This was accomplished using a cordless drill and initially drilling 5mm pilot holes, then re-drilling to full size. The next thing to do was to trim the tin to length. I used a dremel with a cutting wheel, however a junior hacksaw will work just as well. Dont forget to file the edge to remove any sharp burrs. If using a dremel, please use eye protection as little bits of metal will fly off.
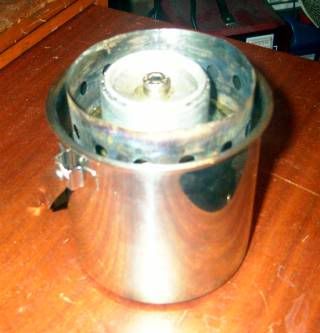
Ready To Go
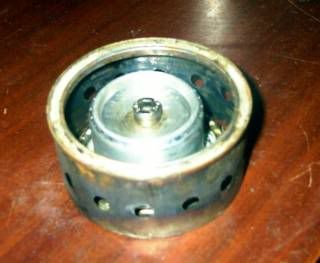
We now have a billy can, a photon burner, a cut down paint tin as a pan support and the lid of the tin to use as a priming tray/burner support. Place the full burner into the tray, add a little meths to prime it, then apply ignition (a lighter). When the photon is burning happily, place the pan support over it and place the billy can on the support. Wait for water to boil then make a well-deserved cup of tea. When finished, push the lid back into the top of the paint can and place upside down into the bottom half of the billy can. The photon will now fit neatly in the top part.
In Use
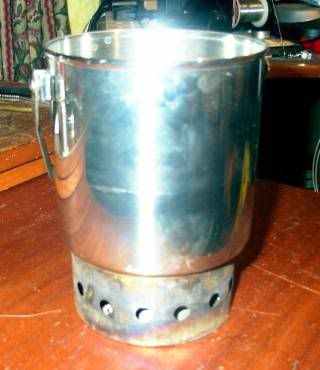
Practical testing showed up a slight deficiency. I was getting flames coming out the ventilation holes of the pot support. I therefore think it would be worth increasing the height of this to say 55mm. Other than this, it seems to work well. It is able to boil 500ml of water in about 20 minutes. Next week I am going to the decorating shop that mixes paints to order to see if they will sell me an empty tin and I shall try this modification. I think this should make this an excellent little stove. The complete set up will fit into the main pocket of a Proteus waist pack.
Nested & Packed
I have since discovered that if you remove the bolt from the burner, everything will fit into the top part of the billy can, although the lid is a couple of mm from a perfect fit. This will give you much more storage space in the main compartment though. Anyway, build one, play with it and set it up to your own preferences. Enjoy.
A few weeks ago, I decided to make one of Martyns excellent Photon stoves. All went very well and I am impressed by its abilities. Mine turned out slightly different to Martyns due to it being about 35mm tall and the holes for the jets being a little large. I used the pin method of making them and probably pushed a little hard. Also, as I had them to hand, I used an 8mm cap head bolt for the filler. However it worked fine and I was quite pleased with myself.
My Mk2 Photon
Shortly after, I acquired a 10cm billy can and decided the photon would be ideal for this. However due to the size I made the stove, it didnt fit in the top part of the billy, which is what I wanted it to do. I therefore made a second stove, this time only 30mm tall allowing it to fit snugly in the top part of the billy can. I also used a dremel with the smallest drill bit I could find to make the burner holes. This stove worked noticeably better than the original. When making this stove, I used a tomato puree tin as the local shop had run out of toast toppers. This tin seems to be a slightly wider diameter compared to the T/T can and required considerable sanding to allow it to fit. If possible use the T/T can. Its easier.
Next I needed to find a way to support the billy above the burner and to provide some kind of windshield. Some rummaging found the almost perfect item. An empty 250ml paint tin, with a diameter of 9cm. The type with the prise out metal lid. This will allow the billy to sit securely above the burner, the lid can be used as a priming pan for the photon and both will stow away inside the billy when not in use. The first thing to do is remove all the dried on paint. Soaking with cellulose thinners for a few hours followed by scraping with a wooden stick and finally scrubbing with hot soapy water accomplished this.
Support Ring
Now, for some metal work. Some tests with the burner showed the total height from the base of the stove to tip of the flames to be between 4550 mm so therefore I decided the pan support should be just over 45mm tall. Before doing any marking and cutting, rum down the outside of the tin with wet and dry paper to remove all the markings and label etc. It will be much harder to do this later. I marked around the paint tin ready for cutting. Before cutting the tin, I decided to make the air holes, thinking it easier to do now, as the can will be stronger and less likely to get crushed during drilling. The circumference of the paint tin was just over 28cm. I decided to drill 14 x 8mm holes on 2cm centres. The centre of these, is at 15mm from the top edge of the can. This was accomplished using a cordless drill and initially drilling 5mm pilot holes, then re-drilling to full size. The next thing to do was to trim the tin to length. I used a dremel with a cutting wheel, however a junior hacksaw will work just as well. Dont forget to file the edge to remove any sharp burrs. If using a dremel, please use eye protection as little bits of metal will fly off.
Ready To Go
We now have a billy can, a photon burner, a cut down paint tin as a pan support and the lid of the tin to use as a priming tray/burner support. Place the full burner into the tray, add a little meths to prime it, then apply ignition (a lighter). When the photon is burning happily, place the pan support over it and place the billy can on the support. Wait for water to boil then make a well-deserved cup of tea. When finished, push the lid back into the top of the paint can and place upside down into the bottom half of the billy can. The photon will now fit neatly in the top part.
In Use
Practical testing showed up a slight deficiency. I was getting flames coming out the ventilation holes of the pot support. I therefore think it would be worth increasing the height of this to say 55mm. Other than this, it seems to work well. It is able to boil 500ml of water in about 20 minutes. Next week I am going to the decorating shop that mixes paints to order to see if they will sell me an empty tin and I shall try this modification. I think this should make this an excellent little stove. The complete set up will fit into the main pocket of a Proteus waist pack.
Nested & Packed
I have since discovered that if you remove the bolt from the burner, everything will fit into the top part of the billy can, although the lid is a couple of mm from a perfect fit. This will give you much more storage space in the main compartment though. Anyway, build one, play with it and set it up to your own preferences. Enjoy.
")


