Photography in Sub Zero Conditions.

  • Hey Guest, Early bird pricing on the Summer Moot (29th July - 10th August) available until April 6th, we'd love you to come. PLEASE CLICK HERE to early bird price and get more information.

Wayland

Hárbarðr
Cold-Camping-under-the-Northern-Lights.jpg


Having just dusted my gear off in preparation for another trip North this winter I realised I had never posted up anything about photography in very cold conditions.

If you check the specifications of almost all digital cameras you will find an operating temperature range that suggest than sub zero photography is not a good idea. A quick trawl of the internet would seem to confirm this view with often conflicting information and horror stories of expensive gear reduced to junk by the conditions. I’m not going to tell you that these issues are unimportant. There is a real risk of damaging your photographic equipment if you do not treat it with respect and care but as with many things, the specifications are only a part of the story.

The first challenge is power. Batteries of any kind do not perform at their best when cold. Some are worse than others but this is a universal problem for photographers.

The next challenge is the effect of the cold on the camera itself. Most worrying are the stories of LCD displays freezing and being permanently damaged. Information on this matter seems scarce and confused but is discouraging.

The most helpful information I could find suggested that a standard TFT display like those found in most cameras, had an operating range between -10°c and +70°c (14°f to 158°f)and could be stored safely between -30/-20°c and +80°c. (-22°f/-4°f and 176°f) Presumably the 10°c difference in the minimum storage temperature is down to variations in manufacturer which there is no way to ascertain which might apply so it’s best to assume that -20°c (-4°f) is the lowest practical limit before you might expect damage to your camera screen.

Another less publicised effect of the cold is that the lubricants used in delicate mechanisms can thicken or even solidify. Again, my research on this matter has been inconclusive and often conflicting so far. Manufacturers are often quite unhelpful frankly and unprepared to state exactly what the real limitations of their equipment are.

All it all, it seems that the best course of action is to prevent the camera and it’s batteries from getting too cold.

The most usual solution that is suggested is to keep your camera inside your clothing and the batteries warm in our pockets so they can be swapped with the cooler ones in the camera. This approach works well but there is a risk that a cold camera, brought into the warm, moist atmosphere of our clothing will attract condensation which can be very damaging to any electrical device. Indeed this is also a major consideration when bringing your photographic equipment from the cold to any warm environment.

Fuji-X10-and-Dry-Bag.jpg


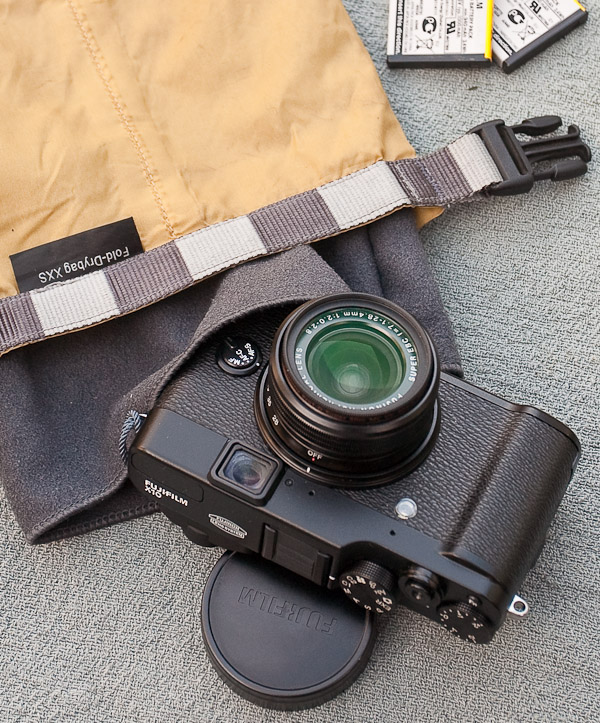
Dry bags are very useful when dealing with condensation problems. The only problems I have experienced with dry bags is that the air trapped inside them in a warm space can contain some moisture which causes a small amount of condensation on the inside of the bag when moving to cold conditions.

To alleviate this problem I line my bags with a secondary bag made from the highly absorbent micro fibre material that is used to make travel towels for backpackers. As a bonus, this also provides some measure of extra padding and protection from the physical rigours of travel and packing.

My routine then is to store the camera in this combination of bags and try to keep it away from the worst of the cold. A compact camera can be kept inside your clothing for much of the time but a large one presents more problems of course. I usually keep mine wrapped in as much spare clothing as I have available in my baggage and keep it in a sheltered place when not in use.

Another useful item to carry with you is some small form of hand warmer. I often use the small disposable type that I can tape around the battery compartment of the camera when it is in use and this is packed in the dry bags, covering the camera display for good measure. A handy trick to keep your camera a bit warmer when packed away is to to put a spare water bottle full of hot water into your baggage as well. This will help to prevent the temperature dropping to dangerous levels and also leave you some liquid water ready for the next round of snowball soup.

When using the camera I keep a couple of batteries in my trouser pocket and swap them whenever the camera power indicator drops a bar or so. Being cold will not discharge the battery it just makes it harder to draw the power, so I keep a store of charged batteries in my baggage that can replace my working set when they are exhausted.

So far, I have not found an effective, practical method of charging these batteries in the field so I use whatever opportunity I get to use mains power, a generator or a vehicle for the job.

Fuji-Battery-Adaptor.jpg


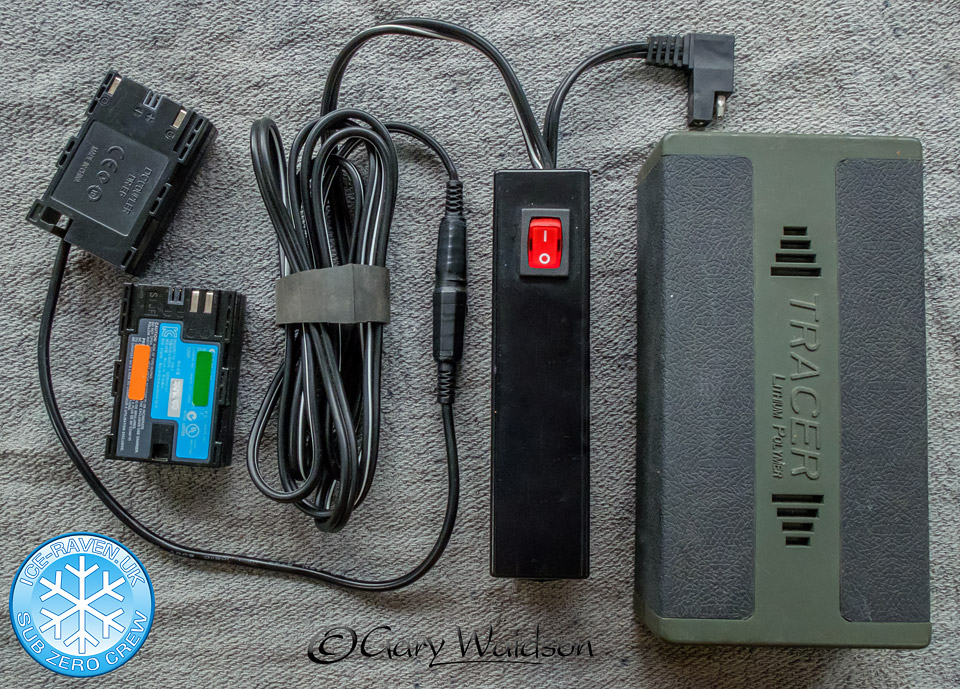
This brings me on to another solution which is based around the mains adapter units that are available for some cameras. These often connect through a battery coupler which is like a dummy battery with a lead which connects to the AC/DC power brick. The AC/DC converter supplies the coupler with DC power so all we need to do is supply DC power of the correct voltage to run the camera.

Rechargeable-AA-Packs.jpg


This gives us the opportunity to have a separate power pack inside our clothing where it is warm, attached to the camera with an connecting lead. The easiest solution is to use AA batteries in a simple holder and use the right number of cells to provide the voltage required.

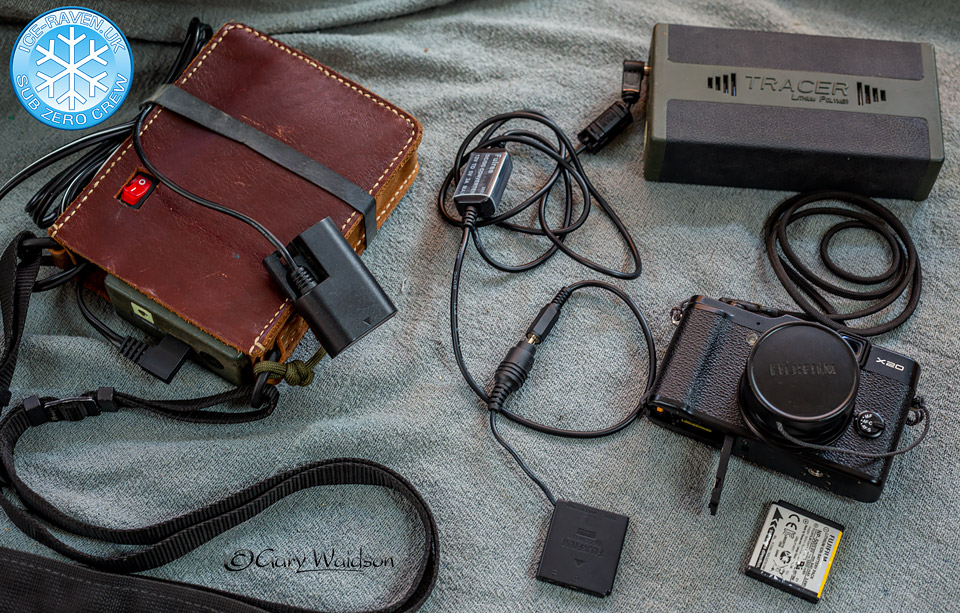
That certainly works but depending on the camera there may be a fairly limited voltage range that it will work with. If camera is designed to work with a battery providing 3.6v like my Fuji for example then it may work a volt or two above and maybe a volt below that but not much more.

If you use four standard 1.5v AA cells that should in theory provide 6v but a fresh cell could provide 1.6v pushing your combined pack to 6.4v, almost twice what the camera is designed for.

Looking at the AC/DC converter will give you a clue how far it is safe to push things. If you look at the Fuji DC Coupler pictured above for example, you can see it is rated for 5v . Rechargeable AA cells usually provide 1.2 - 1.3v so four of those is closer to the mark but inevitably as the power drops we are going to hit the camera's lower power rating. the point at which it stops working.

I have used this method and it does work but I don’t think it is the most efficient.

Inline-voltage-converter.jpg


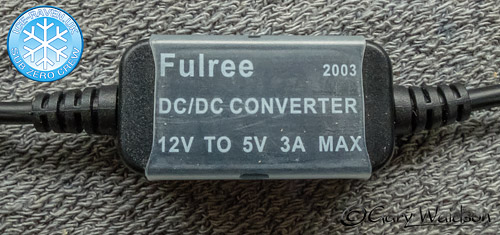
What I prefer to do is use a larger pack of batteries providing somewhere in the region of 12v and then use a DC/DC converter to drop the voltage to the working level.

The advantage of that is that most converters are designed to work with a range of input voltages but provide a fairly stable output voltage.

Buck-Converters.jpg

In the case of the Fuji camera that runs on 5v that was fairly easy. Cars run on 12v and USB connectors provide 5v which means lots of manufacturers make widgets that will do the job. I found a nice neat unit that is fitted in-line so I just swapped the USB output socket lead for a lead that connected to the DC Coupler. Job Done.

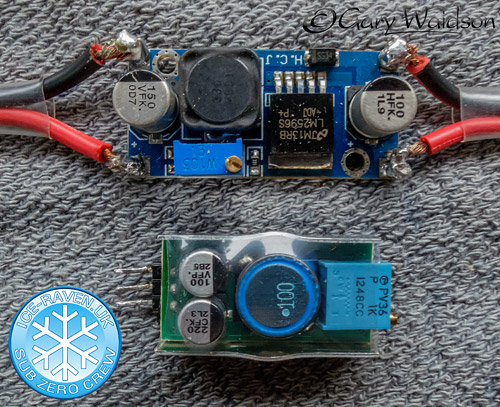
My Canon cameras needed a bit more power. 8.6v according to the spec. I couldn’t find anything ready made so I ordered an adjustable “Buck Converter” like the ones you can see here.

The first one I bought from America, you can see that at the bottom. It cost a fortune and then had crippling import duties and admin charges on top of that which doubled the price.

The unit in the top of the picture was from China. I bought a pack of ten for less than the cost of the American one. They do exactly the same job.

You can see that I’m not an expert with a soldering iron but four connection which are clearly labelled and you are ready to go. I put mine in a plastic project box and added a switch for convenience and that fits into a case which hangs over my shoulder under my parka with a powerful rechargeable Lithium Polymer (LiPo) power pack in it.

Camera-12V-Power-Pack.jpg


Polar-Power.jpg


So far it is working well and the capacity of the pack far out weighs the additional bulk in your pocket.

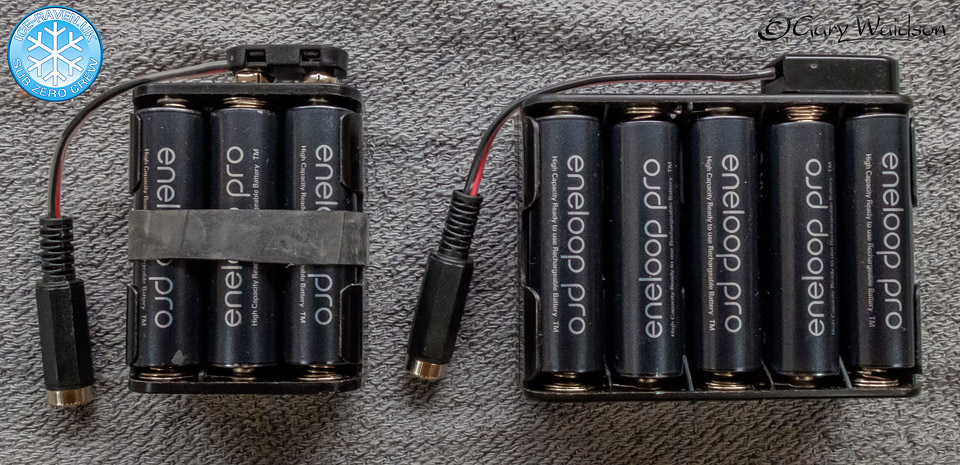
I also carry a couple of ten AA battery packs with good quality nickel metal hydride(NiMH) cells giving me some reserve power if I need it but being splitable for flashlights or other electrical equipment if required.

The lead is robust and long enough to be threaded through my outer clothing to a warm pocket within. Both LiPo and NiMH can provide their power fairly constantly down to -10°c and carry on working down to -20°c so kept inside the clothing there should be no problem.

12v-USB-adaptor.jpg


The LiPo packs I use have a proprietary power connector which, though reliable, is a pain in the butt when it comes to making leads.

Another thing it came with was a car cigarette lighter adaptor which has to be one of the most unreliable ways to connect anything but a cigarette lighter. I have converted mine by plugging a USB adaptor into it so that I can use the power pack to charge USB devices while off grid. You will note that I’ve taped it into position to make it a bit more reliable.

As a tip though, I discovered that the charge socket which is a standard 5.5mm connector can also be used as a power output.
 
Last edited:

Wayland

Hárbarðr
Gloves-and-Mitts.jpg


A more physical challenge for a photographer in cold conditions is the simple logistics of using a camera with gloves on and this will be largely dependent on the camera itself. Few cameras can be properly handled with mittens on. A few more with thick gloves but many can be used with thin gloves to some extent. Fiddly little buttons and menus will always be a challenge though and most camera phones will not work with normal gloves on.

I use a thin pair of fleece gloves that can be worn inside my mitten system and stay on when my mitts come off. This gives me the dexterity I need to use the camera and also prevents cold injury caused by contact with metal equipment in such a cold environment. You can see the type on the right of the picture above.

Of course, camera equipment is an extra burden to carry on expedition and how much you are prepared to carry will be a measure of how you are travelling and how much your photography means to you. For me it is often a major reason for me to be in the wilderness in the first place so I usually pack at least two cameras, sometimes three.

A compact camera with a small sensor cannot compete with a larger sensor. Usually that will mean a larger camera. The main disadvantage of smaller sensors is increased digital “noise” in low light. In most work this is not a huge problem but photographing something like the Northern Lights is a challenge for any camera, let alone a compact.

I tend to use a good quality compact for most of my day to day shots, saving my DSLR with it’s large sensor for more serious landscapes and specific low light work. Such low light photography usually requires a tripod and although I have looked at many clever gadgets promising to replace one, I have yet to see one capable of supporting anything heavier than a shirt pocket compact. This is an annoying gap in the market that I cannot believe is beyond the skill of a good engineer.

I have a medium weight tripod (Manfrotto 190) that I usually take with me or if I can rely upon a few stout branches being available I lash up a wooden tripod and tie on a bracket with a decent ball and socket head on it. Not as flexible but much lighter to pack.

Weight restrictions on flights are a pain when it comes to carrying your gear. I am always reluctant to throw any of my kit, apart from the tripod, into checked baggage as it is almost guaranteed rough handling on the way. I usually chuck all the compact, heavy stuff into the pockets of the coat I am travelling in, because it is never weighed, while the rest of the cameras and lenses go into my hand luggage.

Travel-Photography-R19.jpg


It is worth making the point here that most airlines have limits on the carrying of rechargeable lithium batteries. The packs that I bought were chosen specifically to fall within these limits to make travelling easier. They are not light items to carry but I put them in my hand luggage and, so far, that has never been weighed when boarding a plane. If I get any problems I can decant gear into the coat as mentioned above.
 

Wayland

Hárbarðr
Northern-Lights-over-Shelter1.jpg


We’ve probably all got different things we’d like to photograph in the Arctic but for most of us the Aurora Borealis is going to be high on our list.
The Aurora is caused by charged particles from the sun colliding with the Earth’s magnetic field. It varies with solar activity and it’s visibility is dependent on cloud a light pollution from towns and cities. there is no guarantee that you will see it in the Arctic but the longer hours of darkness in the winter and the Northerly aspect of the sky does increase your chances somewhat.

The next trick is to actually record what you are seeing with a camera.

Jokkmokk-Aurora-Two.jpg


In most cases it will require a long exposure a tripod or other firm support for your camera. It’s very easy to be fooled by the display on the back of your camera when your eyes are adapted to darkness. A quick glance at the screen will convince you that you have the most amazing pictures on your card but unless you are lucky, disappointment lies that way.

More often than not you will find the image is underexposed and very noisy as a result. (This ranks as one of my most regretted mistakes in 40 years of photography and one that I hope will never repeat.) It is far better to check your exposure using the histogram function on your camera. (Check the instruction book if you are not already familiar with that feature.)

Northern-lights-Norway-5-3-2012-n.jpg


My start point for exposure is 15 seconds and I choose the iso. setting based upon the maximum aperture of the lens. For example: If the lens will only open up to f4 I would set the camera to 800 iso. F2.8 would give me 400 iso. and f2 would allow me to set 200 iso. As you can see, the faster the lens on your camera the lower the iso. and therefore the lower the digital noise you will record. Likewise a slower lens like F5.6 would need a setting of 1600 iso. with all the extra noise that entails. Because the Aurora tends to move and shift about, a longer exposure tends to just result in a less defined amorphous result. The other problem with longer exposures is that the Earth’s rotation will cause the stars to streak rather than be recorded as points. 15 seconds seemed to be the optimum in the tests I made. (The two larger spots near the bottom of the photograph above are planets by the way.)

Northern-Lights-Norway-9-3-2012-n.jpg


I find the best shots also have some foreground interest such as trees or even buildings too but if you include illumination in the foreground this will have to be balanced with the main exposure as well. Sometimes you can be lucky with this but other times you may need to take two different exposures and combine them in the computer when you get home.
 
Last edited:

Wayland

Hárbarðr
The last three posts were made for people that understand a bit about photography.

If that lot made sense then you probably know what you are doing with a camera already and can skip the next bit but it is the most common error made when taking pictures in snow conditions so I had better mention it.

If you are taking pictures in snow on an automatic exposure mode, your pictures may come out too dark. This is simply because the camera does not understand what it is being pointed at. It’s cleverly made but not actually able to think for itself.

A camera’s exposure meter is designed to take an average picture of an average subject under average lighting. If it is pointed at a bright subject it will react as if it is pointed at an average subject that is being too brightly lit and it will reduce the exposure to compensate. End result your picture looks too dark. Snow of course is a bright subject.

Some cameras have a special “Snow” setting which might compensate for this problem but you do need to turn it on. If that is not an option you need to find out where the exposure compensation settings are. They are usually fairly easy to find but all cameras vary.

What you need to do is give it some overexposure or positive compensation. Not much, probably one stop or less and that will brighten things up a little. If you apply too much your highlights could burn out so you don’t want that because you cannot repair them later. Check your shots as you go. That histogram feature we mentioned earlier is good for that. Some cameras make over exposed parts of you image blink on and off on the screen in playback as a warning. That might be a feature you need to turn on.

I guess what I am saying is that if you want to get decent pictures you might actually have to read your instruction book again. It should all be in there.
 
Last edited:
  • Like
Reactions: Toddy and Corso

MrEd

Life Member
Feb 18, 2010
2,148
1,053
Surrey/Sussex
www.thetimechamber.co.uk
thats a great post, i did some sub-zero photography and i had LCD freeze (nikon D750) but it didnt leave permanent damage. I also had battery issues, but i kept them in a small puch under my armpit and that kept them working. I was amazed how the camera innards kept functioning even when the camera had an icy layer on it and had been outside for several hours. I was worried the insides might get 'sticky' as the grease thickens but it didnt happen.

To combat condensation i used zip lock bags and a pelicase and i left the camera outside (i was in a log cabin) overnight so that it stayed 'cold' all the time, i only brought the batteries in to charge (we had mains off a genny). Had no lasting issues, i only had 2 batteries though and they froze faster than i could re-warm them so would take 4 batteries next time.

Colour cast was the only other issue but that was easily fixed in PP, that and frozen snot face.
 
  • Like
Reactions: bopdude

Wayland

Hárbarðr
thats a great post, i did some sub-zero photography and i had LCD freeze (nikon D750) but it didnt leave permanent damage. I also had battery issues, but i kept them in a small puch under my armpit and that kept them working. I was amazed how the camera innards kept functioning even when the camera had an icy layer on it and had been outside for several hours. I was worried the insides might get 'sticky' as the grease thickens but it didnt happen.

To combat condensation i used zip lock bags and a pelicase and i left the camera outside (i was in a log cabin) overnight so that it stayed 'cold' all the time, i only brought the batteries in to charge (we had mains off a genny). Had no lasting issues, i only had 2 batteries though and they froze faster than i could re-warm them so would take 4 batteries next time.

Colour cast was the only other issue but that was easily fixed in PP, that and frozen snot face.

Interesting. What sort of cast were you getting?
 

MrEd

Life Member
Feb 18, 2010
2,148
1,053
Surrey/Sussex
www.thetimechamber.co.uk
Interesting. What sort of cast were you getting?

A blue sort of tinge on the snow and pale areas, I couldn’t get it right in camera using WB settings, and I shoot raw so just sorted it in lightroom after. I am still not sure why it was happening, even AWB couldnt sort it.

Made for some very cool toned images with a blue colour cast (and correspondingly unatural greens).

I didn’t realise until I reviewed the photos on the laptop on the evenings by which time I wasn’t shooting anymore. I didn’t ‘chimp’ at the time as wanted to conserve battery and also had rear lcd ‘lag’ problems due to the cold.

I also shot some film, had no issues with that, canon AE1/50mm with ilford HP5 - admittedly the b+w was when out and about during the day in the village etc rather than hours on the lake in the dark etc.
 

Wayland

Hárbarðr
Sounds a bit like what they used to describe as "skylight" in film days. Literally reflected luminance from a blue sky.

Tends to be most visible in shaded areas against snow and blue sky conditions of course.

I have not heard of any differential effect on sensor pixels and in theory it should make no difference because the pixels themselves are actually monochrome. It is the Bayer filter array that creates the illusion of colour differentiation. Could possibly be something else I haven't thought of though. Fascinating.

I would be very interested in seeing a "straight" uncorrected RAW conversion of one of the images to observe the effect.

Interestingly, it was my old Canon A1 that gave me the remote battery pack idea. The old PX28 silver batteries tended to wimp out at low temperatures and Canon used to make a remote battery pack for the A series cameras.

I never had one myself and I don't know if they are available on the SH market now but it did plant the seed of the idea in my mind.

I guess they are a pretty rare item now. In the many years I worked in photographic retail I only ever saw one once and that was a special order I made for someone.
 
Last edited:
  • Like
Reactions: MrEd

MrEd

Life Member
Feb 18, 2010
2,148
1,053
Surrey/Sussex
www.thetimechamber.co.uk
Sounds a bit like what they used to describe as "skylight" in film days. Literally reflected luminance from a blue sky.

Tends to be most visible in shaded areas against snow and blue sky conditions of course.

I have not heard of any differential effect on sensor pixels and in theory it should make no difference because the pixels themselves are actually monochrome. It is the Bayer filter array that creates the illusion of colour differentiation. Could possibly be something else I haven't thought of though. Fascinating.

I would be very interested in seeing a "straight" uncorrected RAW conversion of one of the images to observe the effect.

Interestingly, it was my old Canon A1 that gave me the remote battery pack idea. The old PX28 silver batteries tended to wimp out at low temperatures and Canon used to make a remote battery pack for the A series cameras.

I never had one myself and I don't know if they are available on the SH market now but it did plant the seed of the idea in my mind.

Will have a look, I may still have the raws- it was a few years ago now kind and I don’t keep raws indefinitely (to big) once processed into a photo I like. Will see if I can find them on my backup drive and post them up later

Hadn’t thought of reflection from the sky!
 
  • Like
Reactions: Wayland

Wayland

Hárbarðr
I can't bear to part with my RAW files. The RAW converters are getting improved all the time and I can produce far better images from my old RAWs than I did ten years ago.

Admittedly, they take up a lot of storage space, I have 4TB drive just dedicated to RAW storage now and they are backed up on 1TB drives stored in my fire safe.

I also keep my edited masters with all the adjustment layers intact and an embedded smart object which holds another copy of the RAW file as well. They are triple backed up.

I lost a bunch of RAW files in 2007 due to RAID card failure which corrupted both drives so I'm ultra cautious now.
 

MrEd

Life Member
Feb 18, 2010
2,148
1,053
Surrey/Sussex
www.thetimechamber.co.uk
Yeah I probably have raws going back 5 years, not past that as it’s just unlikely I would revisit them tbh, horses for courses!

I still have negatives from 20+ years ago though that I can’t part with!!! Explain that lol
 

Robson Valley

Full Member
Nov 24, 2014
9,959
2,664
McBride, BC
Thanks Wayland. You would have enjoyed my Dad's company. Outdoor, nighttime, winter photography
was one of what he called " the challenges of winter." Saskatchewan, Canada @ -30C.

He had a camera stripped and relubricated with the synthetic oil used in modern jet engines at -60C.
I run that stuff in my Suburban.

Up north in the Yukon, at -50C, some people claim that they can hear the Northern Lights as they shimmer and shift.
 
  • Like
Reactions: Wayland and MrEd

The Cumbrian

Full Member
Nov 10, 2007
2,078
32
52
The Rainy Side of the Lakes.
I worked in Antarctica back in the 90s, obviously in the days before decent digital cameras. The advice then was to use a camera that was as basic as possible, and put it into a plastic bag when you went indoors to prevent water condensing on it. I ended up taking a very cheap, almost entirely manual Praktica camera with me. It taught me a lot about photography, and I had no problems with the cold following the simple guidelines. The only issue I had was that I once snapped a film when after I loaded it and (manually) wound it on too quickly.
 
  • Like
Reactions: Wayland

Wayland

Hárbarðr
Before I got to the end of your post I was just thinking about how film becomes brittle in low temperatures. :)

Static discharges in the film chamber also used to be a problem with motor wound cameras I gather.

I started out with an old Russian camera with no meter, a mechanical shutter that went "CurLUNK" and smelt of yak hide. Taught me more than any digital camera ever did. Had one of the sharpest lenses I've ever owned as well.

Debs has much better hearing than me and she said she could hear a faint "crackling" noise on one occasion we were watching the Aurora.
 
  • Like
Reactions: The Cumbrian

BCUK Shop

We have a a number of knives, T-Shirts and other items for sale.

SHOP HERE