Patterns for sewing Viking era clothes
with thanks to Sonja Carlson and The Viking Age Club of Minneapolis
I also have a page with patterns for Viking shoes
NOTE: MAKE A MUSLIN PATTERN FIRST!!! It's easier (and cheaper) to make necessary alterations/adjustments with a muslin pattern and you have a pattern for future use.
The cloth should be wool or linen. HINT: large tableclothes are good source for linen. Try looking in 2nd hand shops, Goodwills etc.
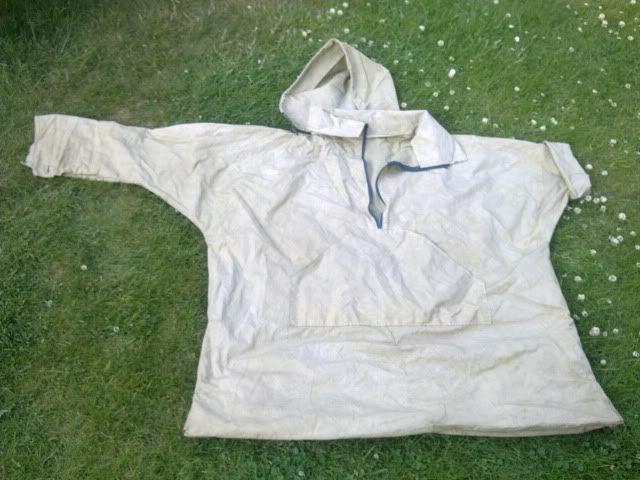
SEWING THE TUNIC OR KIRTLE (DRESS)
The tunic/kirtle was either loom shaped (design features such as the neck opening were shaped during the weaving process) or cut and sewn after weaving. Basically, it is two rectangles sewn together to form the body of the garment and two additional rectangles added for sleeves. The following pattern is one that I found simple to use and one does not need to be a tailor to sew it, either!
(to make a Tunic, measure from the shoulder to the knee, rather than to the ankle.)
1.Measure from shoulder to shoulder and then take the tape measure and measure around the chest. 1/2 the chest measurement should be close to the shoulder to shoulder measurement. Use the larger measurement. Take the shoulder to shoulder measurement and add 1/2" - 1" seam allowance on both sides ( up to 2" if you desire). This is the width that you want to use. For example, for a child that has a shoulder to shoulder measurement of 15" and a chest of 26", you would use a piece of fabric 16" - 17" inches wide. Because 1/2 the chest measurement is 13", you would use the shoulder to shoulder plus seam allowance.
2. Now, measure from the top of the shoulder to the knee or ankle depending on whether you're making a tunic or kirtle. This is the length of the garment. if you're cutting the tunic/kirtle in one piece and therefore having no shoulder seams, double the length and note the top of the shoulder. Also to make walking easier, flair the dress from the knees to the hem. You could also put in gussets, if you're adventurous. The tunic could be flared from waist to knees ( and with or without gussets).
3. Now, you have the basic sleeveless tunic/dress. Mark out a circle approximately 4"-6" in diameter, lying across the shoulders with about 4 inches of it on the side that you want to use as the front.
4. Mark a 4"-6" slit down the front from the circle. This is the front opening. Finish the front in one of two ways:
A. Simply cut out the circle and front opening slit and sew bias tape over the edges.
OR
B. Cut out a keyhole-shaped piece of fabric large enough to extend about 2 inches around the neck hole and front opening slit. Sew this to the outside of the tunic, right sides together, sewing about 1/4" inch from the edge of the neck opening and turn it through the opening and turn it through the opening to the inside of the fabric. Now, turn over the bottom edge of the facing and sew along it to prevent fraying. An alternative to this (and less time) is to zig-zag along the bottom edge without turning under and then apply Fray-Check to the edges. After this is done, tack the facing down at the shoulders to prevent it from flipping up.
5. If sleeves are to be added, take the following measurements:
LENGTH: Long sleeves: measure from shoulder to wrist 3/4 sleeves (elbow length): measure from shoulder to elbow Short sleeves: measure from shoulder to middle of upper arm
WIDTH: Start with the measurement around your shoulder and then measure around your upper arm, elbow and wrist for long sleeves. For shorter sleeves, do the same except stop measuring at the appropriate place. For example, if you wanted 3/4 length sleeves, you would measure around your shoulder, upper arm and elbow. Mark out the measurements adding 3"-6" for ease and seam allowance. The 3"-6" allows the sleeve to be snug or blousey. Taper from shoulder to wrist ( or elbow or upper arm). You should have an inverted trapezoid shape. Now lay the sleeve pattern out with the bottom edge on the sleeve edge of the fabric (the finished edge). if you do this, you won't have to hem the bonom sleeve edges. You may want a drawstring casing for drawstring sleeve heming.
6. Hem bottom of tunic or dress. Add decoration(s) such as trim or embroidery as desired.
Regia Anglorum - Basic Clothing Guide
Tunics and Dresses
The sleeves are tight on the forearm and baggier on the upper arm. On most garments the sleeves are long enough to reach the knuckles or cover the entire hand.
The upper body of the tunic is relatively close fitting, while the skirt is loose fitting. A tunic should reach to the knees or just below when belted and the dress should cover the ankles (and possibly trail at floor level).
The skirt was made as full as possible by adding panels (or gores) into each side, or as we see later - even into the front and back of the garment.
Bands (or facings) were sometimes added to the cuffs and around the neck; these can be decorated with embroidery or left plain to provide contrast and to protect the large pieces of cloth beneath. Occasionally men's tunics have a wide band indicated around the base of the tunic as well.
New members should start with a very plain tunic - decoration should be limited to applying a facing in a contrasting colour.
Basic Construction
Quantity of Cloth
First the cloth - the following assumes that the cloth is about 54-60" (135-150cm) wide - this is the typical width of modern machine made cloth - although the pattern means that you can use cloth from about 24" (60cm) wide - depending on the build of the wearer.
There are two important measurements to take - the chest size (or the belly size if that's bigger) - and then length of the garment. The length of the garment will tell you how much cloth you need. You will need enough cloth to hang over your shoulder to at least mid shin/calf - also remember that the cloth will shrink on washing - so you may want to add 5-10% for shrinkage.
If you want wider side panels or extra panels in the front then you may want to get a bit more.
An example of this is for a man 5'10" (180cm) weighing 14st (90kg) you will need: A piece of cloth about 7½'/2.25m long - the chest measurement is about 44"/110cm round. The sleeves and gores are both about 2'/60cm long and about that at their widest points. A dress for someone of similar size would take about 9'/2.75m long.
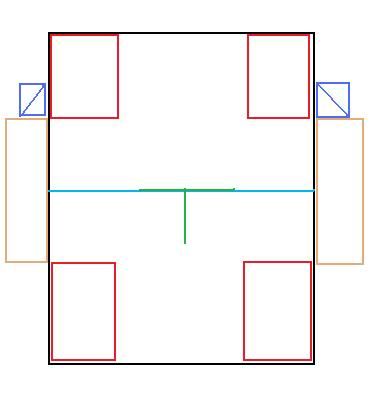
The cutting pattern
This is quite simple - so don't panic.
The overall plan for the pieces is shown on the left - you will need to cut one long panel for the body - a single piece of cloth - the width being half the chest width (+ a bit for seam allowance - normally 1"/2cm).
(1) The neck hole is in the middle of the cloth. It is not positioned centrally - it is normally about 2/3 to the front of the body and 1/3 to the rear. The simplest type is a large square or oval - however - wool and linen doesn't stretch like a t-shirt and this will be quite loose at the neck - a 'keyhole' neck with a slit down the front is not that much more complex (see the diagram). It is probably a good idea once this is cut out and hemmed to try it on to see where the middle point actually is (you will need a friend for this probably!) and then to remeasure the lengths (so allow a little extra at each end when you start).
(2) The sleeves are about the same length as the cross chest width (again you can make them slightly longer if you wish. For a male tunic they should extend to the knuckles or even the finger tips). The wrist should be small enough so that the hand will just fit through - but remember - the hem and seam will take up additional space so you will need to allow a bit for this. As guidance - the wrist on the example tunic is 10"/25cm wide and the arm length is 25"/63cm.
Sew the sleeves to the body to form a cross.
(3) Sew the underside of the sleeves - leaving about 3" (8cm) at the armpit to put in the gusset.
(4) Sew the two gores to the front of the tunic (having sewn them together if they are made from two sections rather than one). They should start from about the top of the hips or just above (in the example tunic they start about 22"/55cm from the shoulder line).
(5) Pin the body together inside out and sew from three inches below the armpit down the side seam and then along back/gore seam.
(6/7) Sew the gusset to the front of the tunic and then to the back.
Now hem the base of the tunic and the cuffs.
Facing can now be added on the neck (and cuffs) (a). More expensive tunics may have a matching wide band of coloured cloth around the bottom. Higher ranking tunics may have tablet weave braid or embroidery around the facings.
Variations
Additional gores can be added to the front of the tunic (don't worry about going exactly up the middle of the tunic - the archaeological evidence seems to indicate that this was not essential - or even the norm!) (b)
These I copied of items on the web and used as a basis for some of my kit - I am afraid that the drawings have disapeared here but if you google the "Viking Patterns" you may find the origial articles copied here
")
")