I have been asked a number of times recently to provide some advice of guidance on the best way to sharpen an axe.
Whilst I am always happy to provide input, I thought that it might be worthwhile to put together a tutorial on the basic techniques.
The techniques used in here are intended to provide not only a sharp axe but also a safe and efficient axe. Before we begin, its useful both to define the terms we will use and also to examine what we are setting out to achieve.
Parts of the Axe
Below is a “jargon key” to the parts of an axe

A: Heel of Head
B: Bit
C: Toe of Head
D: Cheek or Ramp
E: Poll
F: Neck
G: Belly
H: Shoulder
I: Toe of Haft
J: Heel of Haft
K: Eye
L: Wooden Wedge
M: Metal Wedge
Axe Geometry
Its important to understand the shape of an axe and why it is that shape. Firstly, lets examine the types of grinds that exist
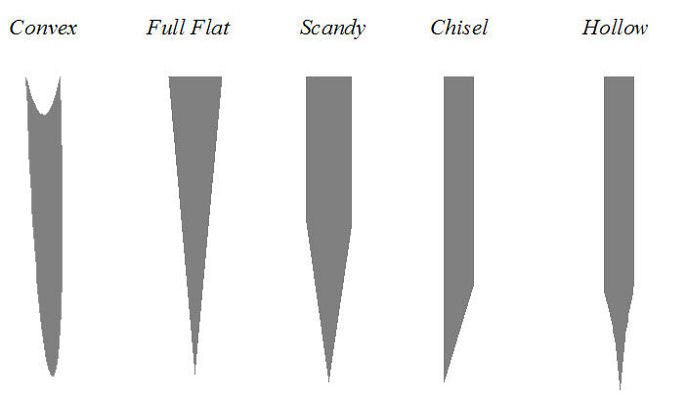
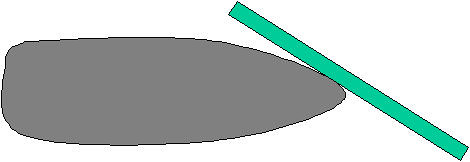
Most axes designed for splitting and chopping are convex in profile (although certain specialist side axes and broad axes may be flat ground for shaping). The reason for giving and axe a convex grind is that it protects the cutting edge from damage.
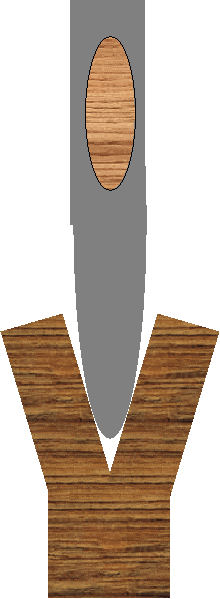
As you can see from the illustration above, due to the curve on a convex grind, the bit (cutting edge) of the axe head is not in contact with the wood after it has penetrated and in fact it is the ramp (side of the head) that is forcing the wood apart. This protects the cutting edge from damage and wear. It also explains why ensuring the ramps of your axe are smooth and polished will aid cutting efficiency
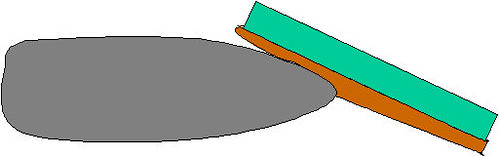
The next important point to consider is the shape of the bit. The vast majority of axe bits are curved (there are exceptions like carpenters axes). The reason for the curve is to aid penetration
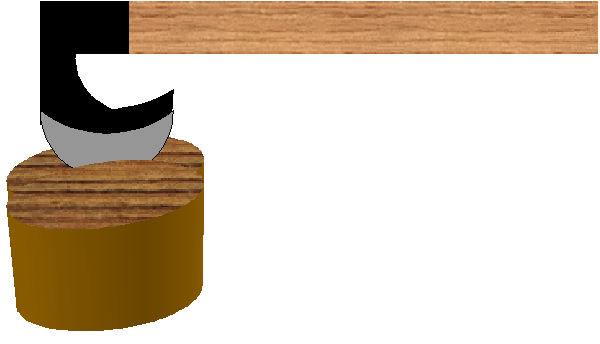
If you look at the illustration above, you can see that, due to the curve, only part of the bit is actually in contact with the wood. The curve of the bit means that a small part of the bit is in contact with the wood when the axe first strikes. This begins the cut and as the contact point penetrates, more and more of the bit is introduced into the cut.
By beginning the cut on a small contact area, tremendous force is brought to bear in that area. It is also the area that is likely to blunt most quickly.
Hopefully this short explanation explains why it is important when sharpening to keep the profile convex and the bit curved.
Safety
Sharpening an axe is awkward, difficult and dangerous. You are forced to grip the axe in strange ways, apply pressure with a file to a curved surface that can cause the file to skate and slip etc.
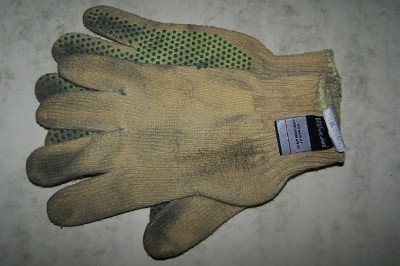
Wear Gloves! Tough, cut proof gloves at that. Your tools will slip and you will cut yourself. Axes are designed to chop through hardwood. Your flesh will provide no resistance and your bones not much. I use Kevlar cut proof gloves, but if you are on a budget I suggest tough “rigger” gloves. But always, always, wear them
The technique for sharpening an axe is different to sharpening a knife. When sharpening a knife you often move the knife over the sharpener (particularly with bench stones etc.). When sharpening an axe, you always move the sharpener over the axe. This means the axe should not move and its mostly your hands that are at risk. Despite this, do not sharpen in your lap. A cut to the femoral artery will kill you. If at home, sharpen at a table with your legs underneath. If in the field, kneeling and keeping the axe head high is safest.
Sharpening Equipment
I wanted to show the stages of sharpening using both “purpose made” and “widely available” equipment. This will make this a slightly longer process, but its important to me that people understand you don’t need to use professional equipment to achieve professional standard sharpening.
Pictured above is the “Gransfors Bruks” sharpening system. It consists of:
An axe file
A diamond file
An axe stone with coarse and smooth sides
These tools allow for four stages of sharpening that we will examine later
Pictured above is a sharpening system that can easily be assembled in a hardware store for less than the price of one of the Gransfors Bruks tools. Not as compact as the Gransfors tools but no less efficient. It consists of
A coarse crosscut file
A fine metal file
A set of diamond hones (these are an alternative to the fine metal file)
A sanding block
A block of buffing compound
In addition to these tools, a variety of grades of “Wet and Dry” abrasive paper and some scrap leather will be needed.
The Stages of Sharpening
There are four stages to the sharpening process. If you axe is blunt, you can omit stage 1, if just a little dull stages 1 & 2 can be omitted etc. The stages are as follows:
Step 1 - Cutting Back
This stage removes a lot of metal from the axe. It is used to “cut back” the bit away from a damaged area or “ding” where a dent in the cutting area has occurred. It is not necessary to remove every tiny nick from your axe blade. Indeed doing so will wear your axe down prematurely. However, periodically damage becomes so pronounced or an individual ding is so severe that cutting back becomes necessary.
The other occasion where I find it necessary to cut back is often when purchasing a new axe.
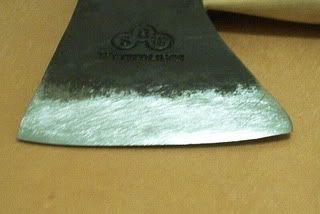
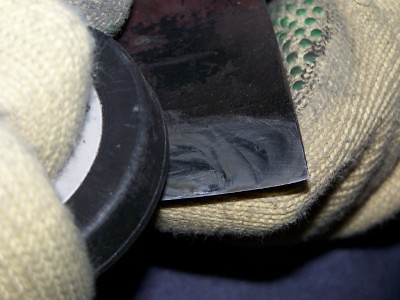
On the photograph above, you can see that the heel of the blade (A) is blunt and rounded compared to the toe (C). There are flat areas on the bevel (B) and the ramp (D). These flat areas will detract from cutting efficiency and trap dirt and sap promoting rust. A little cutting back will correct these problems and improve the utility of the axe.
So, how do we cut back. Well the tool we use is the axe file in the Gransfors Bruks system or the crosscut file in the assembled system.
What we need to do is file backwards, from the bit of the axe towards the poll. If we file forwards, we'll "push" metal towards the cutting edge forming a wire that will block cutting efficiency. Sadly this means we are pushing towards the cutting edge. GLOVES.
When we file, because we are using a coarse file, we'll leave grooves in the metal. These are tricky to get rid of later so we'll file bit to poll but on an angle (toe to heel). At the next stage we'll reverse the angle and this will get rid of the file marks.
Some things are hard to photograph so I’ll need to draw diagrams. I’ll use an overlay of an axe that looks like this to illustrate the required actions
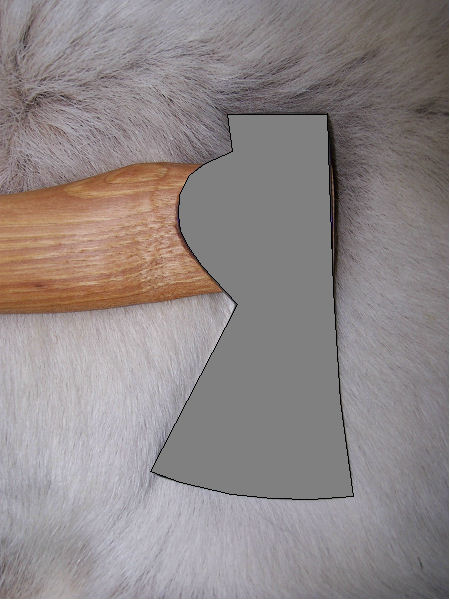
This is the desired motion - imagine the green bar as the file.
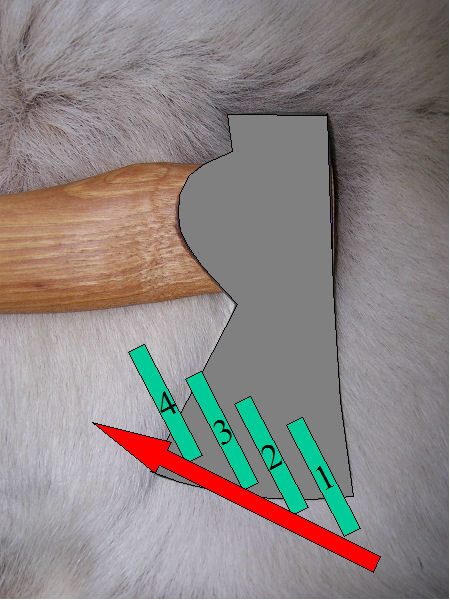
However if that’s all you do, you will file the bit flat, and that’s not what we want, so lift your hand holding the file as you push and roll the file around the convex bevel.
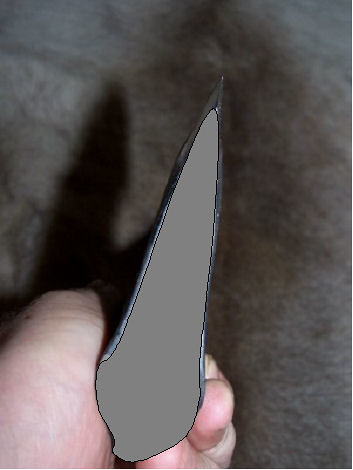
If this is the bevel
Then this is the motion you want
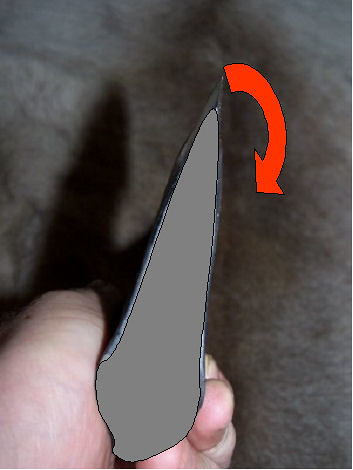
Concentrate on long sweeping strokes right across the bevel
Don’t do lots on one side. Keep turning the axe over and working both sides evenly. Sight along the bit and make sure you are keeping it in perfect line with the haft.

On both sides, keep the file strokes going down towards the haft - this will feel awkward on one side, but don't worry.
The bit, when finished, should be a bit thinner than now, an even thickness, and have no dings. It should be in a straight line as you sight along it and be in line with the haft.
Go slow and steady. You can take more off, but you can't put it back
Put your index finger on top of the file to guide it and work one way....(note where the haft is pointing)
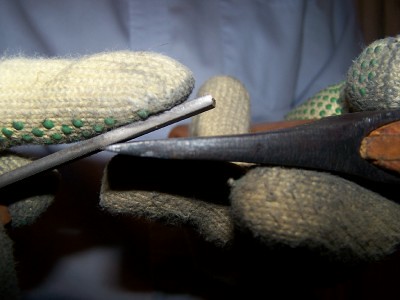
And then the other.....

Step 2 - Smoothing
After cutting back, the axe will be quite rough and show file marks as shown below
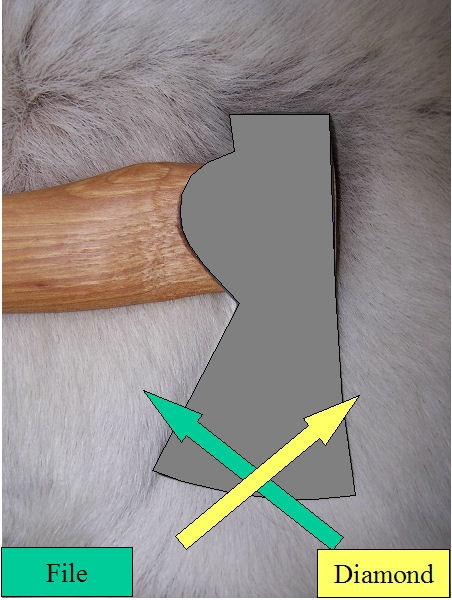
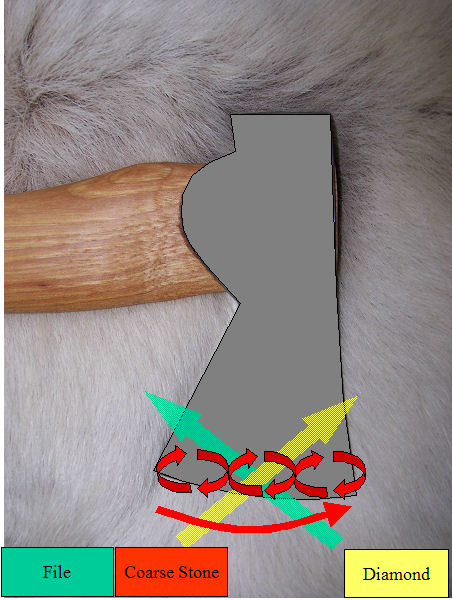
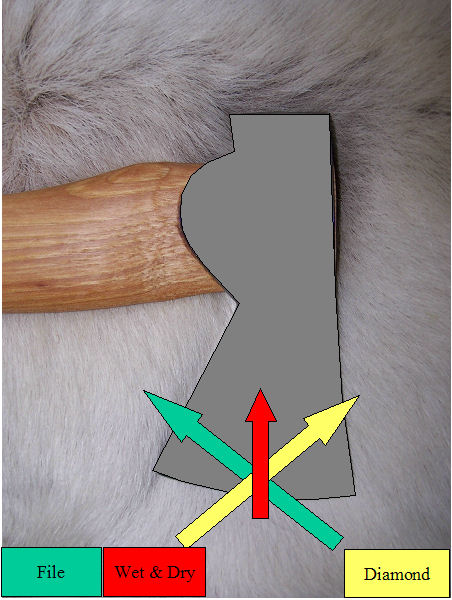
We need to change direction (whilst still removing metal from bit to poll). You therefore change the angle to 90 degrees from your original angle and are filing bit to poll, heel to toe - like this.
In the old days, I would have done this with a fine metal file, however since the advent of diamond files I prefer them. The Gransfors diamond file is great, but we showed the Gransfors tools last so here is one of the basic diamond hones
One of the things I like with these plastic backed diamond hones is that they can be flexed by pressing with the guiding index finger. This keeps more of the hone in contact with the bevel at once and preserves the convex grind.
Most diamond hones come in packs of three – coarse, medium and fine. It makes sense if you have all three to use them in that order. Use the coarse one in the direction indicated until all the file marks are removed. Then change back to the original (file) direction with the medium grit until all the scratches from the coarse grit are removed and finally reverse again with the fine grit. In theory these hones need to be wet to work, although I have used them dry and just rinsed them after use to stop them “clogging” and they worked fine.
Using the Gransfors system, you only have one grit available, so smooth out all the file marks in the direction indicated.
Step 3 – Sharpening
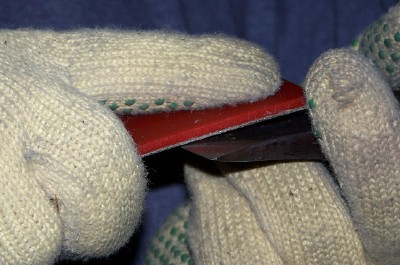
At this point, the techniques used in the two systems diverge. Lets look at the Gransfors system first. The axe stone has two sides – coarse and smooth. The axe stone needs to be wet to work. I carry some “water” in my mouth that seems to work quite well!
Wet the stone and put it onto the bevel. Move the stone in a spiral motion along the bevel from heel to toe.
The water will build up a “paste” on the bevel. Avoid the temptation to remove this. The paste is the abrasive that will sharpen the axe
Use the coarse stone until all marks from the diamond file are removed.
To sharpen with the “assembled” system, we will use the sanding block.
These are the sanding blocks I like to use (they cost the princely sum of about £1.20).
I like them because under the flaps that secure the paper are spikes that hold the paper firmly in place
There is a problem though. If you wrap your wet and dry over something flat, you will make contact on a tiny area - like this
This means that it will take ages to do and will tend to sand the convex bevel flat, however much you "roll your wrist". What you need to do is put something soft between your board and the wet and dry and then push down as you push back. This will bring a lot of wet and dry into contact with the bit and will also preserve the convexing. It will look more like this
I achieve this by gluing a piece of mousemat to one of the blocks. It makes the contact area soft as shown
Wrapping a piece of “wet and dry” over the top gives an ideal axe sharpening tool
Start with a fairly coarse grit (around 400 or even 240 if you only have a coarse diamond file). Push straight back over the bevel towards the eye as illustrated
Work through the grits until the axe is suitably sharp. I usually work up to 1,200 grit.
Step 4 – polishing the bit and bevel
Polishing the bit and bevel (and even the ramp) is not an exercise in vanity. It gives the axe a very sharp edge (an a sharp axe will not glance and is far less likely to rebound to a point you do not intend to strike). In addition a polished bevel and ramp with “glide” through wood, penetrating more deeply and requiring less strokes.
In the Gransfors system, this is achieved by using the fine side of the axe stone (similarly wet). Again, reverse direction.
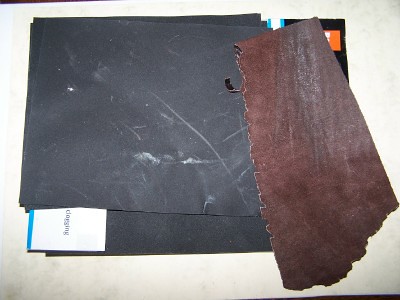
In the assembled system, we will using “buffing compound”. This is an abrasive “crayon” used to polish metal. To do this we need to cut a piece of scrap leather the same size as the “wet & dry” we have been using and attach it to our sanding block rough side showing. If you haven’t got any scrap leather you can use felt or even a cereal packet (leave the non-printed size showing). Crayon all over the leather to get an even layer of compound. Either green or pink / green compound gives the best results
Now we need to change direction again and polish from poll to bit. This will give a mirror shine and snap off any “wire” that has built up over the bit
That’s it. Your axe should now have an even, convex profile and razor sharp profile.
Please use it carefully
Red
Whilst I am always happy to provide input, I thought that it might be worthwhile to put together a tutorial on the basic techniques.
The techniques used in here are intended to provide not only a sharp axe but also a safe and efficient axe. Before we begin, its useful both to define the terms we will use and also to examine what we are setting out to achieve.
Parts of the Axe
Below is a “jargon key” to the parts of an axe
A: Heel of Head
B: Bit
C: Toe of Head
D: Cheek or Ramp
E: Poll
F: Neck
G: Belly
H: Shoulder
I: Toe of Haft
J: Heel of Haft
K: Eye
L: Wooden Wedge
M: Metal Wedge
Axe Geometry
Its important to understand the shape of an axe and why it is that shape. Firstly, lets examine the types of grinds that exist
Most axes designed for splitting and chopping are convex in profile (although certain specialist side axes and broad axes may be flat ground for shaping). The reason for giving and axe a convex grind is that it protects the cutting edge from damage.
As you can see from the illustration above, due to the curve on a convex grind, the bit (cutting edge) of the axe head is not in contact with the wood after it has penetrated and in fact it is the ramp (side of the head) that is forcing the wood apart. This protects the cutting edge from damage and wear. It also explains why ensuring the ramps of your axe are smooth and polished will aid cutting efficiency
The next important point to consider is the shape of the bit. The vast majority of axe bits are curved (there are exceptions like carpenters axes). The reason for the curve is to aid penetration
If you look at the illustration above, you can see that, due to the curve, only part of the bit is actually in contact with the wood. The curve of the bit means that a small part of the bit is in contact with the wood when the axe first strikes. This begins the cut and as the contact point penetrates, more and more of the bit is introduced into the cut.
By beginning the cut on a small contact area, tremendous force is brought to bear in that area. It is also the area that is likely to blunt most quickly.
Hopefully this short explanation explains why it is important when sharpening to keep the profile convex and the bit curved.
Safety
Sharpening an axe is awkward, difficult and dangerous. You are forced to grip the axe in strange ways, apply pressure with a file to a curved surface that can cause the file to skate and slip etc.
Wear Gloves! Tough, cut proof gloves at that. Your tools will slip and you will cut yourself. Axes are designed to chop through hardwood. Your flesh will provide no resistance and your bones not much. I use Kevlar cut proof gloves, but if you are on a budget I suggest tough “rigger” gloves. But always, always, wear them
The technique for sharpening an axe is different to sharpening a knife. When sharpening a knife you often move the knife over the sharpener (particularly with bench stones etc.). When sharpening an axe, you always move the sharpener over the axe. This means the axe should not move and its mostly your hands that are at risk. Despite this, do not sharpen in your lap. A cut to the femoral artery will kill you. If at home, sharpen at a table with your legs underneath. If in the field, kneeling and keeping the axe head high is safest.
Sharpening Equipment
I wanted to show the stages of sharpening using both “purpose made” and “widely available” equipment. This will make this a slightly longer process, but its important to me that people understand you don’t need to use professional equipment to achieve professional standard sharpening.
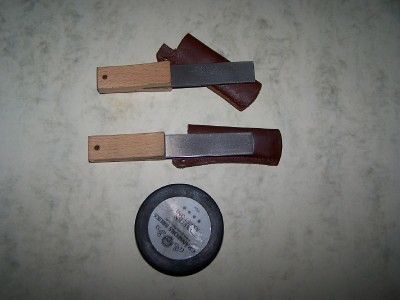
Pictured above is the “Gransfors Bruks” sharpening system. It consists of:
An axe file
A diamond file
An axe stone with coarse and smooth sides
These tools allow for four stages of sharpening that we will examine later
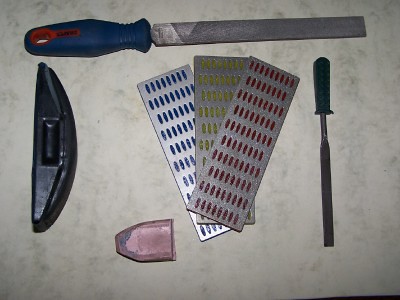
Pictured above is a sharpening system that can easily be assembled in a hardware store for less than the price of one of the Gransfors Bruks tools. Not as compact as the Gransfors tools but no less efficient. It consists of
A coarse crosscut file
A fine metal file
A set of diamond hones (these are an alternative to the fine metal file)
A sanding block
A block of buffing compound
In addition to these tools, a variety of grades of “Wet and Dry” abrasive paper and some scrap leather will be needed.
The Stages of Sharpening
There are four stages to the sharpening process. If you axe is blunt, you can omit stage 1, if just a little dull stages 1 & 2 can be omitted etc. The stages are as follows:
Step 1 - Cutting Back
This stage removes a lot of metal from the axe. It is used to “cut back” the bit away from a damaged area or “ding” where a dent in the cutting area has occurred. It is not necessary to remove every tiny nick from your axe blade. Indeed doing so will wear your axe down prematurely. However, periodically damage becomes so pronounced or an individual ding is so severe that cutting back becomes necessary.
The other occasion where I find it necessary to cut back is often when purchasing a new axe.
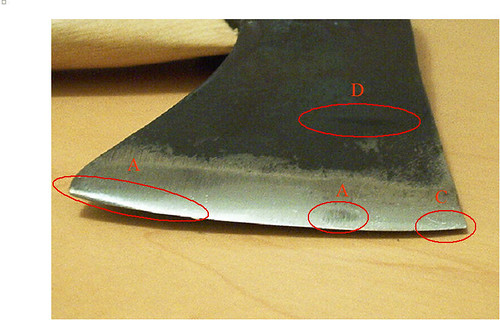
On the photograph above, you can see that the heel of the blade (A) is blunt and rounded compared to the toe (C). There are flat areas on the bevel (B) and the ramp (D). These flat areas will detract from cutting efficiency and trap dirt and sap promoting rust. A little cutting back will correct these problems and improve the utility of the axe.
So, how do we cut back. Well the tool we use is the axe file in the Gransfors Bruks system or the crosscut file in the assembled system.
What we need to do is file backwards, from the bit of the axe towards the poll. If we file forwards, we'll "push" metal towards the cutting edge forming a wire that will block cutting efficiency. Sadly this means we are pushing towards the cutting edge. GLOVES.
When we file, because we are using a coarse file, we'll leave grooves in the metal. These are tricky to get rid of later so we'll file bit to poll but on an angle (toe to heel). At the next stage we'll reverse the angle and this will get rid of the file marks.
Some things are hard to photograph so I’ll need to draw diagrams. I’ll use an overlay of an axe that looks like this to illustrate the required actions
This is the desired motion - imagine the green bar as the file.
However if that’s all you do, you will file the bit flat, and that’s not what we want, so lift your hand holding the file as you push and roll the file around the convex bevel.
If this is the bevel
Then this is the motion you want
Concentrate on long sweeping strokes right across the bevel
Don’t do lots on one side. Keep turning the axe over and working both sides evenly. Sight along the bit and make sure you are keeping it in perfect line with the haft.
On both sides, keep the file strokes going down towards the haft - this will feel awkward on one side, but don't worry.
The bit, when finished, should be a bit thinner than now, an even thickness, and have no dings. It should be in a straight line as you sight along it and be in line with the haft.
Go slow and steady. You can take more off, but you can't put it back
Put your index finger on top of the file to guide it and work one way....(note where the haft is pointing)
And then the other.....
Step 2 - Smoothing
After cutting back, the axe will be quite rough and show file marks as shown below
We need to change direction (whilst still removing metal from bit to poll). You therefore change the angle to 90 degrees from your original angle and are filing bit to poll, heel to toe - like this.
In the old days, I would have done this with a fine metal file, however since the advent of diamond files I prefer them. The Gransfors diamond file is great, but we showed the Gransfors tools last so here is one of the basic diamond hones
One of the things I like with these plastic backed diamond hones is that they can be flexed by pressing with the guiding index finger. This keeps more of the hone in contact with the bevel at once and preserves the convex grind.
Most diamond hones come in packs of three – coarse, medium and fine. It makes sense if you have all three to use them in that order. Use the coarse one in the direction indicated until all the file marks are removed. Then change back to the original (file) direction with the medium grit until all the scratches from the coarse grit are removed and finally reverse again with the fine grit. In theory these hones need to be wet to work, although I have used them dry and just rinsed them after use to stop them “clogging” and they worked fine.
Using the Gransfors system, you only have one grit available, so smooth out all the file marks in the direction indicated.
Step 3 – Sharpening
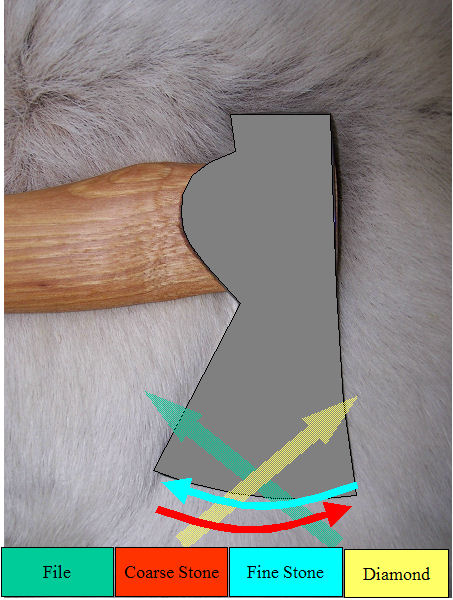
At this point, the techniques used in the two systems diverge. Lets look at the Gransfors system first. The axe stone has two sides – coarse and smooth. The axe stone needs to be wet to work. I carry some “water” in my mouth that seems to work quite well!
Wet the stone and put it onto the bevel. Move the stone in a spiral motion along the bevel from heel to toe.
The water will build up a “paste” on the bevel. Avoid the temptation to remove this. The paste is the abrasive that will sharpen the axe
Use the coarse stone until all marks from the diamond file are removed.
To sharpen with the “assembled” system, we will use the sanding block.
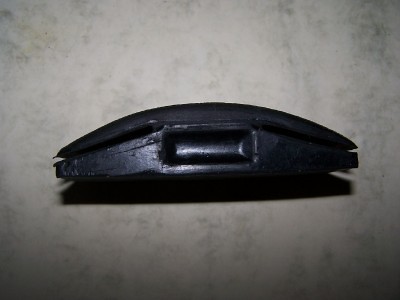
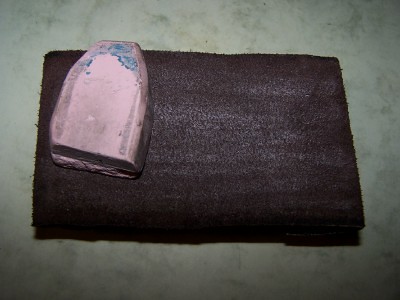
These are the sanding blocks I like to use (they cost the princely sum of about £1.20).
I like them because under the flaps that secure the paper are spikes that hold the paper firmly in place
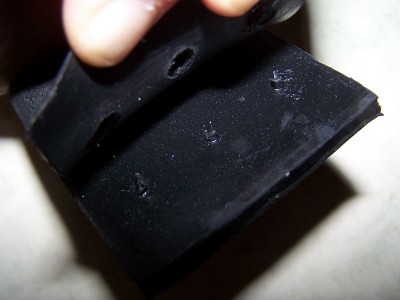
There is a problem though. If you wrap your wet and dry over something flat, you will make contact on a tiny area - like this
This means that it will take ages to do and will tend to sand the convex bevel flat, however much you "roll your wrist". What you need to do is put something soft between your board and the wet and dry and then push down as you push back. This will bring a lot of wet and dry into contact with the bit and will also preserve the convexing. It will look more like this
I achieve this by gluing a piece of mousemat to one of the blocks. It makes the contact area soft as shown
Wrapping a piece of “wet and dry” over the top gives an ideal axe sharpening tool
Start with a fairly coarse grit (around 400 or even 240 if you only have a coarse diamond file). Push straight back over the bevel towards the eye as illustrated
Work through the grits until the axe is suitably sharp. I usually work up to 1,200 grit.
Step 4 – polishing the bit and bevel
Polishing the bit and bevel (and even the ramp) is not an exercise in vanity. It gives the axe a very sharp edge (an a sharp axe will not glance and is far less likely to rebound to a point you do not intend to strike). In addition a polished bevel and ramp with “glide” through wood, penetrating more deeply and requiring less strokes.
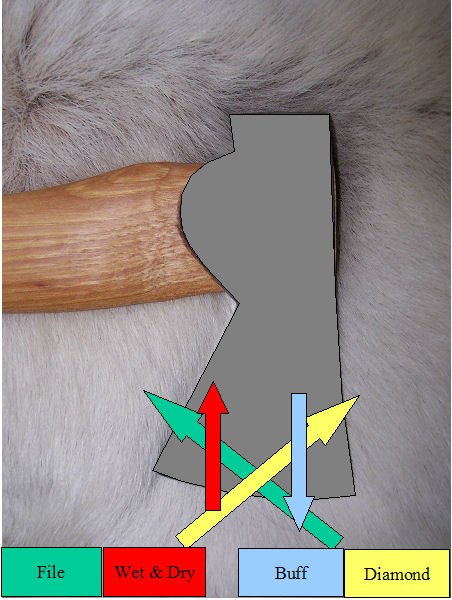
In the Gransfors system, this is achieved by using the fine side of the axe stone (similarly wet). Again, reverse direction.
In the assembled system, we will using “buffing compound”. This is an abrasive “crayon” used to polish metal. To do this we need to cut a piece of scrap leather the same size as the “wet & dry” we have been using and attach it to our sanding block rough side showing. If you haven’t got any scrap leather you can use felt or even a cereal packet (leave the non-printed size showing). Crayon all over the leather to get an even layer of compound. Either green or pink / green compound gives the best results
Now we need to change direction again and polish from poll to bit. This will give a mirror shine and snap off any “wire” that has built up over the bit
That’s it. Your axe should now have an even, convex profile and razor sharp profile.
Please use it carefully
Red


")