Dig out your shrunken pullovers :-)

Toddy

Mod
Mod
Jan 21, 2005
39,133
4,809
S. Lanarkshire
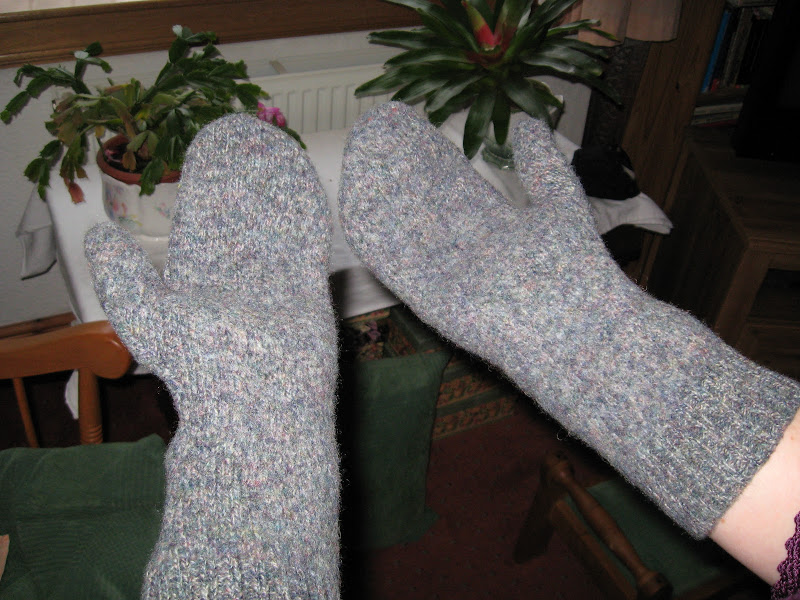
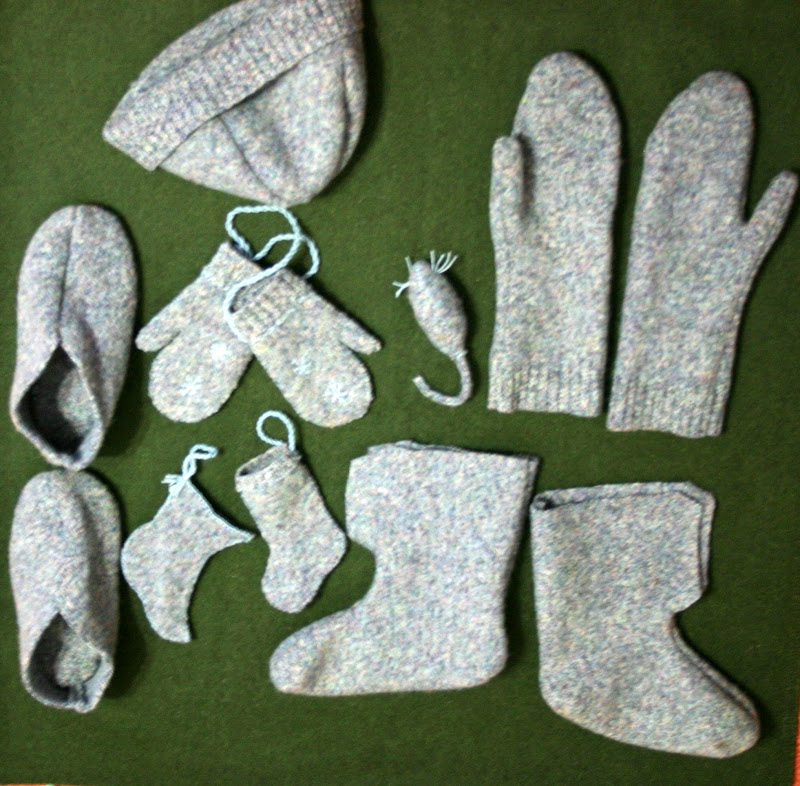
Remember this lot ? The pieces I made from a shrunken jumper.

IMG_8787.JPG


This was the old thread
http://www.bushcraftuk.com/forum/showthread.php?t=50790

I've had three pms this past fortnight from folks who've inadvertantly had their favourite wool pullover shrunken beyond restoration.
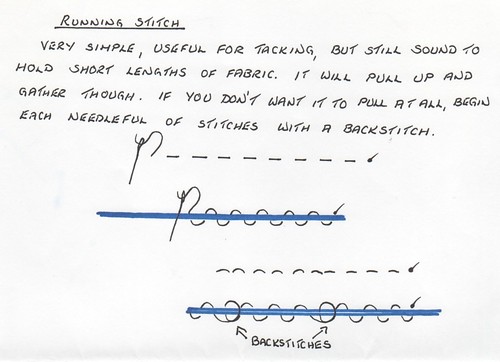
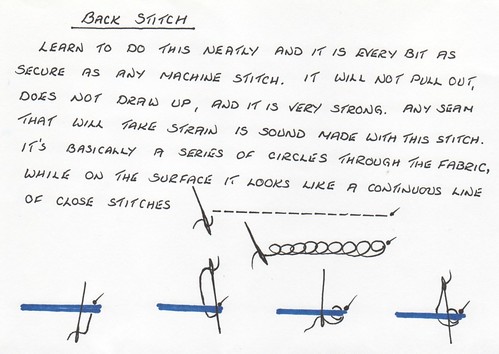
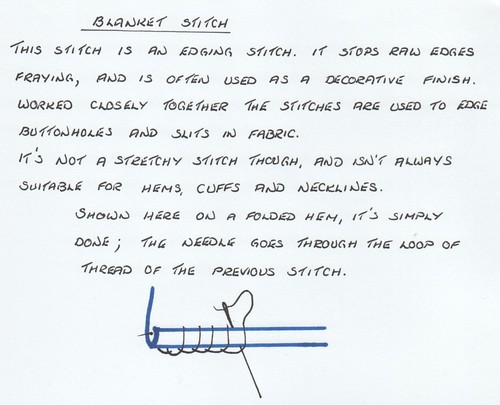
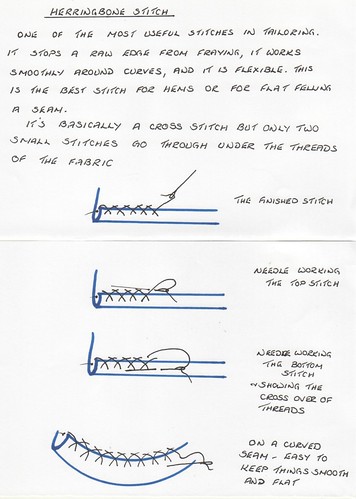
I said last time that I'd do another thread and I'd show the stitches that I used and some other patterns.

I've found my shrunken jumper, and I'd really like to see what other folks make with theirs.
So, go and find yours, and we'll make a start on this new thread and it's instructions in the next day or so :D and see if we can encourage some diy practical stuff before Winter hits :)

Cheers,
Mary
 

tartanferret

Full Member
Aug 25, 2011
1,865
0
barnsley
Cheers for this thread Mary ! More winter projects !:cool:. Old wooly pullys stuff deemed too rubbish for charity shops but too good for the bin. I'm loving it !:)
 

Toddy

Mod
Mod
Jan 21, 2005
39,133
4,809
S. Lanarkshire
I think those mittens need a string to go down the sleeves! Ahhh memories :)

IMG_0999.JPG


These ones turned out to be very warm and windproof and comfortable to wear :D.....and folks in the Arctic wear their mitts on strings so they don't lose one (or the hand from frostbite if they do)

I'm thinking of making fingerless ones this time round, maybe with a fold over mitten top addition for those who want it.


Ok. Old Wooly Pully - Check
Watching this thread - Check
Mmmm the long Winter nights....

Now draw around your hand, and your foot, and mark on your template some of the sizes that I mentioned in the last thread.
Mind that this 2D flat shape will have to fit comfortably around your 3D self :)

List of things to have to hand.

*Something to mark the wool. Chalk or a sliver of hard soap or tie some talcum powder into a rag or the toe of an old sock to make a 'pounce'.
*Thread of some kind that's appropriate to the jumper you're going to cut up. I used fine wool last time (mending wool) but thread will do fine.
*Needles suitable to sew those cut up pieces.
*Scissors that will cut cleanly ( if you can keep your knives sharp enough to shave, you can keep your scissors in decent order :)
*Inch tape or ruler, or learn to use your hands to measure effectively. i.e. I know my handspan is 20cms or 8 inches. I can work along a piece of string and mark it at those points. Folded in between will give me 10 and 5 cm marks. So long as I only use one measuring string/tape/rule for measuring me and the pattern and material, the sizes will work.
*Something to write with and on. Helps keep your sizes at hand.

Last time photographing in the electric light left everything dayglo pink :rolleyes: :eek:
I'll start the photos in the morning :D

If anyone has any specific requests about what they'd like to make, let me know ?

cheers,
M
 

vizsla

Native
Jun 6, 2010
1,517
0
Derbyshire
:rolleyes:
I'm going to get the blame for a whole load of laundry ooops, now, aren't I ?

Check the label ! :D

M

Too late iv already pressed start! So im afraid your right if the beter half tells me off il have no choice but to tell her the whole truth. Mary made me do it! :)
 

Toddy

Mod
Mod
Jan 21, 2005
39,133
4,809
S. Lanarkshire
Firstly, I think we need to discuss measuring.

Patterns are 2D. They are flat, but when the pieces are joined together they will fit a 3D person.
However, there is no magic formula for drawing around someone and adding the same extra all over to make the final garment fit.
Modern standard sizings are more or less "will do's" for most people. They don't actually fit most people very well. Mass production means that a wide choice of clothing is available, and cheaply. If you want something that actually fits you then you must pay a tailor or dressmaker's wages. Modern lycra rich fabrics and stretchy synthetics help give the illusion of fit and comfort without needing to spend a fortune though.

Our hands are the simplest example of what I mean.
This is a sketch of my left hand.

8167154262_cfa5a1b5d2.jpg


I drew around it with a pencil and then went back over the lines with a felt pen so that they could be clearly seen. I have measured across the drawing, and then around my hand. The differences in the numbers are kind of surprising.
To make gloves or mitts that I can actually wear, I have to take into account that the wrist measurement needs to both fit comfortably, and yet still allow the wider part, around the palm of my hand, into the glove.

The second sketch is the pattern I have made that will make comfortable mitts or wrist warmers or fingerless gloves from knitted wool that has felted.

8167109113_5c23036f6e.jpg


It's worth taking time to do this properly. It's not rocket science, but it is comfort. Too big is as uncomfortable to wear as too small.

This one shows the overlap, the extra room I added to make the mitt fit comfortably.

8186892139_beccaca70a.jpg


For outdoor/outdoors, not just shopping in Winter :), gloves, I prefer them to come well up my wrists. The skin is thin there, the veins and arteries are close to the surface and we can chill ourselves down very quickly just by running cold water over the wrists. Wrap them up and it's not just your hands that stay warm :)
This means that your pattern has to take account of how long you want the glove, and how much your forearm widens from your wrist. Usually gloves are knitted to accomodate the roundnesses, or they are pieced from many bits of fabric. From the jumpers we're aiming for warm, practical, simplicity.
Measure carefully :)

cheers,
M
 
Last edited:

Toddy

Mod
Mod
Jan 21, 2005
39,133
4,809
S. Lanarkshire
This is the jumper that I shrunk. It's lambswool and it shrunk at least 20cms upwards and maybe half of that across the width.

8169242790_cac7e4bf45.jpg


I slid my hand down inside the arm and pinned inbetween my fingers with the cuff just about half way down my fingers.
Stretching them as widely as I could, I found that the fabric stretched enough that I really don't need to cut for individual fingers, all I need is to stitch in lines where my pins are so that the mitt won't ride up when I wear it.

8169242550_de34074976.jpg


There are four main stitches used in this kind of hand sewing.
I have sketched each of them, and I'll stitch a sampler and add a photo of that too.

The first is running stitch;

8169761034_24a1578ee9.jpg


Very straightforward, try to keep your stitches small and neat unless you intend to use them to gather up a width of fabric and then the stitch size makes the pleat size and you might make them longer.

Running stitch is usually done by working three or four stitches at once on the needle, but it can be done one stitch at a time (stab stitch). It isn't a fixed stitch, it will pull, but if you begin each needleful of stitches with a backstitch, the running stitch won't pull and it'll be a lot more useful.


The second is back stitch;

8169768116_a467369acd.jpg


This is one of the most useful stitches to learn. It is secure, firm and very sound. It is used for seams where there will be any stress......like the seat of your trousers :), and in this case I'm going to use it to stitch the short seams between the fingers and to stitch the side seam on the mitts.

The third is blanket, or buttonhole, stitch;

8169766584_08f9b8668f.jpg


This stitch is the one that is used to edge the folded over hems of blankets, and stitched closely it edges buttonholes. However, it will stop a raw edge from fraying too. It's not particularly stretchy though, so it's not always suitable for hems, cuff and necklines. It looks best when worked with a consistant tension, and it needs to be securely finished off otherwise it has a tendency to unravel. Once a woollen edge has partially felted around it though, it'll not budge :)

The fourth stitch is herringbone stitch;

8169733523_6d7d5dc70c.jpg


This one is simply the most useful hemming stitch of all. It's very flexible, can easily be sewn around a curved edge, will stop an edge unravelling, will secure a folded over seam without adding bulk, can be very lightly done so that no stitching shows on the outside of the garment, and it's ideal for wool :D

More to come :)
cheers,
M
 

Toddy

Mod
Mod
Jan 21, 2005
39,133
4,809
S. Lanarkshire
I removed the pins, but marked where they were with chalk. Use whatever you find works on your woollen.
Turn the sleeve inside out and lay the mitt pattern that was made earlier onto the sleeve.
This is what mine looked like.....the chalk shows up fine on this pale blue.

8169793345_a72e529c56.jpg


Cut out and turned back right way out. I've put the pins back in where I want the finger guides to be stitched.

8169823436_480d86b603.jpg


I split the side seam for the length of the space needed to let my thumb come through comfortably.

8169823706_9839c225bd.jpg


Repeat on other sleeve, find a needle and suitable thread, and we're ready to sew :D

cheers,
Toddy
 

Toddy

Mod
Mod
Jan 21, 2005
39,133
4,809
S. Lanarkshire
I was lucky and found some fine merino wool that matched my jumper. If I hadn't found one that did match I'd just have used normal sewing thread. The wool has felted enough that it won't unravel so cutting through the knitting stitches won't leave ladders.

Since the little seams will lie between my fingers, and knots are lumpy, I threaded the needle with the loop from a doubled thread. This means that I can start my sewing simply by slipping the needle through the loop to hold the thread neatly without a knot.

8169803407_4b78a86659.jpg


Finishing off I simply made a few stab stitches back through the seam and slid the needle through the last stitches and cut the thread close. It won't come undone and there are no knots to irritate me :)

I sewed the side seam with backstitch, again started with the looped thread, and then I used herringbone to lay that seam flat and to go right around the thumbhole folding the unpicked fabric edge flat.

8169881922_67f6ab7b2b.jpg


I also used herringbone to lay a neat and tidy flat hem at the wrist end.

The result is one pair of warm wristwarming fingerless mitts :D

8170323604_06d168f807.jpg


cheers,
Toddy
 

grey-array

Full Member
Feb 14, 2012
1,067
4
The Netherlands
That is brilliant Mary, thank you for sharing this.
Consider the stitching lesson saved and PDF'ed ^^
I Think I will need to start shrinking down sweaters
Yours sincerely Ruud

Ps you have no idea how happy I am with this ^^
coming 4 months I am gonna make a collection of all machine and handstitches and will try and appoint them their uses, appliances but also their weaknesses etc.
So when I am in the middle of designing I have a nice list of different types of stitching from which to chose, but because I assembled the literature I would probably not need it as I will know them by heart by then
The irony

Also in that document I wanted to put in type of thread and their anatomy, and perhaps If time allows it some different weaves
So I might give you a pm in a couple of weeks.
 
Last edited:
  • Like
Reactions: Toddy

BCUK Shop

We have a a number of knives, T-Shirts and other items for sale.

SHOP HERE