An Ancient Artifact

  • Hey Guest, Early bird pricing on the Summer Moot (29th July - 10th August) available until April 6th, we'd love you to come. PLEASE CLICK HERE to early bird price and get more information.
N

Nomad

Guest
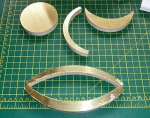
Massive sun compass?

With increments at 10°, perhaps?

On with the next stage - cutting up some of the thin brass. The superglue and masking tape trick again...

NSD 18.jpg

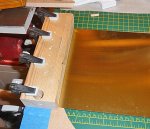
A more spread out bead of glue this time because I want good adhesion over the whole area. The black line indicates where I'm going to cut it with the bandsaw to get a strip that's mounted on MDF to work with - I want the glue to spread up to there, but not get so far that it spreads onto the adjacent metal.

Clamped down to ensure the glue spreads nicely and nothing moves while it's drying...
NSD 19.jpg


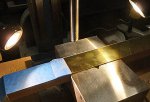
Then cut in the bandsaw (about 30mm wide) and clamped in a vice on my small milling machine (a bench drill would work just as well, which wasn't very well as it turned out)...
NSD 20.jpg

The tool here is another bit of the 9.5mm diameter rod with an 8mm hole drilled in the end (done on the lathe), and some of the resulting wall shape ground away to make a cutter with a single pointy bit that spins around. The idea is that, when it's brought down onto the brass sheet, it cuts in a circular path, leaving a small disc in the middle. Since the hole in the tool is 8mm, the disc left is also 8mm in diameter.

In reality, it was really a bit fraught. The tool didn't run as well centred as I would have liked because I don't have a 9.5mm collet for the mill - I had to bodge with a 10mm collet and a wrap of the 0.25mm brass around the tool to make up the diameter (2 x 0.25mm thicknesses at the radius = 0.5mm increase in diameter = a supposed 10mm diameter tool-and-brass combination).

It still didn't run very true, and this was a problem during the cutting. As the tool went deeper into the material, its slightly eccentric path was able to impart quite a lot of force onto the edge of the brass sheet outside the cut. This made the sheet move around and the adhesion of the masking tape wasn't enough to hold it down (so I found a limit for the masking tape method, but machining forces can be pretty high). In the end, it was asking too much to cut right through the sheet, especially since it was tending to deform under the cutter.

I got the little discs in the end, but ended up cutting them out with a combination of tin snips and wire cutters (both cantilever types for easy and precise cutting). The indented circles helped a lot as a guide for the cutting. You can see some the cut and uncut discs here...

NSD 21.jpg

In the pile of scrap on the left, you can also see the result of the brass sheet parting company from the masking tape - there's a bit with multiple round traces as the cutter hit the metal while it was moving.

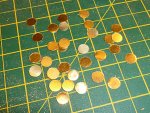
As it turned out, tidying them up was fairly easy. I snipped off the remaining thin bits around the edges with some small wire cutters, and then gently tidied up the edges with a fine file...
NSD 22.jpg

36 of these ought to be enough for anybody (I certainly don't want to make any more...).

The filing went okay - filing the really thin bits where it had been deformed by the cutter was quite quick, and it slowed down noticeably when the file hit the original 0.25mm thickness.

Certainly the most fiddly and and somewhat frustrating stage of the project so far, not least because the plan with the cutter didn't work out, and not helped by them being so small. I've got a bit more to do with these, but I think I can move onto some other, larger, shapes to be made from the thin brass first. Once they're done, I can look at finishing both the little discs and the other bits at the same time because I expect the techniques I use then will be the same for both (once I work out how to do it).
 
  • Like
Reactions: Toddy

Chalkflint

Tenderfoot
Mar 6, 2017
70
34
Oxford
Nomad.
Trepanning is something I always find a bit fiddly.
A trick I use when machining thin material is sandwich it between two other pieces of material and machine through..
This also works well when drilling thin material as it does not throw up burrs if done correctly. I dont think this would be that easy with the tool you made as the sandwich materials need to be much thicker so they dont flex.
You could make up a small thick bit of plate/simple jig with a tight clearance hole that the tool can pass through and clamp it in position locally so it holds the material rigid. This means you dont have to use glue or tape.
I appreciate if you are doing it at home its going to be more restrictive than me doing it in a full engineering workshop.
Chalkflint
 
  • Like
Reactions: Toddy

Paul_B

Bushcrafter through and through
Jul 14, 2008
6,152
1,546
Cumbria
This thread is just as exciting when you know what you're making as when you don't. Assuming I'm right of course.

Great thread!

Is there anyone else with a good guess about what it is and ate itching to see the finished product? Torn between wanting to see the finished product and enjoying the journey?
 
  • Like
Reactions: Toddy
N

Nomad

Guest
I'm pretty sure a buckler would be quite a bit more domed than this.

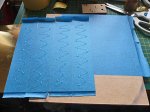
Today's activities involved cutting out the remaining shapes from the thin brass. To make things easier to handle, the sheet was stuck down to some sacrificial MDF with masking tape and plenty of superglue...

NSD 23.jpg

Wiggly lines with the superglue to ensure it spreads well when the bits go together - I want to ensure that there is still a bond when the shapes are cut out because I want to do more with them still attached to the MDF.

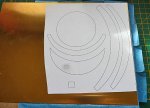
A template was printed out and stuck to the brass with double sided tape (to get 100% adhesion over the whole area)...


NSD 24.jpg

Masking tape between the MDF and brass because the bond with the double sided tape is pretty strong - there would be a high risk of damaging the brass when trying to get it off. On the other hand, the paper and double sided tape can be peeled off readily without damaging the brass (ideally want a really good bond on both sides).

The shapes were roughly cut out on the bandsaw...

NSD 25.jpg

The edges were then tidied up with a couple of electric sanders - an oscillating spindle sander for the concave curves, and a disc sander for the rest.

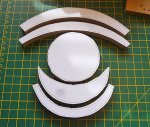
With the paper and tape peeled off, I now have...

NSD 26.jpg

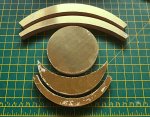
...which can be rearranged into this handy Picasso-style collage...

NSD 27.jpg

A bit more to do on some of these, and then I can get onto the finishing of all of the applied bits (these and the little 8mm discs).
 

Paul_B

Bushcrafter through and through
Jul 14, 2008
6,152
1,546
Cumbria
Yes, me too :)

See post No.16
I think it was your post that helped me find the answer. I had already thought it was asking the lines I was thinking but I couldn't work out the right answer til then.

It's still as interesting to see it developing.
 

Toddy

Mod
Mod
Jan 21, 2005
38,937
4,570
S. Lanarkshire
It's a surprising amount of forethought, and work, imagine making it without power tools.
Intriguing to see it all come together :D
 

Woody girl

Full Member
Mar 31, 2018
4,520
3,460
65
Exmoor
I'm still baffled but I see a sun and moon so I'm wondering if it's to do with the sky or an ancient sort of calendar.
 

BCUK Shop

We have a a number of knives, T-Shirts and other items for sale.

SHOP HERE