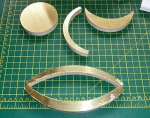
With increments at 10°, perhaps?
On with the next stage - cutting up some of the thin brass. The superglue and masking tape trick again...

A more spread out bead of glue this time because I want good adhesion over the whole area. The black line indicates where I'm going to cut it with the bandsaw to get a strip that's mounted on MDF to work with - I want the glue to spread up to there, but not get so far that it spreads onto the adjacent metal.
Clamped down to ensure the glue spreads nicely and nothing moves while it's drying...
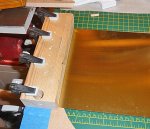
Then cut in the bandsaw (about 30mm wide) and clamped in a vice on my small milling machine (a bench drill would work just as well, which wasn't very well as it turned out)...
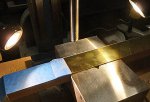
The tool here is another bit of the 9.5mm diameter rod with an 8mm hole drilled in the end (done on the lathe), and some of the resulting wall shape ground away to make a cutter with a single pointy bit that spins around. The idea is that, when it's brought down onto the brass sheet, it cuts in a circular path, leaving a small disc in the middle. Since the hole in the tool is 8mm, the disc left is also 8mm in diameter.
In reality, it was really a bit fraught. The tool didn't run as well centred as I would have liked because I don't have a 9.5mm collet for the mill - I had to bodge with a 10mm collet and a wrap of the 0.25mm brass around the tool to make up the diameter (2 x 0.25mm thicknesses at the radius = 0.5mm increase in diameter = a supposed 10mm diameter tool-and-brass combination).
It still didn't run very true, and this was a problem during the cutting. As the tool went deeper into the material, its slightly eccentric path was able to impart quite a lot of force onto the edge of the brass sheet outside the cut. This made the sheet move around and the adhesion of the masking tape wasn't enough to hold it down (so I found a limit for the masking tape method, but machining forces can be pretty high). In the end, it was asking too much to cut right through the sheet, especially since it was tending to deform under the cutter.
I got the little discs in the end, but ended up cutting them out with a combination of tin snips and wire cutters (both cantilever types for easy and precise cutting). The indented circles helped a lot as a guide for the cutting. You can see some the cut and uncut discs here...

In the pile of scrap on the left, you can also see the result of the brass sheet parting company from the masking tape - there's a bit with multiple round traces as the cutter hit the metal while it was moving.
As it turned out, tidying them up was fairly easy. I snipped off the remaining thin bits around the edges with some small wire cutters, and then gently tidied up the edges with a fine file...
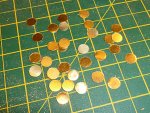
36 of these ought to be enough for anybody (I certainly don't want to make any more...).
The filing went okay - filing the really thin bits where it had been deformed by the cutter was quite quick, and it slowed down noticeably when the file hit the original 0.25mm thickness.
Certainly the most fiddly and and somewhat frustrating stage of the project so far, not least because the plan with the cutter didn't work out, and not helped by them being so small. I've got a bit more to do with these, but I think I can move onto some other, larger, shapes to be made from the thin brass first. Once they're done, I can look at finishing both the little discs and the other bits at the same time because I expect the techniques I use then will be the same for both (once I work out how to do it).


