99p Whoopee Slings
Having read so much about whoopee slings I felt the need to own some of my own. Being too poor to buy any, or even the stuff to make them, I had to make do with something from the pound shop (5 and dime if you prefer). Actually the guy line available from the pound shop makes a very good medium to use as a whoopee sling.
IT IS NOT MEANT TO SUPPORT A HAMMOCK JUST AS A GUY LINE FOR A TARP, SMALL TENT OR POLE.
The following is a quick how-to to make a whoopee sling from a guy line.
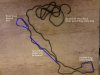
What we need

Photo 01
The above shows a pound shop guy line, a bamboo skewer, sticky tape, tape measure, scissors and lighter. The lighter is used to remove loose threads from the knot at the end and the tape measure is only needed if you have to cut to a fixed length.
Expose the core

Photo 02
Cut the ends of the guy line, if they are sealed, and tease out the central core from the surrounding sheath. Do not worry about the end fraying a bit as we will make use of this later.
Pull out the core

Photo 03
Remove the core from within the line. Push the sheath back until it bunches and then slide this bunch all the way back down the length. Repeat until the sheath is past the core. We only need the outer sheath for this job so the inner is yours for another job. You will note that the sheath will expand its diameter if pushed together along its length, its this property we will use to make the sling work. As we are also only using the outer of the original cord IT MUST BE WEAKER THAN THE ORIGINAL. Having said that the cord is still good for many tasks.
Working out the length

Photo 04
Eventually some of the sheath will pass up inside another section of the sheath. Where this happens will decide on the Max and Min lengths of our whoopee cord. For a given length of cord, say 3 meters, placing the tunnel at one point could give a Max of 2.8 and a Min of 2.5, (0.3m to play with). Another placement on the same cord could give a Max of 1.8 and a Min of 0.5. i.e. a change of 1.3m. You can have a lot of length or a lot of change but not both, (for a given starting length).
Long Length

Photo 05
In Photo 05 we see a length of cord laid out and some of it doubled over at one end. At the single end we will make a fixed loop. Where it is doubled, that will form the Whoopee end. This can be made big or small. The centre part will always be single. This set-up will always give us a long cord, maybe very long, maybe not so long but there will always be a long single part in the middle.
Shorter Length, more options

Photo 06
In photo 06 the active part has been moved much closer to where the fixed loop will go. This means a very large loop could be made. This allows much more flexibility in the length at the expense of using almost twice the original cord.
Smooth needle

Photo 07
Lets get started. Using a long length of sellotape cover the bamboo skewer. This gives a point which slides into the sheath without tearing the thread and allows it to slide along with ease. By all means a knitting needle or length of stiff wire could be used. A skewer is what I had that fitted!
Note in the picture, near the blunt end, you can just make out where the sellotape does not quite fit. This is not an issue, nice and smooth is better than 100% round
Attach cord to skewer

Photo 08
Using another bit of tape, attach one end of the cord to the blunt end of the skewer. The cord will adhere better to the slightly frayed end we did not worry about when we removed the core! If there is a gap between the cord and end of the skewer, no matter.
Making the fixed end

Photo 09
We now have to work out how much of the cord is to be buried inside itself. I was using an 8 inch / 15 cm skewer so it was easy enough to poke the point into the sheath at round the 10 inch point. The more that is buried the stronger will be the loop, 10 inch is plenty.
Slide In the Point

Photo 10
As seen in Photo 10, the point has now been pushed into the central void of the sheath, made by removing the core. The taped point will easy push its way in, I found that twirling the stick plus minus 90 degrees did the job. Push the cord onto the point not the point down the cord. As you push the cord along its length, so its diameter increases allowing the skewer easy passage.
Skewer almost buried

Photo 11
Here the skewer has been passed down inside the cord, further than its own length. By sliding the bunched sheath down the length of the skewer we can get its point to travel that little bit farther. Up to 125% of the length from original end to entry hole work well. Too long and you will not be able to cut off the skewer, too short and the dragged portion will stick out of the exit hole.
Skewer buried

Photo 12
As we move the skewer down, its end will enter the inner void and drag the cord with it. By sliding the excess off the skewer the resulting loop will get smaller and smaller as the cord is consumed by itself. At some point you will have a loop the size you wish, big enough to slip over a tent peg or to be fastened to a Tarp. When you have the required size, hold the point where the two parts meet and smooth back the other way. The friction between the inner and outer sheaths will hold it in place.

Photo 13
Here we see the skewer all the way out of the sheath with some of the outer sheath bunched over its self. The fixed loop is at the size we need. Cut the tape off the skewer, or unpick it if you feel the need. By smoothing the bunched up sheath down away from the fixed loop the end that was attached to the skewer will disappear into cord and the exit hole will heal up.
Finished End Loop

Photo 14
Now we have the end loop at the size we want with the inner tucked inside the outer. The more the loop is pulled the more narrow the outer will becomes, in turn gripping the inner tighter. If you wish you could drop a stitch or two in where the inner meets the outer but I never bothered.
Starting on the non-fixed end.

Photo 15
Now we will make the Whoppe, variable or non-fixed end. Please note that we will be working up the cord the opposite direction from when we worked the fixed end. Also the skewer will not be freed from the cord until almost the last step. We will use the same technique to bury the inner sheath as before but this time it will not be left buried, rather it will pass in, travel along and come out. From the picture above I intend to have the buried portion close to the fixed loop to allow me alter the length of the cord by the largest amount.
Starting the tunnel

Photo 16
The point of the skewer is fed in the same way as for the fixed loop. This time it will come out near to the fixed loop but not too close as the end is full of inner! I have my entry and exit holes about 15 inches (20cm) or a bit more. I find this is enough to bite onto itself.
Entry and Exit

Photo 17
Here we see the skewer exiting the sheath with the end just dragging the cord into the entry hole. The skewer is also covered with bunched up sheath so the distance between entry and exit is more than it seems.
Big Loop has been made

Photo 18
Here the skewer is all out and the cord pulled throw. For all purposes this guy rope is now as long as it will get. The more of the inner is pulled through, the smaller the loop will be and the shorter the cord. At its longest it is around half its starting length
Pulling the cord right through

Photo 19
Now the cord has been pulled almost all the way through. We have the fixed end as before and now a small loop at the other end. The other sheath has been smoothed down and grips the inner ready to take the strain in use. The skewer can now be cut off ready to make another line. The picture shows the cord at almost its minimum length fro loop to loop.
One last Knot

Photo 20
A knot is now added to the end which had been fixed to the skewer and we are finished. This stops the end from disappearing back down the hole from where it came. The picture shows the cord at its longest length, from loop to loop.
ONCE AGAIN THIS IS THIN CORD AND ONLY ITS OUTER HALF. ITS NOT FOR HANGING A HAMMOCK FROM.
Hope its of some use to someone and has not be a waste of your bandwidth
Paddy
Having read so much about whoopee slings I felt the need to own some of my own. Being too poor to buy any, or even the stuff to make them, I had to make do with something from the pound shop (5 and dime if you prefer). Actually the guy line available from the pound shop makes a very good medium to use as a whoopee sling.
IT IS NOT MEANT TO SUPPORT A HAMMOCK JUST AS A GUY LINE FOR A TARP, SMALL TENT OR POLE.
The following is a quick how-to to make a whoopee sling from a guy line.
What we need
Photo 01
The above shows a pound shop guy line, a bamboo skewer, sticky tape, tape measure, scissors and lighter. The lighter is used to remove loose threads from the knot at the end and the tape measure is only needed if you have to cut to a fixed length.
Expose the core
Photo 02
Cut the ends of the guy line, if they are sealed, and tease out the central core from the surrounding sheath. Do not worry about the end fraying a bit as we will make use of this later.
Pull out the core
Photo 03
Remove the core from within the line. Push the sheath back until it bunches and then slide this bunch all the way back down the length. Repeat until the sheath is past the core. We only need the outer sheath for this job so the inner is yours for another job. You will note that the sheath will expand its diameter if pushed together along its length, its this property we will use to make the sling work. As we are also only using the outer of the original cord IT MUST BE WEAKER THAN THE ORIGINAL. Having said that the cord is still good for many tasks.
Working out the length
Photo 04
Eventually some of the sheath will pass up inside another section of the sheath. Where this happens will decide on the Max and Min lengths of our whoopee cord. For a given length of cord, say 3 meters, placing the tunnel at one point could give a Max of 2.8 and a Min of 2.5, (0.3m to play with). Another placement on the same cord could give a Max of 1.8 and a Min of 0.5. i.e. a change of 1.3m. You can have a lot of length or a lot of change but not both, (for a given starting length).
Long Length
Photo 05
In Photo 05 we see a length of cord laid out and some of it doubled over at one end. At the single end we will make a fixed loop. Where it is doubled, that will form the Whoopee end. This can be made big or small. The centre part will always be single. This set-up will always give us a long cord, maybe very long, maybe not so long but there will always be a long single part in the middle.
Shorter Length, more options
Photo 06
In photo 06 the active part has been moved much closer to where the fixed loop will go. This means a very large loop could be made. This allows much more flexibility in the length at the expense of using almost twice the original cord.
Smooth needle
Photo 07
Lets get started. Using a long length of sellotape cover the bamboo skewer. This gives a point which slides into the sheath without tearing the thread and allows it to slide along with ease. By all means a knitting needle or length of stiff wire could be used. A skewer is what I had that fitted!
Note in the picture, near the blunt end, you can just make out where the sellotape does not quite fit. This is not an issue, nice and smooth is better than 100% round
Attach cord to skewer
Photo 08
Using another bit of tape, attach one end of the cord to the blunt end of the skewer. The cord will adhere better to the slightly frayed end we did not worry about when we removed the core! If there is a gap between the cord and end of the skewer, no matter.
Making the fixed end
Photo 09
We now have to work out how much of the cord is to be buried inside itself. I was using an 8 inch / 15 cm skewer so it was easy enough to poke the point into the sheath at round the 10 inch point. The more that is buried the stronger will be the loop, 10 inch is plenty.
Slide In the Point
Photo 10
As seen in Photo 10, the point has now been pushed into the central void of the sheath, made by removing the core. The taped point will easy push its way in, I found that twirling the stick plus minus 90 degrees did the job. Push the cord onto the point not the point down the cord. As you push the cord along its length, so its diameter increases allowing the skewer easy passage.
Skewer almost buried
Photo 11
Here the skewer has been passed down inside the cord, further than its own length. By sliding the bunched sheath down the length of the skewer we can get its point to travel that little bit farther. Up to 125% of the length from original end to entry hole work well. Too long and you will not be able to cut off the skewer, too short and the dragged portion will stick out of the exit hole.
Skewer buried
Photo 12
As we move the skewer down, its end will enter the inner void and drag the cord with it. By sliding the excess off the skewer the resulting loop will get smaller and smaller as the cord is consumed by itself. At some point you will have a loop the size you wish, big enough to slip over a tent peg or to be fastened to a Tarp. When you have the required size, hold the point where the two parts meet and smooth back the other way. The friction between the inner and outer sheaths will hold it in place.
Photo 13
Here we see the skewer all the way out of the sheath with some of the outer sheath bunched over its self. The fixed loop is at the size we need. Cut the tape off the skewer, or unpick it if you feel the need. By smoothing the bunched up sheath down away from the fixed loop the end that was attached to the skewer will disappear into cord and the exit hole will heal up.
Finished End Loop
Photo 14
Now we have the end loop at the size we want with the inner tucked inside the outer. The more the loop is pulled the more narrow the outer will becomes, in turn gripping the inner tighter. If you wish you could drop a stitch or two in where the inner meets the outer but I never bothered.
Starting on the non-fixed end.
Photo 15
Now we will make the Whoppe, variable or non-fixed end. Please note that we will be working up the cord the opposite direction from when we worked the fixed end. Also the skewer will not be freed from the cord until almost the last step. We will use the same technique to bury the inner sheath as before but this time it will not be left buried, rather it will pass in, travel along and come out. From the picture above I intend to have the buried portion close to the fixed loop to allow me alter the length of the cord by the largest amount.
Starting the tunnel
Photo 16
The point of the skewer is fed in the same way as for the fixed loop. This time it will come out near to the fixed loop but not too close as the end is full of inner! I have my entry and exit holes about 15 inches (20cm) or a bit more. I find this is enough to bite onto itself.
Entry and Exit
Photo 17
Here we see the skewer exiting the sheath with the end just dragging the cord into the entry hole. The skewer is also covered with bunched up sheath so the distance between entry and exit is more than it seems.
Big Loop has been made
Photo 18
Here the skewer is all out and the cord pulled throw. For all purposes this guy rope is now as long as it will get. The more of the inner is pulled through, the smaller the loop will be and the shorter the cord. At its longest it is around half its starting length
Pulling the cord right through
Photo 19
Now the cord has been pulled almost all the way through. We have the fixed end as before and now a small loop at the other end. The other sheath has been smoothed down and grips the inner ready to take the strain in use. The skewer can now be cut off ready to make another line. The picture shows the cord at almost its minimum length fro loop to loop.
One last Knot
Photo 20
A knot is now added to the end which had been fixed to the skewer and we are finished. This stops the end from disappearing back down the hole from where it came. The picture shows the cord at its longest length, from loop to loop.
ONCE AGAIN THIS IS THIN CORD AND ONLY ITS OUTER HALF. ITS NOT FOR HANGING A HAMMOCK FROM.
Hope its of some use to someone and has not be a waste of your bandwidth
Paddy
")


