As I see there are several of you interested in learning to flintknapp, I thought to post a quick series of photographs depicting the creation of an arrowhead from a flake. The stone is called "dacite." It is a lot like obsidian, but harder and stronger. It forms much the same way - like a volcanic glass.
This is the flake I started with:

At first, my goal is simply to make this flake as flat as possible. In the ensuing photos, you'll see bumps and humps and irregularities that I will be trying to remove. I'm not worried about making an arrowhead yet...just making a flat stone.
In this next photo, you'll see a hump on the bottom of the stone. I've created a platform from which to attack that hump. A platform is merely the term given to a place on the edge of the stone that I will use to either strike with a percussion tool, or to push with a pressure flaking tool:

That white area is the platform. I've prepared it by using an abrasive stone to grind the edge. Grinding primarily is used to make the edge strong so that it will withstand the strike or the force of the pressure flaking tool without crushing. You want the energy to go into making flake, and not crushing the edge.
In this next shot, You'll see the flake that I took off of that platform. I used a copper tipped batton (percussion flaker) to hit the platform. the photo is a little confusing, as I've turned the piece over in order for the viewer to see the flake that came off. The photo is not very clear, but you can see it right above the arrowhead blank:

In this next photo, you'll see that I created a new set of platforms from which to take more flakes. Again, my goal is to make a flat rock at this point, so I'm placing my platforms, and preparing to take flakes strategically, so that I can attack the bumps/humps on the blank. In this photo, the platform is set to take flakes off of the bottom of the piece. Note that the platforms are below the centerline of the arrowhead blank.

This next photo is of the same platform - just from the side - so I can illustrate something further about proper platforms. My initial 2 striking areas (platforms) are on the right side of the blank. Notice two important things about those platforms: 1. there is a bevel on top of the platform, as well as on the bottom, and; 2. the platforms are set up along ridges (on the bottom), so that the flake travels down the ridge. Flakes like to travel on ridges:

In this photo, you can see where I took those two flakes. Again, I turned the blank over so that you can see the flakes and the flake scars (actually only one flake...the other one fell into the waste pile!).

Those two flakes pretty much cleaned up this side of the blank. By "cleaned up," I mean that they succeeded in removing bumps and irregularities on the stone. Now this face is flat. I will continue to work around the stone, seeking to make both sides flat and as regular as possible. In so doing, the blank becomes thin.
Here's the other side of the blank. With a few thinning flakes (like above), and some luck, I managed to get both faces reasonably flat, and to get the piece fairly thin. You will note here that I have begun shaping the point a bit.

Here's a view from the side. You can see that there is still some irreguglarity, but this will be remedied by pressure flaking. Also in this photo, you'll see that I set up some platforms for my pressure flaker. As before, the platforms are below the centerline of the blank, they have a bevel on top and on bottom, and they have been strengthened by grinding. What you can't see in the photo, is that where possible, the platforms are set for the flake to follow ridges on the stone where possible (note that each flake creates two ridges - one on either side of the flake scar).

To finish the point (and I'm cutting corners in this narrative), I just continued around the blank, creating platforms where I needed them to thin the piece, remove irregularities, and to create symmetry from both the edge view, and the front face view.
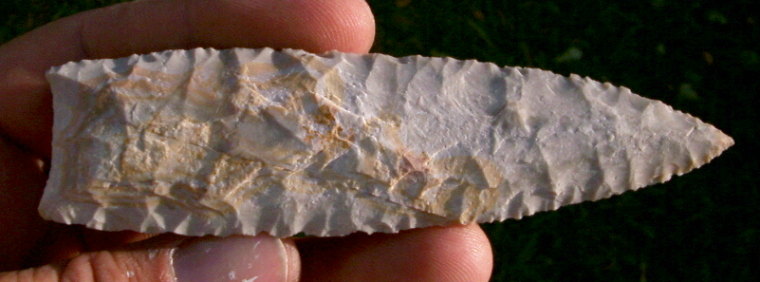
Here's a photo of the finished point:

From the side:

It's not the thinnest point in the world, and certainly not the prettiest! I know the photos and explanations were lacking. Still, I hope it helps (if only a little bit) give you a better understanding than before.
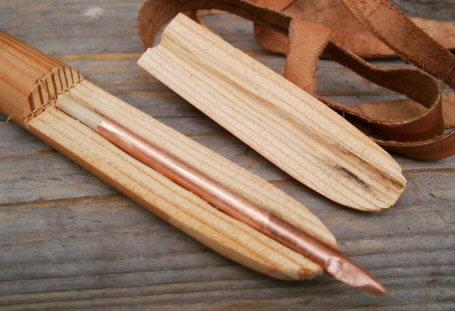
Here's a final few photos of the tools I use:

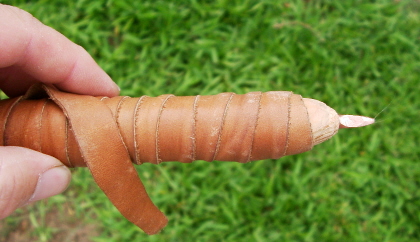
These next and final photos show an easy way to make a pressure flaker using some hardened copper wire:
If you have any questions, fire away and I'll try to answer them.
Cheers,
Tom Mills
This is the flake I started with:
At first, my goal is simply to make this flake as flat as possible. In the ensuing photos, you'll see bumps and humps and irregularities that I will be trying to remove. I'm not worried about making an arrowhead yet...just making a flat stone.
In this next photo, you'll see a hump on the bottom of the stone. I've created a platform from which to attack that hump. A platform is merely the term given to a place on the edge of the stone that I will use to either strike with a percussion tool, or to push with a pressure flaking tool:
That white area is the platform. I've prepared it by using an abrasive stone to grind the edge. Grinding primarily is used to make the edge strong so that it will withstand the strike or the force of the pressure flaking tool without crushing. You want the energy to go into making flake, and not crushing the edge.
In this next shot, You'll see the flake that I took off of that platform. I used a copper tipped batton (percussion flaker) to hit the platform. the photo is a little confusing, as I've turned the piece over in order for the viewer to see the flake that came off. The photo is not very clear, but you can see it right above the arrowhead blank:
In this next photo, you'll see that I created a new set of platforms from which to take more flakes. Again, my goal is to make a flat rock at this point, so I'm placing my platforms, and preparing to take flakes strategically, so that I can attack the bumps/humps on the blank. In this photo, the platform is set to take flakes off of the bottom of the piece. Note that the platforms are below the centerline of the arrowhead blank.
This next photo is of the same platform - just from the side - so I can illustrate something further about proper platforms. My initial 2 striking areas (platforms) are on the right side of the blank. Notice two important things about those platforms: 1. there is a bevel on top of the platform, as well as on the bottom, and; 2. the platforms are set up along ridges (on the bottom), so that the flake travels down the ridge. Flakes like to travel on ridges:
In this photo, you can see where I took those two flakes. Again, I turned the blank over so that you can see the flakes and the flake scars (actually only one flake...the other one fell into the waste pile!).
Those two flakes pretty much cleaned up this side of the blank. By "cleaned up," I mean that they succeeded in removing bumps and irregularities on the stone. Now this face is flat. I will continue to work around the stone, seeking to make both sides flat and as regular as possible. In so doing, the blank becomes thin.
Here's the other side of the blank. With a few thinning flakes (like above), and some luck, I managed to get both faces reasonably flat, and to get the piece fairly thin. You will note here that I have begun shaping the point a bit.
Here's a view from the side. You can see that there is still some irreguglarity, but this will be remedied by pressure flaking. Also in this photo, you'll see that I set up some platforms for my pressure flaker. As before, the platforms are below the centerline of the blank, they have a bevel on top and on bottom, and they have been strengthened by grinding. What you can't see in the photo, is that where possible, the platforms are set for the flake to follow ridges on the stone where possible (note that each flake creates two ridges - one on either side of the flake scar).
To finish the point (and I'm cutting corners in this narrative), I just continued around the blank, creating platforms where I needed them to thin the piece, remove irregularities, and to create symmetry from both the edge view, and the front face view.
Here's a photo of the finished point:
From the side:
It's not the thinnest point in the world, and certainly not the prettiest! I know the photos and explanations were lacking. Still, I hope it helps (if only a little bit) give you a better understanding than before.
Here's a final few photos of the tools I use:
These next and final photos show an easy way to make a pressure flaker using some hardened copper wire:
If you have any questions, fire away and I'll try to answer them.
Cheers,
Tom Mills