Leatherwork question - possibles pouch DIY

  • Hey Guest, Early bird pricing on the Summer Moot (29th July - 10th August) available until April 6th, we'd love you to come. PLEASE CLICK HERE to early bird price and get more information.

redcollective

Settler
Dec 31, 2004
632
17
West Yorkshire
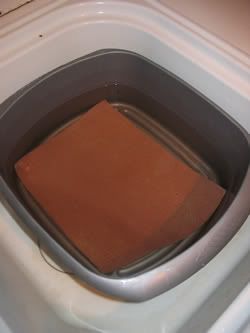
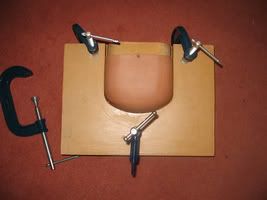
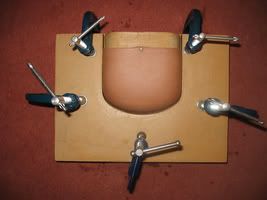
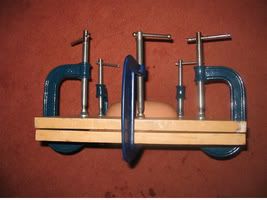
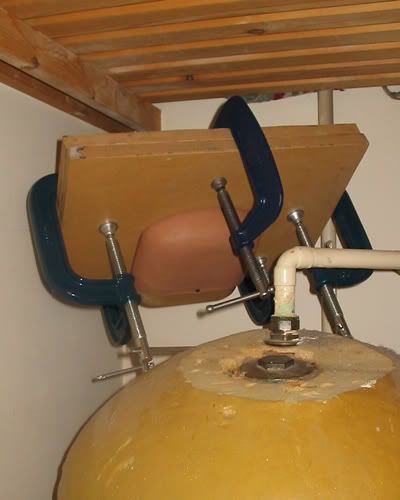
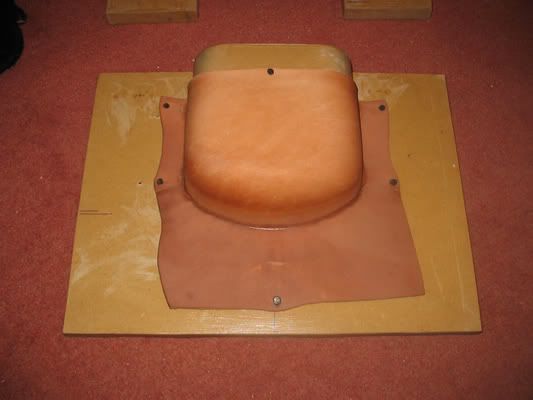
Having just finished my fourth, but first *passable* sheath (the first three were unholy abominations which had to be destroyed before they brought all manners of evil on this world - perhaps that's an exaggeration but I assure you they were butt ugly), and finding myself rather bored with SWMBO on holiday in Aus, I'm eager to try something ambitious to while away the evening hours after work.

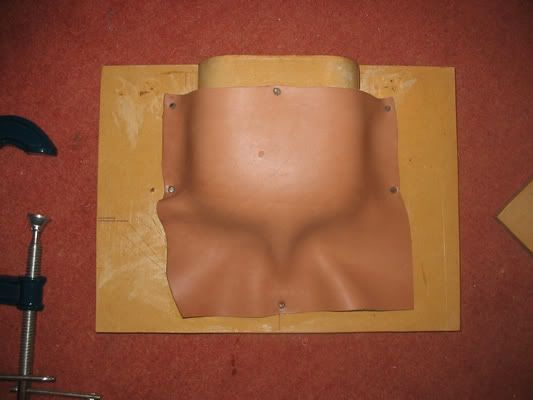
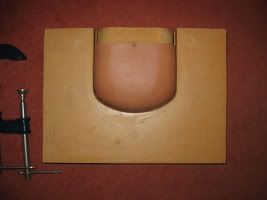
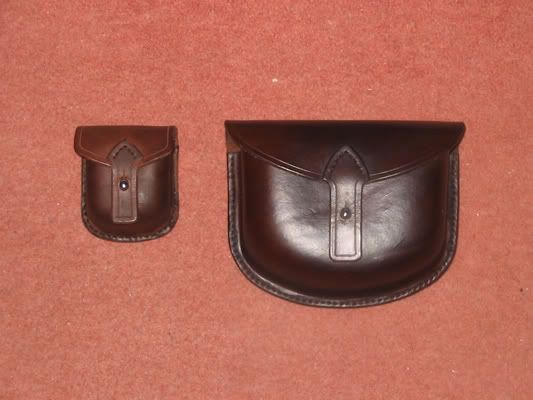
So my idea is a possibles pouch, in the style of the ones you can see on the bearclaw website:
http://www.bearclawbushcraft.co.uk/trading/misc.htm

- the moulded looking one at the top.

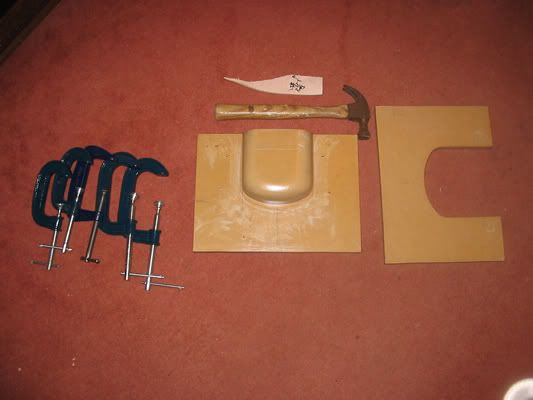
I've got 3mm veg tan leather and lots of enthusiasm but no idea where to start. Any ideas?
 

Longstrider

Settler
Sep 6, 2005
990
12
59
South Northants
As you have already started making sheaths I guess it's safe to assume that you have the tools you will need for the project... Knife, straight edge, needles, thread, awl or drill etc etc.

Draw up a pattern and make sure you have enough leather. You'll be surprised at how many people fail at this stage! *LOL* Wet moulding the front of the pouch will require a little more leather than the back piece don't forget. Best to start with a plan of the finished size of the back but leave plenty of room around that when cutting the leather for the front so as to allow for the extra needed. Soak the leather prior to moulding and either form it over, or in a wooden mould (as I prefer to do) or work it to shape by forming with a smooth tool (others will be able to give more precise info on this).
Stitching should be no more difficult than whilst sheath making.
As with so many projects, the best way to see if you can do it is to plan as much as you can in your head/ on paper, then give it a go. The first attempt might not be all you had hoped for, but you learn with every piece you make and get better and better over time.
With all jobs that start with raw material and end with a product, remember to always "Measure twice, Cut once" and if in doubt, cut off less than you think you need to, you can always trim later but cannot add leather back on.
 

JohnC

Full Member
Jun 28, 2005
2,624
82
62
Edinburgh
make a full scale model from an old cardboard box, staples and tape. get the shape etc right, then cut it up to get the shape to use as a template for the real thing. If you've got offcuts of vinyl floor covering, it works too.
 
I use paper grocery bags to make my patterns. Note the big kukri sheath with separate belt loop. Wish I had a machine stitcher.

Cnv0008.jpg
 

redcollective

Settler
Dec 31, 2004
632
17
West Yorkshire
Am proceding with a cardboard prototype. Making a mould might be a little bit too far for me at this stage: does anyone have any tips on using tools to form the shape? Do you stitch the front and back together first and then wet form it like a sheath or stretch it about a bit first and then stitch it together?. I'm having difficulty visualising the process and not imagining something like a pair of rams proverbials as the end result!

Hmm I have more questions now. How many times can you re-wet leather? I think it would take me a few nights to stitch it all together.
 

jdlenton

Full Member
Dec 14, 2004
3,002
7
50
Northampton
Hi stu I also use a mould when making pouches I'll post some photos of my latest pouch and mould when I get home, I'm going to mould another front tonight so that will be an ideal opportunity . You can I believe sew two pieces of leather together, soak tahm then pop in a block of wood as a former and burnish it to the right shape with a bone folder but I’ve never done it or read about it, also with this technique I don’t think you would end up with a flat back.

If you like the look of the shape of my mould I could mould you a front and you can do the rest its the same mould as the one thats in the maker market but i've been making them a little shorter again i'll post you some pic later

James.
 

match

Settler
Sep 29, 2004
707
8
Edinburgh
I've been told that a good thing for a mould is to find a tupperware box thats about the right size and shape for your finished pouch - these are usually fairly sturdy and have round bottoms and so can be used for pressing the front edge into a nice rounded shape. This is also useful as you can try shoving everything you want into the box first, and if it all doesn't fit, you know your pouch will also be too small :D
 

ESpy

Settler
Aug 28, 2003
925
57
53
Hampshire
www.britishblades.com
redcollective said:
Am proceding with a cardboard prototype. Making a mould might be a little bit too far for me at this stage: does anyone have any tips on using tools to form the shape? Do you stitch the front and back together first and then wet form it like a sheath or stretch it about a bit first and then stitch it together?. I'm having difficulty visualising the process and not imagining something like a pair of rams proverbials as the end result!

The "moulded looking" ones are wet formed fronts with a 2-part wooden mould, done in 3.5mm veg tan. The backs are flat.

I used a bandsaw to rough out the shape of the front from some scrap pine, then refined it to the shape I wanted with rasps, files & sandpapers. The mould front was then glued & screwed onto a backing board (in this case flooring chipboard as it was handy) and given a few coats of varnish to protect the wood. The female half of the mould is a thick piece of plywood - also varnished - with adequate clearance around the former. Sharp internal corners get radiussed. In use, the leather is roughly formed over the mould, then the plywood is clamped on & pressure evenly built up to get it to do what I want. Once it is fully dry, it is removed from the mould, glued to the back & sewn.

As for stretching wet forms - both Bardster & I also use sand to form damp leather; I've made myself a leather sandbag for jewellery work where the sand is left in. Well, I didn't like the price of the commercial ones :D

Hmm I have more questions now. How many times can you re-wet leather? I think it would take me a few nights to stitch it all together.

Don't let it dry out & re-wet it; if you need more time pop it in a plastic bag & keep it in the fridge. If left in the fridge longer than about 2 weeks it will probably go mouldy... :rolleyes:
 

redcollective

Settler
Dec 31, 2004
632
17
West Yorkshire
ESpy said:
The female half of the mould is a thick piece of plywood - also varnished - with adequate clearance around the former. Sharp internal corners get radiussed. In use, the leather is roughly formed over the mould, then the plywood is clamped on & pressure evenly built up to get it to do what I want. Once it is fully dry, it is removed from the mould, glued to the back & sewn.

So the female part of the mould is flat with a hole in it an sits over like a collar?
 

redcollective

Settler
Dec 31, 2004
632
17
West Yorkshire
jdlenton said:
Hi stu I also use a mould when making pouches I'll post some photos of my latest pouch and mould when I get home, I'm going to mould another front tonight so that will be an ideal opportunity . You can I believe sew two pieces of leather together, soak tahm then pop in a block of wood as a former and burnish it to the right shape with a bone folder but I’ve never done it or read about it, also with this technique I don’t think you would end up with a flat back.

A picture would be great... that's an absolutely generous offer of you to make the front by the way - however I don't reckon I'd learn as much - and without sounding ungrateful I;ll try to bumble through it. This mould idea is not sounding so scary now!
 

jdlenton

Full Member
Dec 14, 2004
3,002
7
50
Northampton
redcollective said:
A picture would be great... that's an absolutely generous offer of you to make the front by the way - however I don't reckon I'd learn as much - and without sounding ungrateful I;ll try to bumble through it. This mould idea is not sounding so scary now!

No problem the offer is still open if you don’t make your mould as quickly as you would like.

I didn't get chance to do a pouch front last night as I was fighting with a small but very deep wet mould project but I will tonight as last nights struggle worked :D


Just to make the mould sound even less scary my mould was made of 15 MDF from B&Q with a jig saw and some hand tools a few screws, PVA and some varnish. It only took a couple hours and in there nights I wet from nothing to a moulded pouch front never having done much leather work or any wet moulding.

I was reading one of Al Stoleman’s books last night and he had some nice advice about soaking the leather pre forming. The first thing he said was the leather can never be too wet, the second was soak the leather with the grain side down and that a good rule of thumb was to soak it until all the bubbles stop coming out of the leather and finally he said there are no hard and fast rules about soaking leather it could take ten minutes it could take all night only by practice will you get to know how the leather feels when it right for wet forming.

My only tip from experience is use warm water and dont make it too hot like i did in one of my experiments the leather does not like it.

James
 

redcollective

Settler
Dec 31, 2004
632
17
West Yorkshire
I think I'm going to start with a very small mould for my GPS - I figure it will give me the principles without the effort of a larger version and then I can just scale it up!

Thanks for all your pointers folks. This place is great.
 

ESpy

Settler
Aug 28, 2003
925
57
53
Hampshire
www.britishblades.com
redcollective said:
I think I'm going to start with a very small mould for my GPS - I figure it will give me the principles without the effort of a larger version and then I can just scale it up!

If you're doing a flapped pouch for something like that, can I strongly recommend *agains* using a press stud? The plastic windows of modern kit don't much like the point pressure that needs to be exerted to close them.

Guess how I know...
 

redcollective

Settler
Dec 31, 2004
632
17
West Yorkshire
ESpy said:
If you're doing a flapped pouch for something like that, can I strongly recommend *agains* using a press stud? The plastic windows of modern kit don't much like the point pressure that needs to be exerted to close them.

Guess how I know...


Oh jeeeez that's tough lesson to learn isn't it - thanks for the warning I was thinking exactly of using one!
 

jdlenton

Full Member
Dec 14, 2004
3,002
7
50
Northampton
Right I said I would take photos and I have. :)
I decided to record the whole process and put it here for reference this is not intended as a tutorial on how to wet mould as I don’t know if I’m doing it right. This description is how I do it I’ve only read bits on the net and a few books, taken advice from BCUK users and used trial and error to get the results I get.
If anyone sees anything I can improve or has any tips they wish to share that I’ve missed please do
Step 1. Make two part mould

mould.jpg


Step 2. Soak leather in warm water grain side down until all bubbles stop and leather feels stretchy

soak.jpg


Step 3. Get everything ready and to hand for forming so it can all happen before the leather cools and dries too much

everythingready.jpg


Step 4. Put leather on mould and start to form with hands I have found that nailing the leather to the form in places helps as the leather stays where I put I and stretches against the form better. I have no hard and fast rules about the best position of the nails, in this case I have found them by trial and error.

leatheron.jpg


Step 5. Apply female part of the mould at this point I squeeze the form on with my hand then gently kneel on it to start the leather stretching. I look in between the two boards to see it the leather has pleated over on its self if it starts to I remove the male part and cut slits or triangles out of the fringe leather so the pleat is removed and the fringe can lie flat without overlapping (I don’t cut any where near the bit I want for the finished item)

colaron.jpg


Step 6. Once I have no pleats or overlaps I apply the first clamps and gently apply more and more pressure gradually stretching the leather all the time looking to see if more pleats/overlaps start to form ( if they do i remove the female part and trim again as described above) and that the grain of the leather is not getting damaged.

littlepressuretostart.jpg


Step7. As the two boards start to get closer I apply the last of the clamps to give a more even distribution of pressure and carry on applying pressure until both the boards are just the thickness of the leather apart

evenpressureallround.jpg


clampedup.jpg


Step 8. The whole assembly is then put some where warm (but not too hot) so the leather can dry slowly

warmanddry.jpg


Step 9. Once you think the leather is dry you can remove the clamps and female mould the leather in between the two boards will take longer to dry than the exposed leather if the leather is still damp reapply the mould and claps and leave to dry further I usually leave mine 18 to 24 hours

removecollarandinspect.jpg


Step 10. When completely dry remove leather and trim to desired shape ready for fabrication of finished object

Here are two of my most recent pouches the one on the left was dyed last night and has not been oiled and polished eventually it will have the same finish as the pouch on the right .
The small one fits my petzel tika and the large one is a standard possibles pouch.


done.jpg


hope this all helps answer any questions and as I said right at the top any hits and tips are most welcome.

happy leather work :D

James

EDIT
P.S. I got my G clamps from Wilkinson’s for a couple of quid each 4 for the same price as 1 @ B&Q
 
  • Like
Reactions: Willowbark

ESpy

Settler
Aug 28, 2003
925
57
53
Hampshire
www.britishblades.com
Couple of minor deviations from that that I do...

1) I case the leather overnight in a poly bag in the fridge after soaking it - I want it damp & pliable, not sopping.
2) Speedcramps (e.g. from Screwfix) are much easier to put on than G cramps ;)
3) I don't nail (never got around to trying it and I don't like steel near the leather)
4) I tend not to put darts in - I can usually sculpt the leather 'round the mould without them.

Lukewarm water is what I usually use - if the water is too hot, you'll cook the leather (as you've already alluded to).

More than one way to skin a cat... :)
 

BCUK Shop

We have a a number of knives, T-Shirts and other items for sale.

SHOP HERE