I started this thread to document my learning process during my first time through the restoration of a council tool and collins legitimus. This is an ongoing process!
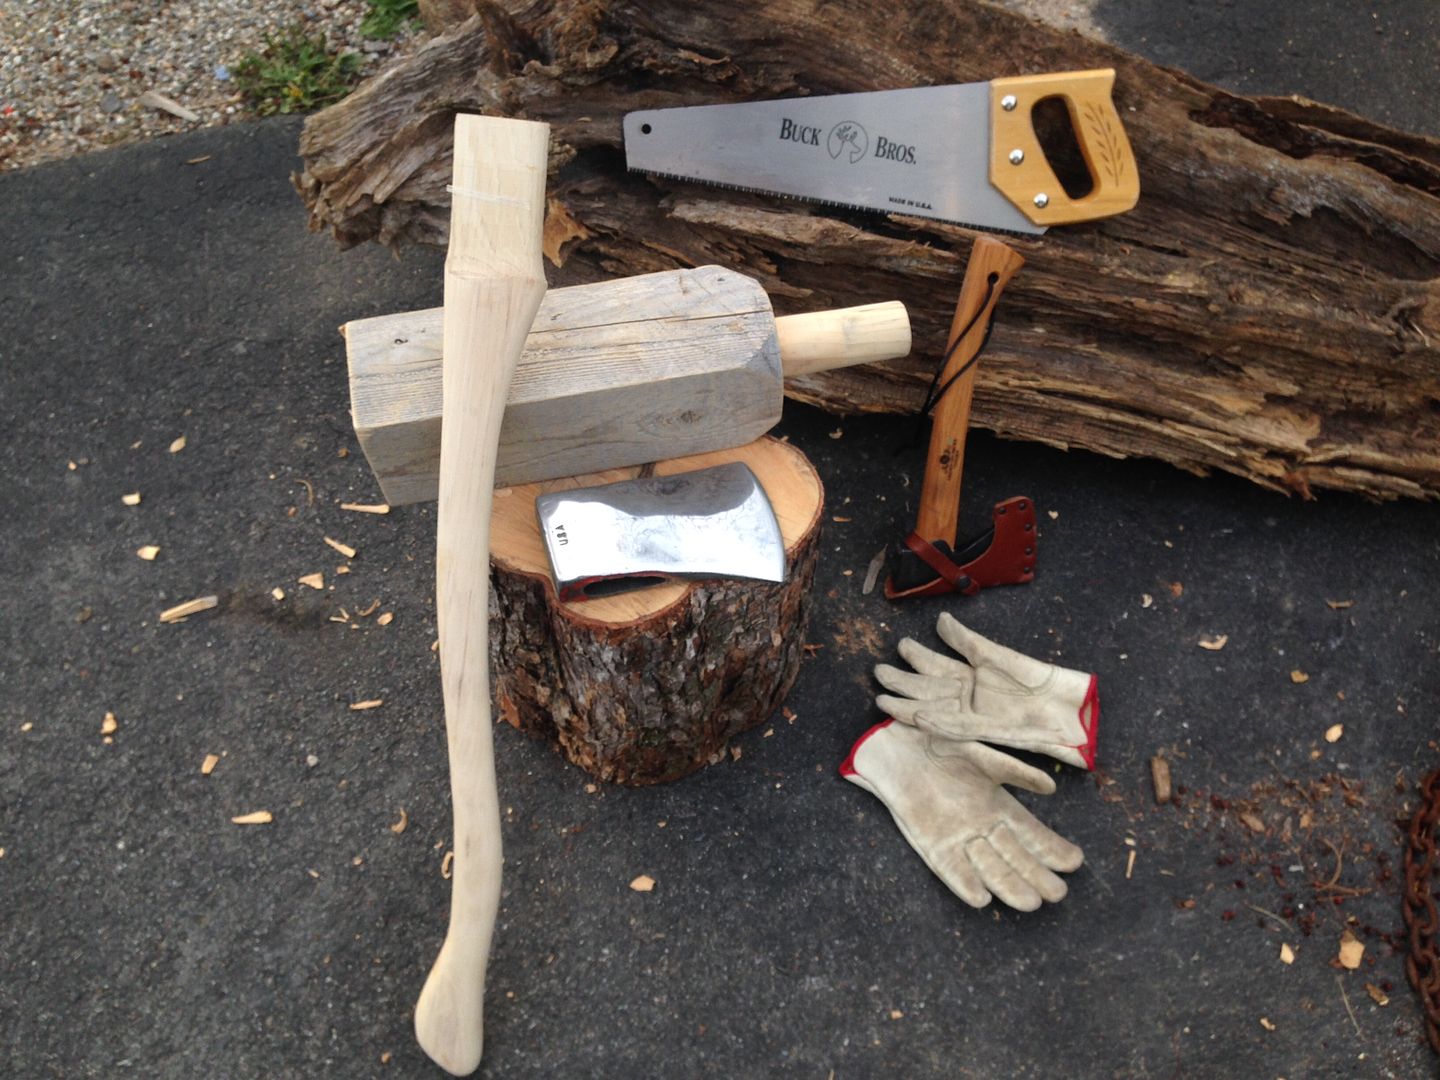
Following my recent fail to acquire a GB SFA from LLBean and some unfortunate financial developments at tax time; I decided to save the money and head out to the shed and see what I might restore. I had a badly rusted 3.5 lb council tool Dayton (age unknown) and an un identified double bit, also 3.5. Only markings on the double bit is text "3 1/2". The Council is badly banged up and I have no idea what sort of activity it was subjected to.
I struggled through the removal of the helves as I don't have a proper work area. I'm following approaches I learned here but I have limited resources. I forgot to take shots before the vinegar bath too! These photos are post bath, and post sanding of the council. I have not sanded the double bit yet. I'd like to put a short, maybe 26" on the council tool.

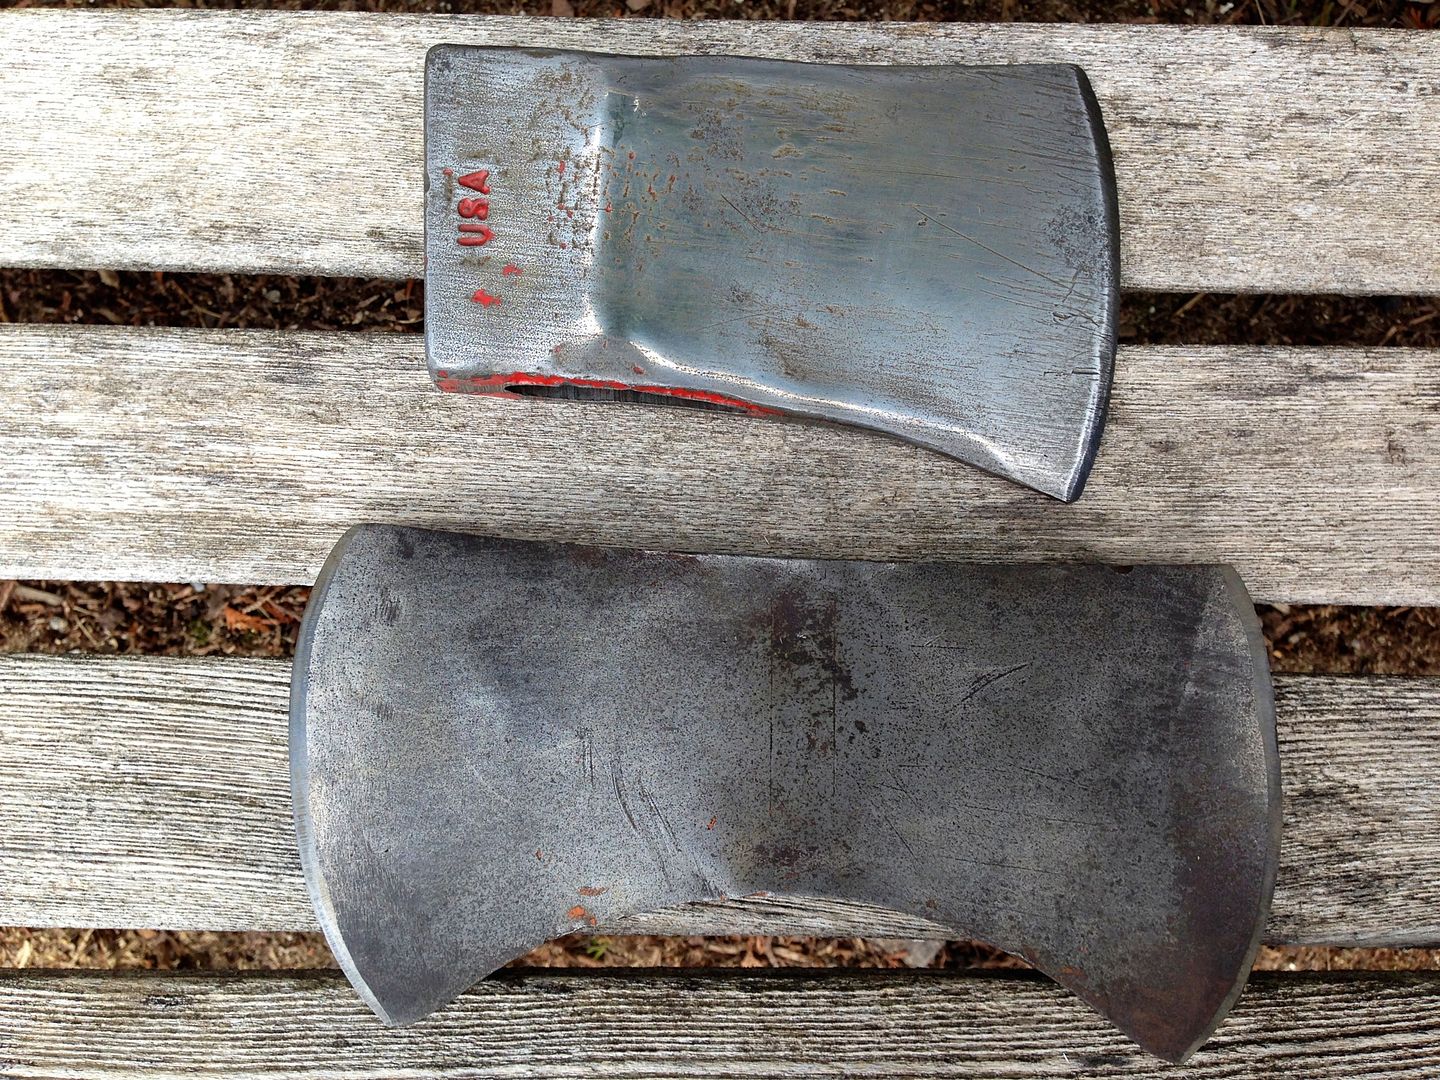
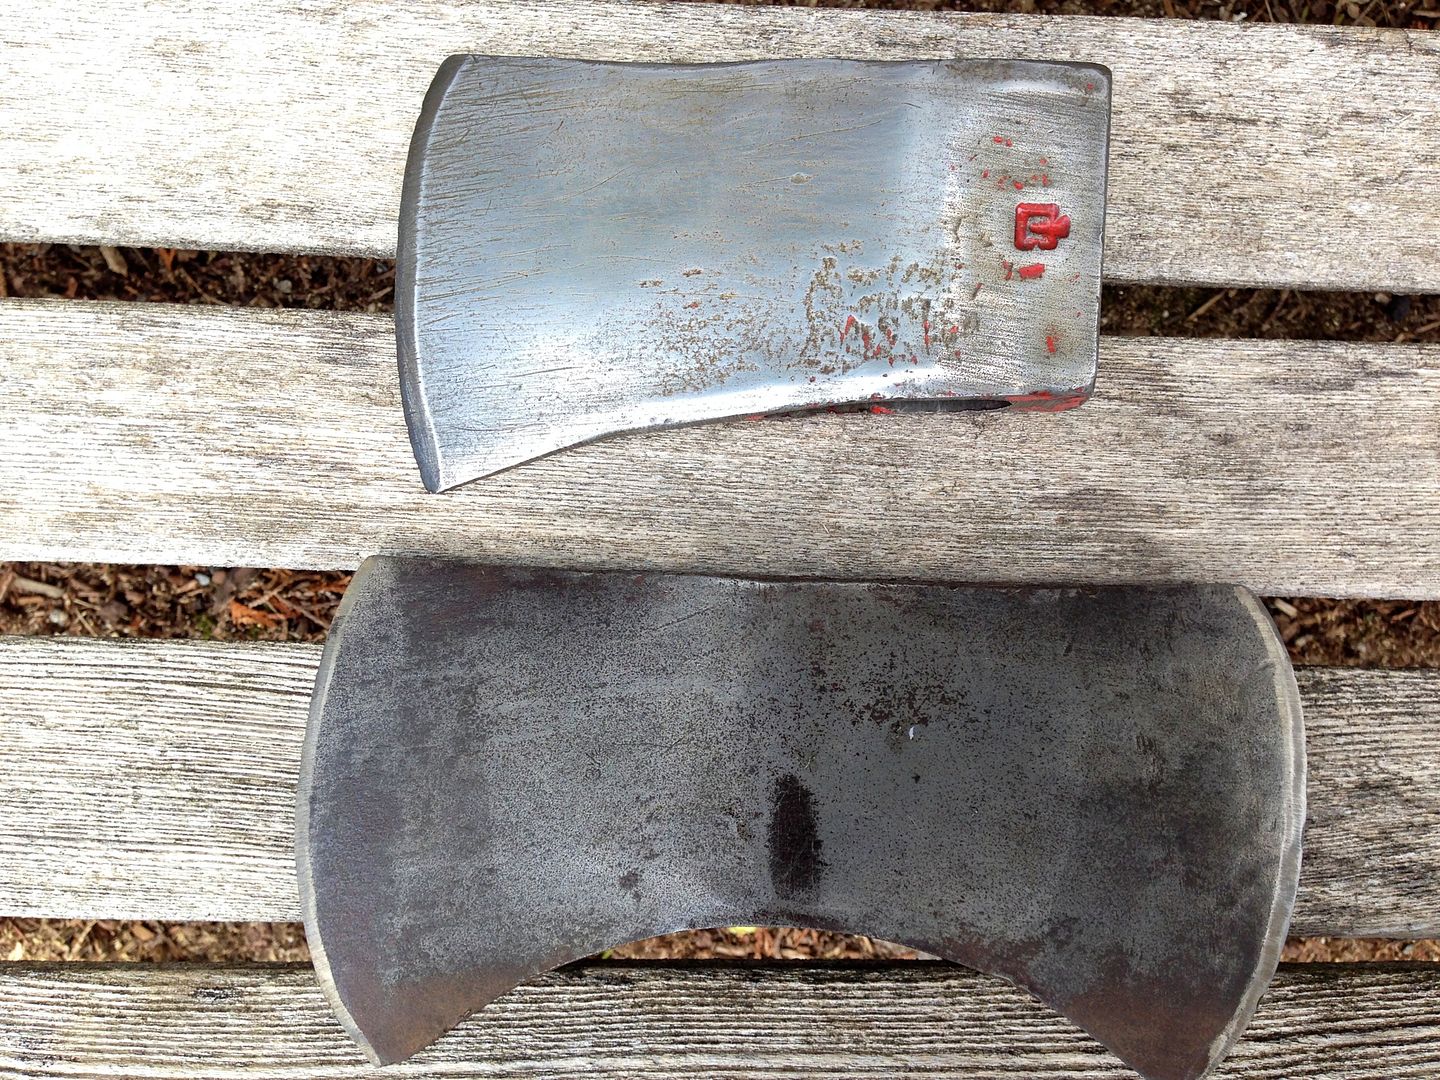
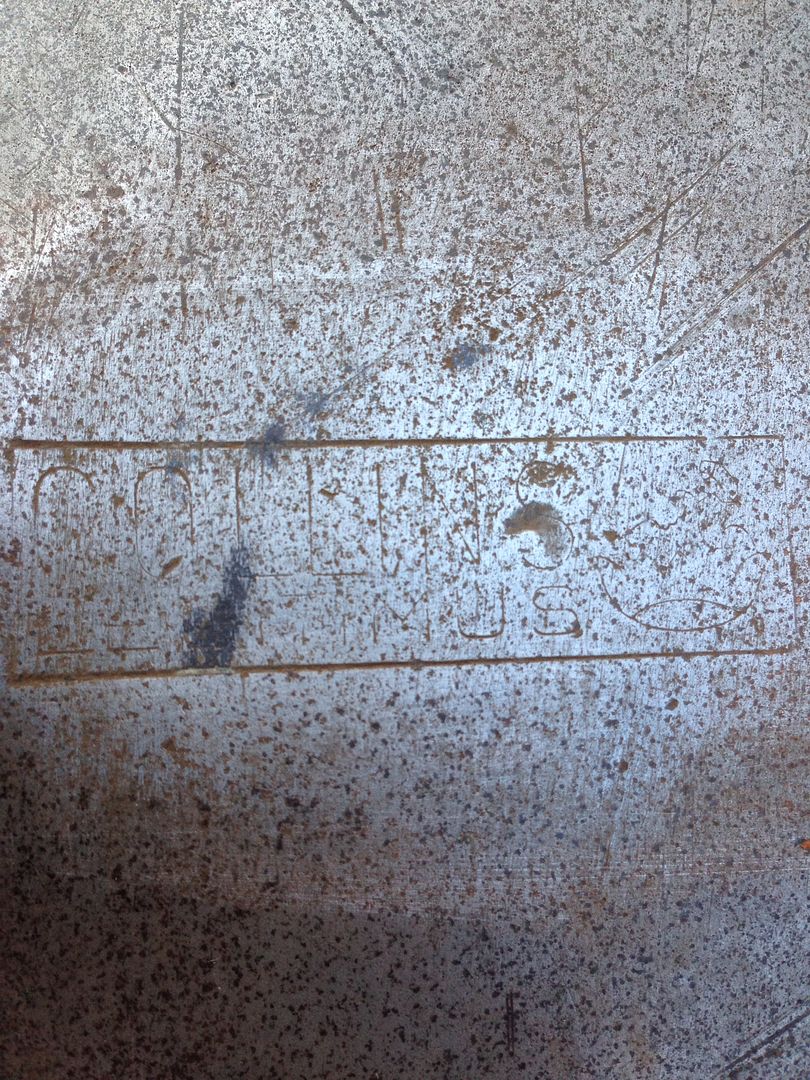
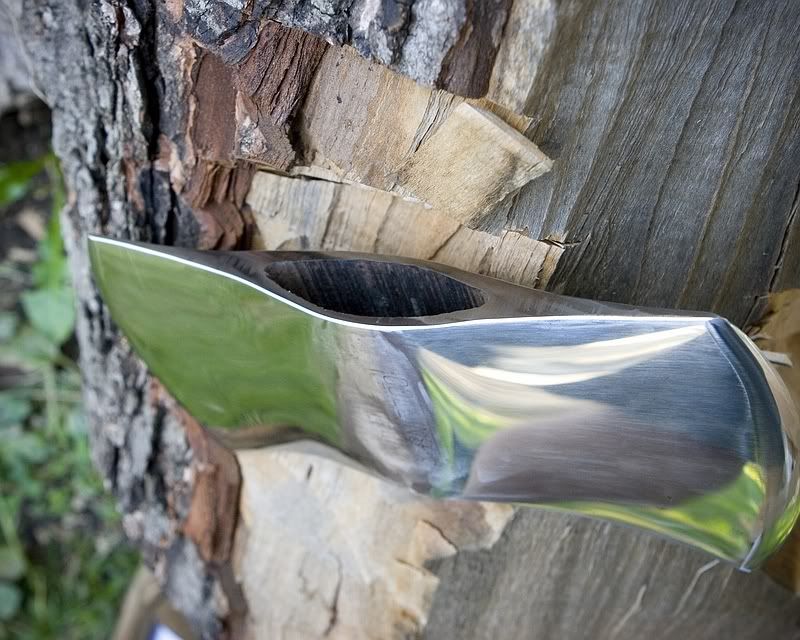
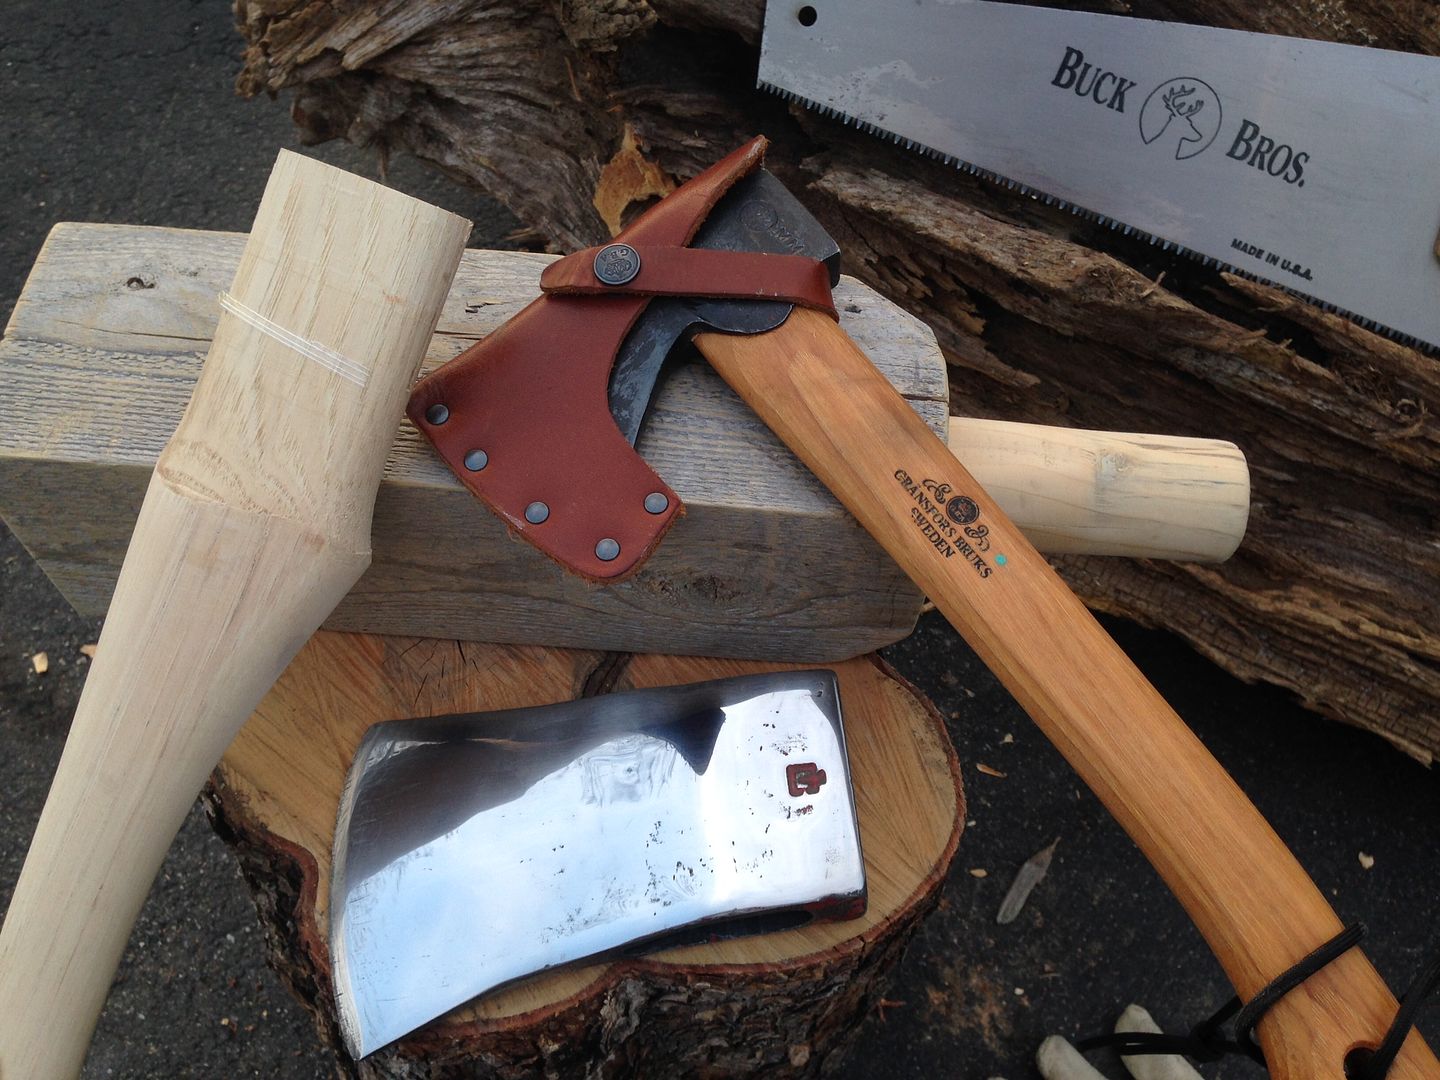
After a bit of work the double bit reveals a logo. Collins Legitimus. Any idea how old? With a little research and feedback from friends online, I learned that Collins Legitimus went out of production in 1966 so this is at least as old. I found this example online of a restore of the same Collins head. It's mirror finish is amazing and started out just like mine. Does one need tools to accomplish this, I wondered.
______________________________
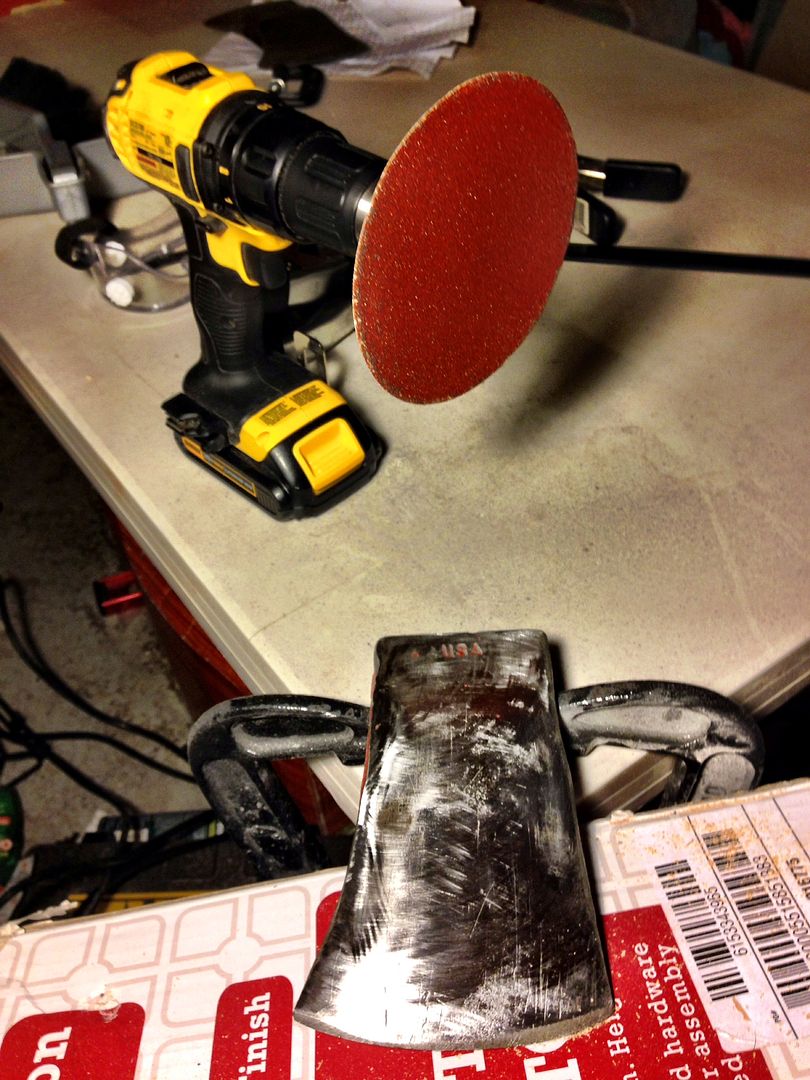
Did a little looking at Lowes and I took a giant leap ahead in power today by investing in a Gator brand sanding attachment for my drill. Actually invest is not the right term - it's only about $5. Yahoo! Now I can take this to the level I want more quickly. The product came with three stick on disks 60, 100 & 150 grit. Starting with 60 grit:
It was quite simple to remove major pits and deep scratches.
Graduated from 60 grit to 100 deciding I was not going to remove more steel. Pits and deeper scratches that remain, I'm leaving for "character" sake.

I went to hand sanding mode now after finishing 150 grit on drill. Here it is after I did one side by hand with 220 - it's starting to look good!
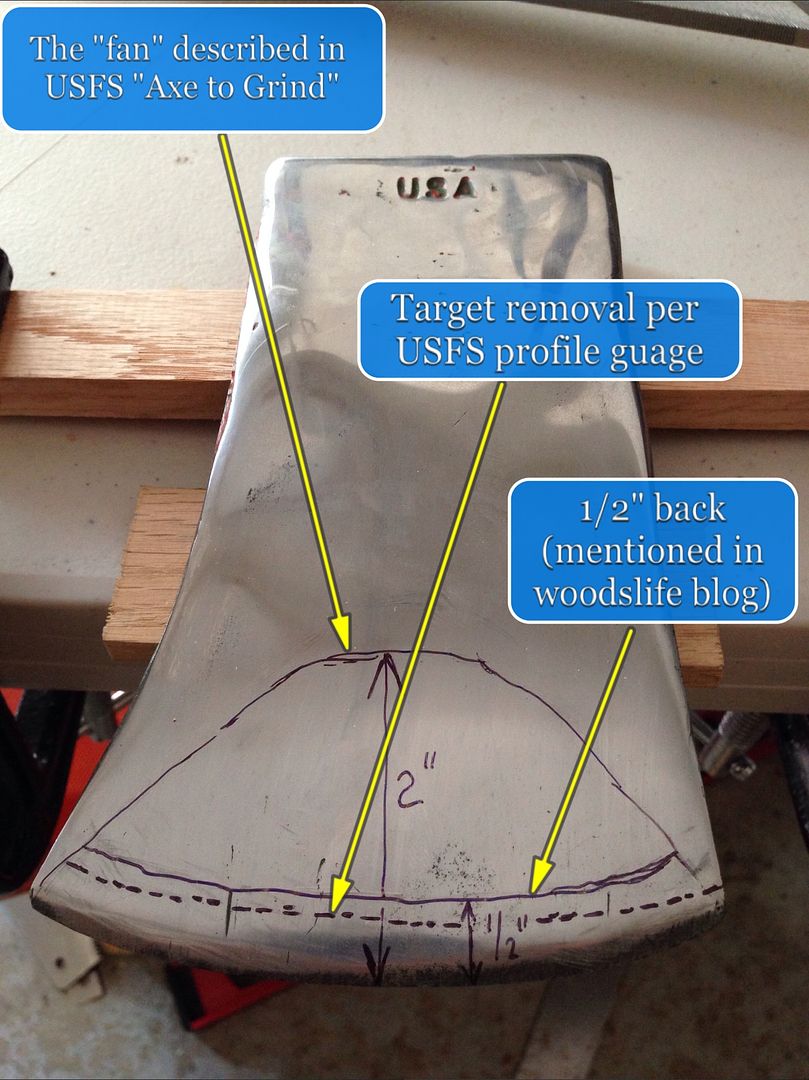
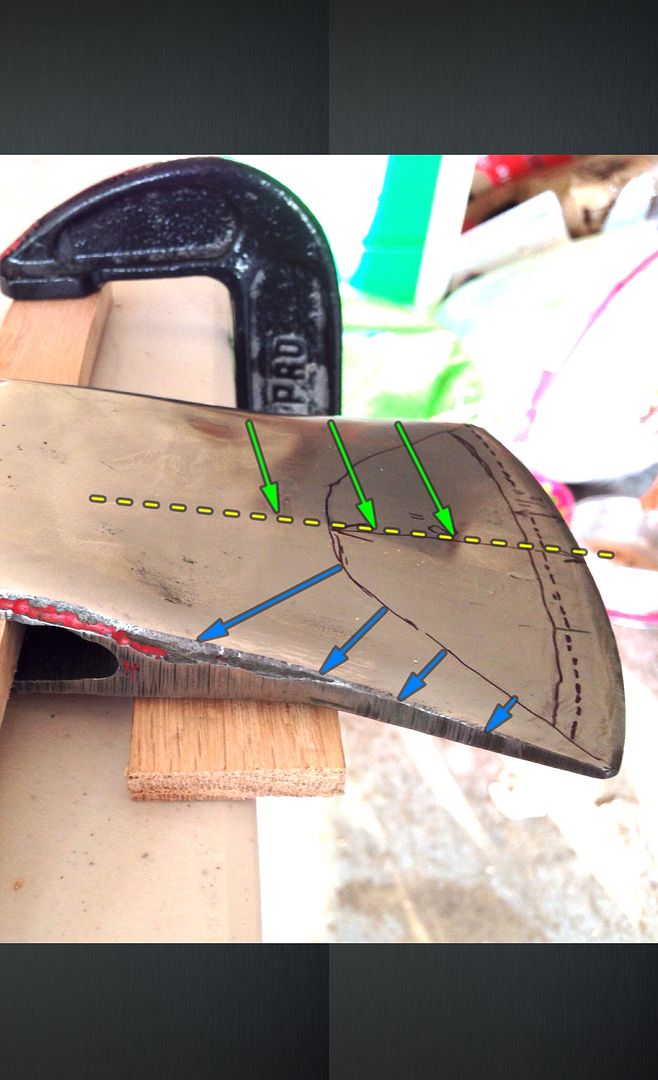
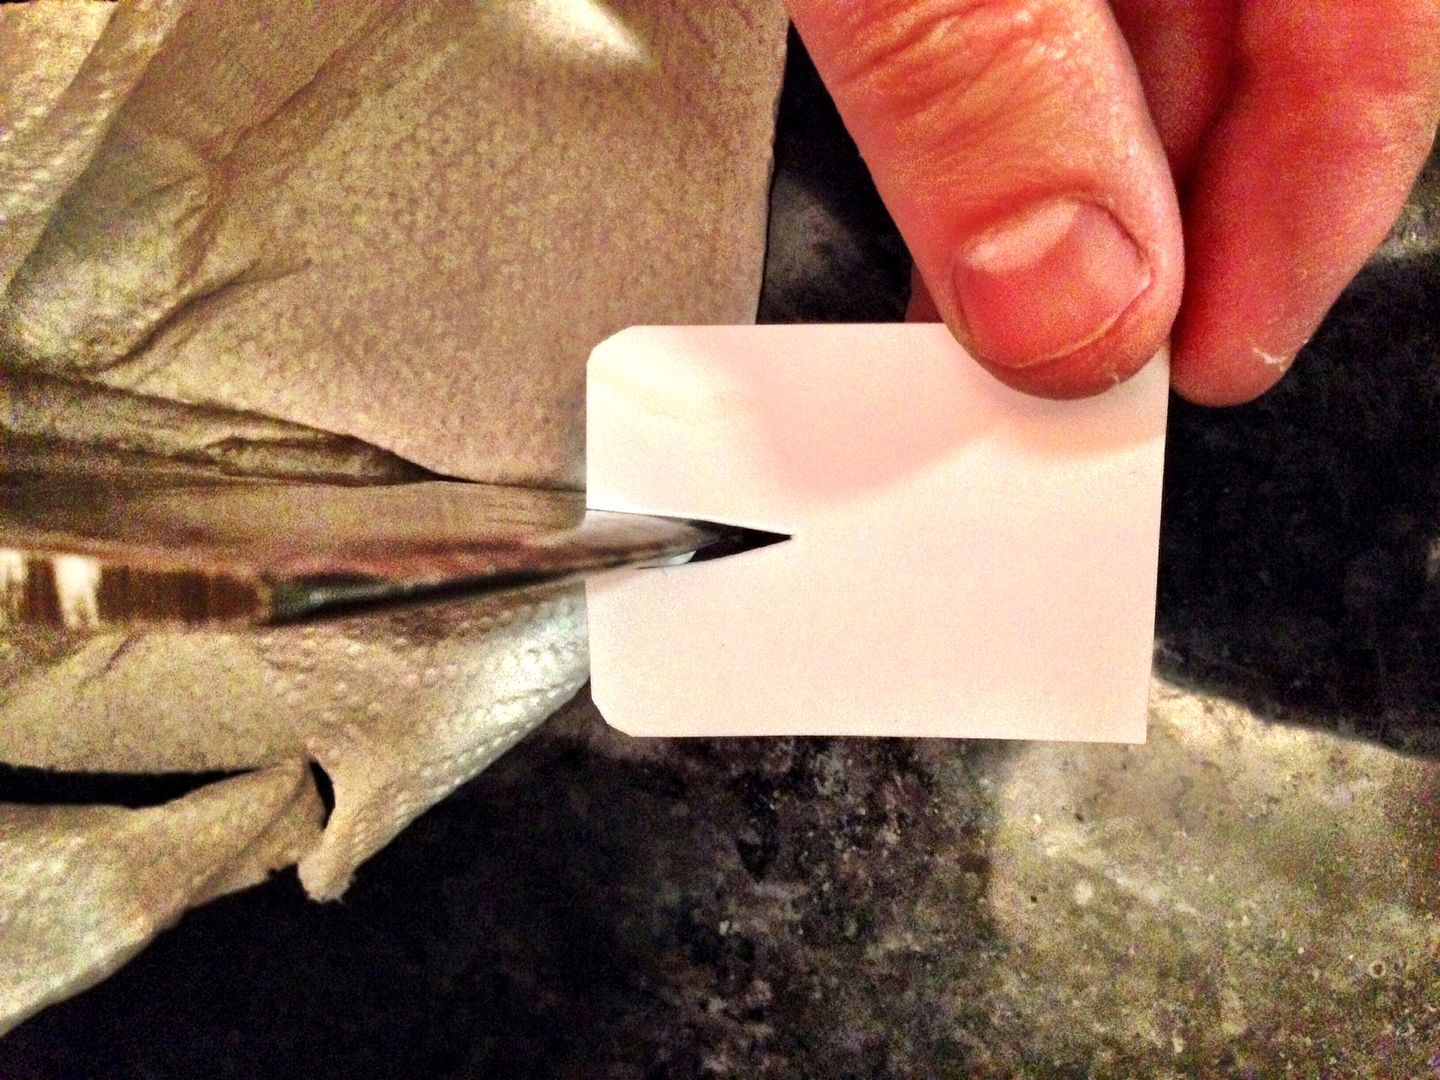
I printed up a profile guide from the forest service publication "an axe to grind". It's cool! This photo shows where the guide "hits" indicating I've got some meat to remove when I get to filing.
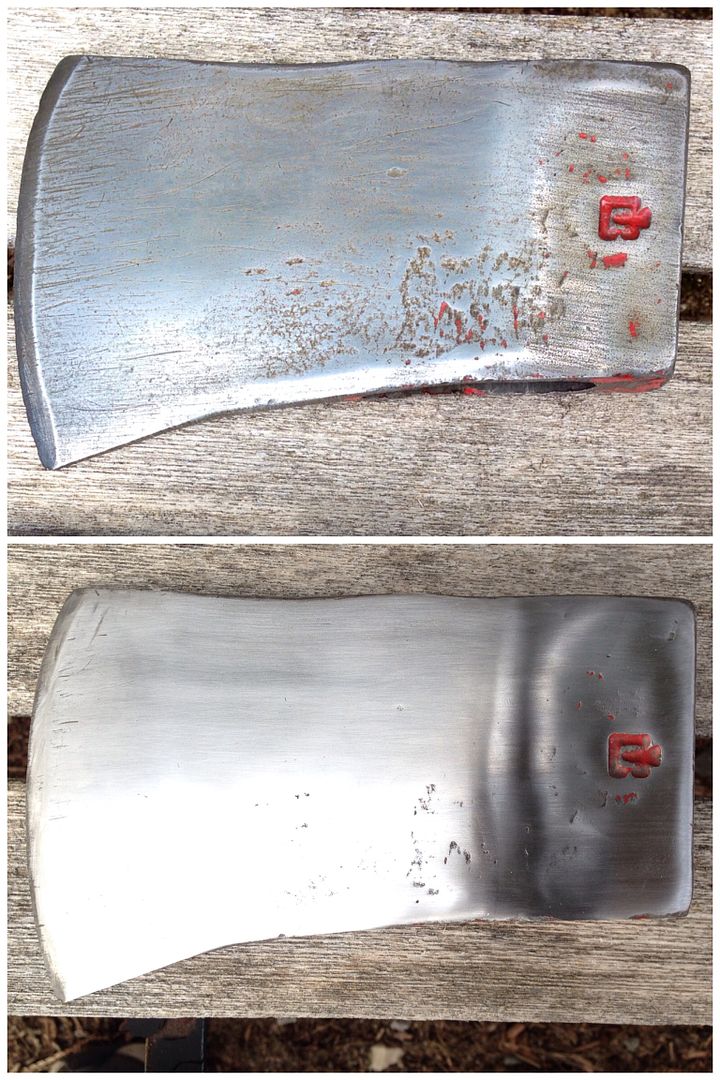
Got both sides sanded to 220 grit. All major scratches are gone except at bit where I believe they are in the file zone and will be cleaned up when sharpening. Below see first pic and current condition. Like a true fool I jumped into this without ever taking the real "before" pic when it was all rusted in the shed!!
_______________________________
I just bought handles for this and the Collins - thanks forum friends for the tip on house handle website. Have a look at the Collins in the first couple photos. I vinegar bathed it to remove surface rust, but nothing else yet. I'm tempted to leave it's natural patina rather than sand shiny like I'm doing the council - thoughts?
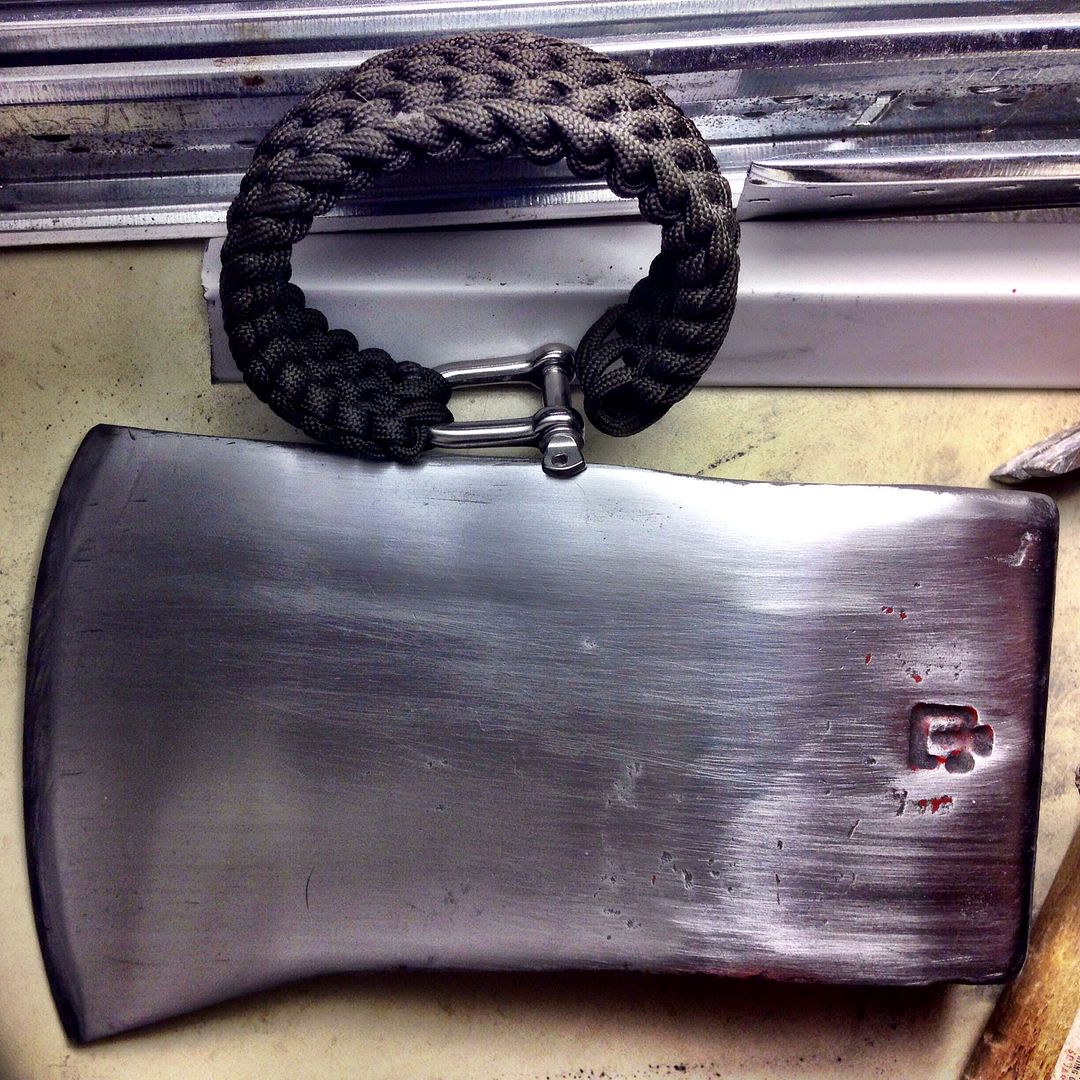
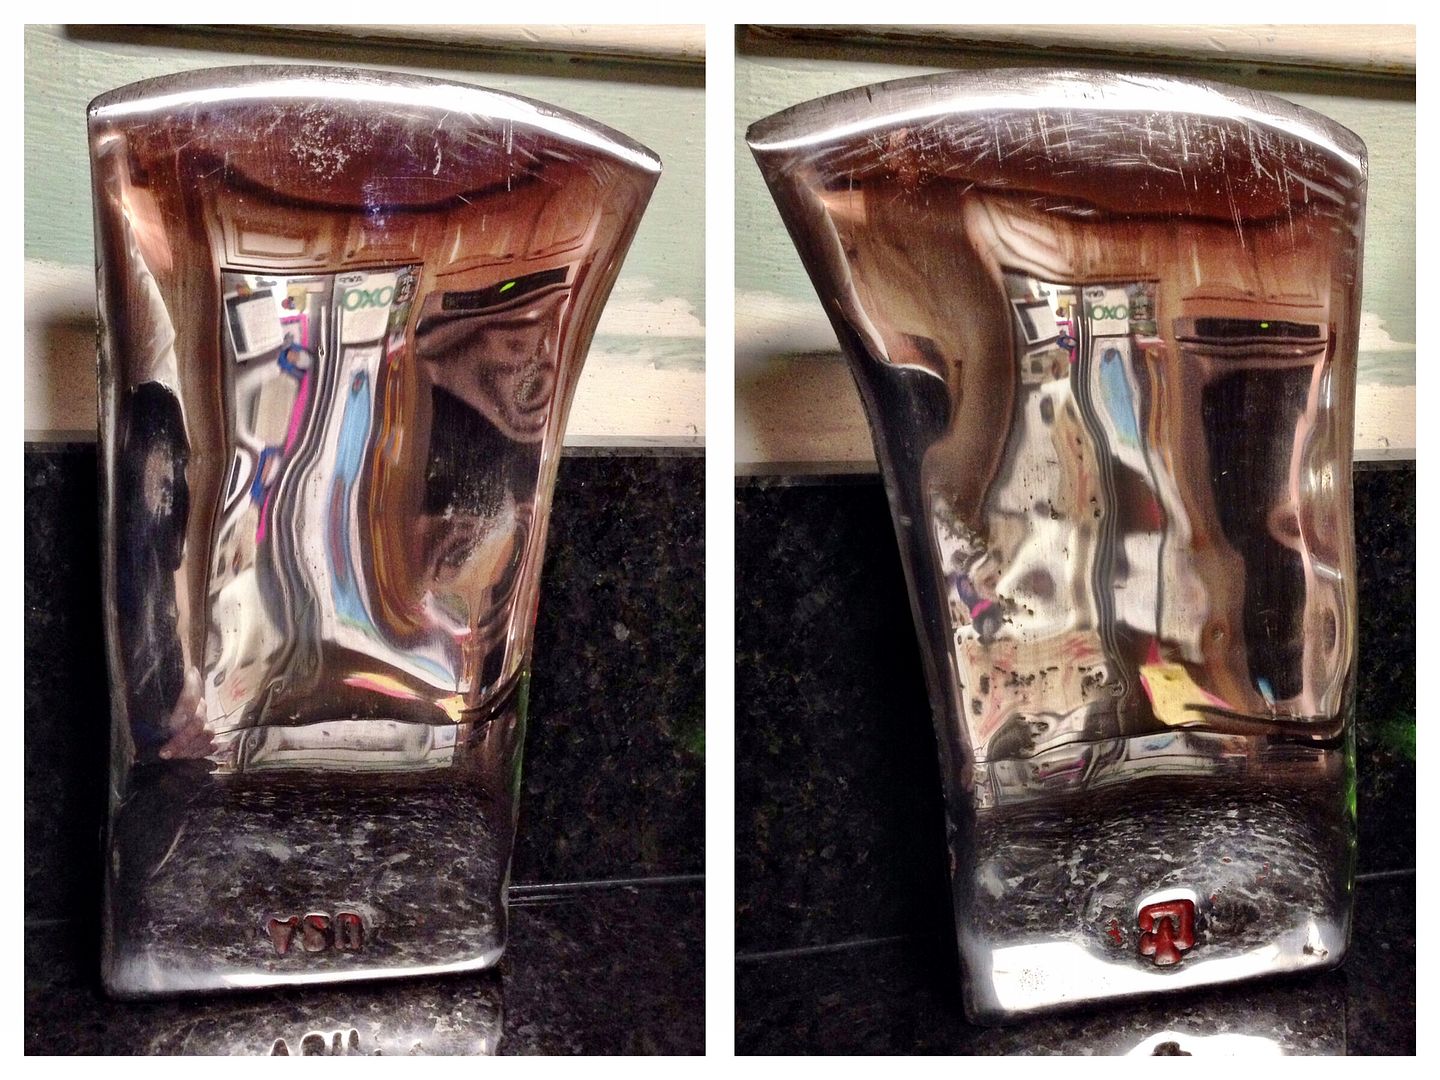
Well after doing the 400 and 600, I did a quick five minutes each with my 1000 and 2000 wet dry sandpapers on the Council. I promise I'm not going to be neurotic about trying to keep this shine once this becomes a woods axe. Since this is my very first restore, I wanted to see how far i could take it for experience. Next step going to work on reprofiling the edge using the USFS guide I posted a bit ago and a file.
At this point in my journey I've reached a mirror finish on the Council Tool, and resigned myself to put the Collins on hold until I "learn my way" through the Council project. If you saw my other post, you know that I recently scored a Grandfors Bruks Wildlife Hatchet at a giveaway price; but it didn't affect my desire to do these restorations. In fact, I am enjoying this activity more and more with each step I take.
A week or so ago I bought my handles from House Handles; a website with great prices, selection and high quality handles. Shipping is also at cost which is nice. If you order from them, be sure to request "select grain handles" and no finish (you'll want to linseed it yourself). They up charge a couple bucks for this but its worth it.
While waiting for the handles to arrive, I methodically planned my next steps by reading anything and everything I could find on the topic of refinishing axes, axe re-profiling, axe sharpening, axe hanging as well as general axe use, maintenance and care materials.
[video=youtube;Xz3rs-eaN3E]https://www.youtube.com/watch?v=Xz3rs-eaN3E[/video]
When I found a great resources, I read and re-read them. From these works I formed a list of things I'd like to make and/or acquire to get through future project steps - like a wooden carpenter's mallet, some proper files, wood rasp, linseed oil, Swel-Lok, file card, Wonderbar rust eraser... In addition to the regular advice and feedback from the forums, I have found the following to be indispensable:
1. An Axe to Grind on youtube by the U.S. Forest Service Axe to Grind by the U.S. Forest Service as well as the detailed PDF of the same title.
2. The Woods Life Blog has three fantastic blogs on axe restoration and care.
My plan is to reprofile the Council Tool with a file soon because the cheek is just too thick. I realize now that I might have been better off doing this before the fine grit sanding work I've done, but I don't mind doing it again as my goal is to do it right first and foremost.
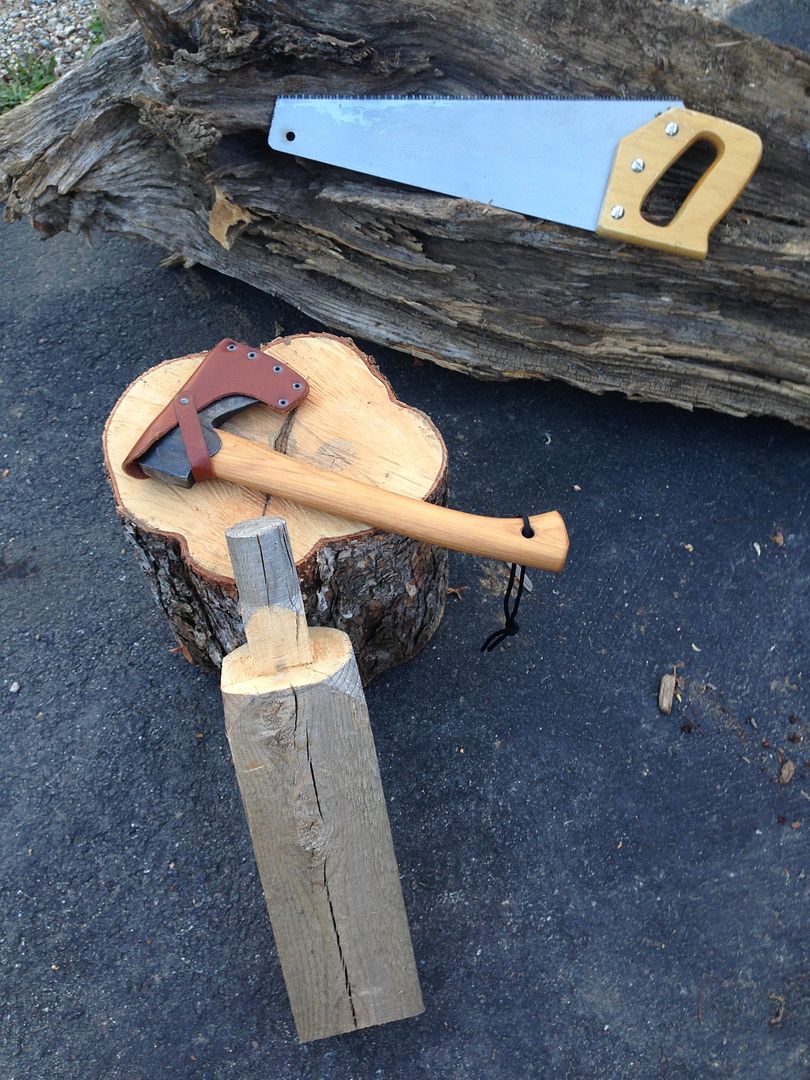
I'm also thinking ahead about the hang. I like detail in the Forest Service publication and video, so I'm planning to follow it closely. One of my next purchases will be Swel-Lok which is the recommendation Bernie Weisgerber (author of Axe to Grind) for the wedge treatment prior to driving it home. I also need a "Carpenter's Wooden Mallet", and tonight decided to make one from an old fence post I was going to throw away. I saw the beginnings of a handle already, so decided to go with it!
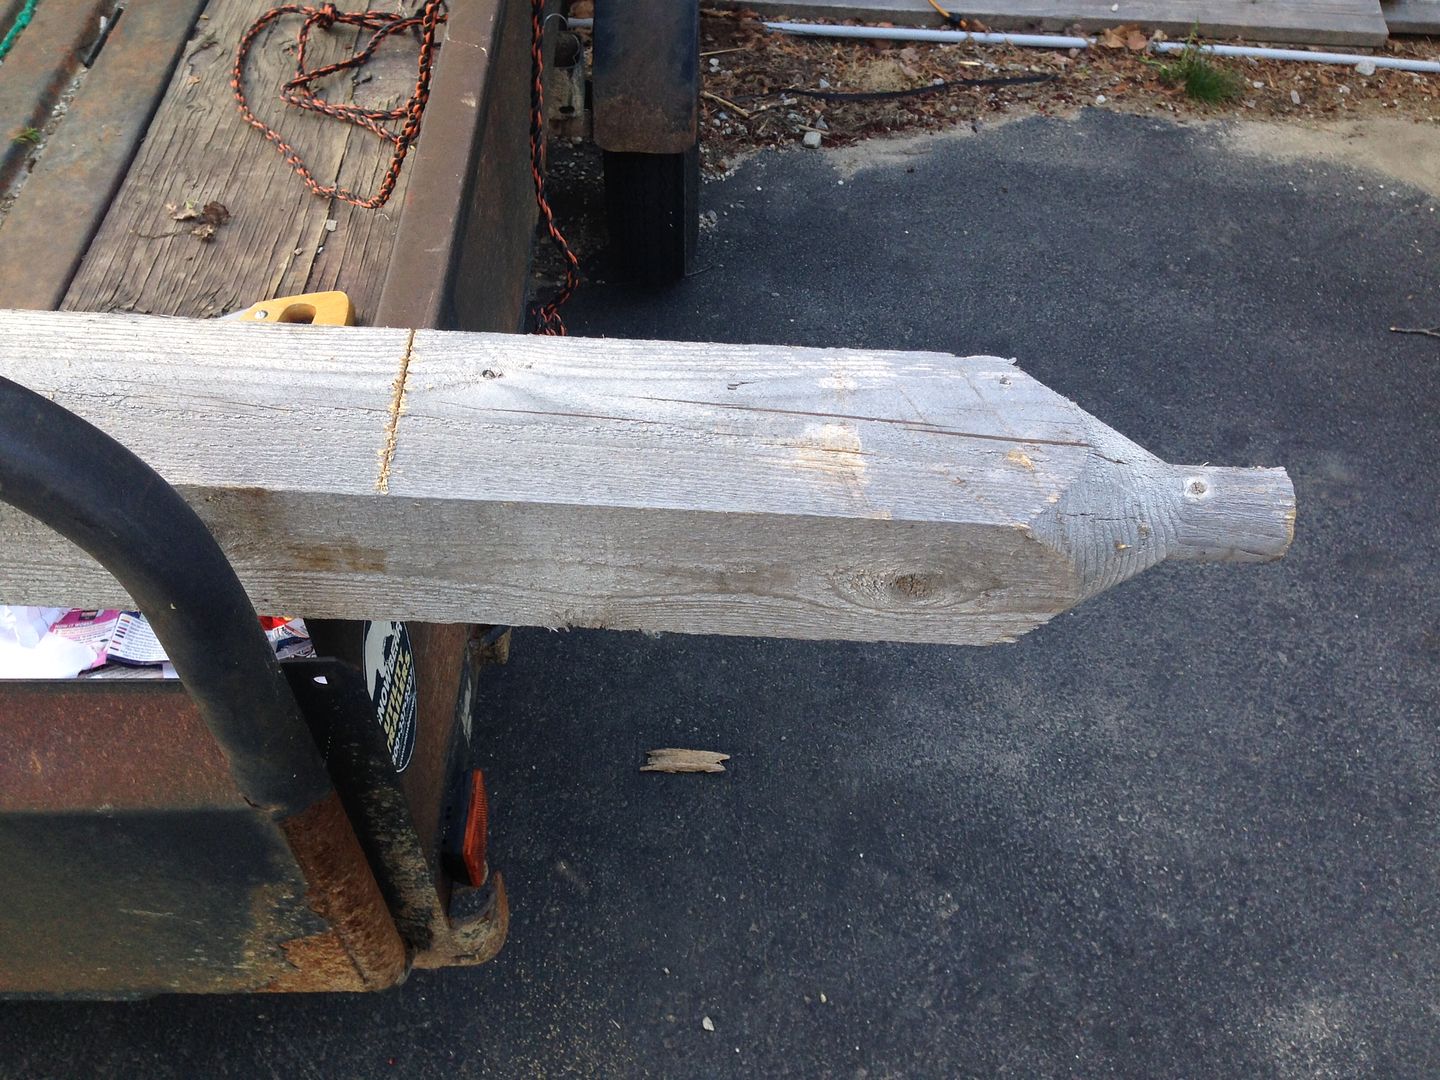
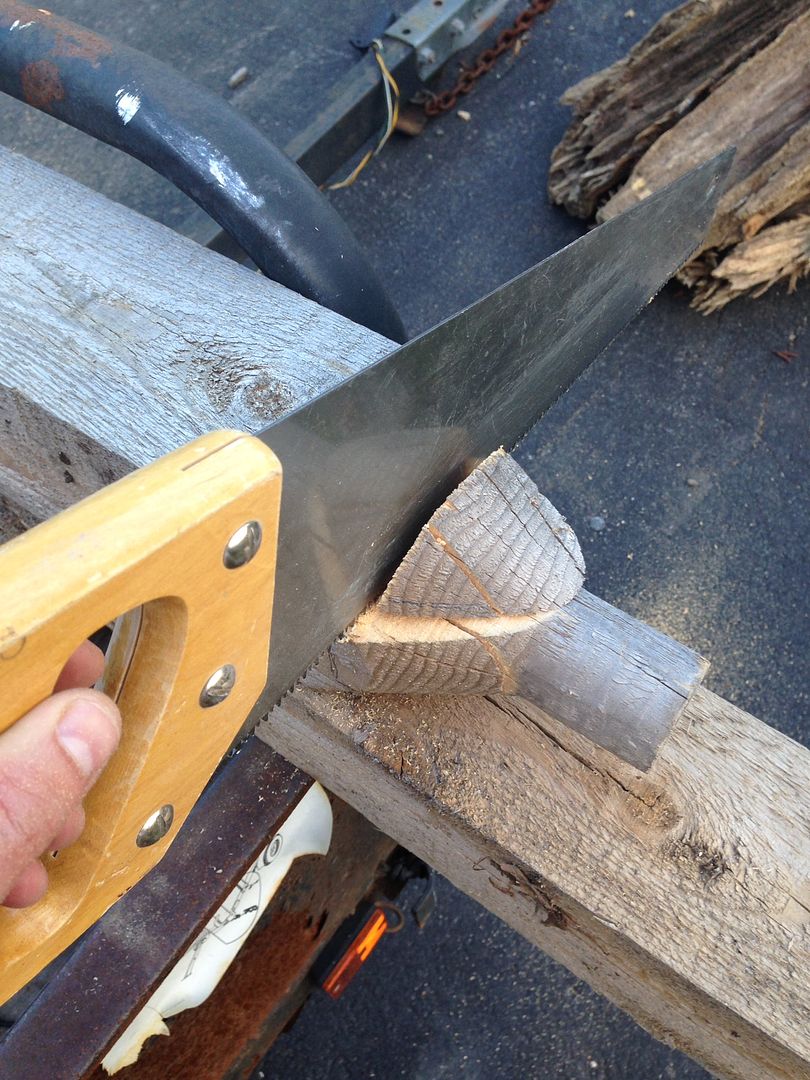
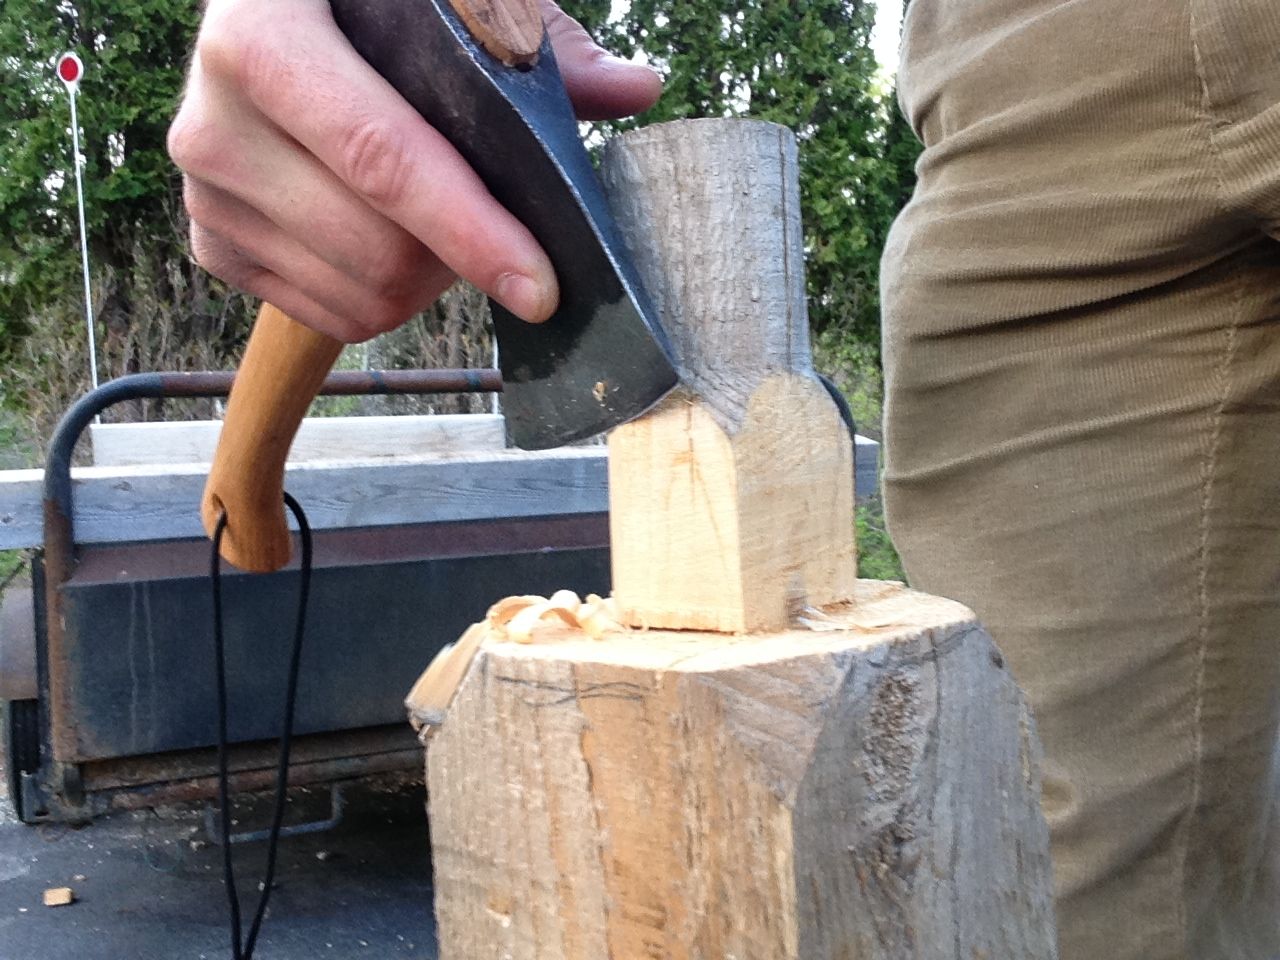
I made a couple vertical cuts down the quadrants of the existing "handle", then turned the post on its side and began to cut out the wedges.
An excuse to use the Gransfors I just acquired for $30:
________________________________
Shaved / rounded the square handle left from the saw cuts. (thats a colt .380 pony in my pocket, I wasn't just happy to see you)
Next I just sanded the heck out of everything for a few minutes
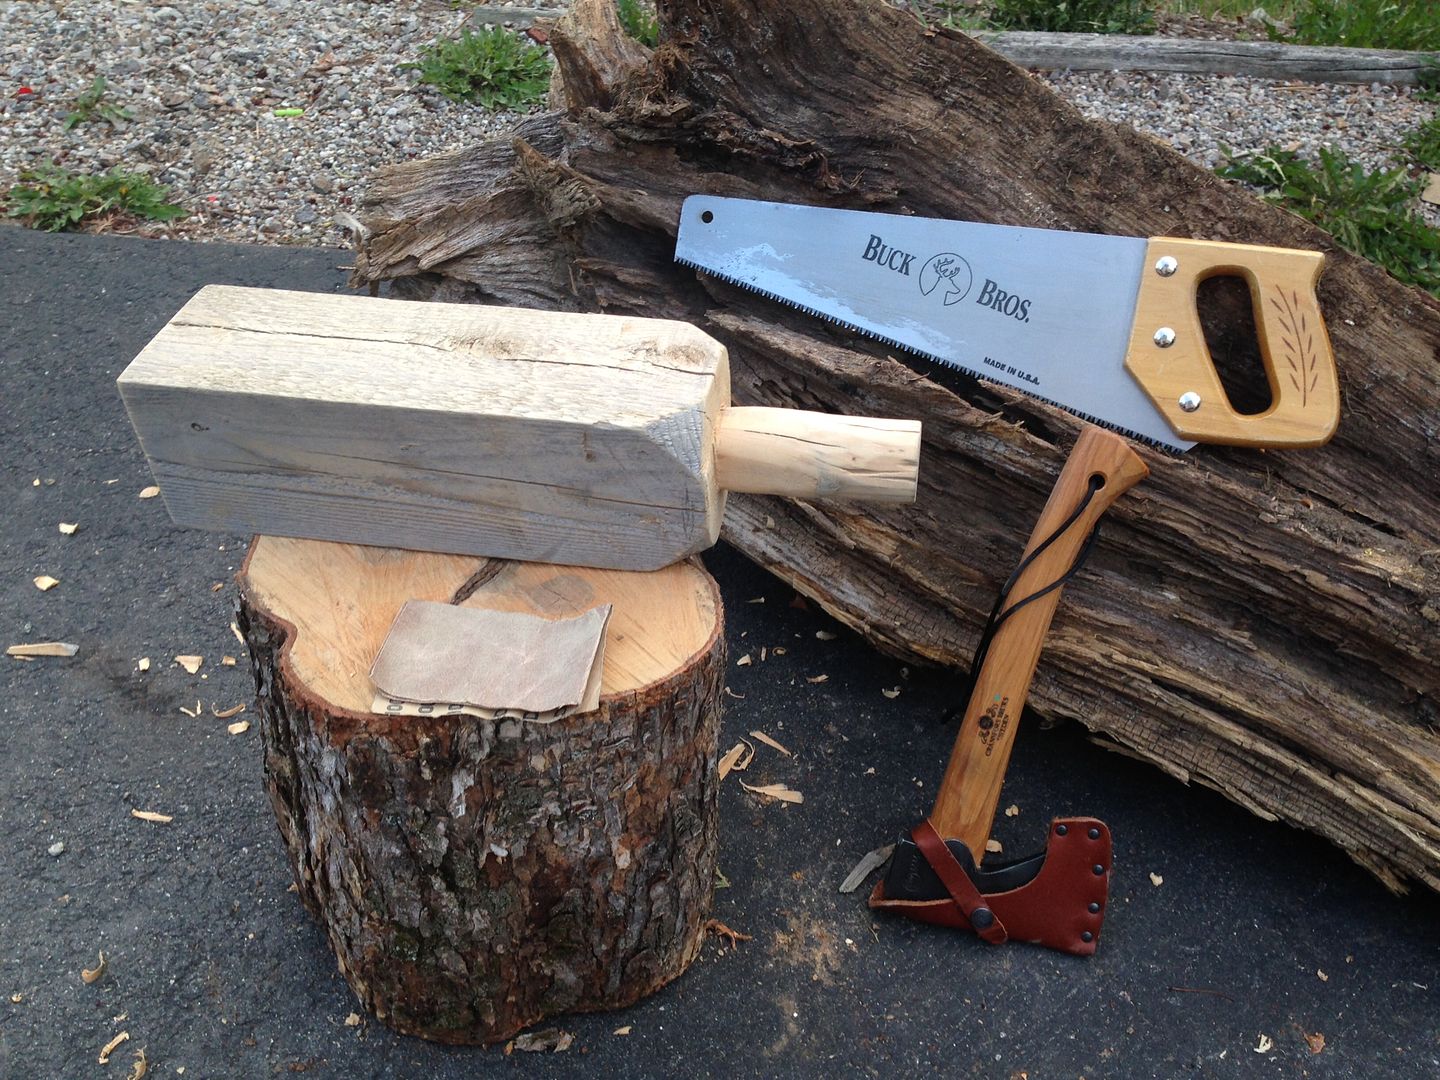
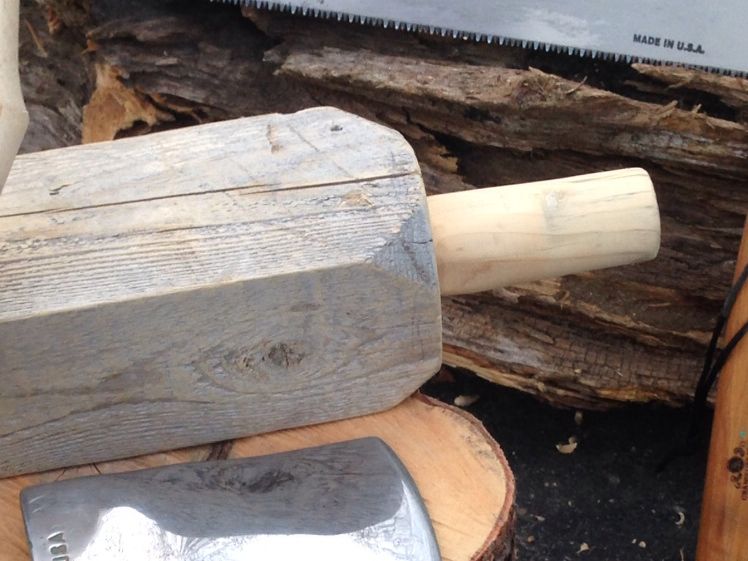
Now I think I have a serviceable mallet for hanging/wedge driving!
____________________________
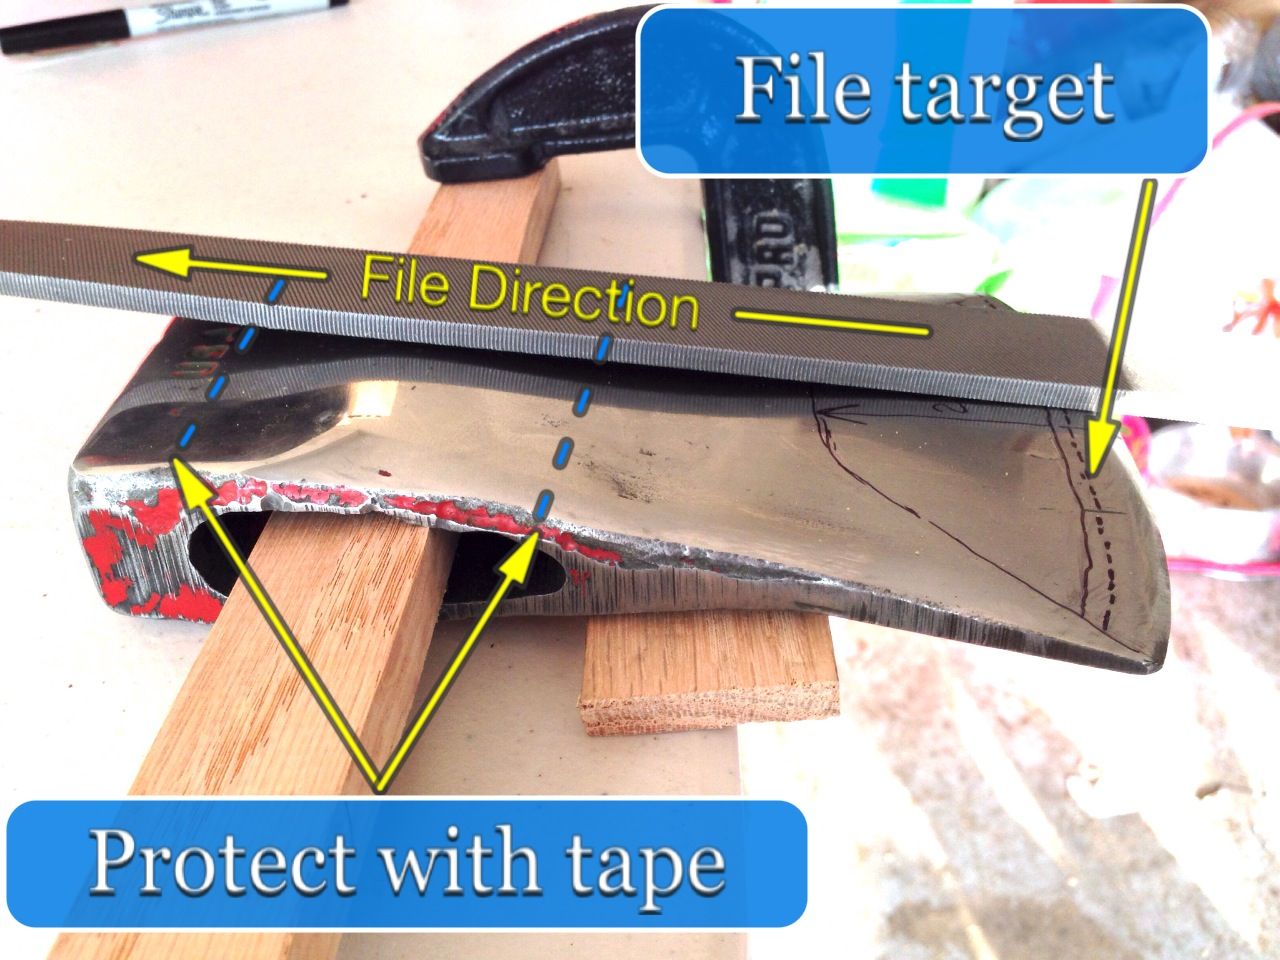
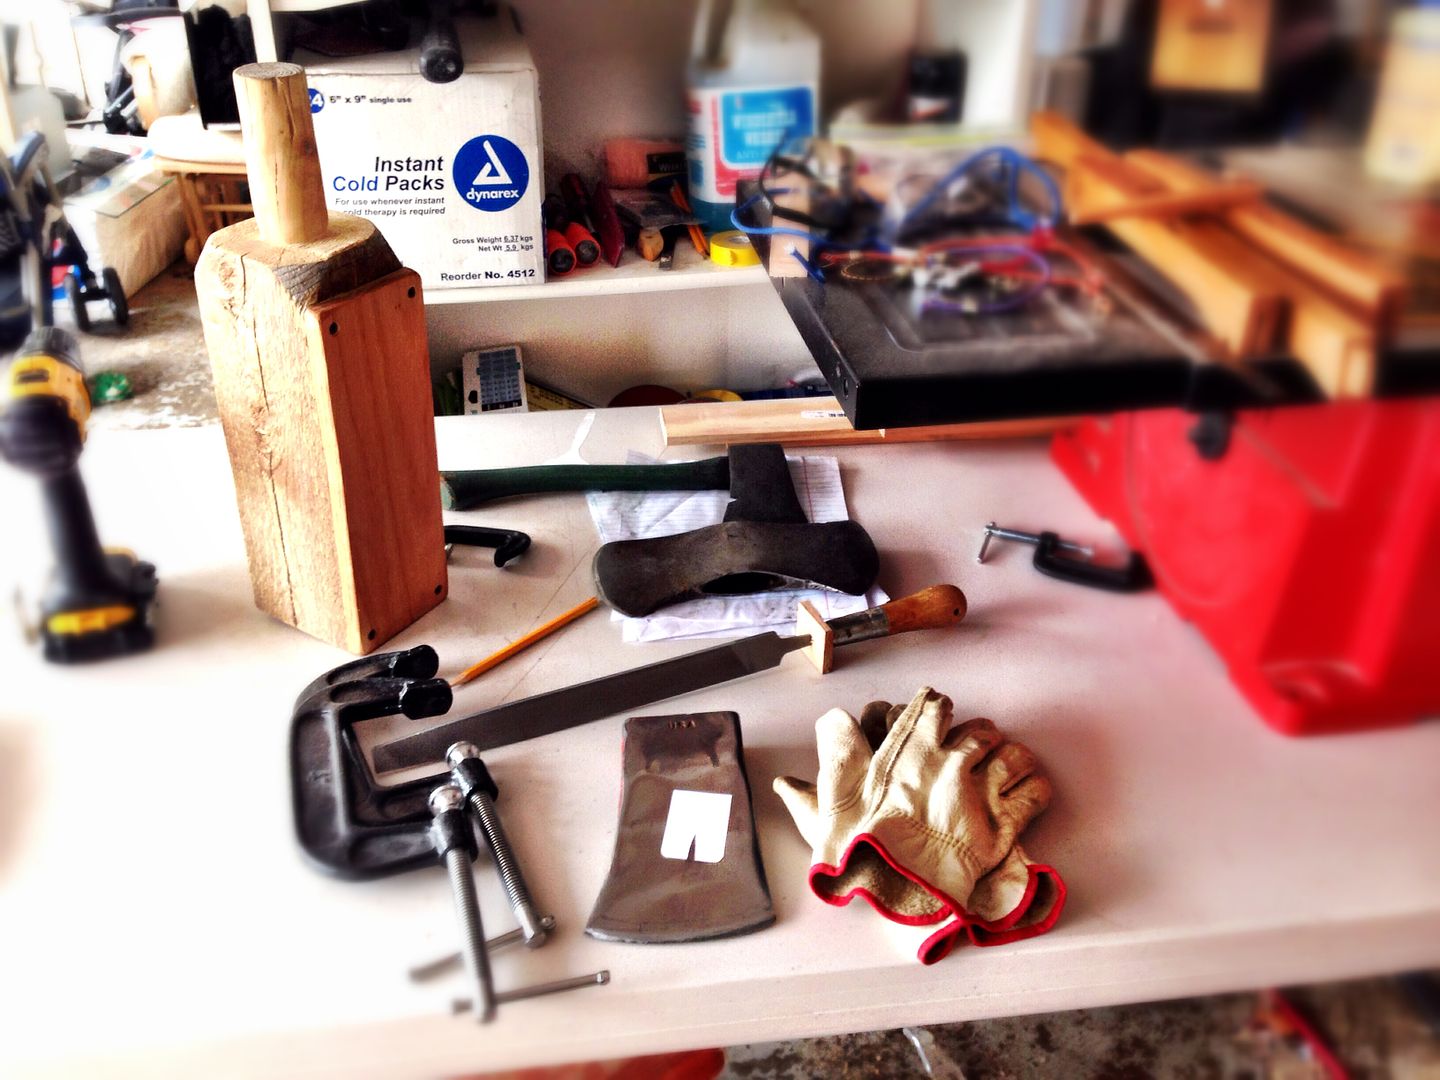
Today I finished the mallet by installing an oak facade over one face of the cedar. This will be more durable I suspect. It's two "craft" slats cut out of a $5 plank from Lowes. I used Titebond II wood glue and a couple couple countersunk wood screws. Also seen in the picture below is a new file I purchased and a finger guard made from oak scrap. Clamps will fasten the head to the table during filing which I plan to do next. The key (as I see it) to the reprofiling process will be the axe bit guage printed from the USFS manual as well as the detailed description of the process from thewoodslife blog.
Sent from my iPhone using Tapatalk
Following my recent fail to acquire a GB SFA from LLBean and some unfortunate financial developments at tax time; I decided to save the money and head out to the shed and see what I might restore. I had a badly rusted 3.5 lb council tool Dayton (age unknown) and an un identified double bit, also 3.5. Only markings on the double bit is text "3 1/2". The Council is badly banged up and I have no idea what sort of activity it was subjected to.
I struggled through the removal of the helves as I don't have a proper work area. I'm following approaches I learned here but I have limited resources. I forgot to take shots before the vinegar bath too! These photos are post bath, and post sanding of the council. I have not sanded the double bit yet. I'd like to put a short, maybe 26" on the council tool.
After a bit of work the double bit reveals a logo. Collins Legitimus. Any idea how old? With a little research and feedback from friends online, I learned that Collins Legitimus went out of production in 1966 so this is at least as old. I found this example online of a restore of the same Collins head. It's mirror finish is amazing and started out just like mine. Does one need tools to accomplish this, I wondered.
______________________________
Did a little looking at Lowes and I took a giant leap ahead in power today by investing in a Gator brand sanding attachment for my drill. Actually invest is not the right term - it's only about $5. Yahoo! Now I can take this to the level I want more quickly. The product came with three stick on disks 60, 100 & 150 grit. Starting with 60 grit:
It was quite simple to remove major pits and deep scratches.
Graduated from 60 grit to 100 deciding I was not going to remove more steel. Pits and deeper scratches that remain, I'm leaving for "character" sake.
I went to hand sanding mode now after finishing 150 grit on drill. Here it is after I did one side by hand with 220 - it's starting to look good!
I printed up a profile guide from the forest service publication "an axe to grind". It's cool! This photo shows where the guide "hits" indicating I've got some meat to remove when I get to filing.
Got both sides sanded to 220 grit. All major scratches are gone except at bit where I believe they are in the file zone and will be cleaned up when sharpening. Below see first pic and current condition. Like a true fool I jumped into this without ever taking the real "before" pic when it was all rusted in the shed!!
_______________________________
I just bought handles for this and the Collins - thanks forum friends for the tip on house handle website. Have a look at the Collins in the first couple photos. I vinegar bathed it to remove surface rust, but nothing else yet. I'm tempted to leave it's natural patina rather than sand shiny like I'm doing the council - thoughts?
Well after doing the 400 and 600, I did a quick five minutes each with my 1000 and 2000 wet dry sandpapers on the Council. I promise I'm not going to be neurotic about trying to keep this shine once this becomes a woods axe. Since this is my very first restore, I wanted to see how far i could take it for experience. Next step going to work on reprofiling the edge using the USFS guide I posted a bit ago and a file.
At this point in my journey I've reached a mirror finish on the Council Tool, and resigned myself to put the Collins on hold until I "learn my way" through the Council project. If you saw my other post, you know that I recently scored a Grandfors Bruks Wildlife Hatchet at a giveaway price; but it didn't affect my desire to do these restorations. In fact, I am enjoying this activity more and more with each step I take.
A week or so ago I bought my handles from House Handles; a website with great prices, selection and high quality handles. Shipping is also at cost which is nice. If you order from them, be sure to request "select grain handles" and no finish (you'll want to linseed it yourself). They up charge a couple bucks for this but its worth it.
While waiting for the handles to arrive, I methodically planned my next steps by reading anything and everything I could find on the topic of refinishing axes, axe re-profiling, axe sharpening, axe hanging as well as general axe use, maintenance and care materials.
[video=youtube;Xz3rs-eaN3E]https://www.youtube.com/watch?v=Xz3rs-eaN3E[/video]
When I found a great resources, I read and re-read them. From these works I formed a list of things I'd like to make and/or acquire to get through future project steps - like a wooden carpenter's mallet, some proper files, wood rasp, linseed oil, Swel-Lok, file card, Wonderbar rust eraser... In addition to the regular advice and feedback from the forums, I have found the following to be indispensable:
1. An Axe to Grind on youtube by the U.S. Forest Service Axe to Grind by the U.S. Forest Service as well as the detailed PDF of the same title.
2. The Woods Life Blog has three fantastic blogs on axe restoration and care.
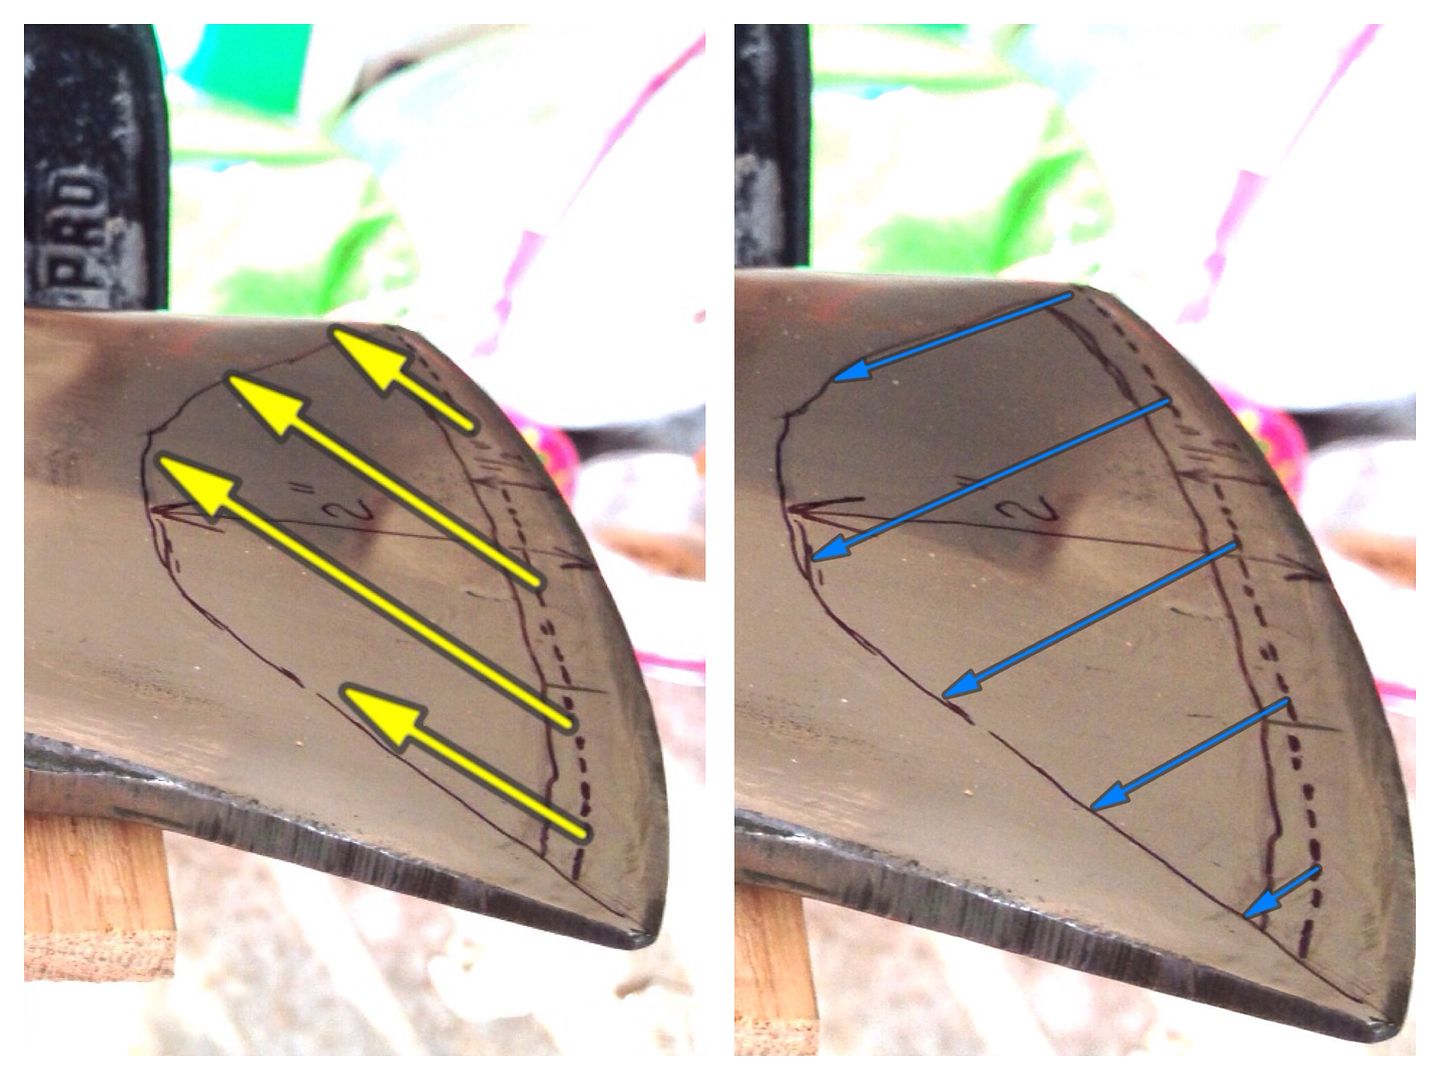
My plan is to reprofile the Council Tool with a file soon because the cheek is just too thick. I realize now that I might have been better off doing this before the fine grit sanding work I've done, but I don't mind doing it again as my goal is to do it right first and foremost.
I'm also thinking ahead about the hang. I like detail in the Forest Service publication and video, so I'm planning to follow it closely. One of my next purchases will be Swel-Lok which is the recommendation Bernie Weisgerber (author of Axe to Grind) for the wedge treatment prior to driving it home. I also need a "Carpenter's Wooden Mallet", and tonight decided to make one from an old fence post I was going to throw away. I saw the beginnings of a handle already, so decided to go with it!
I made a couple vertical cuts down the quadrants of the existing "handle", then turned the post on its side and began to cut out the wedges.
An excuse to use the Gransfors I just acquired for $30:
________________________________
Shaved / rounded the square handle left from the saw cuts. (thats a colt .380 pony in my pocket, I wasn't just happy to see you)
Next I just sanded the heck out of everything for a few minutes
Now I think I have a serviceable mallet for hanging/wedge driving!
____________________________
Today I finished the mallet by installing an oak facade over one face of the cedar. This will be more durable I suspect. It's two "craft" slats cut out of a $5 plank from Lowes. I used Titebond II wood glue and a couple couple countersunk wood screws. Also seen in the picture below is a new file I purchased and a finger guard made from oak scrap. Clamps will fasten the head to the table during filing which I plan to do next. The key (as I see it) to the reprofiling process will be the axe bit guage printed from the USFS manual as well as the detailed description of the process from thewoodslife blog.
Sent from my iPhone using Tapatalk
")
 Im doing a similiar project on my grandads old 4.5lb elwell at the moment.