This thread follows on from this one http://www.bushcraftuk.com/forum/showthread.php?t=38767 where I made a new handle a few days ago. The handle was fairly dry wood when I roughed it out and has had 3 or 4 days near the fire so is now dry enough to fit it.
First thing is to put the head on the end and draw carefully round the inside. The new line is pencil, the red line was drawn before it dried. Notice how it shrinks mostly around the tangential rings.

Hew off sides again starting by making a rectangle.

Then take the corners off.

Now offer it up to the head to see where you need to trim. Hopefully it is just a question of keeping cutting off the high points.

I am trimming with the knife by this stage, all the custs start 2-3" from the end where the head will start.

Now it's time for a trial fit, pop the head on top and give it a few gentle bumps on a block to see how far it goes on.

It will probably be pretty well stuck on there now, I split out a small piece of wood which easily fits inside the eye, put it into the eye and bump it on the block to take the head off.

The dirty bits show where it was rubbing on the eye, leave the bits which didn't touch alone, shave the areas that did touch particularly the area where the head stopped going on.

Trial fit again and check the alignment by looking down the edge towards the foot of the handle. For a neutral axe the edge should line up with the centre of the handle. This one is good as a hewing axe for a right hander so I shall leave it as it is. If I wanted to make it more central I would shave a little from the area where my thumb is which would alter the alignment as it went further on.

Once the handle comes all the way through and a little out of the top of the head its time to take it out and finish any work on shaping the handle. When I make my handles I rough them to a rectangular section and at this stage I take the corners off. I like the elongated octagon this creates, it gives excelent grip, if you like a rounded handle its just a question of repeatedly taking the high corners off.

Now some people like to take the head off and saw a slit down the centre for the wedge I just split it with a knife or chisel. All we need is a small split to start the wedge in, a gentle tap on the back of the knife taking care not to go too far so the knife hits the metal.

Now this bit is important and its more art than science. Have a look at the gaps between handle and head. How big this gap is will depend on how accurate you have been with the shaping but also on the interior profile of the head. This head is fairly straight through inside so the gap is fairly small some heads are quite hour glass waisted inside so the gap would be much more. Now we need a wedge made from a cleft not sawn piece of dry oak, other woods will work but oak is best if you have it, very dry is important so I keep a supply of dry cleft oak siting near the fireplace. Imagine the wedge going a little more than half way through the head, at that point on the wedge you want it to be thick enough to take up all the gap between head and handle and a bit more to allow for a healthy compression. The end of the wedge I shape to have about 1mm flat then chamfer from both sides at 45 degrees this makes a strong but sharp leading edge to go into your split head.

stand the axe up on a solid block of floor and hammer the wedge in until there is no more movement.
It should take up all the gap and make a tight fit.

Saw it off, if there is some gap front and back you can make a small split across the handle and either bang in another wooden wedge or if its just a small gap one of those metal hammer wedges. I always tend to use wood as it makes life easier when you need to drill the handle out to replace it. Small gaps front and back are no problem if your main wedge has gone in well the pressure side to side is imense and it will not move.

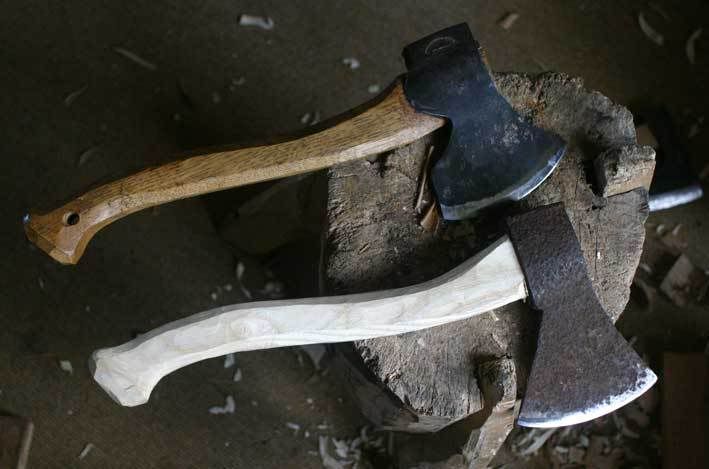
So at the top is my favourite GB carving axe, about £70. below a very good second best, the head cost £2 took 5 minutes to grind and sharpen (with power tools) and the handle took maybe a little more than an hour all told, certainly a lot less time than photographing and typing this tutorial.
Shame I don't do leatherwork really or I could do a tutorial on a nice sheath for it.
First thing is to put the head on the end and draw carefully round the inside. The new line is pencil, the red line was drawn before it dried. Notice how it shrinks mostly around the tangential rings.
Hew off sides again starting by making a rectangle.
Then take the corners off.
Now offer it up to the head to see where you need to trim. Hopefully it is just a question of keeping cutting off the high points.
I am trimming with the knife by this stage, all the custs start 2-3" from the end where the head will start.
Now it's time for a trial fit, pop the head on top and give it a few gentle bumps on a block to see how far it goes on.
It will probably be pretty well stuck on there now, I split out a small piece of wood which easily fits inside the eye, put it into the eye and bump it on the block to take the head off.
The dirty bits show where it was rubbing on the eye, leave the bits which didn't touch alone, shave the areas that did touch particularly the area where the head stopped going on.
Trial fit again and check the alignment by looking down the edge towards the foot of the handle. For a neutral axe the edge should line up with the centre of the handle. This one is good as a hewing axe for a right hander so I shall leave it as it is. If I wanted to make it more central I would shave a little from the area where my thumb is which would alter the alignment as it went further on.
Once the handle comes all the way through and a little out of the top of the head its time to take it out and finish any work on shaping the handle. When I make my handles I rough them to a rectangular section and at this stage I take the corners off. I like the elongated octagon this creates, it gives excelent grip, if you like a rounded handle its just a question of repeatedly taking the high corners off.
Now some people like to take the head off and saw a slit down the centre for the wedge I just split it with a knife or chisel. All we need is a small split to start the wedge in, a gentle tap on the back of the knife taking care not to go too far so the knife hits the metal.
Now this bit is important and its more art than science. Have a look at the gaps between handle and head. How big this gap is will depend on how accurate you have been with the shaping but also on the interior profile of the head. This head is fairly straight through inside so the gap is fairly small some heads are quite hour glass waisted inside so the gap would be much more. Now we need a wedge made from a cleft not sawn piece of dry oak, other woods will work but oak is best if you have it, very dry is important so I keep a supply of dry cleft oak siting near the fireplace. Imagine the wedge going a little more than half way through the head, at that point on the wedge you want it to be thick enough to take up all the gap between head and handle and a bit more to allow for a healthy compression. The end of the wedge I shape to have about 1mm flat then chamfer from both sides at 45 degrees this makes a strong but sharp leading edge to go into your split head.
stand the axe up on a solid block of floor and hammer the wedge in until there is no more movement.
It should take up all the gap and make a tight fit.
Saw it off, if there is some gap front and back you can make a small split across the handle and either bang in another wooden wedge or if its just a small gap one of those metal hammer wedges. I always tend to use wood as it makes life easier when you need to drill the handle out to replace it. Small gaps front and back are no problem if your main wedge has gone in well the pressure side to side is imense and it will not move.
So at the top is my favourite GB carving axe, about £70. below a very good second best, the head cost £2 took 5 minutes to grind and sharpen (with power tools) and the handle took maybe a little more than an hour all told, certainly a lot less time than photographing and typing this tutorial.
Shame I don't do leatherwork really or I could do a tutorial on a nice sheath for it.
")