Sheath Making Tutorial
Rapidboy
previously published 21 Feb 2007
This article follows on from the Knife Handle Tutorial.
I always start by making a template, you can use paper but cardboard of a similar thickness to the leather you are using is best.
Spend time getting this right, you want a sheath that will hold the knife safely and is a snug fit.

I buy all my leather, finishes and leather working tools from LePrevo.
They are a great mail order company and have a comprehensive catalogue that you can down load from their site.
http://www.leprevo.co.uk/index.html
I use 3.5mm shoulder for my sheaths.
When your template is ready trace around it onto the leather and cut it out along with the welt.
The welt is important as it protects the stitching from the blade.

I mark a line along the centre of my template and transfer this line to the leather.
Using a stitch groover cut a series of grooves either side of this line, this will help the leather to bend and prevents it cracking when i fold it later.


The same tool is used where the belt loop will fold over.

Then use an edge beveller to clean up the edge around the belt loop.

Use the stitch groover to scribe a line across the belt loop and then use an overstitch wheel to mark the stitching holes.

An overstitch wheel is not essential but it keeps all the holes the same distance apart and makes the finished sheath look much more professional.

Apply some contact adhesive to the end of the belt loop and when it;s dry push the loop into position and let it set.

I use a small pillar drill for making the stitch holes but this can be done with an awl.


When i have drilled the holes i like to run the stitch groover along them on the inside of the sheath so it gives the thread somewhere to go and helps protect the stitching from the blade.

Using a couple of size 4 needle and some thread that has been covered in bee’s wax to stitch the belt loop in place.


Next we need to attach the welt and again i use impact adhesive.

Then more impact adhesive and fold the sheath in half and press the two halves together.
The grooves I cut at the start really help this fold and you can now see the sheath starting to take shape.


The edge is pretty untidy so you trim it down with a sharp knife and finish with sand paper.
I use a sanding drum in the pillar drill but again that’s just for speed and it’s easily achieved by hand.
Work through the grades of paper to get a nice smooth finish.


At this point i am going to take you through stitching a sheath together in a conventional fashion.
The sheath for my Green River knife will be different but we will look at a more conventional sheath first.
Using a stitch groover ,this time an adjustable one i run a groove the edge and then clean up the edge with the edge beveller.


The overstitch wheel is used again and it’s back to the pillar drill to make the holes.

More waxed thread and I stitch using the 2 needles.


When I finish stitching I run over the stitches with the overstitch wheel to neaten them up.


Then it’s time to dye, there are loads of choices here but i stick to Fiebings Professional Oil Dye’s as they give great results.

For a smooth consistent colour you lightly dampen the surface of the leather with a damp cloth and apply the dye evenly.

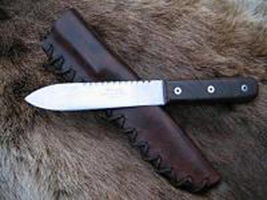
Now that’s one way to stitch a sheath but as this is a mountain mans knife i thought I’d make a mountain mans sheath.
I wanted a simple and primitive look so i decided to use leather thonging and crude stitching.
So we go back to our sheath that has had the edges sanded and i run the edge beveller around them to clean them up.
Then I mark lightly with a pencil the spacing for my stitches.
This stitching is simple and crude and requires fewer but larger holes than before.


The stitching is a simple criss cross pattern, i use a small screw driver or awl to open the holes.


Tapering the thonging helps and when i get to the end I leave the last few loops loose and then pass the 2 free ends down through them.


When i pull the stitching tight the free ends are trapped.


Next is dyeing and in this case I don’t want an even finish.
I’m after a mottled and random pattern so I’m going to apply the dye to dry leather.
Rubber gloves are essential unless you want to end up with your hands matching your new sheath !

I apply the dye this time in a random pattern ,allowing each layer to dry before applying the next.


Rapidboy
The knife Handling Tutorial for this knife can be found here.
Copyright ©2003-2016 Bushcraft UK

Leave A Comment
You must be logged in to post a comment.