A little while ago I commented on a thread in another forum wherea member showed his beautiful collection of Kelly Perfect axes – a vintage axe model sadly unavailable in the UK.
Recently the man himself dropped me a mail and said that he had found a nice double bit head by Kelly Perfect with a few nicks and dings and if I could source a haft he would send it to me.
Well, having finished a happy dance I said “yes please”.
Well, he kindly posted it off …cue disorganised UK customs and carriers…but it found its way here eventually (although I’m glad it wasn’t baked goods). Although the parcel was weirdly large for an axe head.
Like a kid at Christmas I opened it up…..

1) Cruiser Axe Head by British Red, on Flickr

2) Kelly Perfect True Temper by British Red, on Flickr
Now that’s a pretty axe J Sure it had a few nicks and dings – both blades had some chips

3) Blade 1 Edge by British Red, on Flickr

4) Blade 2 Edge by British Red, on Flickr
And the eye had some damage – I suspect from where some klutz removed an old helve

5) Eye Top by British Red, on Flickr
Interestingly the blade bottoms have some scars too. I believe that’s from someone hammering on them with a metal hammer (sigh) – again probably during re-helving. That said though, the axe has been properly sharpened in its life – you can see file teeth marks from cutting back and a pronounced bevel swirl from proper use of an axe stone. I kind of like these reminders of a tools history!
So…why such a big box? Well emptying it out revealed a brand new helve with a lovely straight grain

6) New Helve by British Red, on Flickr
And even a set of wedges!

7) New Wedges by British Red, on Flickr
Now given such extraordinary generosity, I felt it only right and proper to show how I would set up this tool. I have written articles in the past about sharpening axes with hand tools. On this occasion though, I added a little technology – a bench grinder and sander.

9) Bench Grinder by British Red, on Flickr
Only a cheap item this - £20 from Aldi – but its all you need on a job like this if you are careful and go slow.
Before I used it though – safety gear. There are going to be hot sparks, metal dust and rubbish flying around. Protect your eyes, ears, nose, mouth and hands. And wear old clothes. My poor old work fleece is covered in singe marks

8) Safety Gear by British Red, on Flickr
Step one was to cut back the edge. I did this on a grinding wheel. Do a tiny bit at a time, checking carefully. Do not let the blade get hot – you will ruin the temper. Stop before you have removed all the dings – we will finish on a sander. If you aren’t sure, use coarse and mill files to do this.

10) Ground Back Edge by British Red, on Flickr
Next, I used a slack 2” belt sander to profile the blades in a convex shape – one quite rounded for rough work, the other a little finer for cutting. You must use the slack area for this…you don’t want a flat bevel!

11) Sanded Blade by British Red, on Flickr

12) Sanded Blade by British Red, on Flickr
Then I took a coarse half round / flat file and cleaned up that nick in the eye. I also “de-burred” the inside of the eye.

13) Filed Back Eye by British Red, on Flickr
So – that was the head roughed out – sadly I had messed up the lovely age patina with all that filing, grinding and sanding

15) Re-profiled Head by British Red, on Flickr
Next it was out with the diamond axe file, Hoodoo hone (sanding block with mousemat glued on covered in various grits of emery paper) and Leather buff loaded with pink / green polishing compound

16) Sharpening tools by British Red, on Flickr
There we have it…hair popping sharp!

17) Sharpened Blade by British Red, on Flickr
But wait…can you see those little rust pits behind where I’ve messed up the patina. Can’t have that. So I masked the bevels, cleaned the head with acid, washed and degreased it and then cold blued it. I sealed the cold blue with micro crystalline wax

19) Waxed Blade by British Red, on Flickr
It’ll get a final sharpen and polish after re-hanging. So I suppose we had better get on with that next huh?
Here’s the tools
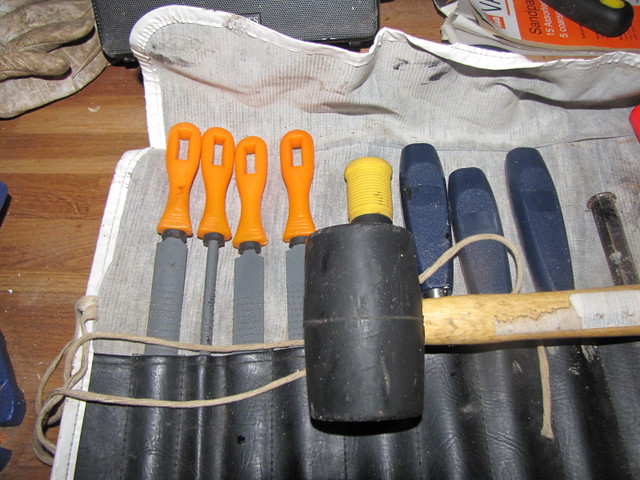
20) Fittitng tools by British Red, on Flickr
The most important tool for fitting a helve is – in my view – a wood rasp (like a file for wood)

21) Wood rasp by British Red, on Flickr
I keep sliding the helve into the handle and rasping off where the wood binds

22) Shaping wood by British Red, on Flickr
As you push the head firmly on (don’t hammer) and remove it, tight areas get a shiny look. I mark these with a carpenters pencil, rasp them off and try again

23) Areas for relief by British Red, on Flickr
Don’t rush this – expect to make twenty or thirty trial fits, taking a little wood each time. Eventually the head will push down to the shoulder of the helve. If the head sticks on, knock it off with a piece of wood – not a metal hammer (remember those marks on the bottom of the blades – that’s what caused them I bet!). Do this over a wooden work bench – don’t drop the head on a concrete floor!

24) Rough fitted by British Red, on Flickr
Now on this axe, the bottom of the head is curved

25) Shoulders tapered by British Red, on Flickr
I rasped a curve onto the shoulder of the helve and then marked how much to cut off the top

26) Marking Cut off by British Red, on Flickr
I sawed off the top of the helve to just above the blade line.
Next I fitted the wedge – for a wedge to fully fit the eye, I find you need to chamfer the edges to fit the curve of the eye

27) Fitting wooden wedge by British Red, on Flickr
I drove the wedge in with a rubber mallet – some prefer a wooden mallet but don’t use a metal hammer. I cut the wedge off square to the helve.

28) Wooden wedge in place by British Red, on Flickr
Next to fit the metal wedge. I don’t like these set square (at 90 degrees to the wooden wedge). I find this causes splits in the wooden wedge. So I set them at 45 degrees. I also start the hole with a sharp ½” wood chisel before inserting the wedge.
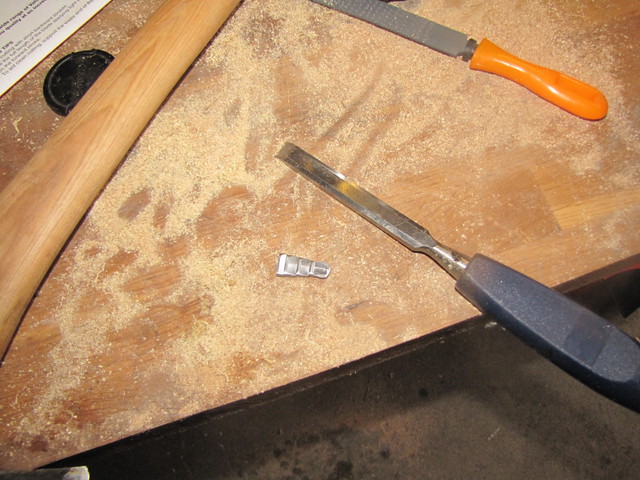
29) Chisel and metal wedge by British Red, on Flickr
Here is the chisel mark

30) Chisel cut by British Red, on Flickr
I do use a metal hammer to drive in the metal wedge. This is the only time I let a metal hammer near an axe head. If you file two nicks in the sides of the metal wedge prior to putting it in, you can hook it out with a sharp screw driver when the helve needs replacing. Stand the bottom of the helve on an old plank before you tap in the metal wedge – or you will scuff the helve on the floor.

31) Metal Wedge by British Red, on Flickr
Now, to finish off, I like to soak the helve in oil. To do this, I lay out a triple layer of kitchen towel and put the helve on it

32) Helve on kitchen towel by British Red, on Flickr
I wrap the paper round the helve and hold it on with rubber bands.

33) Oiled Paper wraped helve by British Red, on Flickr
Then I soak the paper in oil, and cover the paper in plastic wrap

34) Wrapped in cling film by British Red, on Flickr
Leave that for a couple of days, rub off any raised grain with wire wool and then seal the oil in with a rub of beeswax.
A quick final sharpen and there we have it…an old war horse ready to respond to the bugle.

Kelly Perfect Axe by British Red, on Flickr
What a fantastic thing for a guy to send huh? I will trasure for his kindness and its history...which I hope will continue for many years now
Recently the man himself dropped me a mail and said that he had found a nice double bit head by Kelly Perfect with a few nicks and dings and if I could source a haft he would send it to me.
Well, having finished a happy dance I said “yes please”.
Well, he kindly posted it off …cue disorganised UK customs and carriers…but it found its way here eventually (although I’m glad it wasn’t baked goods). Although the parcel was weirdly large for an axe head.
Like a kid at Christmas I opened it up…..
1) Cruiser Axe Head by British Red, on Flickr
2) Kelly Perfect True Temper by British Red, on Flickr
Now that’s a pretty axe J Sure it had a few nicks and dings – both blades had some chips
3) Blade 1 Edge by British Red, on Flickr
4) Blade 2 Edge by British Red, on Flickr
And the eye had some damage – I suspect from where some klutz removed an old helve
5) Eye Top by British Red, on Flickr
Interestingly the blade bottoms have some scars too. I believe that’s from someone hammering on them with a metal hammer (sigh) – again probably during re-helving. That said though, the axe has been properly sharpened in its life – you can see file teeth marks from cutting back and a pronounced bevel swirl from proper use of an axe stone. I kind of like these reminders of a tools history!
So…why such a big box? Well emptying it out revealed a brand new helve with a lovely straight grain
6) New Helve by British Red, on Flickr
And even a set of wedges!
7) New Wedges by British Red, on Flickr
Now given such extraordinary generosity, I felt it only right and proper to show how I would set up this tool. I have written articles in the past about sharpening axes with hand tools. On this occasion though, I added a little technology – a bench grinder and sander.
9) Bench Grinder by British Red, on Flickr
Only a cheap item this - £20 from Aldi – but its all you need on a job like this if you are careful and go slow.
Before I used it though – safety gear. There are going to be hot sparks, metal dust and rubbish flying around. Protect your eyes, ears, nose, mouth and hands. And wear old clothes. My poor old work fleece is covered in singe marks
8) Safety Gear by British Red, on Flickr
Step one was to cut back the edge. I did this on a grinding wheel. Do a tiny bit at a time, checking carefully. Do not let the blade get hot – you will ruin the temper. Stop before you have removed all the dings – we will finish on a sander. If you aren’t sure, use coarse and mill files to do this.
10) Ground Back Edge by British Red, on Flickr
Next, I used a slack 2” belt sander to profile the blades in a convex shape – one quite rounded for rough work, the other a little finer for cutting. You must use the slack area for this…you don’t want a flat bevel!
11) Sanded Blade by British Red, on Flickr
12) Sanded Blade by British Red, on Flickr
Then I took a coarse half round / flat file and cleaned up that nick in the eye. I also “de-burred” the inside of the eye.
13) Filed Back Eye by British Red, on Flickr
So – that was the head roughed out – sadly I had messed up the lovely age patina with all that filing, grinding and sanding
15) Re-profiled Head by British Red, on Flickr
Next it was out with the diamond axe file, Hoodoo hone (sanding block with mousemat glued on covered in various grits of emery paper) and Leather buff loaded with pink / green polishing compound
16) Sharpening tools by British Red, on Flickr
There we have it…hair popping sharp!
17) Sharpened Blade by British Red, on Flickr
But wait…can you see those little rust pits behind where I’ve messed up the patina. Can’t have that. So I masked the bevels, cleaned the head with acid, washed and degreased it and then cold blued it. I sealed the cold blue with micro crystalline wax
19) Waxed Blade by British Red, on Flickr
It’ll get a final sharpen and polish after re-hanging. So I suppose we had better get on with that next huh?
Here’s the tools
20) Fittitng tools by British Red, on Flickr
The most important tool for fitting a helve is – in my view – a wood rasp (like a file for wood)
21) Wood rasp by British Red, on Flickr
I keep sliding the helve into the handle and rasping off where the wood binds
22) Shaping wood by British Red, on Flickr
As you push the head firmly on (don’t hammer) and remove it, tight areas get a shiny look. I mark these with a carpenters pencil, rasp them off and try again
23) Areas for relief by British Red, on Flickr
Don’t rush this – expect to make twenty or thirty trial fits, taking a little wood each time. Eventually the head will push down to the shoulder of the helve. If the head sticks on, knock it off with a piece of wood – not a metal hammer (remember those marks on the bottom of the blades – that’s what caused them I bet!). Do this over a wooden work bench – don’t drop the head on a concrete floor!
24) Rough fitted by British Red, on Flickr
Now on this axe, the bottom of the head is curved
25) Shoulders tapered by British Red, on Flickr
I rasped a curve onto the shoulder of the helve and then marked how much to cut off the top
26) Marking Cut off by British Red, on Flickr
I sawed off the top of the helve to just above the blade line.
Next I fitted the wedge – for a wedge to fully fit the eye, I find you need to chamfer the edges to fit the curve of the eye
27) Fitting wooden wedge by British Red, on Flickr
I drove the wedge in with a rubber mallet – some prefer a wooden mallet but don’t use a metal hammer. I cut the wedge off square to the helve.
28) Wooden wedge in place by British Red, on Flickr
Next to fit the metal wedge. I don’t like these set square (at 90 degrees to the wooden wedge). I find this causes splits in the wooden wedge. So I set them at 45 degrees. I also start the hole with a sharp ½” wood chisel before inserting the wedge.
29) Chisel and metal wedge by British Red, on Flickr
Here is the chisel mark
30) Chisel cut by British Red, on Flickr
I do use a metal hammer to drive in the metal wedge. This is the only time I let a metal hammer near an axe head. If you file two nicks in the sides of the metal wedge prior to putting it in, you can hook it out with a sharp screw driver when the helve needs replacing. Stand the bottom of the helve on an old plank before you tap in the metal wedge – or you will scuff the helve on the floor.
31) Metal Wedge by British Red, on Flickr
Now, to finish off, I like to soak the helve in oil. To do this, I lay out a triple layer of kitchen towel and put the helve on it
32) Helve on kitchen towel by British Red, on Flickr
I wrap the paper round the helve and hold it on with rubber bands.
33) Oiled Paper wraped helve by British Red, on Flickr
Then I soak the paper in oil, and cover the paper in plastic wrap
34) Wrapped in cling film by British Red, on Flickr
Leave that for a couple of days, rub off any raised grain with wire wool and then seal the oil in with a rub of beeswax.
A quick final sharpen and there we have it…an old war horse ready to respond to the bugle.
Kelly Perfect Axe by British Red, on Flickr
What a fantastic thing for a guy to send huh? I will trasure for his kindness and its history...which I hope will continue for many years now
Last edited: