Tutorial Camp Loom & Mat Making
This has become a favourite of ours to use at the NE Scotland meets, we first tried it back in April and it worked so well we decided to try again at the September meet and were impressed yet again.
The original idea came from reading Grave's Bushcraft Books, in particular the part on the camp loom, which can be found at :http://chrismolloy.com/www/p134
This is quite a simple setup and process and can be done by the one person; however it would take a while longer to do and you will need to add some supporting sticks as shown in Grave's diagram to hold the main bar. So I would recommend 2 people at a minimum to complete a mat quickly and neatly. If you have more people the better and it makes for a nice little production line for those standing watching.")
These mats have multiple uses such as floor mats for a shelter or an area that is going to have a lot of people walking over it, or use as a door to your shelter, sleeping mats. One other suggestion that came up is you could probably use multiples of these for walls to a shelter, I guess before you pile on the mulch it would work.
1)To start with you need to find 8 sticks, spike them and place them in the ground.
These define the length of the mat you are going to make and will take the threads which will support the mat.
You can make it as long or as short as you want it.

P1000195 by pandabean2010, on Flickr
2)Start to measure and cut your string/cord, tie it off to the first stake and take it to the second stake opposite it, wrap it round a few times and tie it off here. Make your way back with the string to the starting post and loosely tie it off, you will be tying this to something else.
Continue along all the pairs of stakes until you are done.

P1000198 by pandabean2010, on Flickr
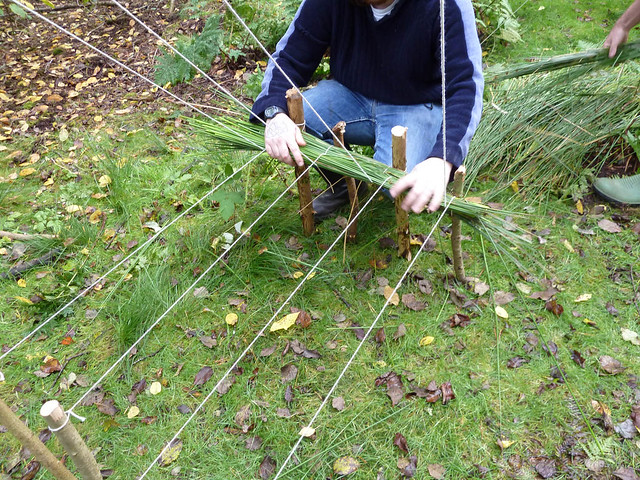
3)Now take the loosely tied ends and tie these to a long straightish stick, this will be your main bar that controls whether the strings go up or down. It is through this motion that you will be able to weave the material through.

P1000202 by pandabean2010, on Flickr
4)Either before you start this loom or once you are at this point you will need to gather suitable material for weaving.
In this case we used some rush that we had cut from the nearby field. Earlier in the year we had used dried reeds from a nearby lake. I have heard of people using dried grass as well, each material will have their own properties.
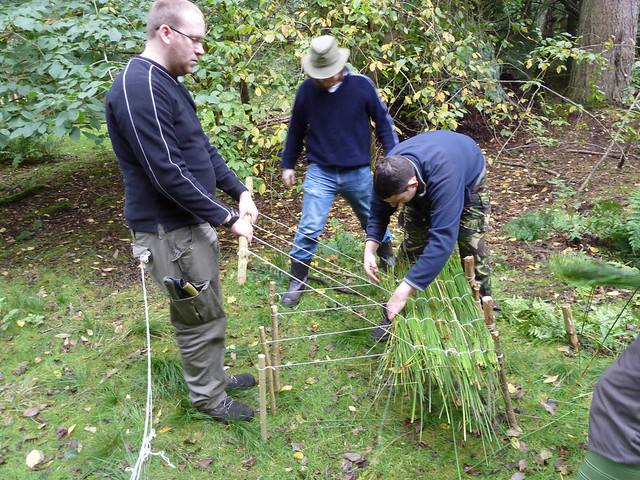
5)Now the weaving begins!
Have one person lower and hold the bar to the ground whilst the other person(s) place some of the rush (the Weft) in between the warp strings. It is best to take 2 bundles per each pass and each bundle with alternate ends, ie bundle 1 will have the thin ends at the top and thick ends at the bottom and bundle 2 will have the thick ends at the top and the thin ends at the bottom.
P1000203 by pandabean2010, on Flickr
6)Once this first weft is done, the person holding the main bar raises it up so that there is enough room to get the second bundle passed in. After two or three bundles it is best to tie off each of the strings as this should stop the bundles sliding down.

P1000204 by pandabean2010, on Flickr
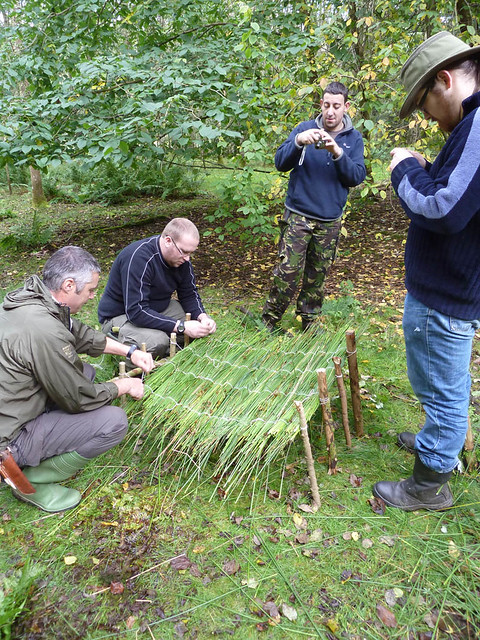
7)Lift up and weave in the next bundle, lower the bar and weave in the next. Continue this process until you reach the end of the available string on the loom and try to the keep the bundles level as you go.
P1000205 by pandabean2010, on Flickr
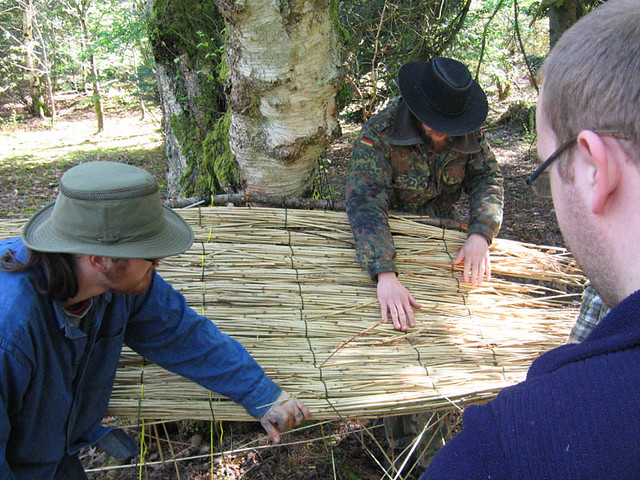
8)Once you reach the end you need to cut the strings from the closest stakes and tie them off, this will be one end done. You will need to repeat at the other end. For this end we found that it is best to add a bit of string at the end of each string to stop it coming undone when you take the strings off.
This is also the point where everyone stands and watches the others do the work.
P1000209 by pandabean2010, on Flickr
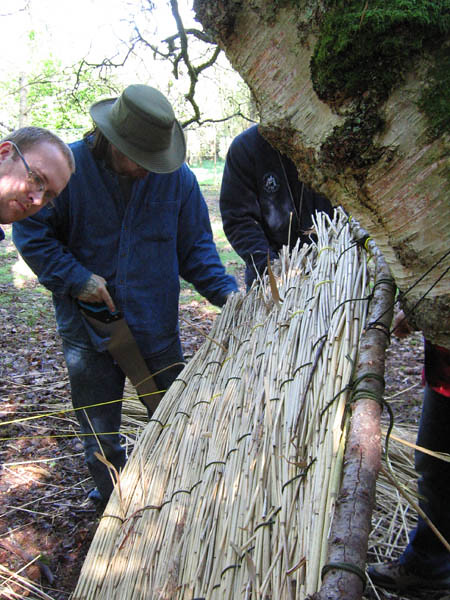
9)After you have cut it all free you have a nice finished mat that has multiple uses and looks nice if you are at a camp for a period of time.
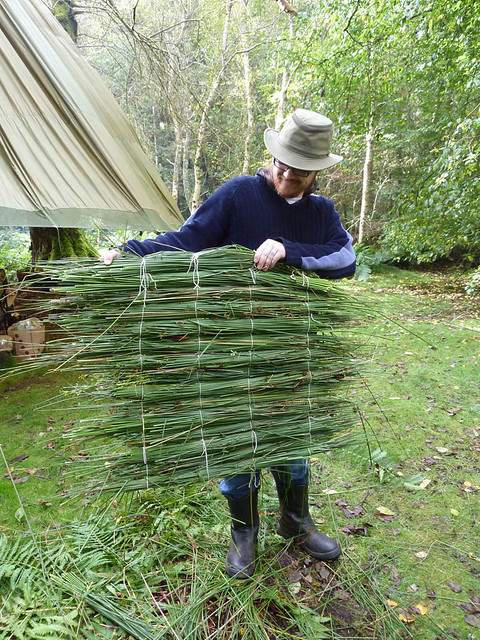
P1000211 by pandabean2010, on Flickr
I have added the photos from our meet earlier in the year which may help in understanding how the loom works. We had used dried reeds from a nearby lake on the estate and instead of putting the spikes in the ground at one end we had used a bar tied to a tree and 4 stakes at the other end.

NE Bushmeet (86) by pandabean2010, on Flickr
NE Bushmeet (90) by pandabean2010, on Flickr
NE Bushmeet (91) by pandabean2010, on Flickr

NE Bushmeet (94) by pandabean2010, on Flickr
This has become a favourite of ours to use at the NE Scotland meets, we first tried it back in April and it worked so well we decided to try again at the September meet and were impressed yet again.
The original idea came from reading Grave's Bushcraft Books, in particular the part on the camp loom, which can be found at :http://chrismolloy.com/www/p134
This is quite a simple setup and process and can be done by the one person; however it would take a while longer to do and you will need to add some supporting sticks as shown in Grave's diagram to hold the main bar. So I would recommend 2 people at a minimum to complete a mat quickly and neatly. If you have more people the better and it makes for a nice little production line for those standing watching.
These mats have multiple uses such as floor mats for a shelter or an area that is going to have a lot of people walking over it, or use as a door to your shelter, sleeping mats. One other suggestion that came up is you could probably use multiples of these for walls to a shelter, I guess before you pile on the mulch it would work.
1)To start with you need to find 8 sticks, spike them and place them in the ground.
These define the length of the mat you are going to make and will take the threads which will support the mat.
You can make it as long or as short as you want it.
P1000195 by pandabean2010, on Flickr
2)Start to measure and cut your string/cord, tie it off to the first stake and take it to the second stake opposite it, wrap it round a few times and tie it off here. Make your way back with the string to the starting post and loosely tie it off, you will be tying this to something else.
Continue along all the pairs of stakes until you are done.
P1000198 by pandabean2010, on Flickr
3)Now take the loosely tied ends and tie these to a long straightish stick, this will be your main bar that controls whether the strings go up or down. It is through this motion that you will be able to weave the material through.
P1000202 by pandabean2010, on Flickr
4)Either before you start this loom or once you are at this point you will need to gather suitable material for weaving.
In this case we used some rush that we had cut from the nearby field. Earlier in the year we had used dried reeds from a nearby lake. I have heard of people using dried grass as well, each material will have their own properties.
5)Now the weaving begins!
Have one person lower and hold the bar to the ground whilst the other person(s) place some of the rush (the Weft) in between the warp strings. It is best to take 2 bundles per each pass and each bundle with alternate ends, ie bundle 1 will have the thin ends at the top and thick ends at the bottom and bundle 2 will have the thick ends at the top and the thin ends at the bottom.
P1000203 by pandabean2010, on Flickr
6)Once this first weft is done, the person holding the main bar raises it up so that there is enough room to get the second bundle passed in. After two or three bundles it is best to tie off each of the strings as this should stop the bundles sliding down.
P1000204 by pandabean2010, on Flickr
7)Lift up and weave in the next bundle, lower the bar and weave in the next. Continue this process until you reach the end of the available string on the loom and try to the keep the bundles level as you go.
P1000205 by pandabean2010, on Flickr
8)Once you reach the end you need to cut the strings from the closest stakes and tie them off, this will be one end done. You will need to repeat at the other end. For this end we found that it is best to add a bit of string at the end of each string to stop it coming undone when you take the strings off.
This is also the point where everyone stands and watches the others do the work.
P1000209 by pandabean2010, on Flickr
9)After you have cut it all free you have a nice finished mat that has multiple uses and looks nice if you are at a camp for a period of time.
P1000211 by pandabean2010, on Flickr
I have added the photos from our meet earlier in the year which may help in understanding how the loom works. We had used dried reeds from a nearby lake on the estate and instead of putting the spikes in the ground at one end we had used a bar tied to a tree and 4 stakes at the other end.
NE Bushmeet (86) by pandabean2010, on Flickr
NE Bushmeet (90) by pandabean2010, on Flickr
NE Bushmeet (91) by pandabean2010, on Flickr
NE Bushmeet (94) by pandabean2010, on Flickr


