For a while I was looking to get a new backpack. Unfortunately I never found one that fit my wants and needs and if I did it was to expensive. Luckily I love making things myself, so I set about creating my own pack.
When I started this project I had a few base specifications I wanted fulfilled.
Materials used:
Most of the materials were bought online through Finnish and Swedish webshops (http://www.shelby.fi, http://www.jonic-textil.se) or at my local sewing shop.
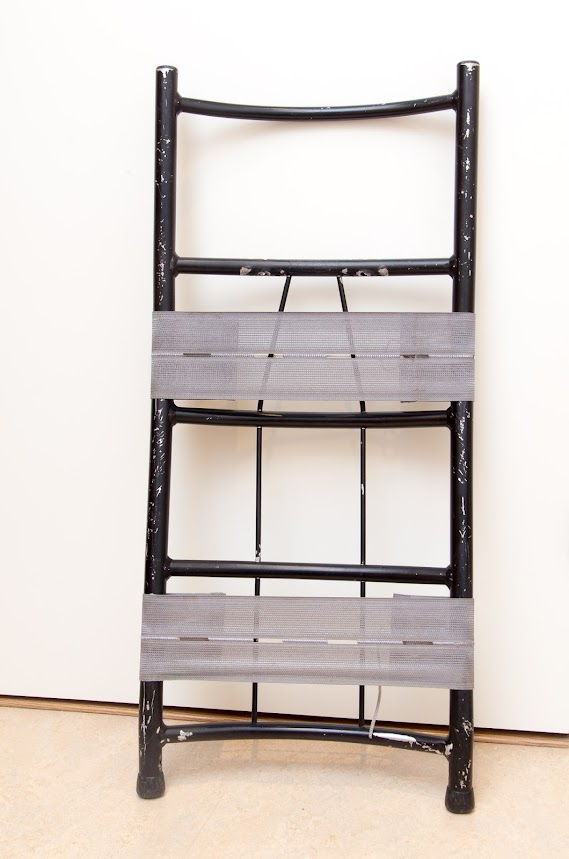
After searching the internet and local thrift shops I found an old Fjällräven aluminium backpack frame to make the base for my backpack. The original bag was promptly discarded due to dubious odours together with the inadequate carry system.
The beginning.
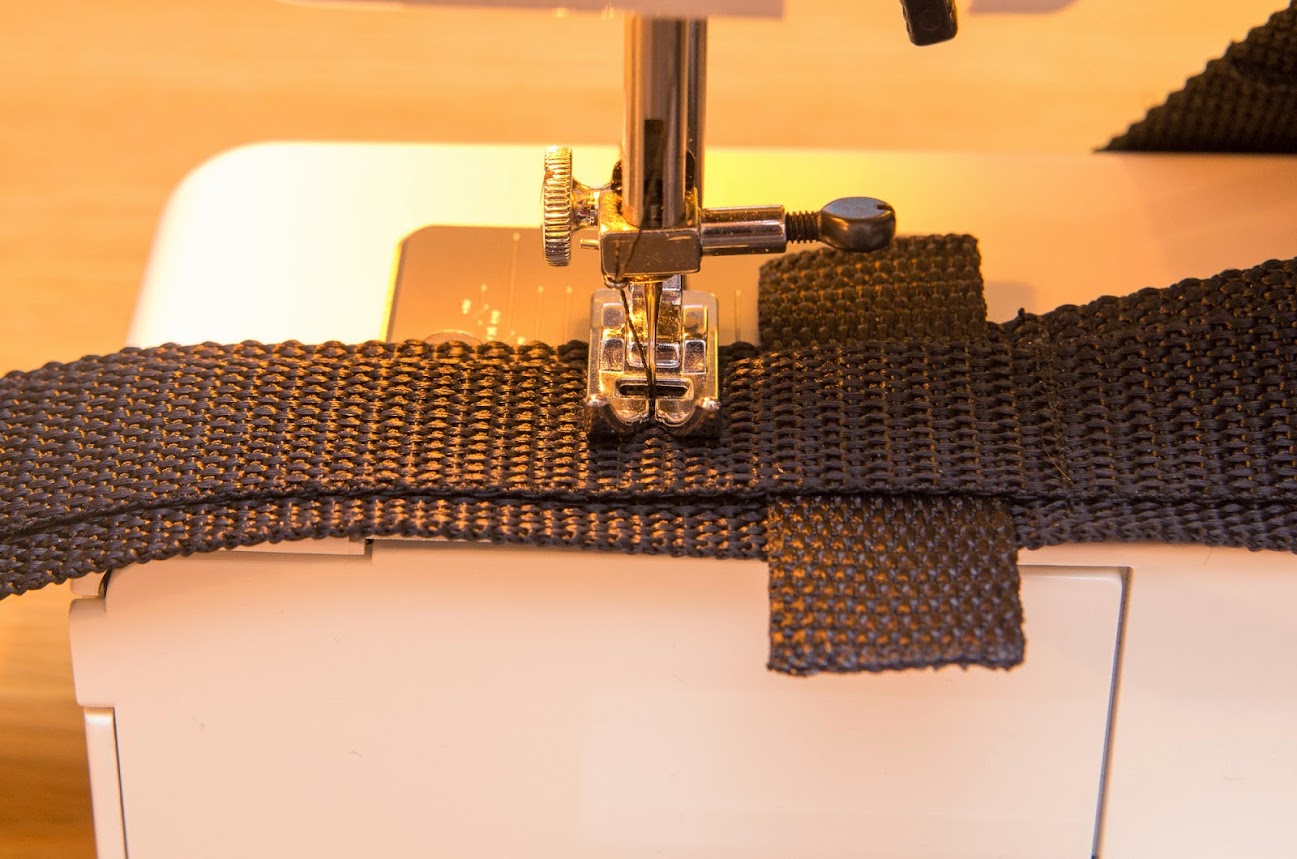
I started out measuring and constructing my carry system, something that would fit my body and be comfortable to carry.
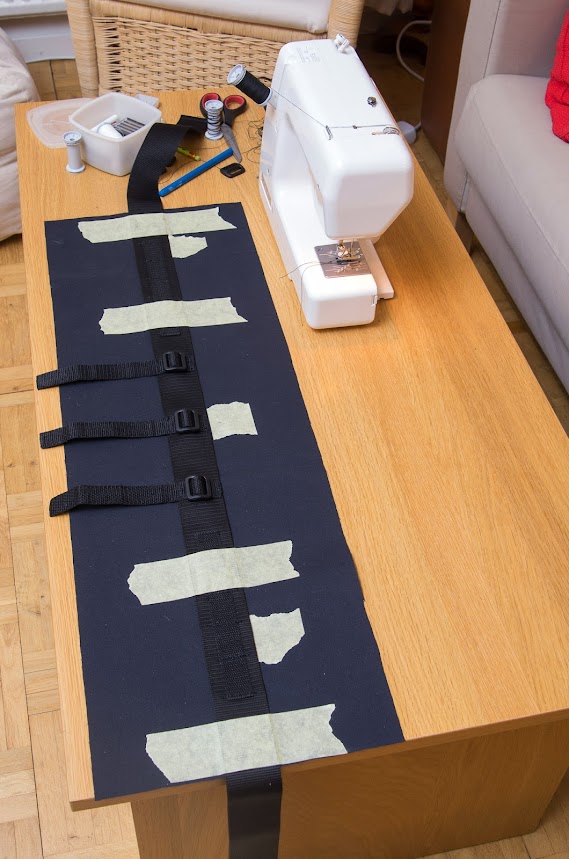
Measuring out and making the belt.
In the above picture you can see how I solved the problem of not being able to use needles while sewing parts to the main nylon fabric (would have completely ruined my waterproof bag). Tape. Lots of tape...

Carry system from start to finish.
After I was somewhat satisfied with the initial results of the carry system I started working on the design of the main bag.
I decided to go for a main bag of about 45 litres, but since I wanted to have a roll-down closing system (for waterproofness), I made sure that the bag was tall enough to make it larger by not rolling it all the way down. After a lot of measuring and cutting (measure twice, cut once) I started sewing the bag together. The main bag is a cylinder with a diameter of about 33 cm and a height of 55 cm.
Since the main material is a PU-coated nylon, I wanted to protect the coating with a liner material. For this I found a cheap sail cloth that had the added benefit of being white (easier to find things inside the bag). After more measuring and cutting I had a duplicate of the main bag made from sail cloth.
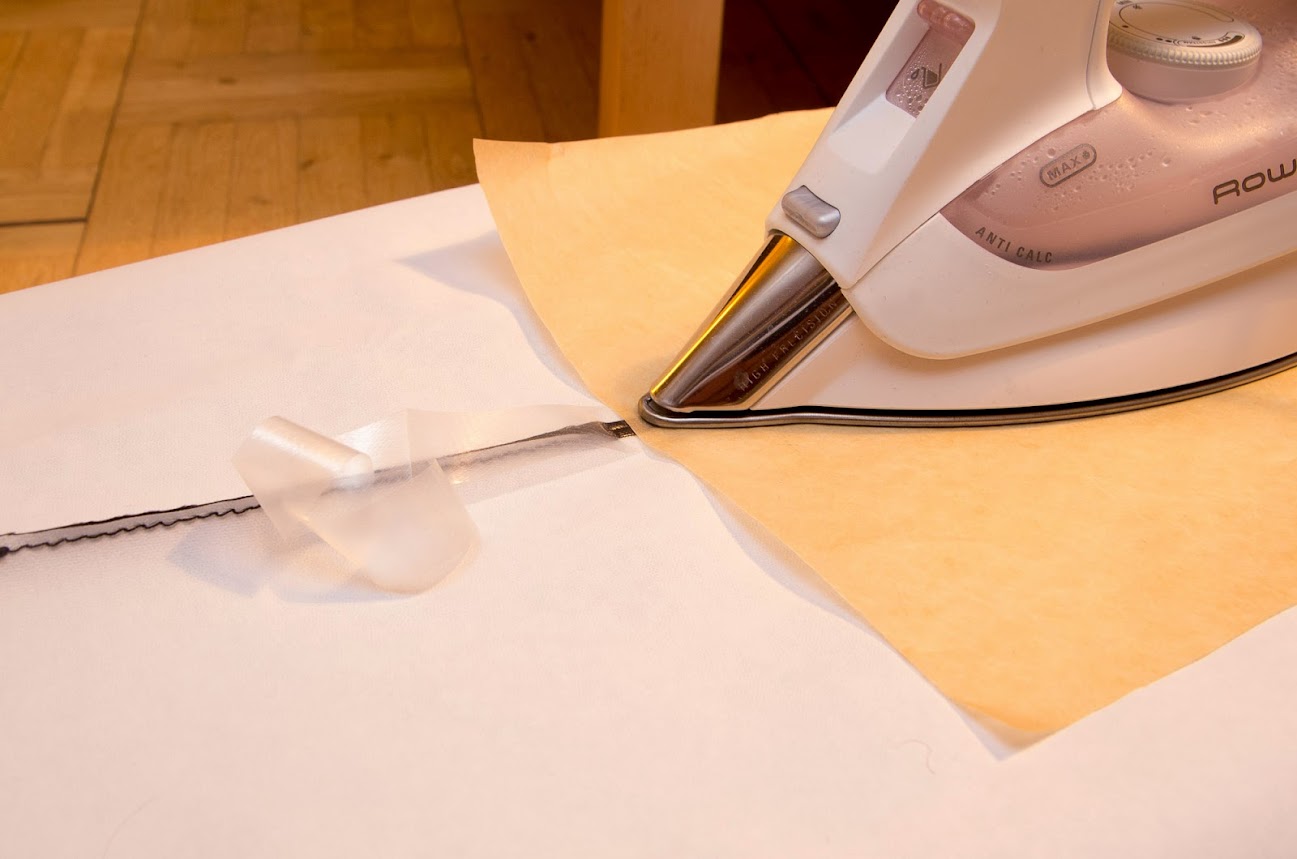
The next step was to make sure all the seams in the main bag was watertight. I had chosen to use seam tape for this, applied to the coating side with an iron. This turned out to be the most time-consuming part of the whole project. I spent almost an hour alone on the round bottom seam. Almost all the seams of the nylon fabric were sealed this way. The only exceptions are around the bottom zipper (protected by a flap) and at the top of the bag and side pouches where the liner and main material attach to each other. I will not mention seam taping again, but it did take place (and took a lot of time).
Seam taping
When I was satisfied that the bag was waterproof I started measuring where to add the water-resistant bottom zipper. This proved to be another challenge, due to the fact I needed to attach it in both the main material and the lining. Very careful measuring was needed to make sure the hole in the two parts lined up properly before cutting and sewing. Lots of needles (and some blood) later I had managed to sew in the zipper. To make sure the integrity of my waterproof bag was not completely ruined by adding a large hole in the bottom I also added a flap over the zipper for added protection. On this flap I also attached some reflective tape, for visibility.
Attaching the zipper flap.
By this time it was time to start thinking about how to attach the bag to the frame. My idea was to make a support from 40mm webbing. This way the strong webbing would carry most of the weight, instead of the nylon fabric.

Webbing support.
In the above pictures you can see five straps sticking out from the rest of the webbing. I use these together with 40mm tension locks to attach the bag to the frame. As you can see I also added some of the reflective tape to the top of the webbing support. As an aid in attaching the two central webbing straps to the bottom of the support frame I used a CAD-program to make a reference sheet. With this I could easily measure where to attach the two straps and at what angle.

Finding the angles.
To make my pack modular I also attached a strip of 25mm webbing to the support frame with about 30mm loops to create a lot of attachment points. There are also attachment points on the shoulder straps and the belt.
Adding attachment points.
Before continuing on to merge bag and webbing support I decided to add a line of grommets on each side of the bag. With some paracord through these I figured I would be able to compress the bag somewhat if needed.

Grommets for compressing the bag, if needed.
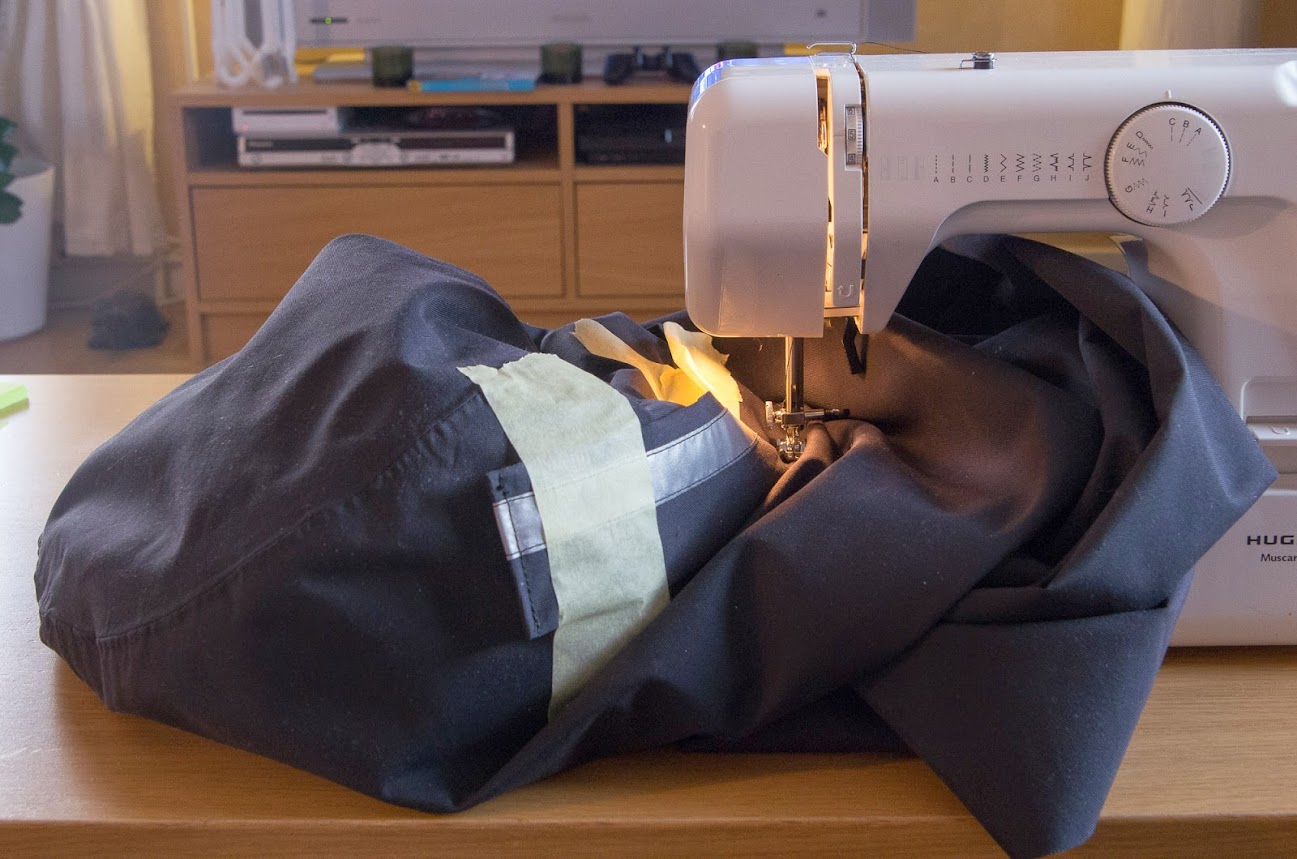
Now came the challenge of making the bag into one unit. After some trial and error I found that if I filled the bag with cushions I could attach the webbing with tape (again, so as not to make unnecessary holes). After this it was a breeze (well…") sewing bag and webbing together.
sewing bag and webbing together.

Lots of cusions and tape to merge bag and webbing support. Note the five straps for attaching the bag to the frame.
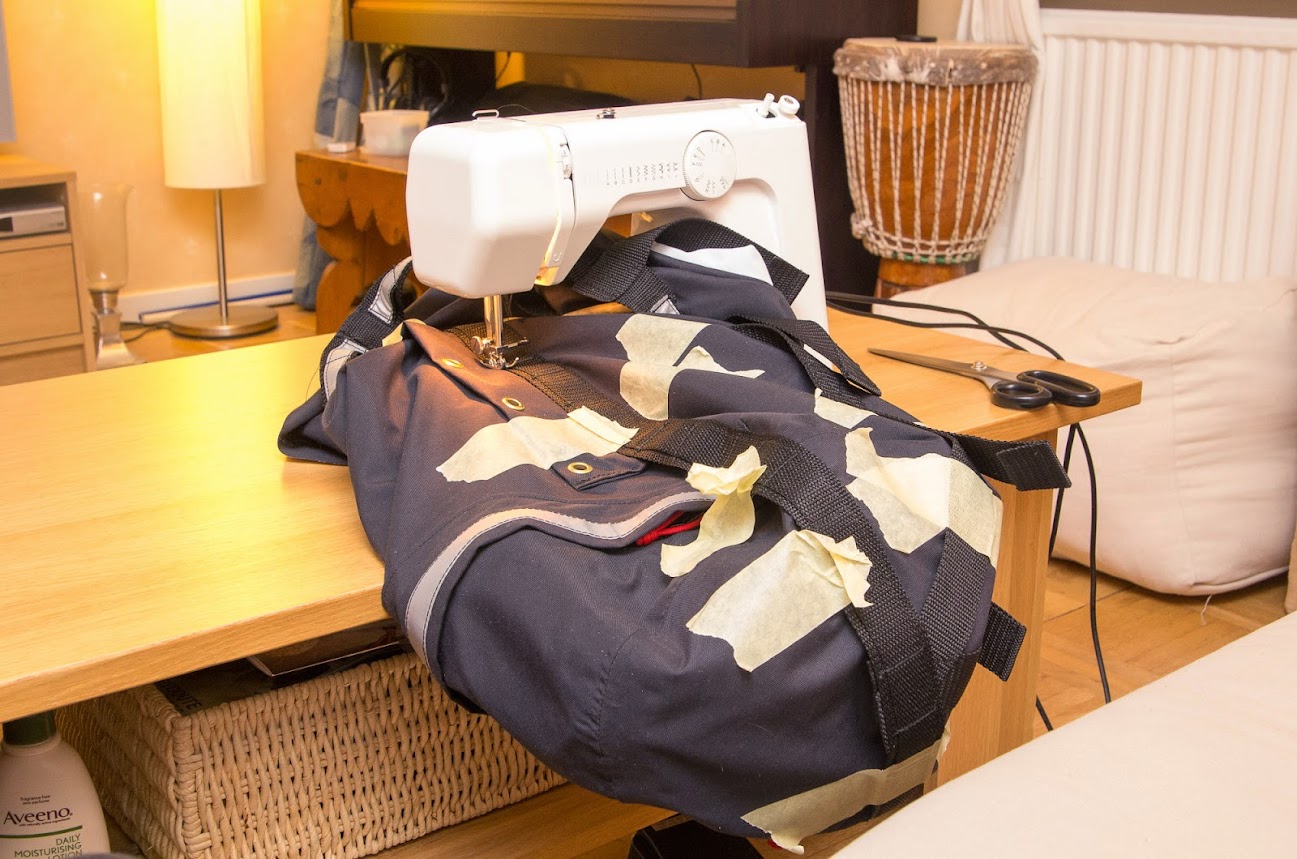
Making bag and webbing support into one unit.
Here you can clearly see the attachment points along the webbing and can also get a good look at the massive industrial sewing machine I used for this project.
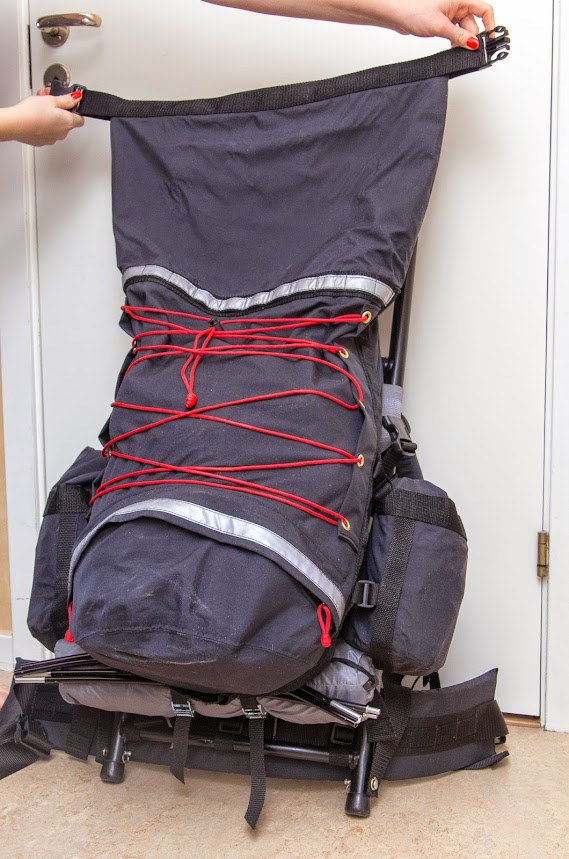
After the webbing and bag was one I attached another piece of webbing together with a click buckle around the rim of the bag for the roll-close. I made sure I found a dual adjust buckle for this, since I wanted to be able to close the bag both by buckles attached to the frame as well as on it’s own. As mentioned before, this is one of the few parts of the bag where I could not waterproof the seams with tape (due to no access after sewing the bag shut). This is no problem since this part will be rolled shut anyway. Apart from at the zipper, this is also the only point where the liner is attached to the main material.
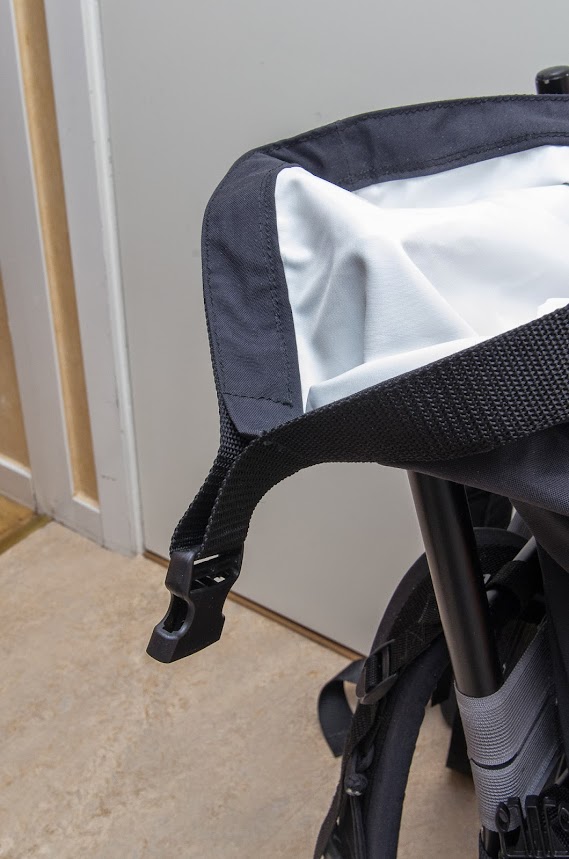
Closeup of roll-close buckle.

Closeup of closing the bag without using the frame attachments.
Now it was time to focus on the side pouches. I decided on making four, two smaller ones at 3.5 litres and two bigger ones at 6 litres. They were made on the same principle as the main bag: main outer material and a lining, webbing support and a roll-close system. For attaching the pouches to the main bag I chose to use straps as shown.

Small side pouch.
Note that in the picture on the right the pouch is empty and is only filled with air. Apparently the waterproofing of the seams have worked!

Closeup of side pouch attached to the frame.
With all four side pouches the pack can fit about 65 litres. If not roll-closed all the way it can fit up to 80 litres. Removing the side pouches leaves a pack of 45-60 litres. Although, not rolling it closed all the way may have an adverse effect on the waterproofness. Total weight of the pack is about 2.5-3 kg depending on if I use the side pouches or not.
Below are pictures of the finished pack.
The backpack with two small side pouches attached. Underneath the main bag I have here attached my Integral Designs Unishelter.
Demonstrating the roll-close part of the bag (with the help of my wife).

Closeup of attachment point for the roll-close.
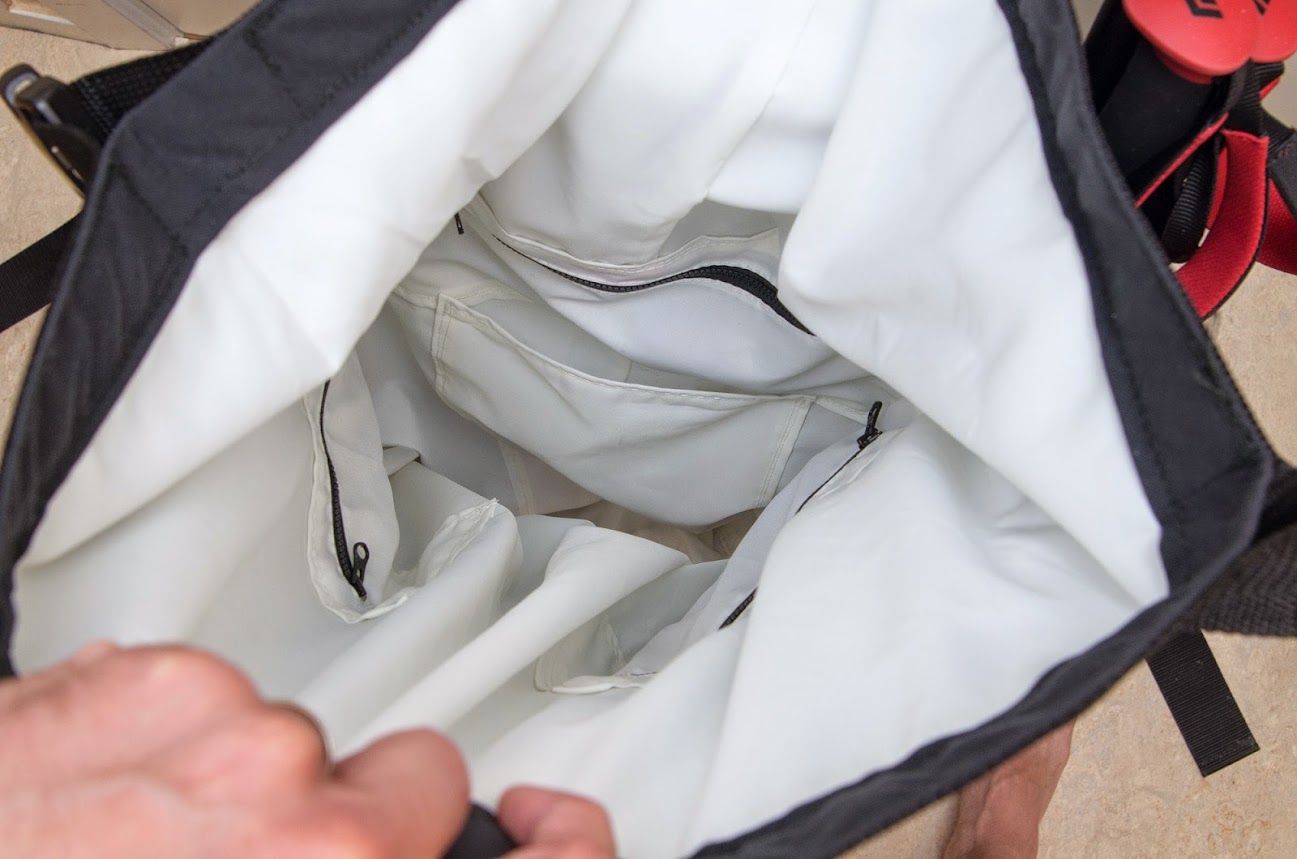
Inside the bag. Three small zip-pockets and one deep open pocket.

Closeup of the bottom opening.
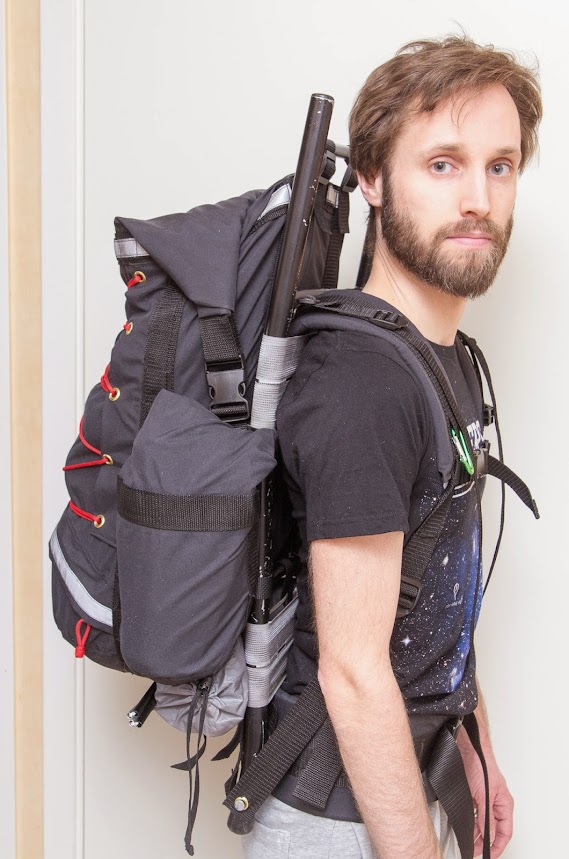
Carrying the pack.
While trying the backpack out on a hike I was fortunate enough to get a lot of rain. I walked for about two hours in pouring rain and by the time I got to my planned campsite I was soaked. But, as it turned out, my pack worked beautifully and everything inside was completely dry. Yay!

Me soaked.
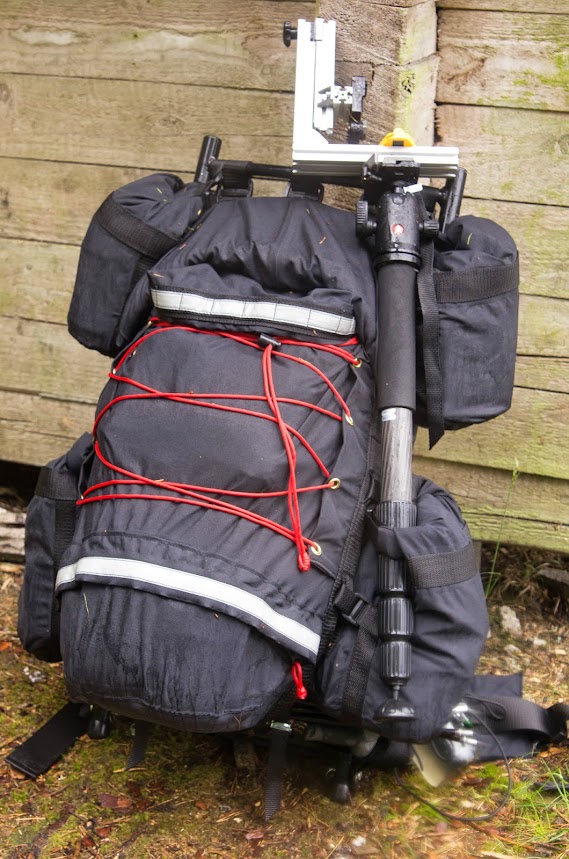
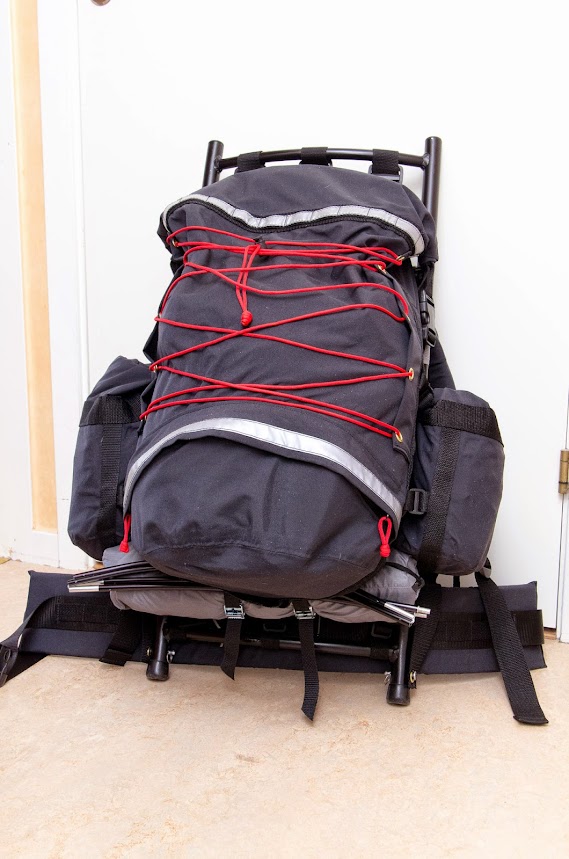
Backpack with all side-pouches, filled with more equipment than needed (about 19 kg, just to test it out), my monopod strapped to the frame. Soaking wet on the outside, completely dry on the inside.
During the hike I did note that it was slightly difficult to get the pack to sit comfortably, especially the belt. I have since looked at the design of the belt and decided to change it so that the pack sits a little lower. A work in progress... This is only a small matter and easy to correct and I am absolutely thrilled over my new backpack.
Future additions to the pack include an attachment on the shoulder straps for my camera and small removable pockets for the belt.
Thanks for reading.
When I started this project I had a few base specifications I wanted fulfilled.
- Waterproof.
- Modular (being able to add or remove side pockets, easily change parts and so on).
- Frame.
- Opening both in the top and bottom.
Materials used:
- One backpack frame (1970’s Fjällräven)
- About 2 meters of 2-layer Waterproof/Breathable Nylon Oxford, PTFE >10 000mm (width 146 cm).
- About 1.5 meters of thin, white sail cloth (width 150cm).
- Several hundred meters of extra tough thread.
- About 40 meters of Action 2-Layer Seam Tape.
- One 60 cm Water-Resistant YKK AquaGuard VISLON 5VS Two-Way Separating Zipper
- One 20cm and two 16 cm YKK VISLON 3VS Tooth Pocket Zipper, Wide Pull
- About 2 meters of double density foam for shoulder straps and belt.
- About 13.5 meters of 25mm webbing.
- About 11 meters of 40mm webbing.
- About 1.5 meters of 50mm webbing.
- Twenty-five 25mm tension lock
- Thirteen 40mm tension lock
- Five 25mm click buckles
- Two 40mm dual adjust click buckles
- One 50mm dual adjust click buckle
- About 1.5 meters of 20mm Reflective Sew-On Tape.
- Twelve 10mm grommets.
- Some red paracord.
- One cord lock, salvaged from an old backpack.
Most of the materials were bought online through Finnish and Swedish webshops (http://www.shelby.fi, http://www.jonic-textil.se) or at my local sewing shop.
After searching the internet and local thrift shops I found an old Fjällräven aluminium backpack frame to make the base for my backpack. The original bag was promptly discarded due to dubious odours together with the inadequate carry system.
The beginning.
I started out measuring and constructing my carry system, something that would fit my body and be comfortable to carry.
Measuring out and making the belt.
In the above picture you can see how I solved the problem of not being able to use needles while sewing parts to the main nylon fabric (would have completely ruined my waterproof bag). Tape. Lots of tape...
Carry system from start to finish.
After I was somewhat satisfied with the initial results of the carry system I started working on the design of the main bag.
I decided to go for a main bag of about 45 litres, but since I wanted to have a roll-down closing system (for waterproofness), I made sure that the bag was tall enough to make it larger by not rolling it all the way down. After a lot of measuring and cutting (measure twice, cut once) I started sewing the bag together. The main bag is a cylinder with a diameter of about 33 cm and a height of 55 cm.
Since the main material is a PU-coated nylon, I wanted to protect the coating with a liner material. For this I found a cheap sail cloth that had the added benefit of being white (easier to find things inside the bag). After more measuring and cutting I had a duplicate of the main bag made from sail cloth.
The next step was to make sure all the seams in the main bag was watertight. I had chosen to use seam tape for this, applied to the coating side with an iron. This turned out to be the most time-consuming part of the whole project. I spent almost an hour alone on the round bottom seam. Almost all the seams of the nylon fabric were sealed this way. The only exceptions are around the bottom zipper (protected by a flap) and at the top of the bag and side pouches where the liner and main material attach to each other. I will not mention seam taping again, but it did take place (and took a lot of time).
Seam taping
When I was satisfied that the bag was waterproof I started measuring where to add the water-resistant bottom zipper. This proved to be another challenge, due to the fact I needed to attach it in both the main material and the lining. Very careful measuring was needed to make sure the hole in the two parts lined up properly before cutting and sewing. Lots of needles (and some blood) later I had managed to sew in the zipper. To make sure the integrity of my waterproof bag was not completely ruined by adding a large hole in the bottom I also added a flap over the zipper for added protection. On this flap I also attached some reflective tape, for visibility.
Attaching the zipper flap.
By this time it was time to start thinking about how to attach the bag to the frame. My idea was to make a support from 40mm webbing. This way the strong webbing would carry most of the weight, instead of the nylon fabric.
Webbing support.
In the above pictures you can see five straps sticking out from the rest of the webbing. I use these together with 40mm tension locks to attach the bag to the frame. As you can see I also added some of the reflective tape to the top of the webbing support. As an aid in attaching the two central webbing straps to the bottom of the support frame I used a CAD-program to make a reference sheet. With this I could easily measure where to attach the two straps and at what angle.
Finding the angles.
To make my pack modular I also attached a strip of 25mm webbing to the support frame with about 30mm loops to create a lot of attachment points. There are also attachment points on the shoulder straps and the belt.
Adding attachment points.
Before continuing on to merge bag and webbing support I decided to add a line of grommets on each side of the bag. With some paracord through these I figured I would be able to compress the bag somewhat if needed.
Grommets for compressing the bag, if needed.
Now came the challenge of making the bag into one unit. After some trial and error I found that if I filled the bag with cushions I could attach the webbing with tape (again, so as not to make unnecessary holes). After this it was a breeze (well…
sewing bag and webbing together.
Lots of cusions and tape to merge bag and webbing support. Note the five straps for attaching the bag to the frame.
Making bag and webbing support into one unit.
Here you can clearly see the attachment points along the webbing and can also get a good look at the massive industrial sewing machine I used for this project.
After the webbing and bag was one I attached another piece of webbing together with a click buckle around the rim of the bag for the roll-close. I made sure I found a dual adjust buckle for this, since I wanted to be able to close the bag both by buckles attached to the frame as well as on it’s own. As mentioned before, this is one of the few parts of the bag where I could not waterproof the seams with tape (due to no access after sewing the bag shut). This is no problem since this part will be rolled shut anyway. Apart from at the zipper, this is also the only point where the liner is attached to the main material.
Closeup of roll-close buckle.
Closeup of closing the bag without using the frame attachments.
Now it was time to focus on the side pouches. I decided on making four, two smaller ones at 3.5 litres and two bigger ones at 6 litres. They were made on the same principle as the main bag: main outer material and a lining, webbing support and a roll-close system. For attaching the pouches to the main bag I chose to use straps as shown.
Small side pouch.
Note that in the picture on the right the pouch is empty and is only filled with air. Apparently the waterproofing of the seams have worked!
Closeup of side pouch attached to the frame.
With all four side pouches the pack can fit about 65 litres. If not roll-closed all the way it can fit up to 80 litres. Removing the side pouches leaves a pack of 45-60 litres. Although, not rolling it closed all the way may have an adverse effect on the waterproofness. Total weight of the pack is about 2.5-3 kg depending on if I use the side pouches or not.
Below are pictures of the finished pack.
The backpack with two small side pouches attached. Underneath the main bag I have here attached my Integral Designs Unishelter.
Demonstrating the roll-close part of the bag (with the help of my wife).
Closeup of attachment point for the roll-close.
Inside the bag. Three small zip-pockets and one deep open pocket.
Closeup of the bottom opening.
Carrying the pack.
While trying the backpack out on a hike I was fortunate enough to get a lot of rain. I walked for about two hours in pouring rain and by the time I got to my planned campsite I was soaked. But, as it turned out, my pack worked beautifully and everything inside was completely dry. Yay!
Me soaked.
Backpack with all side-pouches, filled with more equipment than needed (about 19 kg, just to test it out), my monopod strapped to the frame. Soaking wet on the outside, completely dry on the inside.
During the hike I did note that it was slightly difficult to get the pack to sit comfortably, especially the belt. I have since looked at the design of the belt and decided to change it so that the pack sits a little lower. A work in progress... This is only a small matter and easy to correct and I am absolutely thrilled over my new backpack.
Future additions to the pack include an attachment on the shoulder straps for my camera and small removable pockets for the belt.
Thanks for reading.
Last edited:


")
