Stock removal No3

Pignut

Bushcrafter (boy, I've got a lot to say!)
Jun 9, 2005
4,096
12
45
Lincolnshire
The story so far!! (to show progress or not as the case may be :D )

#1
3mm stock O1 steel with unknown wood handle
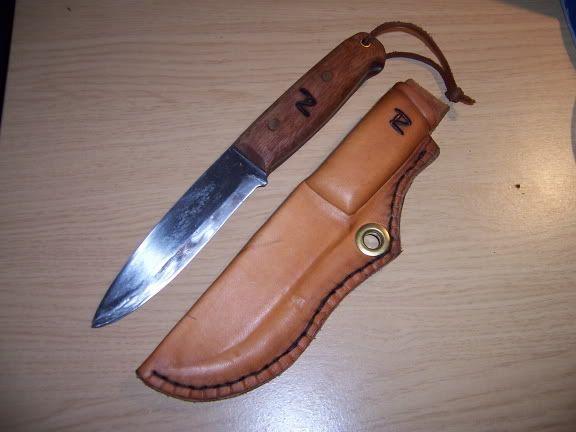
000_0289.jpg


#2
3mm stock O1 steel with Oak handle and unpolished blade
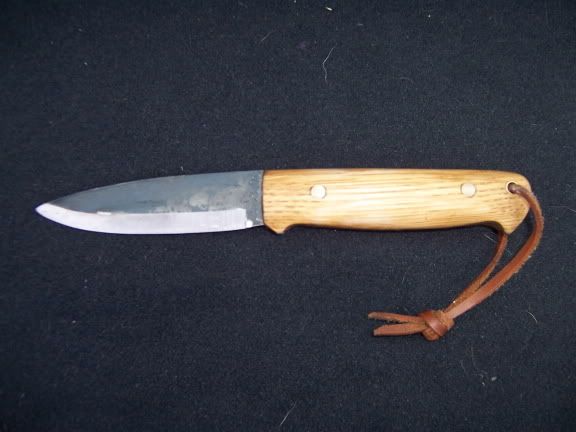
100_0017.jpg


#3
And the latest off the line, Still needs a good session on the stones and a final polish. 3mm stock O1 steel with Maple handle and red fibre spacers
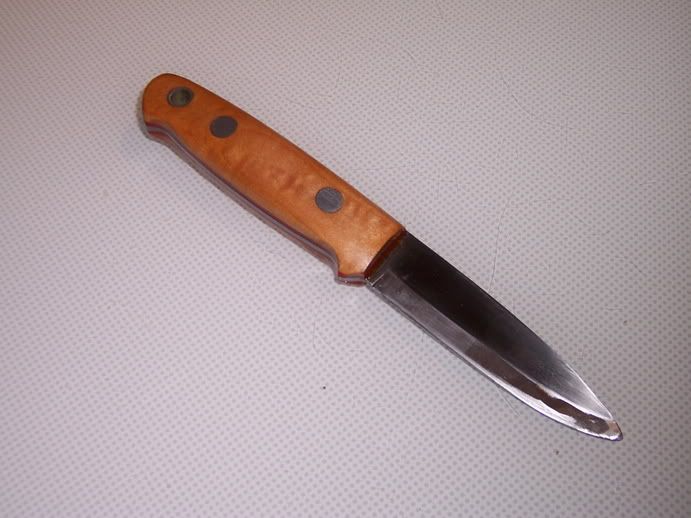
000_0414.jpg


As always comments please
 

capacious

Need to contact Admin...
Nov 7, 2005
316
9
37
Swansea
They are impressive, but the point to the blade looks slightly rounded (not that i could do better) otherwise they are what one might describe a perfect. Nice!
 

KevB

Forager
Oct 19, 2005
133
1
64
Lowestoft, Suffolk, UK
Just picked up on this thread and am in no way qualified to pass serious judgement on this sort of work - but looking at #1, my 'gut feel' is that that either the blade is a little long or the handle a little thin and shallow for my type of 'feedback' feel. #2 and 3 look better proportionaly.
I dont know the dimensions and of course this could just be camera angles !

I know we all have differing preferences for our 'tools' so this may well be an invalid comment for many.

Anyway, the craftsmanship looks excellent - I only wish I had the time and ability to attempt a go myself ! ( I know.... you have to make the time etc...)
 

eraaij

Settler
Feb 18, 2004
557
61
Arnhem
Very, very nice. I think that #3 shows the progression, like you said. But as a maker I would also be very happy with #1.

-Emile
 

Pignut

Bushcrafter (boy, I've got a lot to say!)
Jun 9, 2005
4,096
12
45
Lincolnshire
Thanks all!

The kindness on this website never stops amaizing me!

All of the blade shapes are pretty much the same! it is just my poor photography that does them no justice!

The blade tip is not as round as it apears on the third picture.

Once again, thanks all
 

Pignut

Bushcrafter (boy, I've got a lot to say!)
Jun 9, 2005
4,096
12
45
Lincolnshire
Here it is finnished,

All it needs now is the edge really polishing (Are These Any good)

The tip of the blade, on reflection, was a little round, this has now been re-ground (slowly to avoid heat!)

000_0422.jpg


The sheath is 3/4mm veg tan leather with the Fire Steel holder moved out slightly to accomodate my large hands on removal of the knife from the sheath.

I may change the hadle of the fire steel to a maple one to match the knife handle!

As always your comment are my best teacher so feel free to do your worst!


000_0420.jpg
 

Biddlesby

Settler
May 16, 2005
972
4
Frankfurt
Fantastic work, is it 'easy' to get started with stock removal?

The one you have most recently posted is my favourite from the three, except for the fact that the ricasso goes in slightly
 

Big John

Nomad
Aug 24, 2005
399
0
52
Surrey
Pignut said:
All it needs now is the edge really polishing (Are These Any good)

I've got the combination 1000 / 6000 (or sommit' like that) from there and as far as I can tell they are pretty good - I've not got much to compare against but I reckon I've got a pretty good edge on my knife.

Nice work btw, putting a handle on a blade myself at the moment, but wouldn't know where to start with heat treatment Etc.
 

Pignut

Bushcrafter (boy, I've got a lot to say!)
Jun 9, 2005
4,096
12
45
Lincolnshire
Not to bad! would not call it easy!

Once you have sourced some flat stock design your knife, transfer the outline onto the metal (A scribe is best for this)

I then chain drill around the outside of the outline and use a saw to join the holes untill you are left with a very rough outline.

then file/Grind the rough edges until you have a perfect blank of the knife.

Decide what you want to use as rivets,
(I used 8mm aluminium bar and 8mm aluminium tube for the lanyard hole.)

Then drill the holes on the tang where you want these to fit.

Once this is done Begin to file the beval! (I draw a line around the edge to give me a guide) and slowly file away the steel to the line (This takes days)

Once these steps are complete and the edge is within 1mm of being sharp I heat treat, using a one brick furnace and blowlamp so the steel no longer sticks to a magnet, I then quench in oil to 40degC

Once the blade is cooled I clean with soap and water and temper in the kitchen oven at about 350 - 400 for 30 mins

This method seems to produce a good edge! (The first knife in this post has been used almost daily since it was made and abused in every way posible and still retains a good edge)

Then onto putting on the handle!!!!!!!!

Garbled but hopefully helps a little!

You dont need specialist tools! infact I have heat treated a blade i the BBQ to the point where it looses magnetic atraction, the rest of the job is just basic hand tools!

Look on BB and on the pages of BCUK there are tones of threads about!
 

Pignut

Bushcrafter (boy, I've got a lot to say!)
Jun 9, 2005
4,096
12
45
Lincolnshire
Big John said:
I've got the combination 1000 / 6000 (or sommit' like that) from there and as far as I can tell they are pretty good - I've not got much to compare against but I reckon I've got a pretty good edge on my knife.

Nice work btw, putting a handle on a blade myself at the moment, but wouldn't know where to start with heat treatment Etc.


Good luck with that! post pictures when you have !
 

firemaker

Need to contact Admin...
Jul 26, 2005
139
2
58
Minnesota, USA
stores.ebay.com
Pignut----- again Great job!!! Thay are realy nice knifes. You said that it can take you days to get to that edge! have you thougt about an angle grinder? I use mine alot -- for cutting the blanks out to starting the bevels. Helps alot makes the work faster, and its easy on the arms.
 

C_Claycomb

Moderator staff
Mod
Oct 6, 2003
7,633
2,707
Bedfordshire
Mate, if it takes days to do the bevel you are taking way too many tea breaks :D :lmao:

I timed myself once, I was making a 6" x 1.25" bowie from 3/16" O-1 stock, it took 45 minutes to saw out the shape, no chain drilling, another 30 to file the profile right and polish the edge for marking. Filing a full flat bevel with a distal taper for about half the length took 45-60 minutes per side. Hand sanding to 400grit prior to heat treatment took an hour per side, using a mill file to draw file the surface, or changing paper more often knocked that time down to 40 minutes a side. It will take a while, but not that long ;)

You have been pretty lucky with the heat treating. If its working for you, great! However, I have had very mixed results using a single quench. I found that many of what I thought were my better knives were never tempered as much as they should have been by design, but it was okay since I never got the steel fully hard! :eek: Simple heat treat is easy, really good heat treatment is an enjoyable challenge.

Thanks for sharing :D
 

Ogri the trog

Mod
Mod
Apr 29, 2005
7,182
71
60
Mid Wales UK
C_Claycomb said:
You have been pretty lucky with the heat treating. If its working for you, great! However, I have had very mixed results using a single quench. I found that many of what I thought were my better knives were never tempered as much as they should have been by design, but it was okay since I never got the steel fully hard! :eek: Simple heat treat is easy, really good heat treatment is an enjoyable challenge.

Thanks for sharing :D

Chris,
What are your tips for good heat treatment then?
I'm able to get steel to non-magnetic for a quench, but find it quite difficult to get the temper right. Using a blow torch, its hard to stop the heat before getting to a blue colour. I suppose that experience comes into it but if you have any humdingers I'd really appreciate the help.

TIA

Ogri the trog
 

BCUK Shop

We have a a number of knives, T-Shirts and other items for sale.

SHOP HERE