In the thread 'Wood-gas stove for developing countries'
http://www.bushcraftuk.com/forum/showthread.php?t=84396&highlight=
.
I asked if anyone had made a stove to the actual design in the paper:
http://www.waoline.com/science/newen...odGasStove.pdf
.The main schematic is:
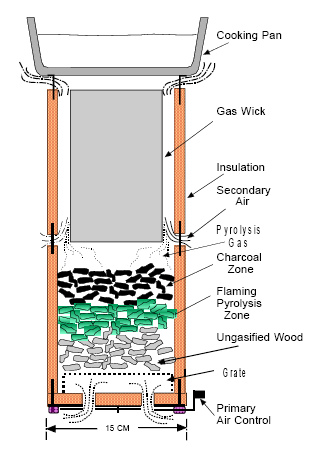
.
No-one seemed to have done it so I thought I would have a go.
.
(People skilled at metal work should be sitting down and away from sharp objects when reading the remainder.)
.
The finished stove looked something like this:
.

.
SUMMARY
.
My impementation of the design did not work well but it has given me some ideas for another stove.
I set out here what I did in case it is of help to someone else with better ideas, skills and tools than me
.
MATERIALS
Two large heinz tomato soup cans and a baked bean can
.
PARTICULAR POINTS
.
(1) the valve at the bottom was relatively simple to make and could be a useful feature in other stoves
.

.

.
as it gives some control over air flow.
.
(2) Because of the valve in the bottom you need a grate - I just used screwed up galvanised wire as it was all I had - worked well enough for my trial, but something like the grid off a disposable BBQ would probably be better
.

.
(3) I tried various ways of holding the 'gas wick' in place
.

.

.
but in the end I just rested it on the bolts on the inside
.

.

.
(4) with the annular ring reduced to about 5mm the flame was a deep orange with occasional hints of blue, so the design seemed to be having some effect on the flame/efficiency of burn
.

.(
5) Insulating the unit (top and bottom halves) would probably have improved the gasification but as it was the bottom tin can was getting red hot
.

.
so if you want to have a go at this then it would be better to use a more robust lower unit
.
(5) I read the design to require that you clip the upper part to the lower part after you have lit the fire. I didn't know how I might do that. Even better if you were to use a method that allowed you to easily adjust the gap. I had to make do with nuts and bolts and it was a faff to amend/correct things eg when I forgot to put the grate in and again when I changed the annular gap
.
(6) You put the fuel in and then light the fire from the top
.

.
I added a bit of tinder and used a fire lighter to get it going
.
(7) The unit should have legs. These weren't essential for my tests but if you have a go then I think you should have only three legs , suitably positioned so that you can still open and close the valve fully
.
(8) You need some way of providing a pot rest that allows a gap for the flames to appear at the top - not essential for my test
.
NEXT TIME
.
Well ... as regards this design there won't be a next time for me. When I get the urge I might have a go at a stove which is just this:
.

.
or something like it
And if anyone ever does make a stove to the original design I'd be more than interested to hear how it worked
http://www.bushcraftuk.com/forum/showthread.php?t=84396&highlight=
.
I asked if anyone had made a stove to the actual design in the paper:
http://www.waoline.com/science/newen...odGasStove.pdf
.The main schematic is:
.
No-one seemed to have done it so I thought I would have a go.
.
(People skilled at metal work should be sitting down and away from sharp objects when reading the remainder.)
.
The finished stove looked something like this:
.
.
SUMMARY
.
My impementation of the design did not work well but it has given me some ideas for another stove.
I set out here what I did in case it is of help to someone else with better ideas, skills and tools than me
.
MATERIALS
Two large heinz tomato soup cans and a baked bean can
.
PARTICULAR POINTS
.
(1) the valve at the bottom was relatively simple to make and could be a useful feature in other stoves
.
.
.
as it gives some control over air flow.
.
(2) Because of the valve in the bottom you need a grate - I just used screwed up galvanised wire as it was all I had - worked well enough for my trial, but something like the grid off a disposable BBQ would probably be better
.
.
(3) I tried various ways of holding the 'gas wick' in place
.
.
.
but in the end I just rested it on the bolts on the inside
.
.
.
(4) with the annular ring reduced to about 5mm the flame was a deep orange with occasional hints of blue, so the design seemed to be having some effect on the flame/efficiency of burn
.
.(
5) Insulating the unit (top and bottom halves) would probably have improved the gasification but as it was the bottom tin can was getting red hot
.
.
so if you want to have a go at this then it would be better to use a more robust lower unit
.
(5) I read the design to require that you clip the upper part to the lower part after you have lit the fire. I didn't know how I might do that. Even better if you were to use a method that allowed you to easily adjust the gap. I had to make do with nuts and bolts and it was a faff to amend/correct things eg when I forgot to put the grate in and again when I changed the annular gap
.
(6) You put the fuel in and then light the fire from the top
.
.
I added a bit of tinder and used a fire lighter to get it going
.
(7) The unit should have legs. These weren't essential for my tests but if you have a go then I think you should have only three legs , suitably positioned so that you can still open and close the valve fully
.
(8) You need some way of providing a pot rest that allows a gap for the flames to appear at the top - not essential for my test
.
NEXT TIME
.
Well ... as regards this design there won't be a next time for me. When I get the urge I might have a go at a stove which is just this:
.
.
or something like it
And if anyone ever does make a stove to the original design I'd be more than interested to hear how it worked
Last edited:


