OK - here we go..
This is the first tutorial I have tried to write and illustrate sooooooooooooooooo....
First of all I thought I would do a "Melon Basket" - as they seem to be easiest and chose to make it with a mixture of Willow - from a tree I planted myself in my garden a few years back, and Blackberry canes or runners.
The first stage was the frame hoops.
These I had already prepared.
When I cut the Willow at the end of the winter I bound them into hoops that were something about 1/3 again as big as the intended baskets, this gave me options to resize a bit when it came to making the baskets but you can make the hoops, from straight bits of willow that have been soaked, without drying them to shape.
To get a join that is not too lumpy I scarf the join, thinning down each end to fit together neatly (one end thinned on the inside one end thinned on the outside to fit).

The hoops were then lashed together with natural cordage - in this case two ply made from (I think) Willow bast that had been tanned in ashes and Willow outerbark. Paracord will work if you prefer... or hemp, nettle, sisal, raffia etc.

Once the hoops are ready they can be made into the first stage of the frame by weaving in the first "weavers".
In this case I used more of the same cordage as I wanted great flexibility.
Start by positioning one hoop iside the other to give the proportions of handle to basket that you want - a right-angle join of eaqal sized sections is a good start.
to start the weaving take the tip of your weaver or end of your cord on the inside of the basket handle hoop, with the end pointing down to the right, and then take the "working part" of the weaver up to the left, around the outside of the handle (above the rim hoop level) and then diagonally down leftwards across the inside of the handle, trapping the tip of the weaver.
Take the weaver/cordaround the outside of the handle hoop (below the rim hoop), back across the inside of the handle hoop ( under the rim hoop level), under the rim hoop, wrap it tightly around the rim hoop and back down under the handle hoop and up to the rim hoop on the other side.
The weaving continues under and over, rim hoop, handle hoop, rim hoop etc etc, always trying to keep it all neat.


Work from both ends toward the centre. When you finish a weaver try to leave the end either trapped against the handle hoop or with the end tucked into the "pocket" formed by previous turns of the weavers over the handle hoop.
I hope you can all follow that!
These pockets will also form the housing for the "ribs" or secondry frame members of the basket.
Once you have woven a couple or so weavers on each side of the basket you can think about adding the ribs.


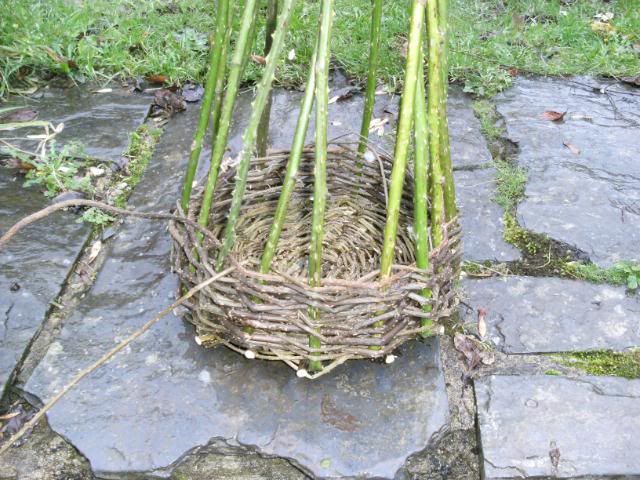
The next thing to do is make the "ribs" - sections of frame that fit into the pockets formed in the weaving. These are of a length to keep a nice curve to the shape of the basket,and pointed at each end to make it easier to push them tight into each of the four pockets.


Once the ribs are in you can keep on weaving the basket, working from each end, in a simple over and under weave. try and end and start the weavers as near the centre line of the basket as possible and match the thickness of each weaver as much as possible.
Toward the middle you may find that there is a gap in the middle of the basket but here is no room for more weavers on the rim (it did not happen in this basket) - simply weave the centre on the ribs, ignoring the rim until the gap is filled.

Keep going until the basket is finished, trim any loose ends and any ends that are sticking out and the job is done!


I hope you have fun with this - the basket in the photos took about 4 hours to weave - and about as long to collect enough materials and prep them. The hoops were not soaked but the brambles were dried for about two weeks and then soaked for a week. __________________
This is the first tutorial I have tried to write and illustrate sooooooooooooooooo....
First of all I thought I would do a "Melon Basket" - as they seem to be easiest and chose to make it with a mixture of Willow - from a tree I planted myself in my garden a few years back, and Blackberry canes or runners.
The first stage was the frame hoops.
These I had already prepared.
When I cut the Willow at the end of the winter I bound them into hoops that were something about 1/3 again as big as the intended baskets, this gave me options to resize a bit when it came to making the baskets but you can make the hoops, from straight bits of willow that have been soaked, without drying them to shape.
To get a join that is not too lumpy I scarf the join, thinning down each end to fit together neatly (one end thinned on the inside one end thinned on the outside to fit).
The hoops were then lashed together with natural cordage - in this case two ply made from (I think) Willow bast that had been tanned in ashes and Willow outerbark. Paracord will work if you prefer... or hemp, nettle, sisal, raffia etc.
Once the hoops are ready they can be made into the first stage of the frame by weaving in the first "weavers".
In this case I used more of the same cordage as I wanted great flexibility.
Start by positioning one hoop iside the other to give the proportions of handle to basket that you want - a right-angle join of eaqal sized sections is a good start.
to start the weaving take the tip of your weaver or end of your cord on the inside of the basket handle hoop, with the end pointing down to the right, and then take the "working part" of the weaver up to the left, around the outside of the handle (above the rim hoop level) and then diagonally down leftwards across the inside of the handle, trapping the tip of the weaver.
Take the weaver/cordaround the outside of the handle hoop (below the rim hoop), back across the inside of the handle hoop ( under the rim hoop level), under the rim hoop, wrap it tightly around the rim hoop and back down under the handle hoop and up to the rim hoop on the other side.
The weaving continues under and over, rim hoop, handle hoop, rim hoop etc etc, always trying to keep it all neat.
Work from both ends toward the centre. When you finish a weaver try to leave the end either trapped against the handle hoop or with the end tucked into the "pocket" formed by previous turns of the weavers over the handle hoop.
I hope you can all follow that!
These pockets will also form the housing for the "ribs" or secondry frame members of the basket.
Once you have woven a couple or so weavers on each side of the basket you can think about adding the ribs.
The next thing to do is make the "ribs" - sections of frame that fit into the pockets formed in the weaving. These are of a length to keep a nice curve to the shape of the basket,and pointed at each end to make it easier to push them tight into each of the four pockets.
Once the ribs are in you can keep on weaving the basket, working from each end, in a simple over and under weave. try and end and start the weavers as near the centre line of the basket as possible and match the thickness of each weaver as much as possible.
Toward the middle you may find that there is a gap in the middle of the basket but here is no room for more weavers on the rim (it did not happen in this basket) - simply weave the centre on the ribs, ignoring the rim until the gap is filled.
Keep going until the basket is finished, trim any loose ends and any ends that are sticking out and the job is done!
I hope you have fun with this - the basket in the photos took about 4 hours to weave - and about as long to collect enough materials and prep them. The hoops were not soaked but the brambles were dried for about two weeks and then soaked for a week. __________________