Afternoon Bushcrafters,
@lostplanet kindly sent this recently-released tent for me to have a looksee over the Christmas/New Year break. Retail site and specifications here: https://durstongear.com/products/x-dome-1-plus-ultralight-backpacking-tent
As the name suggests, it's a one person tent but with a little extra floor-space than you might expect for a standard one person tent, plus a generous sheltered area under the fly for gear that you're happy leaving under cover but not within the mesh inner.
First impression
Immediately noticable was that it was astonishingly light for what I'm used to - 1085 g for the standard set-up (fly, inner, six stakes). This also came with the tailored ground sheet (99 g) which provides floor protection for the inner, but not for the porch area. Tent-wise, I am used to a Terra Nova Ultra Quasar 2 person with an unfitted cheapo ground sheet, weighing in at triple the total weight of this, so it was quite a lovely surprise to have this weight and relatively much smaller packed sized of the Durston.
Pitching
I intentionally went into this without reading anything about the tent. However, I had been exposed to it before via YouTube and knew that it had been described as a tent you could pitch any which way you'd like in terms of inner first, fly/outer first, all together etc.
There were no instructions provided in the pack about how to pitch this. I am usually one to RTFM if provided, so given no instructions were provided I took that to mean it had to be a self-explanatory pitch from the outset. It proved not to be as you shall see!
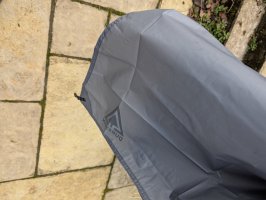
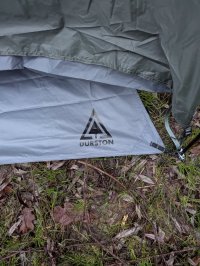
Things didn't go well when I only realised part way through that I'd got the ground sheet the wrong way around. I'd seen what I thought was the logo as I unfurled the ground sheet, but it turned out to be the silhouette of it, i.e. I had it the wrong way up. Here's a photo taken after the fact to show what I saw and mistook for the logo (it also shows how thin the material is for the ground sheet - not necessarily a bad thing).
Wrong way:
Right way:
It is also not symmetrical so directionality needs to be established if you have your sights set on a view that you want out of the tent. As this is a freestanding tent, this resulted in much less faffing to rectify than would have been the case with e.g. a non self-supporting tent such as a tunnel tent.
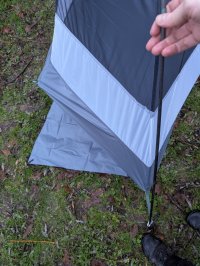
The Easton-made pole set is ridiculously light, being mostly carbon fibre. There is just the one pole assembly. It is all bungeed together into one set so can be a little unwieldy if you're not expecting it. You can also add two trekking poles for additional wind resistance.
You cannot use the ground sheet as the base for the poles - first of all the ground sheet only covers a portion of the area covered by the fly (and thus the poles), and secondly the ground sheet has clips which I later found through trial and error are meant to clip onto the inner's pole docking straps and are not meant to receive the pole ends.

This means you have to do a bit of a dance trying to keep the inner safely on the ground sheet, whilst inserting the pole ends into the pole docking points on the inner. Of course the underside of the inner got a little bit muddy in this process given the acrobatics needed on damp ground.
The pole ends dock into the docking points on the inner:

I then clipped the inner to the poles. This was a nice and simple process and the clips felt good and secure.
However, having clipped the inner to the poles and then starting to look to attach the fly, this is when I realised that it isn't at all a tent that you can choose to pitch in any order that you choose as Durston describes it. The description of it as an inner-first pitching tent is incorrect. This is only the case if you have no intention of using the fly, or if you count having to unclip the inner from everywhere on the poles other than at the base as being 'inner-pitch first'.
The pole structure is external, so of course if you intend on using both inner and fly, you have to attach the fly to it first, and then clip the inner to the fly. How it was ever thought OK to describe it as possible to inner pitch first, I do not understand. Reading the description further, they for some reason think that only pitching the inner alone, counts as inner-pitch first:
I suggest a more accurate description would be that you can pitch fly-only or inner-only, but if needing both then you have to pitch fly-first, or fly and inner pre-connected.
To be clear, I am entirely for pitching fly first. I find the mandatory inner-first pitching on my Ultra Quasar inconvenient given it exposes the inner to the elements. But the Ultra Quasar doesn't claim to be a tent you can pitch in any order.
Anway, enough of that rant.
Starting over and this time going fly first, things worked well (I thought). It was simple to get the pole ends into the docking points (still a slight dance needed but less concern with keeping the fly out of contact with the damp ground than with the inner). Only real challenge was docking the cross bar into the points on the top of the fly, as when you're moving around to dock the opposite side, the cross bar droops and the docking point can fall off. It is a snug fit though so I'm not sure how that happened twice in a row!
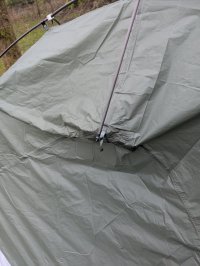
Within the fly now attached to the poles, it came to clipping in the inner to the outer. This was a straight forward process.
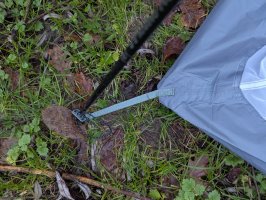
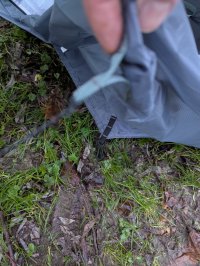
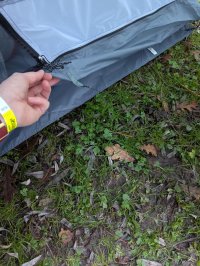
Having done this, it was time to check how taut things were and what needed adjusting. Something wasn't right. Not only was the inner looking decidedly loose on the ground, there was an issue with it contacting the ground, unprotected by the ground sheet. I took the below two photos using the leaf in the bottom right hand corner as an index point so you can see the difference between the ground covered by the ground sheet, and the ground covered by the inner.
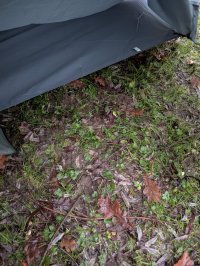
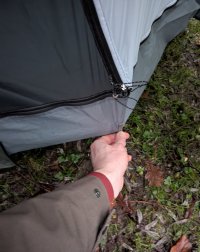
You can see there a large area underneath the inner not protected by the ground sheet. So something wasn't right.
Then came the look around the exterior of the tent. Confirming that something definitely wasn't right. For a moment I thought that this was yet another tent company intentionally not providing the needed lines for pegging-out to keep weight down given there's a tie-out point provided there.
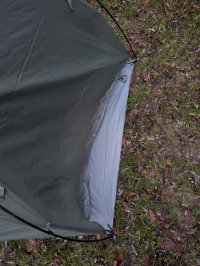
Yet even when pegged out it didn't cover the ground sheet.
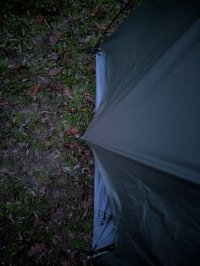
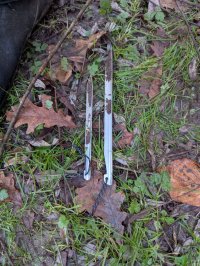
As an aside, these are the pegs that are provided - four of the large and four of the small. These are one of my least favourite designs when using hand pressure to insert into firm ground (not an issue here) given the tiny surface you have to press on, but they are very light and apparently very strong.
What about the other side, surely better? Nope, very high-riding fly
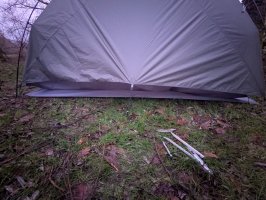
Alarm bells were ringing, and I knew beyond doubt at this point that I must have messed up somewhere. It was getting dark and I was not happy with the pitch so I thought I'd come back to it the next day when I wasn't knackered, hungry and getting cold.
I therefore unclipped the ground sheet which would otherwise have channelled rain water under the inner, pegged out the corners to ensure nothing blew away, and went to the pub.
Next day
I knew I must've done something wrong with the pitch, and when I came back to the tent it was immediately obvious. Having unclipped the ground sheet the night before, things made much more sense. The tent already looked more taut than it had been, and I therefore clipped the ground sheet to the inner's straps leading to the pole docking points, rather than to the pole ends. This solved the previous 'issue' of the ground sheet not protecting a large section of the inner.
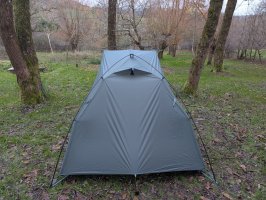
The fly still wasn't quite right though, so I loosened the fly straps completely at all points, and then retightened them all the way around. This resulted then in a nice and taut fly, with the inner now spread taut and the fly covering the ground sheet.
Nice little attached vent struts which velcro down when not needed:

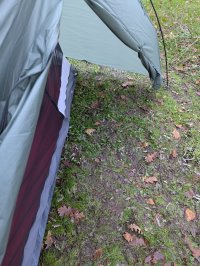
Decent covered area outside of the inner for gear you don't mind not being within the mesh inner:
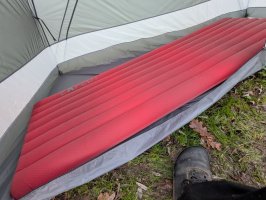
Decent corner area for a medium pack if you're using a large and long sleeping pad angled to one side like this long wide Exped (65 cm wide, 197 cm long)
You also have a decent mesh pocket in the inner for storage of items (Spydie Military taking a kip there)
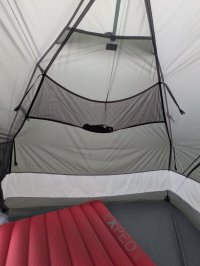
There are some small loops in the ceiling of the inner where I suppose you could tie off a small light or suchlike.
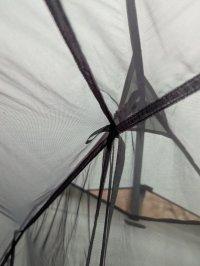
The inner has three zips which meet together when closed. A small hole remains which could potentially let some small critters in.
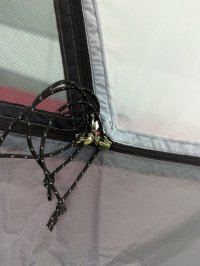
Having unzipped the doorways, there are magnets to secure them rolled up - a really nice touch rather than having to faff with toggles. Slightly less secure, but I far prefer these as if you pull on the door they come free rather than the risk of tearing you can get with toggles.
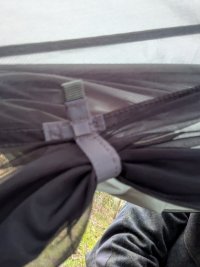
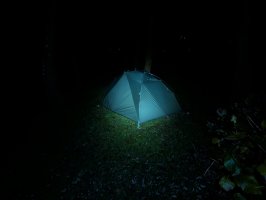
Night shot prior to settling down
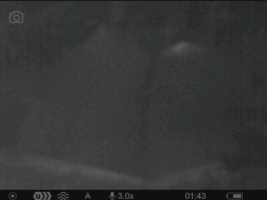
A nigh-useless thermal image of the exterior, unsurprisingly showing heat release from around the base of the fly and the vent
Inside, the vertical space is ridiculously good. Absolutely no mesh coming anywhere near your face, and loads of head room for sitting up in.

The fly is really quite thin, so whilst I couldn't capture it on camera, the ambient moon light was coming through somewhat. I found this pleasant and helped to add to the roomy feeling of the tent.
No condensation to report on. It was circa 5c that night and very still; as I'd expected I was toasty warm in the full mesh inner with the fly's vents both fully open, in my set-up of a Sierra Designs 800F down quilt and the Exped mat with its R value of 5.2 in addition to my baselayer.
Dismantling time
This was a nice and simple process having got to know how the components interact rather well in the preceding two days! The one main annoyance was the clips used to attach the inner to the fly. These had been really easy to clip together, but the design is not suitable for one handed unclipping as the lateral squeeze you need to apply means the very thin clip wants to constantly rotate between your fingers. Something with a bit more meat on the sides would help...or just use two hands.
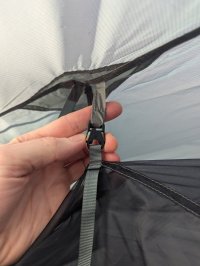
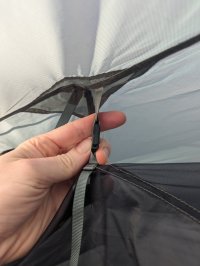
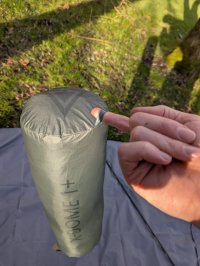
The tent bag has a little loop which I thought could be used to double-up as a little suspended storage bag inside the tent, but it's at the wrong end so things would fall out if suspended from this loop. Maybe it's just to help you get a grip on the bag when removing the contents (I didn't find that was needed).
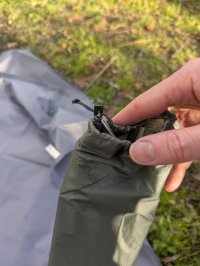
The tent pole design with its splayed wishbone-like structure means it had already started chewing through the tent pole bag as evidenced by the white striations below the drawstrung area. No real issue, but I don't think that'll last long (or maybe the material is stronger than it looks).
Summary
When I'd worked out what I'd done wrong with the pitch, I came to really liked this tent. I would recommend there being some instructions with it as practically all my issues with it were due to there being no instructions provided. It's also another reason why you should always assemble gear before you actually need to use it so that you can find things out before you really need it.
Also, don't say it can be pitched inner first. It can be pitched inner only, but certainly not inner first.
If I was in the market for a(nother) tent, I think I'd be buying this over the competition such as from MSR and Big Agnes. The main reason for this is the displayed strength in Durston's comparison tests (possible bias alert) although I've not owned tents from either of those companies. I also like the way Durston does things like the pre-emptive shipping of a new pole set after a small proportion of the previous poles showed glue issues between the carbon fibre and the metal inserts.
This is, in the scheme of things a relatively inexpensive, very light, well-made, small pack-size and well-thought out tent.
Thank you to lostplanet for the opportunity to have a go with this one.
Final shot of it nestled in its home of a few days.

@lostplanet kindly sent this recently-released tent for me to have a looksee over the Christmas/New Year break. Retail site and specifications here: https://durstongear.com/products/x-dome-1-plus-ultralight-backpacking-tent
As the name suggests, it's a one person tent but with a little extra floor-space than you might expect for a standard one person tent, plus a generous sheltered area under the fly for gear that you're happy leaving under cover but not within the mesh inner.
First impression
Immediately noticable was that it was astonishingly light for what I'm used to - 1085 g for the standard set-up (fly, inner, six stakes). This also came with the tailored ground sheet (99 g) which provides floor protection for the inner, but not for the porch area. Tent-wise, I am used to a Terra Nova Ultra Quasar 2 person with an unfitted cheapo ground sheet, weighing in at triple the total weight of this, so it was quite a lovely surprise to have this weight and relatively much smaller packed sized of the Durston.
Pitching
I intentionally went into this without reading anything about the tent. However, I had been exposed to it before via YouTube and knew that it had been described as a tent you could pitch any which way you'd like in terms of inner first, fly/outer first, all together etc.
There were no instructions provided in the pack about how to pitch this. I am usually one to RTFM if provided, so given no instructions were provided I took that to mean it had to be a self-explanatory pitch from the outset. It proved not to be as you shall see!
Things didn't go well when I only realised part way through that I'd got the ground sheet the wrong way around. I'd seen what I thought was the logo as I unfurled the ground sheet, but it turned out to be the silhouette of it, i.e. I had it the wrong way up. Here's a photo taken after the fact to show what I saw and mistook for the logo (it also shows how thin the material is for the ground sheet - not necessarily a bad thing).
Wrong way:

Right way:

It is also not symmetrical so directionality needs to be established if you have your sights set on a view that you want out of the tent. As this is a freestanding tent, this resulted in much less faffing to rectify than would have been the case with e.g. a non self-supporting tent such as a tunnel tent.

The Easton-made pole set is ridiculously light, being mostly carbon fibre. There is just the one pole assembly. It is all bungeed together into one set so can be a little unwieldy if you're not expecting it. You can also add two trekking poles for additional wind resistance.
You cannot use the ground sheet as the base for the poles - first of all the ground sheet only covers a portion of the area covered by the fly (and thus the poles), and secondly the ground sheet has clips which I later found through trial and error are meant to clip onto the inner's pole docking straps and are not meant to receive the pole ends.
This means you have to do a bit of a dance trying to keep the inner safely on the ground sheet, whilst inserting the pole ends into the pole docking points on the inner. Of course the underside of the inner got a little bit muddy in this process given the acrobatics needed on damp ground.
The pole ends dock into the docking points on the inner:
I then clipped the inner to the poles. This was a nice and simple process and the clips felt good and secure.
However, having clipped the inner to the poles and then starting to look to attach the fly, this is when I realised that it isn't at all a tent that you can choose to pitch in any order that you choose as Durston describes it. The description of it as an inner-first pitching tent is incorrect. This is only the case if you have no intention of using the fly, or if you count having to unclip the inner from everywhere on the poles other than at the base as being 'inner-pitch first'.
Website: That starts with the pitch, where the fly, inner, and poles all extend to the same four points so you can pitch the tent in any order.
The pole structure is external, so of course if you intend on using both inner and fly, you have to attach the fly to it first, and then clip the inner to the fly. How it was ever thought OK to describe it as possible to inner pitch first, I do not understand. Reading the description further, they for some reason think that only pitching the inner alone, counts as inner-pitch first:
Website: It can pitch fly first to keep the inner tent dry during setup in the rain, but just as easily pitch it inner first to stargaze on clear nights.
I suggest a more accurate description would be that you can pitch fly-only or inner-only, but if needing both then you have to pitch fly-first, or fly and inner pre-connected.
To be clear, I am entirely for pitching fly first. I find the mandatory inner-first pitching on my Ultra Quasar inconvenient given it exposes the inner to the elements. But the Ultra Quasar doesn't claim to be a tent you can pitch in any order.
Anway, enough of that rant.
Starting over and this time going fly first, things worked well (I thought). It was simple to get the pole ends into the docking points (still a slight dance needed but less concern with keeping the fly out of contact with the damp ground than with the inner). Only real challenge was docking the cross bar into the points on the top of the fly, as when you're moving around to dock the opposite side, the cross bar droops and the docking point can fall off. It is a snug fit though so I'm not sure how that happened twice in a row!

Within the fly now attached to the poles, it came to clipping in the inner to the outer. This was a straight forward process.
Having done this, it was time to check how taut things were and what needed adjusting. Something wasn't right. Not only was the inner looking decidedly loose on the ground, there was an issue with it contacting the ground, unprotected by the ground sheet. I took the below two photos using the leaf in the bottom right hand corner as an index point so you can see the difference between the ground covered by the ground sheet, and the ground covered by the inner.


You can see there a large area underneath the inner not protected by the ground sheet. So something wasn't right.
Then came the look around the exterior of the tent. Confirming that something definitely wasn't right. For a moment I thought that this was yet another tent company intentionally not providing the needed lines for pegging-out to keep weight down given there's a tie-out point provided there.

Yet even when pegged out it didn't cover the ground sheet.

As an aside, these are the pegs that are provided - four of the large and four of the small. These are one of my least favourite designs when using hand pressure to insert into firm ground (not an issue here) given the tiny surface you have to press on, but they are very light and apparently very strong.

What about the other side, surely better? Nope, very high-riding fly

Alarm bells were ringing, and I knew beyond doubt at this point that I must have messed up somewhere. It was getting dark and I was not happy with the pitch so I thought I'd come back to it the next day when I wasn't knackered, hungry and getting cold.
I therefore unclipped the ground sheet which would otherwise have channelled rain water under the inner, pegged out the corners to ensure nothing blew away, and went to the pub.
Next day
I knew I must've done something wrong with the pitch, and when I came back to the tent it was immediately obvious. Having unclipped the ground sheet the night before, things made much more sense. The tent already looked more taut than it had been, and I therefore clipped the ground sheet to the inner's straps leading to the pole docking points, rather than to the pole ends. This solved the previous 'issue' of the ground sheet not protecting a large section of the inner.

The fly still wasn't quite right though, so I loosened the fly straps completely at all points, and then retightened them all the way around. This resulted then in a nice and taut fly, with the inner now spread taut and the fly covering the ground sheet.

Nice little attached vent struts which velcro down when not needed:

Decent covered area outside of the inner for gear you don't mind not being within the mesh inner:

Decent corner area for a medium pack if you're using a large and long sleeping pad angled to one side like this long wide Exped (65 cm wide, 197 cm long)

You also have a decent mesh pocket in the inner for storage of items (Spydie Military taking a kip there)

There are some small loops in the ceiling of the inner where I suppose you could tie off a small light or suchlike.

The inner has three zips which meet together when closed. A small hole remains which could potentially let some small critters in.

Having unzipped the doorways, there are magnets to secure them rolled up - a really nice touch rather than having to faff with toggles. Slightly less secure, but I far prefer these as if you pull on the door they come free rather than the risk of tearing you can get with toggles.

Night shot prior to settling down

A nigh-useless thermal image of the exterior, unsurprisingly showing heat release from around the base of the fly and the vent

Inside, the vertical space is ridiculously good. Absolutely no mesh coming anywhere near your face, and loads of head room for sitting up in.

The fly is really quite thin, so whilst I couldn't capture it on camera, the ambient moon light was coming through somewhat. I found this pleasant and helped to add to the roomy feeling of the tent.
No condensation to report on. It was circa 5c that night and very still; as I'd expected I was toasty warm in the full mesh inner with the fly's vents both fully open, in my set-up of a Sierra Designs 800F down quilt and the Exped mat with its R value of 5.2 in addition to my baselayer.
Dismantling time
This was a nice and simple process having got to know how the components interact rather well in the preceding two days! The one main annoyance was the clips used to attach the inner to the fly. These had been really easy to clip together, but the design is not suitable for one handed unclipping as the lateral squeeze you need to apply means the very thin clip wants to constantly rotate between your fingers. Something with a bit more meat on the sides would help...or just use two hands.


The tent bag has a little loop which I thought could be used to double-up as a little suspended storage bag inside the tent, but it's at the wrong end so things would fall out if suspended from this loop. Maybe it's just to help you get a grip on the bag when removing the contents (I didn't find that was needed).

The tent pole design with its splayed wishbone-like structure means it had already started chewing through the tent pole bag as evidenced by the white striations below the drawstrung area. No real issue, but I don't think that'll last long (or maybe the material is stronger than it looks).

Summary
When I'd worked out what I'd done wrong with the pitch, I came to really liked this tent. I would recommend there being some instructions with it as practically all my issues with it were due to there being no instructions provided. It's also another reason why you should always assemble gear before you actually need to use it so that you can find things out before you really need it.
Also, don't say it can be pitched inner first. It can be pitched inner only, but certainly not inner first.
If I was in the market for a(nother) tent, I think I'd be buying this over the competition such as from MSR and Big Agnes. The main reason for this is the displayed strength in Durston's comparison tests (possible bias alert) although I've not owned tents from either of those companies. I also like the way Durston does things like the pre-emptive shipping of a new pole set after a small proportion of the previous poles showed glue issues between the carbon fibre and the metal inserts.
This is, in the scheme of things a relatively inexpensive, very light, well-made, small pack-size and well-thought out tent.
Thank you to lostplanet for the opportunity to have a go with this one.
Final shot of it nestled in its home of a few days.

Attachments
Last edited:

