Chris's trying out leatherwork thread

  • BushMoot: Come along to the amazing Summer Moot 31st July - 5th August (extended Moot : 27th July - 8th August), a festival of bushcrafting and camping in a beautiful woodland PLEASE CLICK HERE for more information.

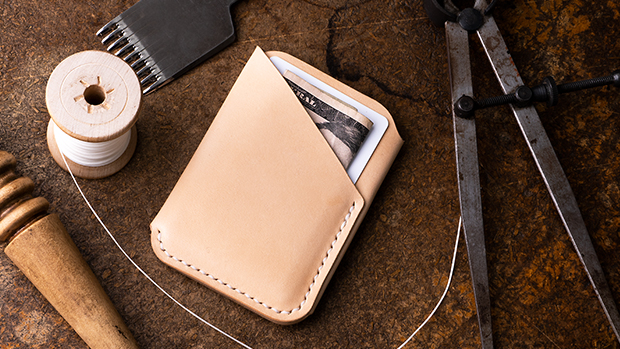
Project #2 - Card wallet​


I have a wallet by Three Sons Leather Company which I bought a few years ago from the US and I really like, but maybe I'd like it even more if I made it myself? Who knows!

I found a base template free online. It isn't quite the same though, so I'll need to add some bits on to the design.


Printed off the A4 template and glued the A4 paper to a piece of A3 card so that I could extend the design out by two thirds-ish. I then cut this out with a craft knife and traced around it again on another single piece of card just so I have a spare template. (Bottom piece is the printed template before I cleaned my printer nozzle).

1762376305236.png

I then traced around the template onto a piece of approx 1.15-1.3mm veg tanned calf leather.

1762376567153.png

1762376573233.png

To avoid Tired Man mistakes like last time, that's where I'm leaving it for tonight. Though a quick rough fold seems like I'm fairly close, if not slightly generous with the estimates I made for the 'bend notches', whatever they're really called. I increased the width of these indentations by approx 5mm per wrap.

1762376703394.png

Need to do a little bit of cleaning up around the edges but it seems fairly close, even if not exactly the same dimensions.
 
I mentioned above that I may have been too generous in the bend notches, in particular I am a bit suspicious of the final (widest) one. I thought I'd just put the wallet together today using some clips and some credit card 'blanks' (cost a couple of quid online, also useful for hotel rooms where you need to put a card in to turn the lights on!).

1762443852206.png

You can see on the left hand side of this image that there's a bit of a gap between the outer wrap and the next layer, which I don't want to be there.

1762443899862.png

My current wallet doesn't have that. That may be because there's a bit more in it, but I also expect the leather may stretch slightly once it's in regular use so I thought just in case, I'd draw out a second template where that final notch is reduced in span by 5mm.

1762444060982.png

Then if this first one does turn out to be slightly too long, I am not too many steps behind to make a second one with adjusted dimensions.

(Blu Tack for the win yet again)
 
Right, I will call this the 'Prototype'. As I suspected, I need to lose about 5mm from the length of the outer flap. I also don't actually need quite such large 'notches' at the bends. Other than that though I am quite happy with how it's turned out.

Went for the veg tan colour with a coating of neatsfoot oil and then a finish with bees wax balsam. Black 1mm waxed thread (synthetic, wanted to try it out).

I scratched up the shiny side of the leather a little bit where I was glueing, I don't know if this will help it bind but I thought it worth a shot.

1762463444363.png
1762463453602.png
1762463462251.png
1762463468754.png
1762463479396.png

I used a stitching punch on the very top layer prior to glueing to get the right locations, then used the mini drill press with a large needle to push through the remaining layers.

1762463545163.png

Then it was the saddle stitching! I copied my existing wallet with a few wraps around on the first stitch, I think it looks cool as well as it being practical.

1762463583868.png
1762463590386.png

Stitched up, back stitched a few holes, sanded the bottom edge of the wallet and then burnished it. Gave it all a once over with the beeswax balsam, I think that's helped even the colour out a bit.

Here is some spam of the finished prototype, I've tried to show what I mean about there just being a bit too much length on the leather:

1762463843850.png
1762463875704.png
1762463881995.png
1762463893357.png
1762463900998.png

I think I'll move straight on to my next version with the fixes mentioned, but it's feeling pretty close.
 
That’s super, and yes roughing the leather before gluing is definitely worth doing.
I often make prototypes from PU leather sheets just to get a feel for how it will go together, I don’t stitch them though, I just staple them.

Don’t chuck pro types aaway lol, they can be unpicked and the leather used for other things :)
 
  • Like
Reactions: Chris
That’s super, and yes roughing the leather before gluing is definitely worth doing.
I often make prototypes from PU leather sheets just to get a feel for how it will go together, I don’t stitch them though, I just staple them.

Don’t chuck pro types aaway lol, they can be unpicked and the leather used for other things :)

I’m actually just going to use this one as my wallet for a while to see how the undyed leather ages/patinas, for research purposes. I think my next one will be dyed to see how that impacts the feel/softness of the leather.
 
  • Like
Reactions: MrEd
I love the mottled brown!
And I cannot see how "handedness" would be an issue....
Good work :0
Thanks!

The mottling was an accidental outcome of an experiment with the oiling of the leather. I wanted to see what happened if you put a light neatsfoot oil coating on the flesh side and then beeswax balsam on the shiny side. The neatsfoot soaked through where the first brush stroke on the inside of the leather was placed and creates that effect. I quite like it!

I’ll skip the neatsfoot oil if I want a consistent colour on any leather this thin, but it’s nice to know I can also create that effect should I so desire.
 
Last edited:
Great work, you can have a card wallet in both pockets now! I like the mottled brown too. More seriously, might the neatsfoot oil on the inside affect any paper cash, tickets etc kept in the wallet for any length of time. I guess time will tell!
 
  • Like
Reactions: Chris
I tried to recreate the mottled brown effect on a larger piece of leather from which I can make a few wallets. It worked out quite well.

Step 1 is just a single layer of the Fiebing's Pro walnut dye on each side of the leather, then let it dry.

Step 2 - roughly brush the flesh side of the leather with oil

Step 3 - Beeswax balsam the shiny side

Here's some pictures showing the pattern I brushed the oil on, and watching the markings appear on the shiny side:

1762806979318.png
1762806992195.png1762806997524.png1762807001992.png
1762807011403.png

With a bit more time the oil stains even out/soften up a bit, and the final beeswax balsam/polish of the finished product seemed to subdue it yet again. Will see how that fares with the wallets from this piece.
 
I tried to recreate the mottled brown effect on a larger piece of leather from which I can make a few wallets. It worked out quite well.

Step 1 is just a single layer of the Fiebing's Pro walnut dye on each side of the leather, then let it dry.

Step 2 - roughly brush the flesh side of the leather with oil

Step 3 - Beeswax balsam the shiny side

Here's some pictures showing the pattern I brushed the oil on, and watching the markings appear on the shiny side:

View attachment 99224
View attachment 99225View attachment 99226View attachment 99227
View attachment 99228

With a bit more time the oil stains even out/soften up a bit, and the final beeswax balsam/polish of the finished product seemed to subdue it yet again. Will see how that fares with the wallets from this piece.

That’s cool, you have essentially made a piece of pull up leather. Will make some lovely wallets.
 
  • Like
Reactions: Chris

BCUK Shop

We have a a number of knives, T-Shirts and other items for sale.

SHOP HERE