How To Make A Flat Pack Wood Burning Stove
by Swissnic
First published 21/02/2007
I saw some plans to make a flat-pack wood burning stove on another site. It looked interesting, but flimsy and complicated. I wanted to make something simple and sturdy, and this is what I came up with…

Firstly, I ordered a couple of 300mm x 300mm x 2.5mm sheets of aluminium from Chronos Limited.

We need to cut the sheets in half (30cm x 15cm) to give us the 4 sides needed for the stove.[/TD]


I recommend you mark out all the sheets before you start cutting. Getting something the wrong way around is a real bear!

The base slots into the sides to support the weight of the fire. By using a locking slot, this negates the need for locking pins.

Note the base slots are made a few cm’s above the bottom, to allow air to easily flow under the fire, and also to minimise ground-burn.

The back fits between the two sides and locks out the whole stove.


Now all that’s left is to drill out the air holes and remove the plastic protective coating.

And fully made – it looks like this


This is the end product – in bits. I haven’t done a picture of the plans as I made it up as I went along. For those who want to give this a try – maybe you can use the picture for planning. I will happily email you a higher quality pic if you want. PM me.

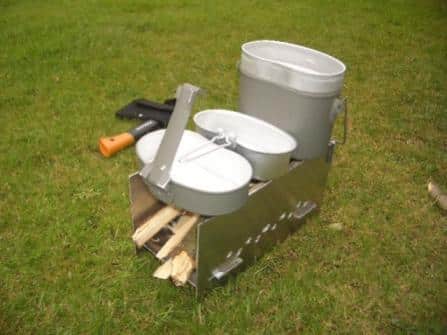
The reason I went for a 30cm length is to accommodate my 3-part billy can. Here you can see it fits nicely onto the stove, allowing 3 cooking compartments.
I really like this flat-packable stove. You can use it with natural materials, and use it where no camp fires are not allowed (in my case – Dartmoor). And it only cost £17.00 to build – not bad I think!
Tools: I used a portable work-bench to work on, with a couple of clamps to hold the Alu down when cutting/drilling. I used a standard jig-saw with a metal blade to cut the edges, and a dremmel to cut the slots, and generally even up and smooth the cut edges and holes. I used a 6.5mm drill-bit to drill the holes, and that is it! You don’t even need a big toolkit for this job!
Cheers, SwissNic.
Copyright ©2003-2010 Bushcraft UK

Leave A Comment
You must be logged in to post a comment.