Looking for other bits of info to post I came across some articles I wrote a while back but never published .... I thought they might be of interest ... so here we go ")
Metal military type mugs are excellent pieces of kit for bushcrafting purposes. I have a preference for the “Crusader Mug” from BCB Int. However, if you want to cook in them they all suffer from not having a lid.
With a little ingenuity and very basic tools it is not too hard to remedy this lack and make your own lid for your military mug in the comfort of your own home.
I start making my mug lids by finding a bit of scrap wood, in this case an old drawer front from the scrap wood pile, to make a “former”. Turning my mug upside down on the wood I draw around the rim and then carefully saw out the wooden former.
Your choice of materials for the lid depends on how robust you want it to be and here I show how to make lids from heavy gauge aluminium foil (a pound-shop turkey roasting tin) and medium weight aluminium (an old mess tin bought for pence at a car boot sale). For both weights you draw around the “former” onto your lid material and add a“border” no wider than the distance between the rim of your mug and the top of its folding handles.
For the foil lid you can use scissors to cut out your lid blank but the mess tin requires a metal saw of some type. In each case carefully cut out the blank ready to shape it over the former.
This is easily done with your fingers, or a pair of square nosed pliers for the foil lid(I leave a tab handle sticking out for ease of removing the lid) andyou will find you have lots of pleats forming in the foil. These may not look great, but the lid will work fine. Foil lids will bend easily in transport and require bending back into shape each time you use them, but are quick and easy to make!
The “Mess Tin” lids are harder, and more time-consuming to make, but almost seem to last forever.
To shape the mess tin aluminium, drill a hole in the centre of the lid blank and screw the blank to the former, making sure it is centred and with the “border”equal all the way around the former. You can then hammer the border down around the sides of the former, the metal deforming to fit fairly neatly.
Once you are happy with the shape of the lid on the former, unscrew it from the former and test it on your mug – it will probably need a bit of tweaking,mine always do! File and sand off any rough metal edges then cut a“button” handle from a stick of wood and screw this to the top of the lid using the hole already drilled in the lid, and your lid is complete.
Over the years I have made lots of lids this way, some with holes to act as strainer for when I am cooking pasta, rice or potatoes, and even one to support my essential coffee filter and, apart from almost disposable foil models, they are all still going strong.
Pine Resin Glue
If you have ever come in contact with resin bleeding from a damaged coniferous tree, then you already know that it is very sticky. This property alone makes it a good basis for a natural glue.
Unfortunately, resin tends to get very brittle as it dries out, but if you can keep it a little pliable, then it is ideal for use in many situations where a glue or pitch is needed.
My basic recipe for Pine Resin Glue uses resin from almost any conifer (Sitka Spruce is ideal and there are lots of Sitka planted in vast swathes around Britain), beeswax as a plasticizer and some fine ground charcoal to temper and hold it all together.
Always source your resin from trees already bleeding – sites where contractors are felling often have damaged trees from collisions between their vehicles and trees not felled! Do not enter working sites, but wait until the contractors have moved on and you have free access as this gives time for large amounts of resin to bleed out and become easily available. Never damage a healthy tree just for a bit of resin!
Beeswax is often sold in small blocks in hardware, furniture and even healthfood shops, while charcoal can come from your fireplace or BBQ!
I find a mix of two parts resin to one part wax and O.5 part of charcoal works well, but feel free
to experiment – you could also replace the charcoal with dried rabbit dung if you like(trust me, it works!).
Melt the wax in a metal pot, then add the resin and charcoal. Remove it from the heat and mix as it cools with a twig or thin stick.
If you allow the cooling mixture to accumulate on the stick, you end up with primitive“glue sticks”.
To use the glue, melt your glue stick and drip hot glue into the areas to be joined. You will need to keep the glue hot until you have everything lined up.
I have joined wood,secured spear heads (bone, stone and metal), fletched arrows and waterproofed natural fibre cordage with this mix over the years, with excellent results.
A Fire Windlass
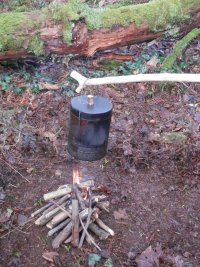
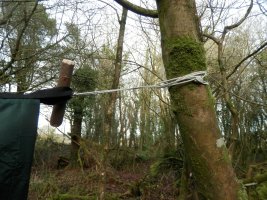
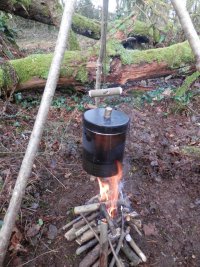
Afire windlass is a simple device that allows you to securely raise and lower a billycan in small increments to get its ideal position over the fire for ensuring the right amount of heat, whether you want to boil, simmer or gently heat the contents.
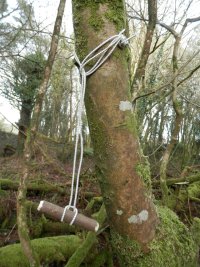
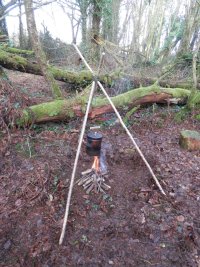
To make a fire windlass you need to make a “fire frame” (a forked pole set up each side of the fire with a cross pole resting in the forks, crossing the fire) but choose a strong and thick pole for the cross pole.
Where the round pole sits in the fork you will see that it has a gap under it and the pole can easily rotate. To avoid this rotation you need to cut the cross pole where it sits in the fork, to a triangular section to fit the fork.
To create the triangular section you simply cut 3 pairs of stop cuts around the pole each just deep enough to meet the next cut at around bark level. With axe and/or knife, remove the wood between each pair of stop cuts and you will have your triangular section which, when placed in the fork of the fire frame upright pole, will stop any tendency of the cross pole to rotate.
You can cut triangular sections into the cross pole at either, both or at just one end.
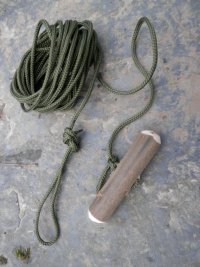
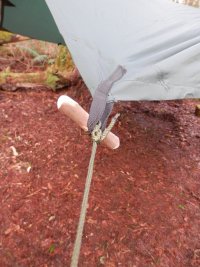
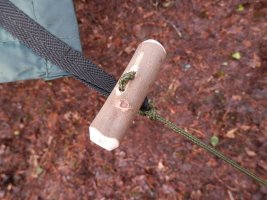
The“billycan suspension system” can be made from cord, wire or, as I have done in this example, from light chain. Whatever you use to dangle your billy by, it needs to be securely fixed to the pole so that it cannot snap under load.
Secure knots should work for cord or wire, but in the case of the chain used here, I opened up the end link and hammered one end into the pole as an anchor hook – and then tied the chain around the pole in a clove hitch as well! Note – small karabiners can be awkward to use when hot. I have swapped the one in the photos for a hook since I took the pictures…
The length of your cord, wire or chain “suspension system” should be such that fully extended it should rest the billycan on the bed of the fireplace.
To raise or lower the billycan you simply lift the triangular section(s)of the cross pole out of the fork and rotate the pole so that the cord, wire or chain, is wound around (or is unwound from) the pole to the height above the flames that you desire. Resting the triangular section back into the fork effectively locks the suspension system at that height.
A simple and elegant cooking heat control that can be compared to turning the knob on a cooker at home.
 scrap wood mug and pen.JPG")
 marked out.JPG")
 former cut out and lid materials.JPG")
 lids marked out.JPG")
 lids cut out.JPG")
 Foil lid shaped.JPG")
 heavy lid screwed to former.JPG")
 hammered to shape.JPG")
 finished lid.JPG")
 various lids.JPG")
 various lids.JPG")
 billy lowered onto the flames.JPG")
 select a strong cross pole.JPG")
 round pole in forked stick.JPG")
 cutting the round pole to a triangular section.JPG")
 triangular section in forked stick.JPG")
 chain hammered into the pole.JPG")
 billy hung high.JPG")
 billy too high to boil.JPG")
 billy lowered onto the flames.JPG")
 resin bleeding from a damaged tree.JPG")
 resin beeswax charcoal dust pot.jpg")
 glue sticks.JPG")
 some items joined sealed and waterproofed with the glue.JPG")
PHOTO CAPTIONS
Crusader Mug Lids
1 Scrapwood, mug and pen
2 Markedout
3 Formercut out and lid materials
4 Lids marked out
5 Lids cut out
6 Foil lid shaped
7 Heavy lid screwed to former
8 Hammeredto shape
9 Finished lid
10 Variouslids
11 Various lids
Pine Resin Glue
1 Resin bleeding from a damaged tree
2 Resin,beeswax, charcoal dust, pot
3 Gluesticks
4 Some items joined, sealed and waterproofed with the glue
Fire Windlass
1 Select a strong pole
2 Round pole in forked stick
3 Cutting the round pole to a triangular section
4 Triangular section in forked stick
5 Chain hammered into the pole
6 Billy hung high
7 Billy hung too high to boil
8 Billy lowered onto the flames
MUG LID, RESIN GLUE AND FIRE WINDLASS
In this article I am looking at the construction of what I hope will be a few useful bits and pieces to make life a little more comfortable and effortless when out in the woods: A lid to turn a military style mug into an efficient cooking pot, natural glue with which to make, seal or waterproof other items, and a simple fire windlass to place your billycan at just the right height over the flames for boiling, simmering or gently warming its contents.
Crusader Mug Lids
Metal military type mugs are excellent pieces of kit for bushcrafting purposes. I have a preference for the “Crusader Mug” from BCB Int. However, if you want to cook in them they all suffer from not having a lid.
With a little ingenuity and very basic tools it is not too hard to remedy this lack and make your own lid for your military mug in the comfort of your own home.
I start making my mug lids by finding a bit of scrap wood, in this case an old drawer front from the scrap wood pile, to make a “former”. Turning my mug upside down on the wood I draw around the rim and then carefully saw out the wooden former.
Your choice of materials for the lid depends on how robust you want it to be and here I show how to make lids from heavy gauge aluminium foil (a pound-shop turkey roasting tin) and medium weight aluminium (an old mess tin bought for pence at a car boot sale). For both weights you draw around the “former” onto your lid material and add a“border” no wider than the distance between the rim of your mug and the top of its folding handles.
For the foil lid you can use scissors to cut out your lid blank but the mess tin requires a metal saw of some type. In each case carefully cut out the blank ready to shape it over the former.
This is easily done with your fingers, or a pair of square nosed pliers for the foil lid(I leave a tab handle sticking out for ease of removing the lid) andyou will find you have lots of pleats forming in the foil. These may not look great, but the lid will work fine. Foil lids will bend easily in transport and require bending back into shape each time you use them, but are quick and easy to make!
The “Mess Tin” lids are harder, and more time-consuming to make, but almost seem to last forever.
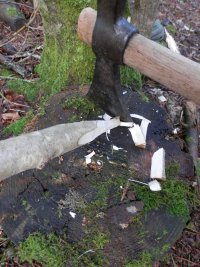
To shape the mess tin aluminium, drill a hole in the centre of the lid blank and screw the blank to the former, making sure it is centred and with the “border”equal all the way around the former. You can then hammer the border down around the sides of the former, the metal deforming to fit fairly neatly.
Once you are happy with the shape of the lid on the former, unscrew it from the former and test it on your mug – it will probably need a bit of tweaking,mine always do! File and sand off any rough metal edges then cut a“button” handle from a stick of wood and screw this to the top of the lid using the hole already drilled in the lid, and your lid is complete.
Over the years I have made lots of lids this way, some with holes to act as strainer for when I am cooking pasta, rice or potatoes, and even one to support my essential coffee filter and, apart from almost disposable foil models, they are all still going strong.
Pine Resin Glue
If you have ever come in contact with resin bleeding from a damaged coniferous tree, then you already know that it is very sticky. This property alone makes it a good basis for a natural glue.
Unfortunately, resin tends to get very brittle as it dries out, but if you can keep it a little pliable, then it is ideal for use in many situations where a glue or pitch is needed.
My basic recipe for Pine Resin Glue uses resin from almost any conifer (Sitka Spruce is ideal and there are lots of Sitka planted in vast swathes around Britain), beeswax as a plasticizer and some fine ground charcoal to temper and hold it all together.
Always source your resin from trees already bleeding – sites where contractors are felling often have damaged trees from collisions between their vehicles and trees not felled! Do not enter working sites, but wait until the contractors have moved on and you have free access as this gives time for large amounts of resin to bleed out and become easily available. Never damage a healthy tree just for a bit of resin!
Beeswax is often sold in small blocks in hardware, furniture and even healthfood shops, while charcoal can come from your fireplace or BBQ!
I find a mix of two parts resin to one part wax and O.5 part of charcoal works well, but feel free
to experiment – you could also replace the charcoal with dried rabbit dung if you like(trust me, it works!).
Melt the wax in a metal pot, then add the resin and charcoal. Remove it from the heat and mix as it cools with a twig or thin stick.
If you allow the cooling mixture to accumulate on the stick, you end up with primitive“glue sticks”.
To use the glue, melt your glue stick and drip hot glue into the areas to be joined. You will need to keep the glue hot until you have everything lined up.
I have joined wood,secured spear heads (bone, stone and metal), fletched arrows and waterproofed natural fibre cordage with this mix over the years, with excellent results.
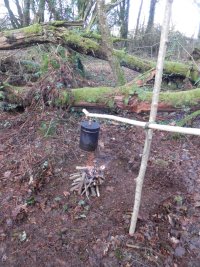
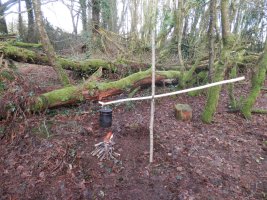
A Fire Windlass
Afire windlass is a simple device that allows you to securely raise and lower a billycan in small increments to get its ideal position over the fire for ensuring the right amount of heat, whether you want to boil, simmer or gently heat the contents.
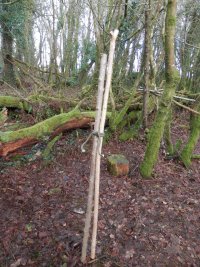
To make a fire windlass you need to make a “fire frame” (a forked pole set up each side of the fire with a cross pole resting in the forks, crossing the fire) but choose a strong and thick pole for the cross pole.
Where the round pole sits in the fork you will see that it has a gap under it and the pole can easily rotate. To avoid this rotation you need to cut the cross pole where it sits in the fork, to a triangular section to fit the fork.
To create the triangular section you simply cut 3 pairs of stop cuts around the pole each just deep enough to meet the next cut at around bark level. With axe and/or knife, remove the wood between each pair of stop cuts and you will have your triangular section which, when placed in the fork of the fire frame upright pole, will stop any tendency of the cross pole to rotate.
You can cut triangular sections into the cross pole at either, both or at just one end.
The“billycan suspension system” can be made from cord, wire or, as I have done in this example, from light chain. Whatever you use to dangle your billy by, it needs to be securely fixed to the pole so that it cannot snap under load.
Secure knots should work for cord or wire, but in the case of the chain used here, I opened up the end link and hammered one end into the pole as an anchor hook – and then tied the chain around the pole in a clove hitch as well! Note – small karabiners can be awkward to use when hot. I have swapped the one in the photos for a hook since I took the pictures…
The length of your cord, wire or chain “suspension system” should be such that fully extended it should rest the billycan on the bed of the fireplace.
To raise or lower the billycan you simply lift the triangular section(s)of the cross pole out of the fork and rotate the pole so that the cord, wire or chain, is wound around (or is unwound from) the pole to the height above the flames that you desire. Resting the triangular section back into the fork effectively locks the suspension system at that height.
A simple and elegant cooking heat control that can be compared to turning the knob on a cooker at home.
PHOTO CAPTIONS
Crusader Mug Lids
1 Scrapwood, mug and pen
2 Markedout
3 Formercut out and lid materials
4 Lids marked out
5 Lids cut out
6 Foil lid shaped
7 Heavy lid screwed to former
8 Hammeredto shape
9 Finished lid
10 Variouslids
11 Various lids
Pine Resin Glue
1 Resin bleeding from a damaged tree
2 Resin,beeswax, charcoal dust, pot
3 Gluesticks
4 Some items joined, sealed and waterproofed with the glue
Fire Windlass
1 Select a strong pole
2 Round pole in forked stick
3 Cutting the round pole to a triangular section
4 Triangular section in forked stick
5 Chain hammered into the pole
6 Billy hung high
7 Billy hung too high to boil
8 Billy lowered onto the flames
 form a loop.JPG")
 wrap the working end around.JPG")
 cross the standing part.JPG")
 tuck a bight through.JPG")
 work the knot tight.JPG")
 pouring.JPG")
.JPG")
 notches.JPG")


 twisted hoop and weavers.JPG")
 stop here for a greenstick grill.JPG")
 with handle ready for trimming.JPG")
.JPG")


 the cut billet.JPG")
The split billet.JPG")
 the fork marked out in charcoal.JPG")
 roughly shaped.JPG")
 tines cut with a saw.JPG")
 whittled to shape.JPG")
 select a log with straight grain.JPG")
 split out a thin oblong.JPG")
 saw in the Shoulders.JPG")
 split out the handle to the shoulder cuts.JPG")
 shape the spatula with ax and knife.JPG")


 cut a rod.JPG")
 thin the centre third.JPG")
carefully bend the tongs to shape.JPG")
 shape the ends to meet.JPG")
 test by gripping thin items.JPG")
.JPG")
Elder tree.JPG")
.JPG")
 cut straight Elder stem.JPG")
 pith.JPG")
 removing the pith with a sharp twig).JPG")
 removing the pith with a sharp twig.JPG")
 removing the pith with a wire.JPG")
 removing the pith with wire.JPG")
 using string to clean the tube.JPG")
 finished blow poker.JPG")
 broken bolt blowpoker.JPG")
 select a forked stick.JPG")
 stop cuts.JPG")
 Thin the centre.JPG")
 drill cord holes.JPG")
 finished.JPG")
 finished.JPG")
 tongs meet well.JPG")
 gripping a charcloth can.JPG")
 in use making charcloth.JPG")
 folded.jpg")
 half open.JPG")
 bolt detail.JPG")
 opened.jpg")
 stong enough for Dutch Oven cooking.jpg")
 cooking bannock.JPG")
 with an oiled bakestone.JPG")
 Bannock and coffee.JPG")
 cut several knot fee lengths of Ash.JPG")
 mark equally sized bead lengths.JPG")
 V cut to start shaping beads.JPG")
 shorten the lengths.JPG")
 bore out the beads.JPG")
 separate the beads and clean up the cut edges.JPG")
 separate the beads into a set of 9 and a set of 5.JPG")
 thread the beads.JPG")
 cut poles for your tent pegs.JPG")
 roughly point one end of your poles.JPG")
 cut the cord notches.JPG")
 split each pole in half.JPG")
 each pole is now two pegs.JPG")
 chamfer all sharp edges.JPG")
 a small orchestra of whistles.JPG")
 select your stick.JPG")
 bore out the centre.JPG")
 bore out the centre.JPG")
 cut the wedge out.JPG")
 whittle the fipple.JPG")
 flatten the top of the fipple.JPG")
 fit and glue the fipple.JPG")
 shape the mouthpiece.JPG")
 finished.JPG")


 Silver Birch.JPG")
 tapping a Birch drill method.JPG")
 tapping a Birch cut method.JPG")
 plugging the tap.JPG")
 healed tap.JPG")
 Blackberries.JPG")
 Blackberry Vodka.JPG")
 Blackberry Vodka.JPG")
 Sloes.JPG")
 Sloe Gin.JPG")
 Rosehips.JPG")
 Rosehips.JPG")
 Rosehip wine.JPG")
 basic winemaking kit.JPG")
 Wines and Spirits.JPG")
 ELDERFLOWER CORDIAL.JPG")


 the notched poles.JPG")
 bottom joints lashed.JPG")
 all joints lashed.JPG")
 shoulder straps from a webbing belt lashed on.JPG")
 grass stuffed socks lashed on as shoulder straps.JPG")
 the frame as worn.JPG")
 the sock shoulder straps.JPG")
 packing the square bundle.JPG")
 pack the bundle to exclude leak points.JPG")
 fully loaded frame side note the bulge.JPG")
 with a full load and ready to go.JPG")
 a bramble built pack basket.JPG")
 a simple waterproof shiralee.JPG")
 a simple shiralee.JPG")
 A shiralee.JPG")
 The unrolled shiralee sleeping bag and groundsheet.JPG")
choose a log.JPG")
 cut some rounds.JPG")
 drill a hole.JPG")
 draw a design.JPG")
 cut the design into the wood.JPG")
 fill the cuts with charcoal.JPG")
 add a hanging loop.JPG")
 the tools.JPG")
 cut the log.JPG")
 cut the head and body.JPG")
 chip out the face.JPG")
 cut legs and neck.JPG")
 drill leg and neck holes.JPG")
 fit head and legs.JPG")
 drill holes for and fit antlers and draw on a face.JPG")
 take it home for a garden decoration.JPG")
 cut willow whips.JPG")
 first whip twisted into a hoop.JPG")
 more whips twisted around the hoop.JPG")
 starting to weave in the Holly.JPG")
 weaving in some Rosemary.JPG")
 weaving in the Ivy.JPG")
 an added cordage bow and a hanging loop.JPG")
 15 twigs.JPG")
 Twigs devided into 5 bundles.JPG")
 sheer lashing the first two bundles together.JPG")
 lashing the third bundle into place.JPG")
 adding the fourth bundle.JPG")
 last bundle added.JPG")
 sticky bits.JPG")
 sharps and sharps tubes.JPG")
 threads and buttons.JPG")
 buckles cord and boots.JPG")
 containers and hard stuff.JPG")
 two kits.JPG")
 Saami sewing kit.JPG")
 Saami sewing kit.JPG")
 Saami sewing kit open.JPG")
Saami sewing kit worn.JPG")
 paracord cores.JPG")
 artificial sinew stripped down.JPG")
FixnZip medium zip repair packaged.JPG")
 bone awl and needles.JPG")
 bone needles and awl.JPG")