Ye Olde Englishe Machette
- Thread starter tombear
- Start date
-
Hey Guest, Early bird pricing on the Summer Moot (29th July - 10th August) available until April 6th, we'd love you to come. PLEASE CLICK HERE to early bird price and get more information.
You are using an out of date browser. It may not display this or other websites correctly.
You should upgrade or use an alternative browser.
You should upgrade or use an alternative browser.
Thanks. Going to order some leather at the weekend for the sheaths. For the longseax sheath I need to get 4 foot of 2.5 to 3 inch wide 1/4 inch thick wood. Looking at the texts poplar would be most correct but ash would be good. It needs to be seasoned with a flat face to carve the blade shapes out of. I wish I had access to a table circular saw or a big band saw with a guide so I could cut accurate long thin planks. It will be a nightmare doing it with a rip saw!
atb
tom
atb
tom
Last edited:
since the wood is being sorted I thought i'd start on the sheepskin lining.
I'd aquired a cheap sheepskin jacket for 3 quid from a charity shop and removed the outside panel of one of the sleaves to make the lining.
First off i cut straight edge to work from and used a ruler and beardtrimmer thing to shave off a strip that will be the part of the liner that will be sewn to whatever I cover the wooden boards with.

Since the wool was quite thick I used the trimmer to thin it down to a reasonable thickness,

I then used the blade as a guide to chalk out the lines I would be working to and then shaved down the rest of the material, just leaving the wool on where the blade would be in contact with it

I then trimmed the skin roughly to shape and using quite large stitches sewed it together, gingerly feeding the blade in periodically rather than taping the cutting edge (D'oh!) The stitches are only to hold it in shape while it is glued into the yet to be made wooden parts. I will trim the excess down to the stitches, or as close as I can get, when i start chopping out the hollows in the two boards. I also forced some of that smellless contact glue into the seams and clamped the lot together while it dried so the seam should hold while I'm faffing about. I may wind some strong thread around the lot to make sure.

I will apply the lanolin to the wool after is all made so the I will be glueing clean(ish) dry and absorbant materials together rather than to oily stuff.
Even shaved down a lot the sheepskin adds a suprising amount of bulk to the scabbard. I can see why the Anglo Normans and later medieval types used woven cloth or felt to line the flimsy scabbards they made.
I intend to make a simple storage sheath from three layers of 7mm marine ply like I made for the big nessy, I will line that with felt to absorb some oil.
ATB
Tom
I'd aquired a cheap sheepskin jacket for 3 quid from a charity shop and removed the outside panel of one of the sleaves to make the lining.
First off i cut straight edge to work from and used a ruler and beardtrimmer thing to shave off a strip that will be the part of the liner that will be sewn to whatever I cover the wooden boards with.
Since the wool was quite thick I used the trimmer to thin it down to a reasonable thickness,
I then used the blade as a guide to chalk out the lines I would be working to and then shaved down the rest of the material, just leaving the wool on where the blade would be in contact with it
I then trimmed the skin roughly to shape and using quite large stitches sewed it together, gingerly feeding the blade in periodically rather than taping the cutting edge (D'oh!) The stitches are only to hold it in shape while it is glued into the yet to be made wooden parts. I will trim the excess down to the stitches, or as close as I can get, when i start chopping out the hollows in the two boards. I also forced some of that smellless contact glue into the seams and clamped the lot together while it dried so the seam should hold while I'm faffing about. I may wind some strong thread around the lot to make sure.
I will apply the lanolin to the wool after is all made so the I will be glueing clean(ish) dry and absorbant materials together rather than to oily stuff.
Even shaved down a lot the sheepskin adds a suprising amount of bulk to the scabbard. I can see why the Anglo Normans and later medieval types used woven cloth or felt to line the flimsy scabbards they made.
I intend to make a simple storage sheath from three layers of 7mm marine ply like I made for the big nessy, I will line that with felt to absorb some oil.
ATB
Tom
Last edited:
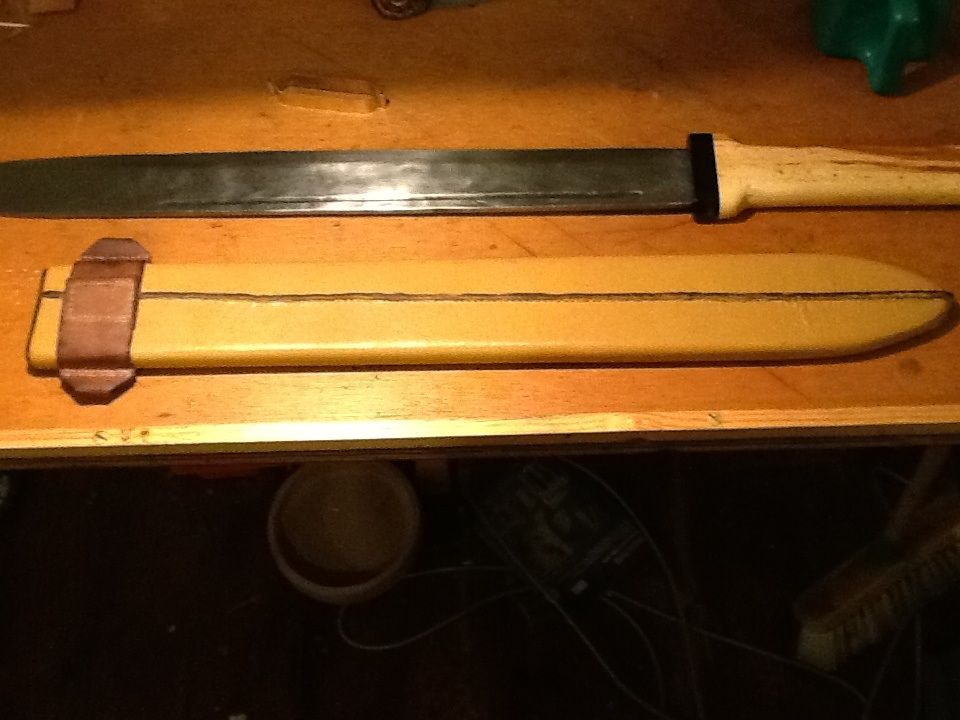
As a temporary measure, and for storage I knocked up a plywood sheath for the Frankish Longseax. I used aircraft grade wood glue on it which is oil resistant so it shouldn't fall apart too quickly. I'll think about a suspension system for it tomorrow. The fancy sheepskin lined sheath will be to go with a Anglo Saxon costume so will be saved for "best".

I may glue on a piece of felt to protect the horn from banging into the end of the plywood.
ATB
Tom
I may glue on a piece of felt to protect the horn from banging into the end of the plywood.
ATB
Tom
Last edited:
'Fitted a leather spacer to the storage sheath, drilled out the holes for the tiny brass tacks and sank them below the surface of the leather. The gap for the blade looks bigger than it needs to as its slightly wider near the tip.
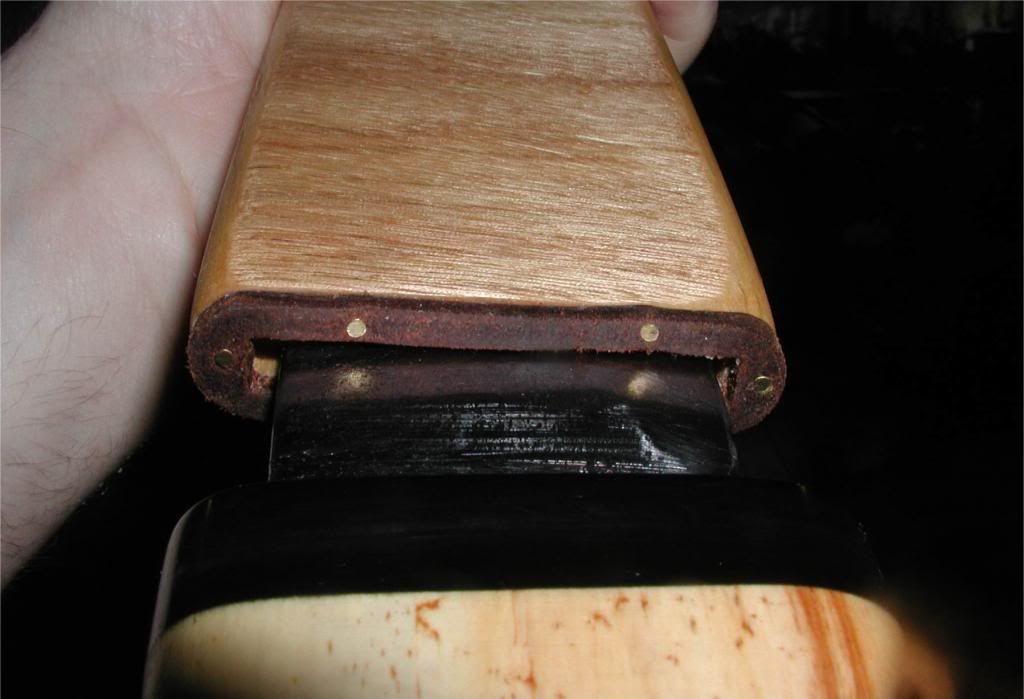
As practice I am thinking of covering with some thin veg tan (well it passed the boiling water curling up test) I was given a lot of. Since I wont be fitting a chape can any leather worker advise how to neatly cover the pointy end. Looking at the sword scabbard covers dug up at York theres no clue (to me) how they fitted the end.
ATb
Tom
Last edited:
That looks very good indeed Tom - the leather washer near the throat is certainly correct to Napoleonic era swords so I see no reason why they wouldn't have existed earlier
As for the covering, something akin to a Scandinavian puukko sheath would work I assume - but I would be tempted to put the seam at the edge of wood rather than at the back
As for the covering, something akin to a Scandinavian puukko sheath would work I assume - but I would be tempted to put the seam at the edge of wood rather than at the back
Well that was, different. I'm glad I did this as a practice piece as it was fiddlier than I thought. The seam went all skew-wiff as it dried out but its done and its the back anyway! I need to sort a couple of brass rings and a narrow baldric when I get the chance.

T
i shrunk the suspension bit on and when it had dried out gave it a good rub down with a mix of boot wax and neets foot oil.
ATB
Tom
T
i shrunk the suspension bit on and when it had dried out gave it a good rub down with a mix of boot wax and neets foot oil.
ATB
Tom
Cheers! It was all going too well until I was about 2/3rds up the back and it all started drifting to the left despite trying to haul it back, re wetting and screaming at it. It's all shrunk on good and tight and I've slathered on enough waterproofing to make sure it protects the blade as this will be the user sheath.
i will poke about to see if I've any rings to attach the baldric to, I should have waited until I had the rings before I shrank the strappy bit on but it was one of those 3 AM, of god lets get this finished as far as we can moments.
ATB
Tom
Now need to source at least 70 inches of veg tan belt, which will probably cost as much as all the rest so far!
It took a 14 year old to point out that the leather I shrank on to hang it from would work loose so I've drilled through the wooden edge and all the leather layers and have laced it on. If that doesn't work I'll rivet it on!
While one of the kind members of this parish is digging out some brass harness rings I've resorted to decidedly non period steel split rings to hang it from.

While one of the kind members of this parish is digging out some brass harness rings I've resorted to decidedly non period steel split rings to hang it from.
Having received the ash planks and hide glue from a generous member of this parish I have started to make the posh version of the scabbard for the Frankish style longseax, done as best i can find out, in the style of a late Anglo Saxon sword scabbard.
Previously I have shown how I made the sheepskin lining for the scabbard and to ensure a correct fit I fitted this to the blade, pulling it up so that there will be some of the skin protruding from the wood .
Despite shortening the length of the wool the lining has considerably bulked out the blade. having managed to lose my profile gauge I had to faff about making a template to show the cross section of the holes I needed to chissel out of the two planks.
First off I used soft wire to make a loop the same as the cross section of the lined blade,

I then transfered this to a piece of scrap balsa, cut out the centre and checked to see how wrong this fisdt template was,

By repeatedly comparing the gap between the covered blade and the edge of the hole in the Balsa and removing material from the cut out piece I was able to make a reasonable template, which I transfered to some thin hardwood to make templates I could use to gauge the removal of wood from the two ash planks, or at least along the parralel sections. I was then ready to start.

Id erred on the size of caution when makeing the templates as its easier to remove more material than add it. I simply drew around the covered blade, remembering to flip the blade over, onto each plank and used the relevant template to draw the section to be removed at what will be the mouth of the scabbard. i took care to mark all the pieces and templates so I wouldn't get confused which went with which.
Then it was time to attack the poor defenceless wood with all gouges I have done up over the years and a pair of Mora spoon knives.

Taking care to use the templates often and test fitting the covered blade from time to time I removed all the wood to take half the blade and covering without squishing the sheepskin.
It was a real pleaure using sharp tools on some quality wood.

And now to start on nthe other side...
ATB
Tom
m
Previously I have shown how I made the sheepskin lining for the scabbard and to ensure a correct fit I fitted this to the blade, pulling it up so that there will be some of the skin protruding from the wood .
Despite shortening the length of the wool the lining has considerably bulked out the blade. having managed to lose my profile gauge I had to faff about making a template to show the cross section of the holes I needed to chissel out of the two planks.
First off I used soft wire to make a loop the same as the cross section of the lined blade,
I then transfered this to a piece of scrap balsa, cut out the centre and checked to see how wrong this fisdt template was,
By repeatedly comparing the gap between the covered blade and the edge of the hole in the Balsa and removing material from the cut out piece I was able to make a reasonable template, which I transfered to some thin hardwood to make templates I could use to gauge the removal of wood from the two ash planks, or at least along the parralel sections. I was then ready to start.
Id erred on the size of caution when makeing the templates as its easier to remove more material than add it. I simply drew around the covered blade, remembering to flip the blade over, onto each plank and used the relevant template to draw the section to be removed at what will be the mouth of the scabbard. i took care to mark all the pieces and templates so I wouldn't get confused which went with which.
Then it was time to attack the poor defenceless wood with all gouges I have done up over the years and a pair of Mora spoon knives.
Taking care to use the templates often and test fitting the covered blade from time to time I removed all the wood to take half the blade and covering without squishing the sheepskin.
It was a real pleaure using sharp tools on some quality wood.
And now to start on nthe other side...
ATB
Tom
m
Last edited:
Since the rest of the clan objected to my chiseling after a certain hour I knocked up a non period specific baldric to go on the plywood and leather sheath. I kept it as simple as I could, just laced construction, a quick rub with raw neetsfoot on the outside and a thick coat of tallow and beeswax all over.

ATB
Tom
ATB
Tom
I haven't got much done today.
I chiselled out the second plank, repeatedly testing the fit on the longseax.

And then marked out and cut one of the planks to the approximate finished shape.

Once I was happy that The blade wouldnt be trapped I applied copious amounts of glue, both to the edges and the inset part where the sheepskin lining would go, fitted it together and clamped it to death!

I will confess that on this build I lost my nerve and rather than using the hide glue for the first time ever I used some incredibly strong water and oil/fuel proof model aircraft grade glue. I will be using the hide stuff on the next project, and will have a practice.
After about 4 hours the glue was as cured as it gets so i removed the clamps. The blade drew out with just the right amount of resistance so i know it won't fall out accidentally. I then trimmed the excess wood from the other plank using the already shaped one as a guide with a saw and began the long job of removing the excess wood with surforms.

And thats your lot for tonight!
ATb
Tom
I chiselled out the second plank, repeatedly testing the fit on the longseax.
And then marked out and cut one of the planks to the approximate finished shape.
Once I was happy that The blade wouldnt be trapped I applied copious amounts of glue, both to the edges and the inset part where the sheepskin lining would go, fitted it together and clamped it to death!
I will confess that on this build I lost my nerve and rather than using the hide glue for the first time ever I used some incredibly strong water and oil/fuel proof model aircraft grade glue. I will be using the hide stuff on the next project, and will have a practice.
After about 4 hours the glue was as cured as it gets so i removed the clamps. The blade drew out with just the right amount of resistance so i know it won't fall out accidentally. I then trimmed the excess wood from the other plank using the already shaped one as a guide with a saw and began the long job of removing the excess wood with surforms.
And thats your lot for tonight!
ATb
Tom
Last edited:
Like em? I love them!

and heres a better pic of the basic baldric
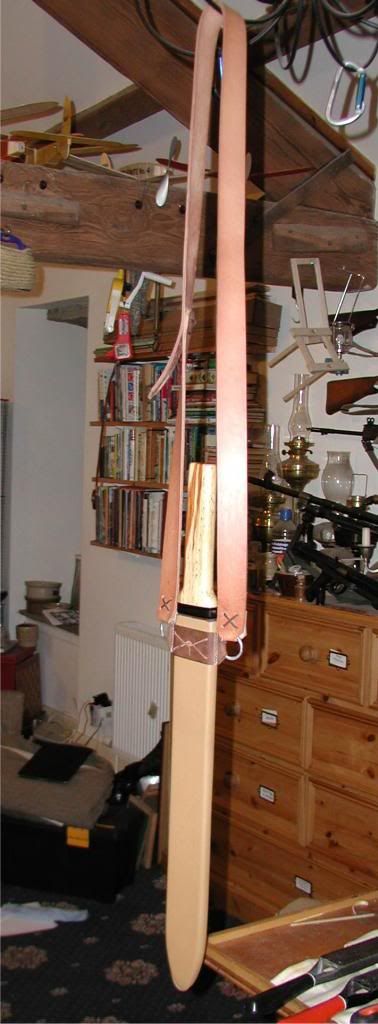
I'm currently in two minds about what to cover the ash scabbard in. Theres evidence for both leather and linen, and both. also before long i will have to think about the suspesion system. It's two long, and heavy, for a fat git like me with a equator rather than a waist, to have horizontal on a belt and since I'm aiming for a 9th Century look theres not a vast amount of evidence for how they were carried.
ATB
Tom
and heres a better pic of the basic baldric
I'm currently in two minds about what to cover the ash scabbard in. Theres evidence for both leather and linen, and both. also before long i will have to think about the suspesion system. It's two long, and heavy, for a fat git like me with a equator rather than a waist, to have horizontal on a belt and since I'm aiming for a 9th Century look theres not a vast amount of evidence for how they were carried.
ATB
Tom
You always do that to me with tools - make me jealous ")
I'd vote for leather given it will add a level of protection?
I'd vote for leather given it will add a level of protection?
All carboot finds apart from the three orange and black handled rasps. I'm still looking for a few different shapes.
ATB
Tom.
ATB
Tom.
Perrari
Bushcrafter (boy, I've got a lot to say!)
What a superb project ! It look absolutely fantastic !
How many hours do you think you have put in to it so far ? (if you don't mind me asking).
How many hours do you think you have put in to it so far ? (if you don't mind me asking).
Similar threads
- Replies
- 6
- Views
- 238