Need a Brush? Make Your Own!! (Pic Heavy)

  • Hey Guest, Early bird pricing on the Summer Moot (29th July - 10th August) available until April 6th, we'd love you to come. PLEASE CLICK HERE to early bird price and get more information.

Toddy

Mod
Mod
Jan 21, 2005
38,996
4,648
S. Lanarkshire
Fresh cut hazel is blooming hard to get to start to peel and not need kedged along. Then suddenly it peels back :D :D

I've got a mess all over the back step, the living room floor :rolleyes: and I've got the most unkempt wee brush imaginable, but I've had fun :D

I think cut thicker rather than thinner for the starting stick.

Did the OP say if he was using fresh or slightly dried out hazel ?

Oh, and the little necker made by Mark Hill is highly recommended :D

Photos when himself gets around to loading them up for me :)

atb,
Toddy
 

Stew

Bushcrafter through and through
Nov 29, 2003
6,465
1,301
Aylesbury
stewartjlight-knives.com
I couldn't get hazel to work in my very quick trial. It would run off the side straight away. I managed a very thick peel with Birch though. More of a deck scrubbing brush than the delicate beauties Ulf produces. :D I will be playing more!!
 

Mesquite

It is what it is.
Mar 5, 2008
27,909
2,951
62
~Hemel Hempstead~
Did the OP say if he was using fresh or slightly dried out hazel ?

This is all he has to say about making them Mary which was in response to several questions :)

Excuse the spelling but it's a direct copy of what Ulf posted
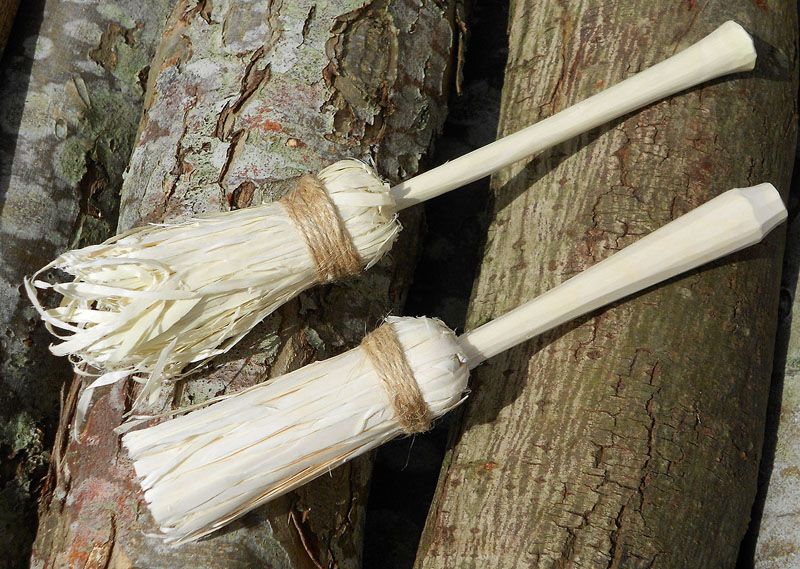
Hi everyone. I gonna try to answer all you´r questions. My brusch are made of fresch green Hazel,(Jerrods are made of Birch) For me Its take about a halfouer to peel them. After two to tree turns the fibers become longer, I cant finde enything like this in Scandinavia. So far the technique seems to be used onely of North american indians. Works to put on slampaint and now I gonna try it for spreading BBQ sauce.
 

John Fenna

Lifetime Member & Maker
Oct 7, 2006
23,139
2,879
66
Pembrokeshire
I just stole a quick half hour to try this - once I had gone around the stick twice, pulling off short lengths and getting frustrated it all came together nicely anfd I started pulling off long "bristles" without problem.
001.jpg002.jpg
Mine is pretty coarse - but hopefully it will improve with practice.
I have previously made Zulu style brushes from two bundles of grass tied to a stick, one bundles fine end pointing up the stick and the others pointing down the stick and then the bunch pointing up the stick being folded down over the bunch pointing down, hiding the cut ends of both bunches, and then tied in place.
I like this one twig brush idea though - it makes a great hearth brush!
I may offer this as a prezzie to my Mrs ... then run for cover!
 
  • Like
Reactions: Toddy

Toddy

Mod
Mod
Jan 21, 2005
38,996
4,648
S. Lanarkshire
I've got sore hands :sigh: and two wee brushes :D
Callouses need more work obviously.

The first layer is totally a pita to get to strip back, and then it just peels long and fine :)
I need an awful lot more practice though; your one is very tidy John :D

I'm tempted to strip off the layer under the bark entirely and see if that lets me into the peeling layer more easily.

M
 
Last edited:

Kepis

Bushcrafter through and through
Jul 17, 2005
6,711
2,213
Sussex
Gave this a try myself earlier, couldn't get the hazel to run to save my life, so carved the bristles instead;), will get some fresh cut hazel this week from the copse and give it another shot.

aDSCN1178.jpg
 
  • Like
Reactions: Toddy

Clouston98

Woodsman & Beekeeper
Aug 19, 2013
4,364
2
26
Cumbria
Gave this a try myself earlier, couldn't get the hazel to run to save my life, so carved the bristles instead;), will get some fresh cut hazel this week from the copse and give it another shot.

aDSCN1178.jpg

They're really good! I tried it and the looked like green wood feathersticks! You've done great :).
 

Toddy

Mod
Mod
Jan 21, 2005
38,996
4,648
S. Lanarkshire
Nice work Kepis :approve:

You need to get in a couple of rounds and then it suddenly peels instead of juddering along and needing kedged.
Honestly, it's like night and day.....and I still haven't gotten my photos up, but mine are carp next to yours :eek:

M
 

Teepee

Bushcrafter (boy, I've got a lot to say!)
Jan 15, 2010
4,115
5
Northamptonshire
Nice work Kepis :)

I had a play with this yesterday. I found it a bit of a bind to get started on the filaments. Didn't seem to matter how deep I carved, the filaments just wouldn't go to the stop without doing a complete round.

The point of the knife technique leaves much thinner, rounder filaments but are harder to make look neat.

Quite surpising how it's a struggle to get started but once they peel, it's quite a quick and efficient process.

I'm with Mary, mine are an eyesore too and I didn't get the filament length right. :)

I think MOT has some piccies of said abomination.
 

John Fenna

Lifetime Member & Maker
Oct 7, 2006
23,139
2,879
66
Pembrokeshire
Gave this a try myself earlier, couldn't get the hazel to run to save my life, so carved the bristles instead;), will get some fresh cut hazel this week from the copse and give it another shot.

aDSCN1178.jpg

My Hazel was about 1 week old from cut and after a couple of goes it ran easily.
Those look very good though :)
 

Kepis

Bushcrafter through and through
Jul 17, 2005
6,711
2,213
Sussex
My Hazel was about 1 week old from cut and after a couple of goes it ran easily.
Those look very good though :)

Cheers John, the hazel i used is over a month old and has been kept in the workshop, thinking reading everyone's comments that it may be too dry, will get some fresh stuff this week and try again.

Nice work Kepis :approve:

You need to get in a couple of rounds and then it suddenly peels instead of juddering along and needing kedged.
Honestly, it's like night and day.....and I still haven't gotten my photos up, but mine are carp next to yours :eek:

M

Thanks Mary, more practice is required on my part, i will get there though :)

They're really good! I tried it and the looked like green wood feathersticks! You've done great :).

Cheers mate

Nice work Kepis :)

I had a play with this yesterday. I found it a bit of a bind to get started on the filaments. Didn't seem to matter how deep I carved, the filaments just wouldn't go to the stop without doing a complete round.

The point of the knife technique leaves much thinner, rounder filaments but are harder to make look neat.

Quite surpising how it's a struggle to get started but once they peel, it's quite a quick and efficient process.

I'm with Mary, mine are an eyesore too and I didn't get the filament length right. :)

I think MOT has some piccies of said abomination.

Thanks for the tip, will post some pics up later in the week when ive had another go with some fresher wood.
 

Mesquite

It is what it is.
Mar 5, 2008
27,909
2,951
62
~Hemel Hempstead~
I'm really pleased with how well this article has been received by folks on here and by the brushes that have been made so far.

Ulf has posted a couple more photos and final tips should you decide to use them

Heres som last tip for you all brushmakers. When you finished the brush, hit it with a piece of Wood. Then de fibrers split and become more thin, Not to hard because then they brakes.
And before you paint with it, put it in water for a while and it become softer.

1907610_286102848216807_7351666176659108438_n.jpg

10169225_286102994883459_1106443756708576025_n.jpg
 

BCUK Shop

We have a a number of knives, T-Shirts and other items for sale.

SHOP HERE