Clamping leather for box stitch

  • Hey Guest, Early bird pricing on the Summer Moot (29th July - 10th August) available until April 6th, we'd love you to come. PLEASE CLICK HERE to early bird price and get more information.

MagiKelly

Making memories since '67
One thing I have never been able to master in leatherwork is the box stitch. Where two pieces of leather are stitched together at a 90 degree angle.

I would like to be able to do this as it would make pouches and bags a lot neater. I think my main problem is not having a way to clamp / hold the leather in the correct position while I form the holes and make the stitches.

I know a lot of people here manage this with considerable style so hope you can tell me how. pictures of the clamp set up would be a bonus.

AtDhVaAnNkCsE
 

g4ghb

Bushcrafter (boy, I've got a lot to say!)
Sep 21, 2005
4,321
246
54
Wiltshire
I don't use a clamp at all John.... and I'm sure I don't use the 'proper' technique either :rolleyes:

I make the holes with a dremel and drill bit - one half I drill at roughly 45 degrees and the other half just off 90. Then it's a case of hold together and sew..... not easy to be fair but it works for me:eek:

I'd also like to know if there is a better way - so anyone else gonna share their secrets???
 

Barney

Settler
Aug 15, 2008
947
0
Lancashire
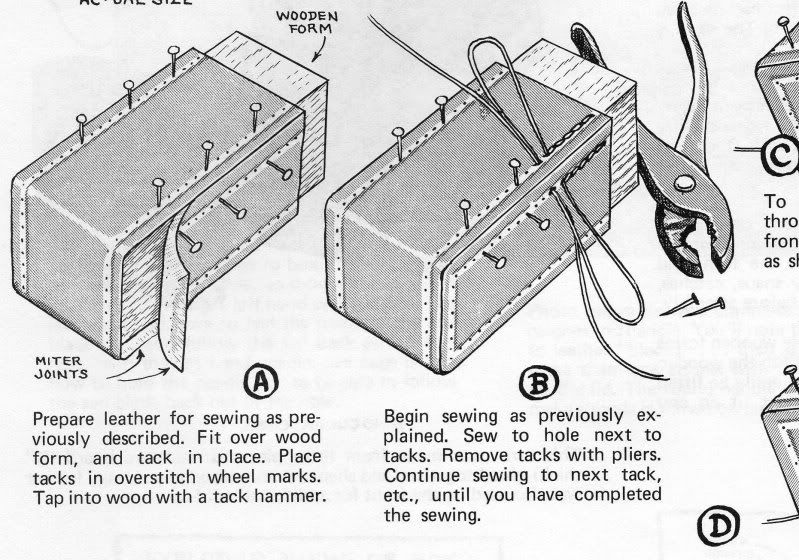
The correct joint is a mitre not a lap joint. Mark out the holes and then get a piece of 4x2 or whatever then nail the leather across the corner using tacks. The diamond shaped nails, these will match the holes in the leather made with the awl. Then proceed to sew.
 

Chainsaw

Native
Jul 23, 2007
1,379
148
57
Central Scotland
I've got a book and it details the making of a handbag <ahem> sorry a large possibles pouch with strap :rolleyes: and essentially is says the same as Graham it's a saddle stich but angled at 45 degrees across the joint. There is a piccie, the top bit of leather butting over the bottom sort of (excuse the ascii art)

------------------------------------
|
------------------------------------
`````````````````````````````````--
`````````````````````````````````| |
`````````````````````````````````| |
`````````````````````````````````| |

stitching a 45 degrees top left to bottom right (but you guessed that) The ``` are just white space

Book is Geoffrey West Leatherwork - A manual of techniques, 978-1-86126-742-9. I'll bring it next time I'm down but I don't think it'll shed much light...

Cheers,

Alan

Maybe have a go at a possibles pouch tonight if I can figure out a closure...
 

g4ghb

Bushcrafter (boy, I've got a lot to say!)
Sep 21, 2005
4,321
246
54
Wiltshire
Wot I am working along the right lines!? - surely not!!! :eek:

any chance of a photo of the pic :rolleyes: - to be honest your asci is not that clear :sulkoff:
 

Chainsaw

Native
Jul 23, 2007
1,379
148
57
Central Scotland
to be honest your asci is not that clear :sulkoff:

how dare you!! that took me ages ;)

here you go, I'll swap you for a pic of a possibles pouch closure using only leather, like a strap going under another strap type thing... sorry for the hijack john...

3513505086_9ac2d25359_b.jpg


Cheers,

Alan
 

Tadpole

Full Member
Nov 12, 2005
2,842
21
60
Bristol
I've a book that has a picture similar to yours but what it does not do is tell you how to hold the two pieces in that position, aligned, while I poke holes with an awl and then sew them.
Al Stohlman suggest that you tack it to a wooden form
boxmiter.jpg
 

Eric_Methven

Bushcrafter (boy, I've got a lot to say!)
Apr 20, 2005
3,600
42
73
Durham City, County Durham
My goodness, what a faff-on! The easiest way is to select one of the pieces to be sewn, run a stitch groover down the length, then dampen the edge and mark it with a stitching wheel. Now use a curved awl and go through each mark of the wheel, but go in the top and out the side of the leather. Once you've gone all the way where you want stitches, place the leather on top of the piece it's to be joined to, hold it in position, pass the awl through the first hole you made and push it through the bottom piece of leather, do the same for the next three only. So now you have four holes aligned. Sew these first with a double needle (saddle stitch). Then make four more holes lining the joint up by hand then sew these four, and so on working your way along the piece until you come to the end.

It was never traditional, or practical to make all the holes in both pieces of leather all together. Hole one side up, then make the matching holes a few at a time as you go. This technique also allows you to go round corners, make oval or round objects without the worry of knowing the holes on the outside diameter will be further apart than the holes on the inside diameter. Just a few at a time will allow you to make the second set of holes as you go. Of course you'll only need to worry about what's ahead of you. The holes behind you are already stitched.

I've tried all the methods, and making the holes as you stitch is in my opinion by far the easiest method. I use it for shoe uppers to soles where there are different hole spacings as you go round the toe and heel then along the side. I use it for my leather tankards and shot cups, and I use it for bags, cases and quivers where two distinct diameters are involved. I can make adjustments as I go, because only one of the pieces has holes beforehand.

Eric
 

Black Sheep

Native
Jun 28, 2007
1,539
0
North Yorkshire
photobucket.com
I've a book that has a picture similar to yours but what it does not do is tell you how to hold the two pieces in that position, aligned, while I poke holes with an awl and then sew them.

John,

I taught myself after looking at a little leather box I've got (Ex-GPO case for something).

I usually cut my leather to size/shape, dare I say glue it in position, make the grooves for the stitches and drill the hole at 45 deg's with a small drill in my Dremal . I don't clamp it just sew it hand held.

I work on the theory that its belt and braces - glued and stitched.

Regards

Richard
 

BCUK Shop

We have a a number of knives, T-Shirts and other items for sale.

SHOP HERE